
 数据结构
数据结构 网络
网络 关系型数据库管理系统 (RDBMS)
 操作系统
操作系统 Java
Java iOS
iOS HTML
HTML CSS
CSS Android
 Python
 C语言编程
C语言编程 C++
C++ C#
C# MongoDB
 MySQL
MySQL Javascript
 PHP
PHP创建旋律程序
一个简单的蜂鸣器可以连接到 ESP32 控制器来发出声音。它也可以用来产生旋律。本文使用两个不同的例子,在 Arduino 上使用 C 代码让蜂鸣器播放旋律。在第一个例子“一闪一闪亮晶晶”中,播放诗歌的音符;在第二个例子中,使用另一首著名诗歌“铃儿响叮当”来播放音符,同时让两个彩色 LED 灯开关来创造一个灯光与音乐的表演。
示例 1:使用蜂鸣器和 ESP32 播放诗歌音符
电路是使用 Arduino 软件制作的,程序也是用它编写的。这里给出的 C 语言程序定义了不同钢琴键的音乐音符频率。playNotes() 函数用于根据音符的持续时间和播放时间使蜂鸣器引脚变高或变低。
电路设计步骤和编码
步骤 1 − 将 ESP32 微控制器连接到面包板。
步骤 2 − 将蜂鸣器也放在面包板上。
步骤 3 − 将蜂鸣器的正极连接到 ESP32 的 D26 引脚。将蜂鸣器的负极连接到 ESP32 的 GND 引脚。
步骤 4 − 使用 Arduino 为播放旋律编写 C 程序。
步骤 5 − 使用 USB 数据线将 ESP32 连接到电脑。
步骤 6 − 编译并将代码传输到 ESP32,然后检查结果。
代码
// set piano notes (frequencies)
#define c 3830
#define d 3400
#define e 3038
#define f 2864
#define g 2550
#define a 2272
#define b 2028
#define C 1912
#define R 0

// buzzer pin is D26 on ESP32

int buzzOut  = 26;
int startFlag = 1;
int flagPlay=1;
// this rhythm_measure is the tempo of the song
long rhythm_measure = 10000;

int pauseTime = 500;
int do_nothing = 2;

int audioTone = 0;
int beat1 = 0;
long timedur  = 0;

void setup() {
   // set the buzzer as output component for melody
   pinMode(buzzOut, OUTPUT);
   if (startFlag) {
      // specify the baud rate
      Serial.begin(9600);
   }
}

// these are the music notes for Twinkle twinkle little star poem
double songNotes[] = {
   c,c,g,g,a,a,g,
   f,f,e,e,d,d,c,
   g,g,f,f,e,e,d,
   g,g,f,f,e,e,d,
   c,c,g,g,a,a,g,
   f,f,e,e,d,d,c
};

int MAX_COUNT = sizeof(songNotes) / 2;

// this is the function which makes the buzzer high and low while playing the poem notes
void playNotes() {
   long passed_time = 0;
   if (audioTone > 0) {

      while (passed_time < timedur) {
      digitalWrite(buzzOut,HIGH);
      delayMicroseconds(audioTone / 2);
      digitalWrite(buzzOut, LOW);
      delayMicroseconds(audioTone / 2);
      passed_time += (audioTone);
      }
   }
   else {
      for (int n = 0; n < do_nothing; n++) {
         delayMicroseconds(timedur);
      }
   }

}
void loop() {
   for (int m=0; m<MAX_COUNT; m++) {
      audioTone = songNotes[m];
       beat1 = 50;


       timedur = beat1 * rhythm_measure;
       if( flagPlay != 0)        {
         playNotes();
      }

      delayMicroseconds(pauseTime);
   }
   delay(5000);
}
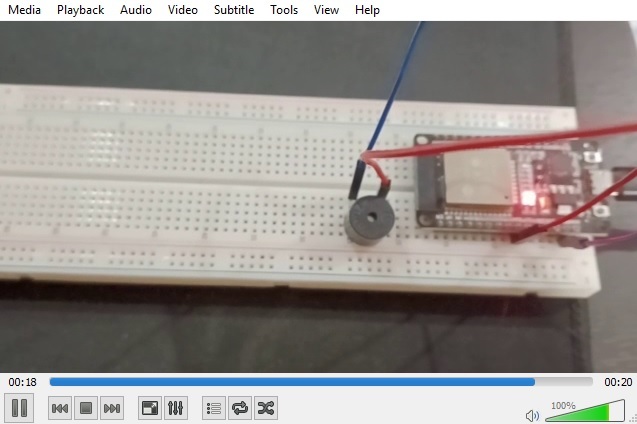
查看结果
代码编译并传输/上传到 ESP32 后,即可看到结果。
示例 2:使用 LED、蜂鸣器和 ESP32 播放诗歌音符并制作跳舞的灯光
给出了 C 语言程序。playNotes() 函数用于根据音符的持续时间和播放时间使蜂鸣器引脚变高或变低。loop() 函数中的代码还使红色和绿色 LED 灯随着音乐播放而变高和变低。
电路设计步骤和编码
步骤 1 − 将 ESP32 放置在面包板上。将 GND 连接到负轨。
步骤 2 − 连接蜂鸣器。将其正极连接到 ESP32 的 D26 引脚,将其负极连接到面包板的负轨。
步骤 3 − 将红色 LED 连接到面包板上。将其较小的引脚连接到负轨,较大的引脚(正极)通过电阻连接到 ESP32 的 D12 引脚。
步骤 4 − 将绿色 LED 连接到面包板上。将其较小的引脚连接到负轨,较大的引脚(正极)通过电阻连接到 ESP32 的 D13 引脚。
步骤 5 − 使用 Arduino 编写 C 程序来播放旋律并使两个 LED 灯交替开关。
步骤 6 − 使用 USB 数据线将 ESP32 连接到电脑。
步骤 7 − 编译并将代码传输到 ESP32,然后检查结果。
代码
// set piano notes (frequencies)
#define R 0
#define cnote 3830
#define d 3400
#define e 3038
#define f 2864
#define g 2550
#define b 2028
#define C 1912

// buzzer pin is D26 on ESP32
int buzzOut = 26;

// Green color LED pin is D13 on ESP32
int LED_green = 13;

// Red color LED pin is D12 on ESP32
int LED_red = 12;
int LED_flag = 0;
int flag1 = 0;

// this rhythm_measure is the tempo of the song
long rhythm_measure = 15000;
int pauseDur = 2000;
int doNothing = 200;
int audioTone = 0;
int beat1 = 0;
long timedur = 0;

//These are the music notes for the Jingle bells poem
int songNotes[] = { e, e, e,
   e, e, e,
   e, g, cnote, d, e,
   f, f, f,
   f, f, e, e,
   e, e, e,
   d, d, e, d, g, R
};
int MaxNo = sizeof(songNotes) / 2;
int songBeats[] = { 16, 16, 32,
   16, 16, 32,
   16, 16, 16, 8, 48,
   16, 16, 16,
   16, 16, 8, 8,
   16, 16, 16,
   16, 16, 16, 16, 8, 48
};
void changeFlag() {
   if (LED_flag == 0){
      LED_flag = 1;
   } else {
      LED_flag = 0;
   }
}
void playNote() {
   long passed_time = 0;
   if (audioTone > 0) {
      while (passed_time < timedur) {
         digitalWrite(buzzOut,HIGH);
         delayMicroseconds(audioTone / 2);
         digitalWrite(buzzOut, LOW);
         delayMicroseconds(audioTone / 2);
         passed_time += (audioTone);
      }
   }
   else {
      for (int m = 0; m < doNothing; m++) {
         delayMicroseconds(timedur);
      }
   }
}
void setup() {

   // set the buzzer as output component for melody
   pinMode(buzzOut, OUTPUT);

   // set the LEDs as output component for dancing lights
   pinMode(LED_green, OUTPUT);
   pinMode(LED_red, OUTPUT);
   if (flag1) {
      Serial.begin(9600); // Set serial out if we want flag1ging
   }
}
void loop() {
   for (int n=0; n<MaxNo; n++) {
      audioTone = songNotes[n];
      beat1 = songBeats[n];
      changeFlag();
      if (LED_flag == 1){

         // make the green and red lights on and off one after the other
         digitalWrite(LED_green,HIGH);
         digitalWrite(LED_red,LOW);
      } else {
         digitalWrite(LED_green,LOW);
         digitalWrite(LED_red,HIGH);
      }
      timedur = beat1 * rhythm_measure;
      playNote();
      delayMicroseconds(1000);
      if (LED_flag == 1){
         digitalWrite(LED_green,LOW);
         digitalWrite(LED_red,LOW);
      } else {
         digitalWrite(LED_green,LOW);
         digitalWrite(LED_red,LOW);
      }
      if (flag1) {
         Serial.print(n);
         Serial.print(":");
         Serial.print(beat1);
         Serial.print(" ");
         Serial.print(audioTone);
         Serial.print(" ");
         Serial.println(timedur);
      }
   }
}
查看结果 - 示例 2
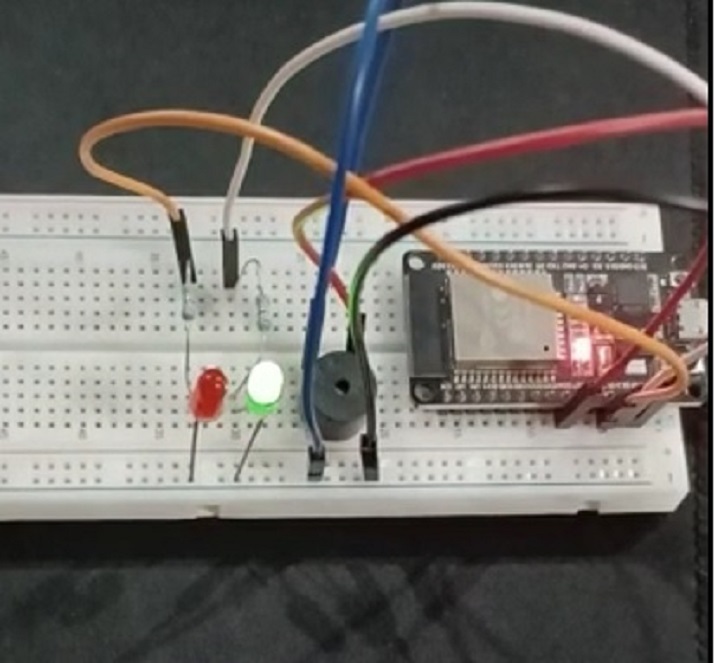
图:显示播放旋律并使 LED 灯开关的电路。
本文使用两个不同的例子,介绍了使用 ESP32 和蜂鸣器播放旋律的方法。首先介绍了播放诗歌旋律的方法,在第二个例子中,播放另一个旋律的同时,LED 灯交替开关,制作灯光秀。

浏览量:379
