Django 中的 Google 身份验证
在许多开发者网站上,我们都能看到 Google 社交身份验证,这非常方便。在本文中,我们将了解如何创建一个 Django Google 登录项目。
首先,访问 https://console.cloud.google.com/apis/dashboard并创建一个项目。
转到 OAuth 同意屏幕并创建一个屏幕,然后保存并继续。
转到凭据,点击“创建凭据”,然后点击“OAuth 客户端 ID”。
然后,选择 Web 应用程序,并添加以下两个 URL:
- http://127.0.0.1:8000/
- http://127.0.0.1:8000/accounts/github/login/callback/
现在,您将获得一个客户端 ID 和一个密钥,请将它们安全地保存在您的文件中。
示例
创建一个 Django 项目和一个应用程序。
在 **settings.py** 中:
SITE_ID = 1
LOGIN_REDIRECT_URL = "/"

INSTALLED_APPS = [
   'django.contrib.admin',
   'django.contrib.auth',
   'django.contrib.contenttypes',
   'django.contrib.sessions',
   'django.contrib.messages',
   'django.contrib.staticfiles',
   "django.contrib.sites", # <--
   "allauth", # <--
   "allauth.account", # <--
   "allauth.socialaccount", # <--
   "allauth.socialaccount.providers.google",
   "googleauthentication" #this is my app name ,you can name your app anything you want
]
SOCIALACCOUNT_PROVIDERS = {
   'google': {
      'SCOPE': [
         'profile',
         'email',
      ],
      'AUTH_PARAMS': {
         'access_type': 'online',
      }
   }
}

#add this in the end of file
AUTHENTICATION_BACKENDS = (
   "django.contrib.auth.backends.ModelBackend",
   "allauth.account.auth_backends.AuthenticationBackend",
)
在这里,我们定义了一个重定向 URL。在 INSTALLED_APPS 中,我们定义了我们将用于身份验证的重要后端。然后,我们定义了社交账户提供商,它将告诉我们应该使用什么进行登录(这里我们使用 Google)。我们还定义了它应该存储用户的哪些数据。
现在,在项目的 **urls.py** 中,添加以下内容:
from django.contrib import admin
from django.urls import path,include

urlpatterns = [
   path('admin/', admin.site.urls),
   path("accounts/", include("allauth.urls")), #most important
   path('',include("googleauthentication.urls")) #my app urls
]
在这里,我们添加了需要添加的默认路径;它是 allauth 库路径,用于启用 Google 登录。第二个是我们创建的应用程序路径。
在应用程序的 **urls.py** 中:
from django.urls import path
from . import views
urlpatterns = [
   path('',views.home),
]
在这里,我们设置了我们的 **urls** 并将我们的视图渲染到主页 url 上。
在 **views.py** 中:
from django.shortcuts import render

# Create your views here.
def home(request):
   return render(request,'home.html')
我们只是在这里渲染了前端。
在应用程序的主目录中创建一个 **templates** 文件夹,并添加一个名为 **home.html** 的文件,内容如下:
<!DOCTYPE html>
<html>
   <head>
      <title>Google Registration</title>
   </head>
   <body>
      {% load socialaccount %}
      <h1>My Google Login Project</h1>
      <a href="{% provider_login_url 'google'%}?next=/">Login with Google</a>
   </body>
</html>
在这里,我们渲染了 JS 并加载了 **allauth** 库到前端。在 **<a>** 中,我们提供了 Google 登录页面,在该页面上我们设置了我们的默认 Google 登录页面。
现在,在终端上运行以下命令:
python manage.py makemigrations
python manage.py migrate
接下来,创建一个 **超级用户**。
python manage.py createsuperuser
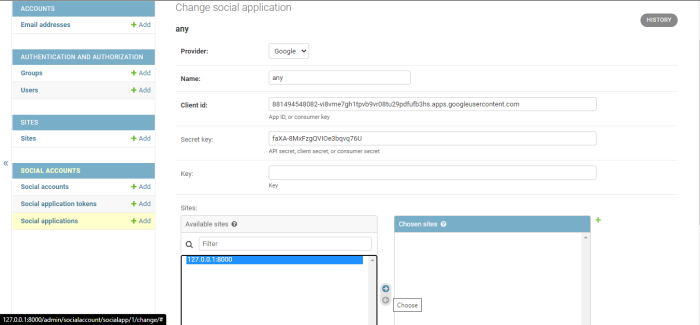
然后,启动服务器并转到管理面板。转到站点并添加一个具有 url 名称和显示名称的站点:http://127.0.0.1:8000
转到社交应用程序并添加应用程序。选择您之前添加的站点:

这将在您的 Django 项目中注册 Google 作为身份验证后端。一切设置就绪,现在您可以继续检查输出。
输出


 数据结构
数据结构 网络
网络 关系型数据库管理系统 (RDBMS)
 操作系统
操作系统 Java
Java iOS
iOS HTML
HTML CSS
CSS Android
 Python
 C 编程
C 编程 C++
C++ C#
C# MongoDB
 MySQL
MySQL Javascript
 PHP
PHP