自编码器的工作原理?
自编码器是一种高效的神经网络类别,用于无监督学习和降维。它们能够通过将输入数据编码到低维潜在空间,然后解码以恢复原始输入来学习输入数据的紧凑表示。本文深入探讨了Python中自编码器的工作原理,特别是使用Keras库,以提供对其功能的全面理解。
什么是自编码器?
自编码器是一种专门设计用于重构输入数据的神经网络。它由两部分组成:解码器网络,负责从压缩表示中重新创建原始输入;编码器网络,负责将输入压缩成低维表示。自编码器擅长识别重要的数据特征和模式,并且经过训练以最大限度地减少重建过程中的误差。其应用包括降维、异常检测和模型生成。
数据压缩、异常检测、图像合成和去噪只是自编码器发挥重要作用的几个应用。当输入数据没有明确的标签,或者我们想要在不依赖标记示例的情况下从数据中提取有意义的特征时,它们特别有用。
自编码器如何工作?
自编码器通过获取输入数据的紧凑有效表示来工作。为了捕捉基本特征,自编码器使用编码器网络将输入压缩到低维潜在空间。随后,解码器网络从这种压缩表示中重建原始输入。在整个训练过程中,自编码器力求最小化输入和重建输出之间的差异。这使得自编码器能够学习数据的编码和解码。通过迫使网络忠实地重建输入,自编码器能够获得有意义的表示并提取有价值的特征。因此,它们在降维、异常检测和模型生成等任务中非常有价值。
以下是我们将遵循的步骤,以了解自编码器如何通过程序示例工作:
加载并预处理MNIST数据集。
使用编码器和解码器层定义自编码器模型。
创建单独的编码器和解码器模型以隔离其功能。
在训练数据上编译和训练自编码器。
在完成模型训练后,使用编码器对输入测试数据进行编码,并使用解码器将编码后的数据解码回原始输入空间。
使用Matplotlib可视化原始图像和重建图像。
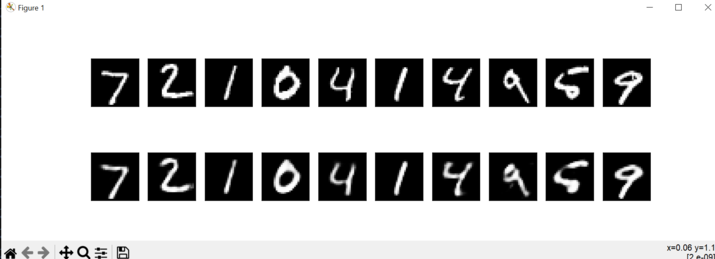
下面的程序将显示一个包含10行的图形,每行包含一个原始图像及其重建的对应图像。我们还可以尝试不同的超参数,并观察它们如何影响重建图像的质量。
示例
import numpy as npp
import matplotlib.pyplot as pltt
from keras.datasets import mnist
from keras.layers import Input, Dense
from keras.models import Model

# Load the MNIST dataset
(x_train_m, _), (x_test_m, _) = mnist.load_data()

# Normalize the pixel values between 0 and 1
x_train_m = x_train_m.astype('float32') / 255.
x_test_m = x_test_m.astype('float32') / 255.

# Reshape the input images
x_train = x_train_m.reshape((len(x_train_m), npp.prod(x_train_m.shape[1:])))
x_test = x_test_m.reshape((len(x_test_m), npp.prod(x_test_m.shape[1:])))

# Define the size of the latent space
latent_dim = 32

# Define the input layer
input_img = Input(shape=(784,))

# Define the encoder layers
encoded1 = Dense(128, activation='relu')(input_img)
encoded2 = Dense(latent_dim, activation='relu')(encoded1)

# Define the decoder layers
decoded1 = Dense(128, activation='relu')(encoded2)
decoded2 = Dense(784, activation='sigmoid')(decoded1)

# Create the autoencoder model
autoencoder = Model(input_img, decoded2)

# Create separate encoder and decoder models
encoder = Model(input_img, encoded2)

# Define the decoder input
latent_input_m = Input(shape=(latent_dim,))
decoder_layer_m = autoencoder.layers[-2](latent_input_m)
decoder_layer_m = autoencoder.layers[-1](decoder_layer_m)
decoder = Model(latent_input_m, decoder_layer_m)

# Compile the autoencoder
autoencoder.compile(optimizer='adam', loss='binary_crossentropy')

# Train the autoencoder
autoencoder.fit(x_train, x_train,
   epochs=50,
   batch_size=256,
   shuffle=True,
   validation_data=(x_test, x_test))

# Encode and decode the input test data
encoded_imgs = encoder.predict(x_test)
decoded_imgs = decoder.predict(encoded_imgs)

# Display the original and reconstructed images
n = 10
pltt.figure(figsize=(20, 4))
for i in range(n):
   # Original image
   ax = pltt.subplot(2, n, i+1)
   pltt.imshow(x_test[i].reshape(28, 28))
   pltt.gray()
   ax.get_xaxis().set_visible(False)
   ax.get_yaxis().set_visible(False)

   # Reconstructed image
   ax = pltt.subplot(2, n, i+n+1)
   pltt.imshow(decoded_imgs[i].reshape(28, 28))
   pltt.gray()
   ax.get_xaxis().set_visible(False)
   ax.get_yaxis().set_visible(False)
pltt.show()
输出

结论
总之,自编码器提供了一个强大的框架,用于学习输入数据的压缩表示。通过采用编码器-解码器架构,它们可以有效地捕捉数据中的重要特征和模式。自编码器广泛用于异常检测、降维和生成式建模等任务。通过训练过程,它们优化重建误差,使它们能够学习有意义的表示并从复杂的数据集中提取有价值的见解。凭借其编码和解码数据的能力,自编码器为各种机器学习应用提供了灵活而有效的工具。


 数据结构
数据结构 网络
网络 关系数据库管理系统 (RDBMS)
 操作系统
操作系统 Java
Java iOS
iOS HTML
HTML CSS
CSS Android
 Python
 C语言编程
C语言编程 C++
C++ C#
C# MongoDB
 MySQL
MySQL Javascript
 PHP
PHP