如果 Android Fragment 存在,如何从 BackStack 中恢复它?
介绍
Android 应用程序是使用不同的组件构建的,例如 Activity 和 Fragment。Fragment 是 Activity 的轻量级版本,因此在大多数情况下用于显示应用程序的 UI。Fragment 被认为是 Android 应用程序的重要组件之一。它们通常用于创建复杂、动态的用户界面,这些界面既健壮又高度可定制。在 Android 应用程序中管理 Fragment 有点棘手,尤其是在从 Back Stack 中恢复 Fragment 时。在本文中,我们将了解如果 Android Fragment 存在,如何从 BackStack 中恢复它。
实现
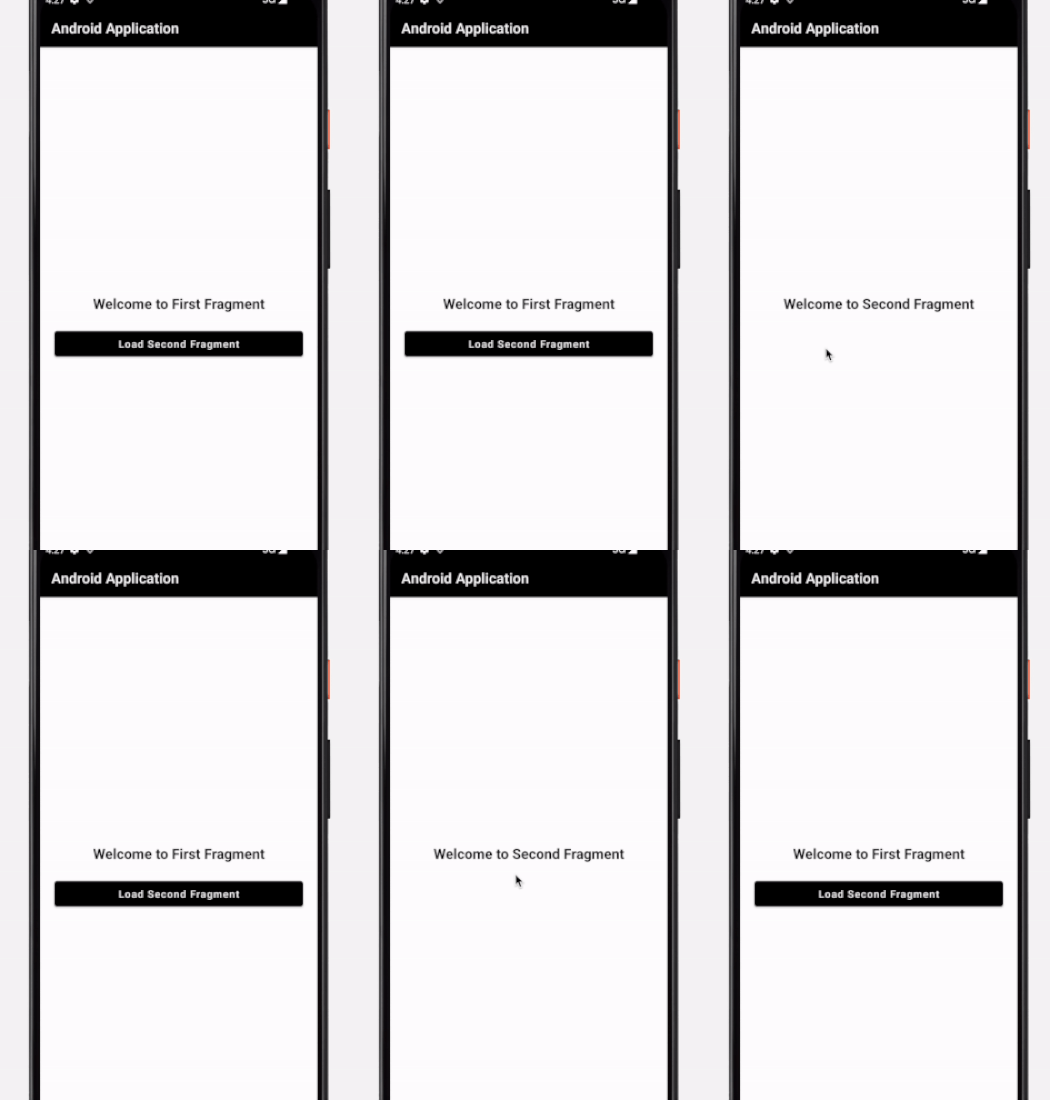
我们将创建一个简单的项目,在其中我们将显示第一个 Fragment,在其中我们将显示一个 TextView 和一个按钮。我们将在这个 Activity 中显示第一个 Fragment。点击按钮,我们将打开第二个 Fragment 并显示一个 TextView。
步骤 1:在 Android Studio 中创建一个新项目
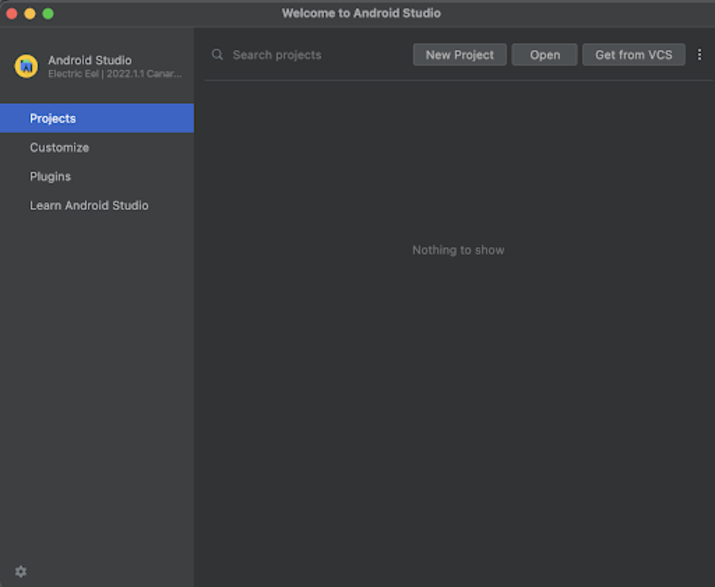
导航到 Android Studio,如下面的屏幕截图所示。在下面的屏幕截图中,单击“新建项目”以创建新的 Android Studio 项目。

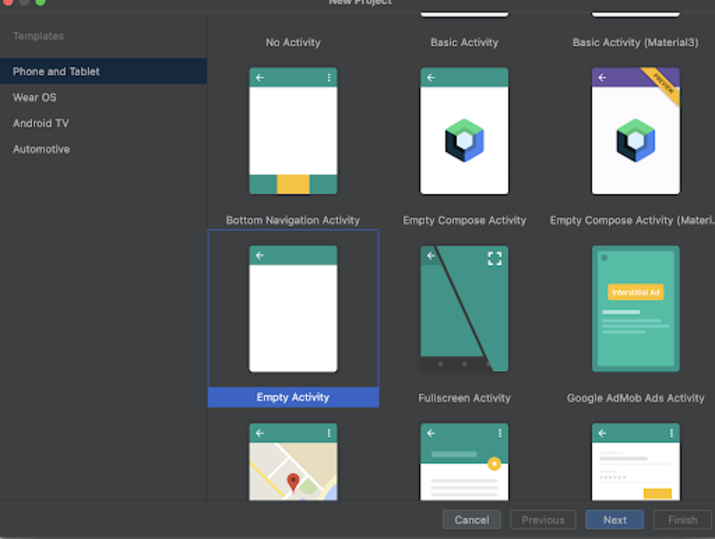
单击“新建项目”后,您将看到下面的屏幕。

在此屏幕中,我们只需选择“空活动”并单击“下一步”。单击“下一步”后,您将看到下面的屏幕。

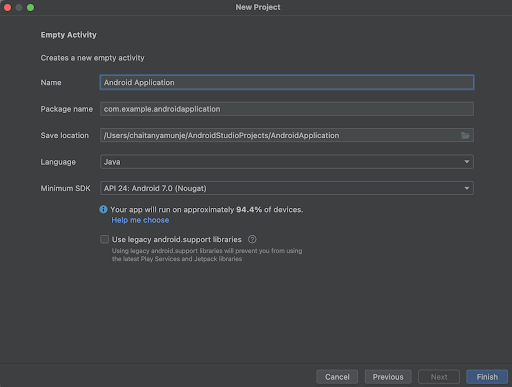
在此屏幕中,我们只需指定项目名称。然后包名称将自动生成。
注意 - 确保选择 Java 作为语言。
指定所有详细信息后,单击“完成”以创建新的 Android Studio 项目。
创建项目后,我们将看到两个打开的文件,即 activity_main.xml 和 MainActivity.java 文件。
步骤 3:使用 activity_main.xml
导航到 activity_main.xml。如果此文件不可见,则要打开此文件,在左侧窗格中导航到 app>res>layout>activity_main.xml 以打开此文件。打开此文件后,将以下代码添加到其中。代码中添加了注释以详细了解。
<?xml version="1.0" encoding="utf-8"?>
<RelativeLayout xmlns:android="http://schemas.android.com/apk/res/android"
   xmlns:app="http://schemas.android.com/apk/res-auto"
   xmlns:tools="http://schemas.android.com/tools"
   android:id="@+id/idRLLayout"
   android:layout_width="match_parent"
   android:layout_height="match_parent"
   android:orientation="vertical"
   tools:context=".MainActivity">

   <!-- creating a frame layout for displaying a container-->
   <FrameLayout
      android:id="@+id/frameContainer"
      android:layout_width="match_parent"
      android:layout_height="match_parent" />
</RelativeLayout>
说明 - 在上面的代码中,我们创建了一个 RelativeLayout 作为根布局,并在其中创建了一个 FrameLayout,我们将在其中显示我们的第一个 Fragment,该 Fragment 将包含一个 TextView 和一个按钮。点击按钮,我们将打开一个新的 Fragment。
步骤 4:创建一个新的 Fragment。
现在我们将创建一个第一个 Fragment。要创建一个新的 Fragment,请导航到 app>java>您的应用程序包名称>右键单击它>新建>Fragment 并选择一个空的 Blank Fragment 并将其命名为 FragmentOne。创建新的 Fragment 后,将创建两个文件,一个是名为 FragmentOne.java 的 Java 文件,另一个是 fragment_one.xml 文件。类似地,我们必须创建另一个名为 FragmentTwo 的 Blank Fragment。对于此 Fragment,也将创建两个文件,分别命名为 fragment_two.xml 和 FragmentTwo.java 文件。
步骤 5:使用 fragment_one.xml 文件。
导航到 fragment_one.xml。如果此文件不可见,则要打开此文件,在左侧窗格中导航到 app>res>layout>fragment_one.xml 以打开此文件。打开此文件后,将以下代码添加到其中。代码中添加了注释以详细了解。
<?xml version="1.0" encoding="utf-8"?>
<RelativeLayout xmlns:android="http://schemas.android.com/apk/res/android"
   xmlns:tools="http://schemas.android.com/tools"
   android:layout_width="match_parent"
   android:layout_height="match_parent"
   tools:context=".FragmentOne">

   <!-- creating a text view for displaying tezt view on below line-->
   <TextView
      android:id="@+id/idTVHeading"
      android:layout_width="match_parent"
      android:layout_height="wrap_content"
      android:layout_centerInParent="true"
      android:text="Welcome to First Fragment"
      android:textAlignment="center"
      android:textColor="@color/black"
      android:textSize="20sp"
      android:textStyle="bold" />

   <!-- creating a button to open second fragment -->
   <Button
      android:id="@+id/idBtnLoadFragment"
      android:layout_width="match_parent"
      android:layout_height="wrap_content"
      android:layout_below="@id/idTVHeading"
      android:layout_margin="20dp"
      android:text="Open Second Fragment"
      android:textAllCaps="false" />
</RelativeLayout>
说明 - 在上面的代码中,我们创建了一个 RelativeLayout 作为根布局。在此 RelativeLayout 中,我们创建了一个 TextView 用于显示标题,以及一个用于打开新 Fragment 的按钮。
步骤 6:使用 fragment_two.xml 文件。
导航到 fragment_two.xml。如果此文件不可见,则要打开此文件,在左侧窗格中导航到 app>res>layout>fragment_two.xml 以打开此文件。打开此文件后,将以下代码添加到其中。代码中添加了注释以详细了解。
<?xml version="1.0" encoding="utf-8"?>
<RelativeLayout xmlns:android="http://schemas.android.com/apk/res/android"
   xmlns:tools="http://schemas.android.com/tools"
   android:layout_width="match_parent"
   android:layout_height="match_parent"
   tools:context=".FragmentTwo">

   <!-- creating a text view for displaying text view on below line-->
   <TextView
      android:id="@+id/idTVHeading"
      android:layout_width="match_parent"
      android:layout_height="wrap_content"
      android:layout_centerInParent="true"
      android:text="Welcome to Second Fragment"
      android:textAlignment="center"
      android:textColor="@color/black"
      android:textSize="20sp"
      android:textStyle="bold" />
</RelativeLayout>
步骤 7:使用 FragmentOne.java 文件
导航到 FragmentOne.java。如果此文件不可见,则要打开此文件,在左侧窗格中导航到 app>java>您的应用程序包名称>FragmentOne.java 以打开此文件。打开此文件后,将以下代码添加到其中。代码中添加了注释以详细了解。
package com.example.androidjavaapp;

import android.os.Bundle;
import androidx.fragment.app.Fragment;
import androidx.fragment.app.FragmentTransaction;
import android.view.LayoutInflater;
import android.view.View;
import android.view.ViewGroup;
import android.widget.Button;

public class FragmentOne extends Fragment {

   @Override
   public View onCreateView(LayoutInflater inflater, ViewGroup container,
   Bundle savedInstanceState) {
      // Inflate the layout for this fragment
      View view = inflater.inflate(R.layout.fragment_one, container, false);
      // on below line creating and initializing variable for button
      Button loadFragment = view.findViewById(R.id.idBtnLoadFragment);
      // on below line adding click listner for our button.
      loadFragment.setOnClickListener(new View.OnClickListener() {
         @Override
         public void onClick(View v) {
            // on below line creating and initializing variable for fragment.
            Fragment fragment = new FragmentTwo();
            // on below line creating and initializing variable for fragment transcation.
            FragmentTransaction transaction = getFragmentManager().beginTransaction();
            // on below line replacing the container
            transaction.replace(R.id.frameContainer, fragment);
            // on below line adding back stack as null.
            transaction.addToBackStack(null);
            // on below line committing the changes.
            transaction.commit();
         }
      });
      return view;
   }
}
说明 - 在上面的代码中,我们可以看到一个 onCreateView 方法,在此方法中,我们正在加载要显示的布局文件。之后,我们正在创建和初始化按钮的变量,并使用我们在 fragment_one.xml 文件中提供的 id。之后,我们为该按钮添加了一个点击监听器。在点击监听器方法中,我们正在打开第二个 Fragment 并添加一个空 Back Stack,以便当用户从第二个 Fragment 返回时,他将导航到第一个 Fragment。
步骤 7:使用 MainActivity.java 文件
导航到 MainActivity.java。如果此文件不可见,则要打开此文件,在左侧窗格中导航到 app>java>您的应用程序包名称>MainActivity.java 以打开此文件。打开此文件后,将以下代码添加到其中。代码中添加了注释以详细了解。
package com.example.androidjavaapp;

import android.annotation.SuppressLint;
import android.content.Intent;
import android.content.pm.PackageManager;
import android.database.Cursor;
import android.graphics.Bitmap;
import android.net.Uri;
import android.os.Bundle;
import android.provider.ContactsContract;
import android.provider.MediaStore;
import android.util.Log;
import android.view.View;
import android.widget.ImageView;
import android.widget.ListView;
import android.widget.SimpleCursorAdapter;
import android.widget.TextView;
import android.widget.Toast;
import androidx.annotation.Nullable;
import androidx.appcompat.app.AppCompatActivity;
import androidx.core.app.ActivityCompat;
import androidx.core.content.ContextCompat;
import androidx.fragment.app.Fragment;
import androidx.fragment.app.FragmentTransaction;
import com.android.volley.NetworkResponse;
import com.android.volley.Request;
import com.android.volley.Response;
import com.android.volley.VolleyError;
import com.android.volley.toolbox.Volley;
import org.json.JSONException;
import org.json.JSONObject;
import java.io.ByteArrayOutputStream;
import java.io.IOException;
import java.util.HashMap;
import java.util.Map;

public class MainActivity extends AppCompatActivity {

   @Override
   protected void onCreate(Bundle savedInstanceState) {
      super.onCreate(savedInstanceState);
      setContentView(R.layout.activity_main);
      // on below line creating and initializing variable for fragment.
      Fragment fragment = new FragmentOne();
      // on below line creating and initializing variable for fragment transcation.
      FragmentTransaction transaction = getSupportFragmentManager().beginTransaction();
      // on below line replacing the transaction with the fragment.
      transaction.replace(R.id.frameContainer, fragment);
      // on below line adding back stack as null.
      transaction.addToBackStack(null);
      // on below line committing changes.
      transaction.commit();
   }
}
说明 - 在上面的代码中,我们可以看到 onCreate 方法,在其中我们正在为 activity_main.xml 加载布局。在此 onCreate 方法中,我们正在加载 FragmentOne 并为其添加 Back Stack 以及 null。
添加上述代码后,我们只需单击顶部栏中的绿色图标即可在移动设备上运行我们的应用程序。
注意 - 确保您已连接到您的真实设备或模拟器。
输出

结论
在以上教程中,我们了解了如何在 Android 应用程序中创建 Fragment。我们如何在这两个 Fragment 之间导航以及如果 Android Fragment 存在,如何从 BackStack 中恢复它。


 数据结构
数据结构 网络
网络 关系型数据库管理系统
 操作系统
操作系统 Java
Java iOS
iOS HTML
HTML CSS
CSS Android
 Python
 C 编程
C 编程 C++
C++ C#
C# MongoDB
 MySQL
MySQL Javascript
 PHP
PHP