Tkinter 中的 place_info()、pack_info() 和 grid_info() 方法
在 Tkinter 库中,它是一个用于创建基于 Python 的图形用户界面 (GUI) 的流行工具包,方法 place_info()、pack_info() 和 grid_info() 在管理窗口内部件的位置和布局方面发挥着至关重要的作用。这些方法是有效组织和排列窗口中部件的基本工具。
本文探讨了 Tkinter,一个广泛使用的 Python GUI 工具包,并深入研究了这三个基本方法 place_info()、pack_info() 和 grid_info() 的功能,突出了它们对部件定位、大小和布局相关细节的宝贵见解。
Tkinter 中的 place_info()、pack_info() 和 grid_info() 方法
Tkinter 中的 place_info()、pack_info() 和 grid_info() 方法对于管理窗口内部件的位置和布局至关重要。每个方法都提供独特的函数和语法,以满足不同的布局方法。
place_info()
place_info() 方法提供有关使用 place 几何管理器管理的小部件的当前状态的信息。它返回一个字典,其中包含有关小部件的位置、宽度、高度和其他属性的详细信息。
语法
widget.place_info()
pack_info()
pack_info() 方法用于检索由 pack 几何管理器管理的小部件的当前状态信息。它返回一个字典,其中包含有关小部件的大小、位置、填充和其他属性的详细信息。
语法
widget.pack_info()
grid_info()
grid_info() 方法用于获取由网格几何管理器管理的小部件的当前状态信息。它返回一个字典,其中包含有关小部件的行、列、columnspan、rowspan 和其他属性的信息。
语法
widget.grid_info()
语法的主要区别
对于 place_info(),该方法直接在部件实例上调用,使用点表示法 - widget.place_info()。
对于 pack_info(),该方法也称为部件实例,使用点表示法 - widget.pack_info()。
对于 grid_info(),该方法类似地称为部件实例,使用点表示法 - widget.grid_info()。
主要区别在于用于从每个几何管理器检索信息的语法。但是,在所有情况下,返回的字典都包含特定于部件的位置、大小和属性的详细信息。当开发人员需要获取有关由 Tkinter 中的不同几何管理器管理的小部件的当前状态的信息时,这些方法非常有用,从而可以更好地控制和调整 GUI 布局。
如何在 Tkinter 中使用 place_info()、pack_info() 和 grid_info() 方法?
place_info()
以下是步骤和示例程序 -
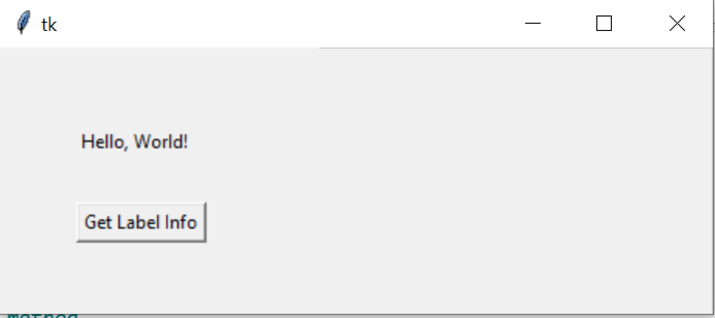
我们创建一个 Tkinter 窗口和一个标签部件。标签部件使用 place() 方法和特定的 x 和 y 坐标进行定位。
display_info() 函数使用 place_info() 方法检索有关标签部件的信息。此方法返回一个字典,其中包含有关部件放置的详细信息,例如其 x 和 y 坐标、宽度、高度和锚点。
我们创建了一个按钮,当单击时,会触发 display_info() 函数。单击按钮将打印通过 place_info() 方法获得的有关标签部件的信息。
示例
import tkinter as tk

# Create a Tkinter window
window = tk.Tk()

# Create a label widget
label = tk.Label(window, text="Hello, World!")

# Place the label using the place() method
label.place(x=50, y=50)

# Function to display information about the label widget
def display_info():
   info = label.place_info()
   print("Label Info:", info)

# Create a button to trigger the display_info() function
info_button = tk.Button(window, text="Get Label Info", command=display_info)
info_button.place(x=50, y=100)

# Start the Tkinter event loop
window.mainloop()
输出

单击“获取标签信息”按钮后 -
Label Info: {'in': <tkinter.Tk object .>, 'x': '50', 'relx': '0', 'y': '50', 'rely': '0', 'width': '', 'relwidth': '', 'height': '', 'relheight': '', 'anchor': 'nw', 'bordermode': 'inside'}
pack_info()
以下是步骤和示例程序 -
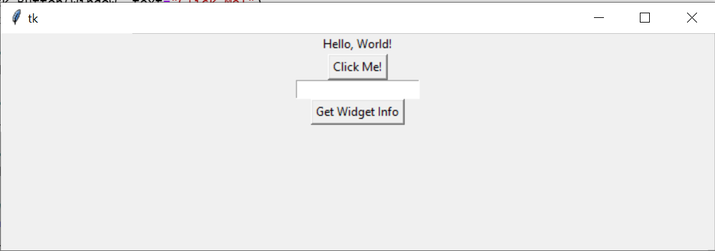
我们创建一个 Tkinter 窗口和三个不同的部件 - 一个标签、一个按钮和一个输入字段。每个部件都使用 pack() 方法打包。
display_info() 函数使用 pack_info() 方法检索有关每个部件的信息。此方法返回一个字典,其中包含有关部件打包的详细信息,例如其填充、扩展、侧面和锚点。
我们创建了一个按钮,当单击时,会触发 display_info() 函数。单击按钮将打印通过 pack_info() 方法获得的有关每个部件的信息。
示例
import tkinter as tk

# Create a Tkinter window
window = tk.Tk()

# Create three different widgets: a label, a button, and an entry
label = tk.Label(window, text="Hello, World!")
button = tk.Button(window, text="Click Me!")
entry = tk.Entry(window)

# Pack the label using the pack() method
label.pack()

# Pack the button using the pack() method
button.pack()

# Pack the entry widget using the pack() method
entry.pack()

# Function to display information about the widgets
def display_info():
   label_info = label.pack_info()
   button_info = button.pack_info()
   entry_info = entry.pack_info()

   print("Label Info:", label_info)
   print("Button Info:", button_info)
   print("Entry Info:", entry_info)

# Create a button to trigger the display_info() function
info_button = tk.Button(window, text="Get Widget Info", command=display_info)
info_button.pack()

# Start the Tkinter event loop
window.mainloop()
输出

单击“获取部件信息”后,我们将获得以下输出 -
Label Info: {'in': <tkinter.Tk object .>, 'anchor': 'center', 'expand': 0, 'fill': 'none', 'ipadx': 0, 'ipady': 0, 'padx': 0, 'pady': 0, 'side': 'top'}
Button Info: {'in': <tkinter.Tk object .>, 'anchor': 'center', 'expand': 0, 'fill': 'none', 'ipadx': 0, 'ipady': 0, 'padx': 0, 'pady': 0, 'side': 'top'}
Entry Info: {'in': <tkinter.Tk object .>, 'anchor': 'center', 'expand': 0, 'fill': 'none', 'ipadx': 0, 'ipady': 0, 'padx': 0, 'pady': 0, 'side': 'top'}
grid_info()
以下是步骤和示例程序 -
我们将创建一个 Tkinter 窗口和三个不同的部件:一个标签、一个按钮和一个输入字段。每个部件都使用 grid() 方法和特定的行和列值放置在窗口中。
display_info() 函数使用 grid_info() 方法检索有关每个部件的信息。此方法返回一个字典,其中包含有关部件网格放置的详细信息,例如其行、列、rowspan 和 columnspan。
我们创建了一个按钮,当单击时,会触发 display_info() 函数。单击按钮将打印通过 grid_info() 方法获得的有关每个部件网格放置的信息。
示例
import tkinter as tk

# Create a Tkinter window
window = tk.Tk()

# Create three different widgets: a label, a button, and an entry
label = tk.Label(window, text="Hello, World!")
button = tk.Button(window, text="Click Me!")
entry = tk.Entry(window)

# Grid the label using the grid() method
label.grid(row=0, column=0)

# Grid the button using the grid() method
button.grid(row=1, column=0)

# Grid the entry widget using the grid() method
entry.grid(row=2, column=0)

# Function to display information about the widgets
def display_info():
   label_info = label.grid_info()
   button_info = button.grid_info()
   entry_info = entry.grid_info()

   print("Label Info:", label_info)
   print("Button Info:", button_info)
   print("Entry Info:", entry_info)

# Create a button to trigger the display_info() function
info_button = tk.Button(window, text="Get Widget Info", command=display_info)
info_button.grid(row=3, column=0)

# Start the Tkinter event loop
window.mainloop()
输出

单击“获取部件信息”按钮后,我们将获得以下输出 -
Label Info: {'in': <tkinter.Tk object .>, 'column': 0, 'row': 0, 'columnspan': 1, 'rowspan': 1, 'ipadx': 0, 'ipady': 0, 'padx': 0, 'pady': 0, 'sticky': ''}
Button Info: {'in': <tkinter.Tk object .>, 'column': 0, 'row': 1, 'columnspan': 1, 'rowspan': 1, 'ipadx': 0, 'ipady': 0, 'padx': 0, 'pady': 0, 'sticky': ''}
Entry Info: {'in': <tkinter.Tk object .>, 'column': 0, 'row': 2, 'columnspan': 1, 'rowspan': 1, 'ipadx': 0, 'ipady': 0, 'padx': 0, 'pady': 0, 'sticky': ''}
结论
总之,Tkinter 中的 place_info()、pack_info() 和 grid_info() 方法对于管理部件定位和布局非常宝贵。通过利用这些方法,开发人员可以获取有关部件放置的关键信息,从而在 Tkinter 应用程序中创建结构良好且视觉上吸引人的用户界面。


 数据结构
数据结构 网络
网络 关系数据库管理系统
 操作系统
操作系统 Java
Java iOS
iOS HTML
HTML CSS
CSS Android
 Python
 C 语言编程
 C++
C++ C#
C# MongoDB
 MySQL
MySQL Javascript
 PHP
PHP