Android 中 FillParent 和 wrap_content 的区别是什么?
本示例演示了如何在 Android 中显示 FillParent 和 wrap_content 的区别。
步骤 1 − 在 Android Studio 中创建一个新项目,转到文件 ⇒ 新建项目,并填写所有必需的详细信息以创建新项目。
步骤 2 − 将以下代码添加到 res/layout/activity_main.xml。
<?xml version="1.0" encoding="utf-8"?>
<RelativeLayout
   xmlns:android="http://schemas.android.com/apk/res/android"
   xmlns:tools="http://schemas.android.com/tools"
   android:layout_width="match_parent"
   android:layout_height="match_parent"
   tools:context=".MainActivity">
   <TextView
      android:layout_width="fill_parent"
      android:layout_height="fill_parent"
      android:text="A wiki is run using wiki software, otherwise known as a wiki engine. A wiki
      engine is a type of content management system, but it differs from most other such systems,
      including blog software, in that the content is created without any defined owner or leader,
       and wikis have little inherent structure, allowing structure to emerge according to the needs
       of the users."/>
   <TextView
      android:layout_width="wrap_content"
      android:layout_height="wrap_content"
      android:layout_centerInParent="true"
      android:text="This is a Wrap text"/>
</RelativeLayout>
步骤 3 − 将以下代码添加到 src/MainActivity.java。
import android.support.v7.app.AppCompatActivity;
import android.os.Bundle;
public class MainActivity extends AppCompatActivity {
   @Override
   protected void onCreate(Bundle savedInstanceState) {
      super.onCreate(savedInstanceState);
      setContentView(R.layout.activity_main);
   }
}
步骤 4 − 将以下代码添加到 androidManifest.xml。
<?xml version="1.0" encoding="utf-8"?>
<manifest
   xmlns:android="http://schemas.android.com/apk/res/android"
   package="app.com.sample">
   <application
      android:allowBackup="true"
      android:icon="@mipmap/ic_launcher"
      android:label="@string/app_name"
      android:roundIcon="@mipmap/ic_launcher_round"
      android:supportsRtl="true"
      android:theme="@style/AppTheme">
      <activity android:name=".MainActivity">
         <intent-filter>
            <action
               android:name="android.intent.action.MAIN" />
            <category
               android:name="android.intent.category.LAUNCHER" />
         </intent-filter>
      </activity>
   </application>
</manifest>
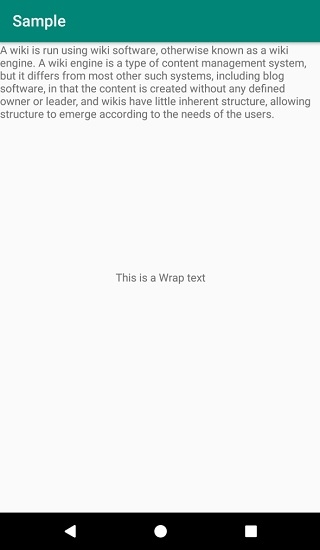
让我们尝试运行您的应用程序。我假设您已将您的实际 Android 移动设备连接到您的计算机。要从 Android Studio 运行应用程序,请打开您的一个项目活动文件,然后单击工具栏中的运行![]() 图标。选择您的移动设备作为选项,然后检查您的移动设备,它将显示您的默认屏幕 −
图标。选择您的移动设备作为选项,然后检查您的移动设备,它将显示您的默认屏幕 −

FillParent/match_parent:FillParent 是旧版本,更新版本是 match_parent,它占据整个屏幕。
wrap_content:wrap_content 根据文本长度并包裹其内容。例如:“这是一个换行文本”。wrap_content 从“这”开始包裹,到“文本”结束。

广告

 数据结构
数据结构 网络
网络 关系数据库管理系统 (RDBMS)
 操作系统
操作系统 Java
Java iOS
iOS HTML
HTML CSS
CSS Android
 Python
 C 语言编程
 C++
C++ C#
C# MongoDB
 MySQL
MySQL Javascript
 PHP
PHP