如何在Android中使用runOnUiThread?
在进入示例之前,我们应该了解Android中的runOnUiThread()是什么。有时主线程执行一些繁重的操作。如果用户想在UI上添加一些额外的操作,它会变得很慢并产生ANR(应用程序无响应)。使用runOnUiThread将在工作线程上执行后台操作并在主线程上更新结果。
此示例演示如何在Android中使用runOnUiThread。
步骤1 - 在Android Studio中创建一个新项目,转到文件⇒新建项目,并填写所有必需的详细信息以创建新项目。
步骤2 - 将以下代码添加到res/layout/activity_main.xml中。
<?xml version="1.0" encoding="utf-8"?>
<LinearLayout xmlns:android="http://schemas.android.com/apk/res/android"
   android:id="@+id/parent"
   xmlns:tools="http://schemas.android.com/tools"
   android:layout_width="match_parent"
   android:layout_height="match_parent"
   tools:context=".MainActivity"
   android:gravity="center"
   android:orientation="vertical">
   <Button
      android:id="@+id/runOn"
      android:text="Run"
      android:layout_width="wrap_content"
      android:layout_height="wrap_content" />
   <TextView
      android:id="@+id/text"
      android:textSize="20sp"
      android:layout_width="wrap_content"
      android:layout_height="wrap_content" />
</LinearLayout>
在上面的代码中,我们添加了一个按钮和一个文本视图,当您单击按钮时,它将更新文本视图。
步骤3 - 将以下代码添加到src/MainActivity.java中
package com.example.andy.myapplication;
import android.os.Build;
import android.os.Bundle;
import android.support.annotation.RequiresApi;
import android.support.v7.app.AppCompatActivity;
import android.view.View;
import android.widget.Button;
import android.widget.TextView;

public class MainActivity extends AppCompatActivity {
   int i = 0;
   @RequiresApi(api = Build.VERSION_CODES.JELLY_BEAN)
   @Override
   protected void onCreate(Bundle savedInstanceState) {
      super.onCreate(savedInstanceState);
      setContentView(R.layout.activity_main);
      final TextView textView = findViewById(R.id.text);
      final Button runOn = findViewById(R.id.runOn);
      runOn.setOnClickListener(new View.OnClickListener() {
         @Override
         public void onClick(View v) {
            new Thread() {
               public void run() {
                  while (i++ < 1000) {
                     try {
                        runOnUiThread(new Runnable() {
                           @Override
                           public void run() {
                              textView.setText("#" + i);
                           }
                        });
                        Thread.sleep(300);
                     } catch (InterruptedException e) {
                        e.printStackTrace();
                     }
                  }
               }
            }.start();
         }
      });
   }
}
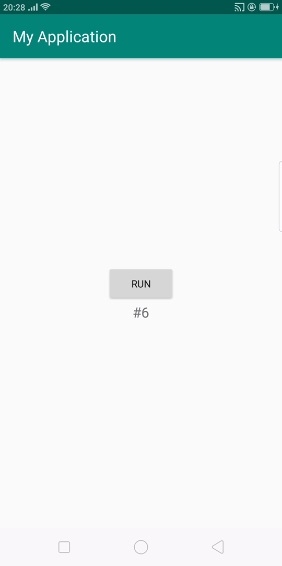
在上面的代码中,当用户单击按钮时。它将使用runOnUiThread()更新文本视图,如下所示 -
new Thread() {
   public void run() {
      while (i++ < 1000) {
         try {
            runOnUiThread(new Runnable() {
               @Override
               public void run() {
                  textView.setText("#" + i);
               }
            });
            Thread.sleep(300);
         } catch (InterruptedException e) {
            e.printStackTrace();
         }
      }
   }
}.start();
让我们尝试运行您的应用程序。我假设您已将您的实际Android移动设备连接到您的电脑。要从Android Studio运行应用程序,请打开您的项目中的一个活动文件,然后单击工具栏中的运行![]() 图标。选择您的移动设备作为选项,然后检查您的移动设备,它将显示您的默认屏幕 -
图标。选择您的移动设备作为选项,然后检查您的移动设备,它将显示您的默认屏幕 -

在以上结果中,它显示了初始屏幕。当用户单击运行按钮时,它将更新文本视图,如下所示 -

点击这里下载项目代码

广告

 数据结构
数据结构 网络
网络 关系数据库管理系统
 操作系统
操作系统 Java
Java iOS
iOS HTML
HTML CSS
CSS Android
 Python
 C语言编程
C语言编程 C++
C++ C#
C# MongoDB
 MySQL
MySQL Javascript
 PHP
PHP