如何在Python中创建Seaborn相关性热力图?
相关性热力图以图形方式显示数据集变量对之间相关性的强度和方向,它描绘了相关性矩阵。这是一种有效的方法,可以发现大型数据集中的模式和关系。
Python数据可视化工具包Seaborn提供简单的实用程序来生成统计图形。其创建相关性热力图的功能使用户可以快速查看数据集的相关性矩阵。
为了构建相关性热力图,我们必须导入数据集,计算变量的相关性矩阵,然后使用Seaborn的heatmap函数生成热力图。热力图显示一个矩阵,颜色表示变量之间相关性的程度。此外,用户可以在热力图上显示相关系数。
Seaborn相关性热力图是检查数据集模式和关系的有效可视化技术,可用于识别需要进一步研究的关键变量。
使用Heatmap()函数
heatmap函数生成一个颜色编码矩阵,该矩阵显示数据集中的两对变量之间相互关联的强度。heatmap函数要求我们将变量的相关性矩阵提供给它,这可以使用Pandas数据框的corr方法来计算。heatmap函数提供广泛的可选参数,使用户能够更改热力图的视觉外观,包括颜色方案、注释、绘图大小和位置。
语法
import seaborn as sns
sns.heatmap(data, cmap=None, annot=None)
上述函数中的参数data是一个表示输入数据集的相关性矩阵。cmap是用于为热力图着色的颜色图。
示例1
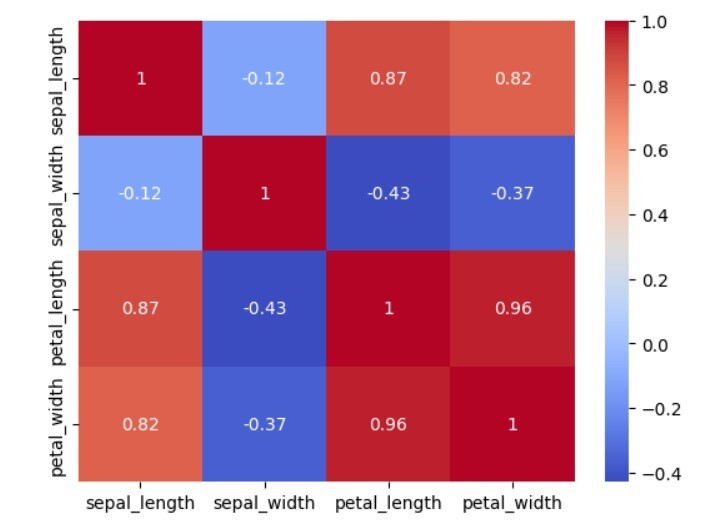
在这个例子中,我们在Python中创建了一个seaborn相关性热力图。首先,我们导入seaborn和matplotlib库,并使用Seaborn的load_dataset函数加载iris数据集。该数据集包含SepalLength、SepalWidth、PetalLength和PetalWidth变量。iris数据集包含鸢尾花萼片长度、萼片宽度、花瓣长度和花瓣宽度的测量值。这是一个示例信息:
| 序号 | sepal_length | sepal_width | petal_length | petal_width | species |
|---|---|---|---|---|---|
| 0 | 5.1 | 3.5 | 1.4 | 0.2 | setosa |
| 1 | 4.9 | 3.0 | 1.4 | 0.2 | Setosa |
| 2 | 4.7 | 3.2 | 1.3 | 0.2 | Setosa |
| 3 | 4.6 | 3.1 | 1.5 | 0.2 | Setosa |
| 4 | 5.0 | 3.6 | 1.4 | 0.2 | setosa |
用户可以使用Seaborn的load_dataset方法将iris数据集加载到Pandas DataFrame中。然后使用Pandas DataFrame的corr方法计算变量的相关性矩阵,并将其存储在名为corr_matrix的变量中。我们使用Seaborn的heatmap方法生成热力图。我们将相关性矩阵corr_matrix传递给函数,并将cmap参数设置为“coolwarm”,以使用不同的颜色来表示正相关和负相关。最后,我们使用matplotlib的pyplot模块的show方法显示热力图。
# Required libraries
import seaborn as sns
import matplotlib.pyplot as plt

# Load the iris dataset into a Pandas dataframe
iris_data = sns.load_dataset('iris')

# Creating the correlation matrix of the iris dataset
iris_corr_matrix = iris_data.corr()
print(iris_corr_matrix)

# Create the heatmap using the `heatmap` function of Seaborn
sns.heatmap(iris_corr_matrix, cmap='coolwarm', annot=True)

# Display the heatmap using the `show` method of the `pyplot` module from matplotlib.
plt.show()
输出
              sepal_length  sepal_width  petal_length  petal_width
sepal_length      1.000000    -0.117570      0.871754     0.817941
sepal_width      -0.117570     1.000000     -0.428440    -0.366126
petal_length      0.871754    -0.428440      1.000000     0.962865
petal_width       0.817941    -0.366126      0.962865     1.000000
示例2
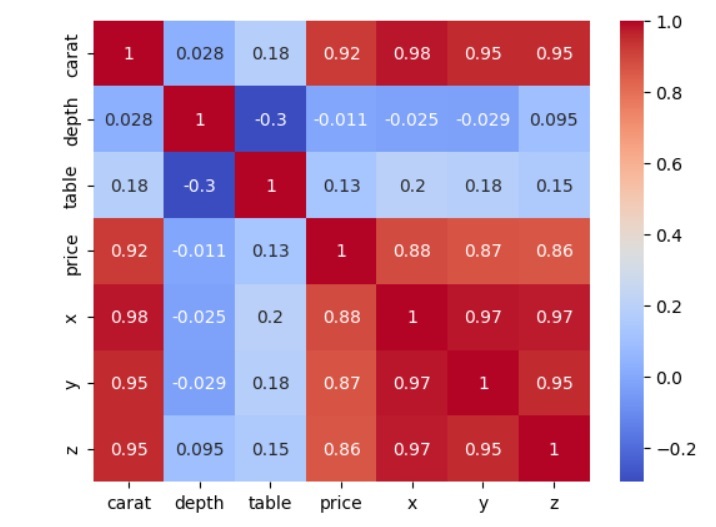
在这个例子中,我们再次在Python中创建一个seaborn相关性热力图。首先,我们导入seaborn和matplotlib库,并使用Seaborn的load_dataset函数加载diamonds数据集。diamonds数据集包含有关钻石成本和特征的详细信息,包括其克拉重量、切割、颜色和净度。这是一个示例信息:
| 序号 | carat | cut | color | clarity | depth | table | price | x | y | z |
|---|---|---|---|---|---|---|---|---|---|---|
| 0 | 0.23 | Ideal | E | SI2 | 61.5 | 55.0 | 326 | 3.95 | 3.98 | 2.43 |
| 1 | 0.21 | Premium | E | SI1 | 59.8 | 61.0 | 326 | 3.89 | 3.84 | 2.31 |
| 2 | 0.23 | Good | E | VS1 | 56.9 | 65.0 | 327 | 4.05 | 4.07 | 2.31 |
| 3 | 0.29 | Premium | I | VS2 | 62.4 | 58.0 | 334 | 4.20 | 4.23 | 2.63 |
| 4 | 0.31 | Good | J | SI2 | 63.3 | 58.0 | 335 | 4.34 | 4.35 | 2.75 |
可以使用Seaborn的load_dataset函数将diamonds数据集加载到Pandas DataFrame中。接下来,使用Pandas DataFrame的corr方法计算变量的相关性矩阵,并将其存储在名为diamond_corr_matrix的变量中。为了使用不同的颜色来表示正相关和负相关,我们将相关性矩阵corr_matrix传递给函数,并将cmap参数设置为“coolwarm”。最后,我们使用matplotlib的pyplot模块的show方法显示热力图。
# Required libraries
import seaborn as sns
import matplotlib.pyplot as plt

# Load the diamond dataset into a Pandas dataframe
diamonds_data = sns.load_dataset('diamonds')

# Compute the correlation matrix of the variables
diamonds_corr_matrix = diamonds_data.corr()
print(diamonds_corr_matrix)

# Create the heatmap using the `heatmap` function of Seaborn
sns.heatmap(diamonds_corr_matrix, cmap='coolwarm', annot=True)

# Display the heatmap using the `show` method of the `pyplot` module from matplotlib.
plt.show()
输出
          carat     depth     table     price         x         y         z
carat  1.000000  0.028224  0.181618  0.921591  0.975094  0.951722  0.953387
depth  0.028224  1.000000 -0.295779 -0.010647 -0.025289 -0.029341  0.094924
table  0.181618 -0.295779  1.000000  0.127134  0.195344  0.183760  0.150929
price  0.921591 -0.010647  0.127134  1.000000  0.884435  0.865421  0.861249
x      0.975094 -0.025289  0.195344  0.884435  1.000000  0.974701  0.970772
y      0.951722 -0.029341  0.183760  0.865421  0.974701  1.000000  0.952006
z      0.953387  0.094924  0.150929  0.861249  0.970772  0.952006  1.000000

热力图是一种有益的图形表示,seaborn使其简单易用。


 数据结构
数据结构 网络
网络 关系数据库管理系统 (RDBMS)
 操作系统
操作系统 Java
Java iOS
iOS HTML
HTML CSS
CSS Android
 Python
 C语言编程
C语言编程 C++
C++ C#
C# MongoDB
 MySQL
MySQL Javascript
 PHP
PHP
