如何在Android中将HashMap数据移除到用于ListView的ArrayList中?
本例演示了如何在Android中将HashMap数据移除到用于ListView的ArrayList中
步骤 1 − 在Android Studio中创建一个新项目,进入文件 ⇒ 新建项目,并填写所有必需的详细信息以创建新项目。
步骤 2 − 将以下代码添加到res/layout/activity_main.xml。
<?xml version="1.0" encoding="utf-8"?>
<LinearLayout xmlns:android="http://schemas.android.com/apk/res/android"
   xmlns:tools="http://schemas.android.com/tools"
   android:layout_width="match_parent"
   android:layout_height="match_parent"
   tools:context=".MainActivity"
   android:orientation="vertical">
   <EditText
      android:id="@+id/record"
      android:layout_width="match_parent"
      android:hint="record number"
      android:inputType="number"
      android:layout_height="wrap_content" />
   <EditText
      android:id="@+id/name"
      android:layout_width="match_parent"
      android:hint="Enter Name"
      android:layout_height="wrap_content" />
   <LinearLayout
      android:layout_width="wrap_content"
      android:layout_height="wrap_content">
      <Button
         android:id="@+id/save"
         android:text="Save"
         android:layout_width="wrap_content"
         android:layout_height="wrap_content" />
      <Button
         android:id="@+id/refresh"
         android:text="Refresh"
         android:layout_width="wrap_content"
         android:layout_height="wrap_content" />
      <Button
         android:id="@+id/delete"
         android:text="Delete"
         android:layout_width="wrap_content"
         android:layout_height="wrap_content" />
   </LinearLayout>
   <ListView
      android:id="@+id/listView"
      android:layout_width="match_parent"
      android:layout_height="wrap_content">
   </ListView>
</LinearLayout>
在上面的代码中,我们使用了名称和记录编号作为EditText,当用户点击保存按钮时,它会将数据存储到ArrayList中。点击带有记录ID的删除按钮即可从ListView中移除元素。
步骤 3 − 将以下代码添加到src/MainActivity.java
package com.example.andy.myapplication;

import android.os.Bundle;
import android.support.v7.app.AppCompatActivity;
import android.view.View;
import android.widget.ArrayAdapter;
import android.widget.Button;
import android.widget.EditText;
import android.widget.ListView;
import android.widget.Toast;

import java.util.ArrayDeque;
import java.util.ArrayList;
import java.util.Collection;
import java.util.Deque;
import java.util.HashMap;
import java.util.Map;
import java.util.PriorityQueue;

public class MainActivity extends AppCompatActivity {
   Button save, refresh;
   EditText name,record;
   ArrayAdapter arrayAdapter;
   PriorityQueue<String> hs;
   ArrayList<String> array_list;
   private ListView listView;
   Map map = new HashMap();

   @Override
   protected void onCreate(Bundle readdInstanceState) {
      super.onCreate(readdInstanceState);
      setContentView(R.layout.activity_main);
      array_list = new ArrayList<>();
      name = findViewById(R.id.name);
      record = findViewById(R.id.record);
      listView = findViewById(R.id.listView);
      findViewById(R.id.refresh).setOnClickListener(new View.OnClickListener() {
         @Override
         public void onClick(View v) {
            arrayAdapter.notifyDataSetChanged();
            listView.invalidateViews();
            listView.refreshDrawableState();
         }
      });

      findViewById(R.id.delete).setOnClickListener(new View.OnClickListener() {
         @Override
         public void onClick(View v) {
            if(!record.getText().toString().isEmpty()){
               map.remove(record.getText().toString());
               array_list.clear();
               array_list.addAll(map.values());
               arrayAdapter = new ArrayAdapter(MainActivity.this, android.R.layout.simple_list_item_1, array_list);
               listView.setAdapter(arrayAdapter);
               Toast.makeText(MainActivity.this, "Deleted", Toast.LENGTH_LONG).show();
            }
         }
      });

      findViewById(R.id.save).setOnClickListener(new View.OnClickListener() {
         @Override
         public void onClick(View v) {
            if (!name.getText().toString().isEmpty() && !record.getText().toString().isEmpty()) {
               map.put(record.getText().toString(),name.getText().toString());
               array_list.clear();
               array_list.addAll(map.values());
               arrayAdapter = new ArrayAdapter(MainActivity.this, android.R.layout.simple_list_item_1, array_list);
               listView.setAdapter(arrayAdapter);
               Toast.makeText(MainActivity.this, "Inserted", Toast.LENGTH_LONG).show();
            } else {
               name.setError("Enter NAME");
               record.setError("Enter Record");
            }
         }
      });
   }
}
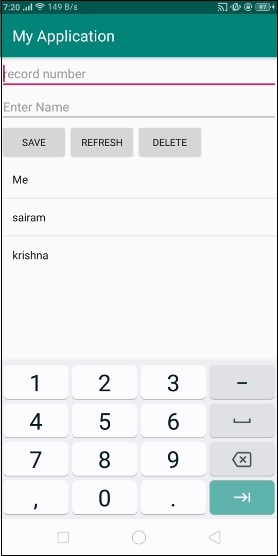
让我们尝试运行您的应用程序。我假设您已将您的实际Android移动设备连接到您的计算机。要在Android Studio中运行应用程序,请打开项目中的一个活动文件,然后点击运行 ![]() 工具栏中的图标。选择您的移动设备作为选项,然后检查您的移动设备,它将显示您的默认屏幕 −
工具栏中的图标。选择您的移动设备作为选项,然后检查您的移动设备,它将显示您的默认屏幕 −

在上面的结果中,我们已插入3条记录,如上所示。

现在我们输入记录编号为3并点击删除按钮。它将从ListView中删除一条记录,如上所示。
点击 这里 下载项目代码

广告

 数据结构
数据结构 网络
网络 关系型数据库管理系统 (RDBMS)
 操作系统
操作系统 Java
Java iOS
iOS HTML
HTML CSS
CSS Android
 Python
 C语言编程
C语言编程 C++
C++ C#
C# MongoDB
 MySQL
MySQL Javascript
 PHP
PHP