如何在 Kotlin Android 中使用简单的 SQLite 数据库?
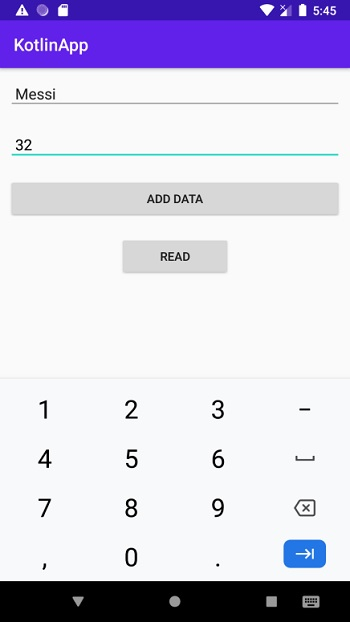
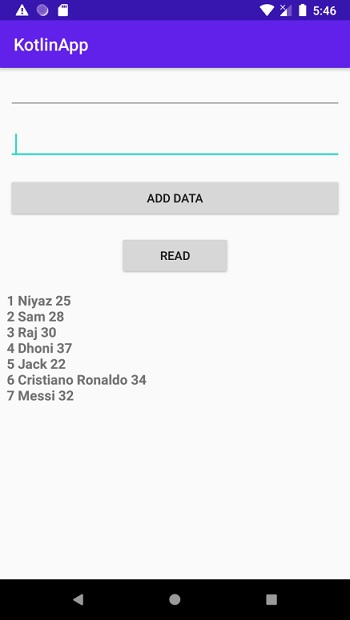
此示例演示如何在 Kotlin android 中使用简单的 SQLite 数据库。
步骤 1 − 在 Android Studio 中创建一个新项目,转到文件 ⇉ 新项目,并填写所有必需的详细信息以创建一个新项目。
步骤 2 − 将以下代码添加到 res/layout/activity_main.xml。
<?xml version="1.0" encoding="utf-8"?>
<LinearLayout xmlns:android="http://schemas.android.com/apk/res/android"
   xmlns:app="http://schemas.android.com/apk/res-auto"
   xmlns:tools="http://schemas.android.com/tools"
   android:layout_width="match_parent"
   android:layout_height="match_parent"
   android:orientation="vertical"
   tools:context=".MainActivity">
   <LinearLayout
      android:layout_width="match_parent"
      android:layout_height="wrap_content"
      android:orientation="vertical">
   <EditText
      android:id="@+id/editTextName"
      android:layout_width="match_parent"
      android:layout_height="wrap_content"
      android:layout_margin="10dp"
      android:padding="8dp" />
   <EditText
      android:id="@+id/editTextAge"
      android:layout_width="match_parent"
      android:layout_height="wrap_content"
      android:layout_margin="10dp"
      android:autofillHints="Age"
      android:inputType="number"
      android:padding="8dp"
      android:textColor="@android:color/background_dark" />
   <Button
      android:id="@+id/btnInsert"
      android:layout_width="match_parent"
      android:layout_height="wrap_content"
      android:layout_margin="10dp"
      android:padding="8dp"
      android:text="Add data" />
   </LinearLayout>
   <LinearLayout
      android:layout_width="match_parent"
      android:layout_height="wrap_content"
      android:gravity="center"
      android:orientation="horizontal"
      android:weightSum="3">
   <Button
      android:id="@+id/btnRead"
      android:layout_width="0dp"
      android:layout_height="wrap_content"
      android:layout_margin="10dp"
      android:layout_weight="1"
      android:padding="8dp"
      android:text="Read" />
   </LinearLayout>
   <ScrollView
      android:layout_width="match_parent"
      android:layout_height="match_parent>
   <TextView
      android:id="@+id/tvResult"
      android:layout_width="match_parent"
      android:layout_height="wrap_content"
      android:padding="8dp"
      android:textSize="16sp"
      android:textStyle="bold" />
   </ScrollView>
</LinearLayout>
步骤 3 − 将以下代码添加到 src/MainActivity.kt
package app.com.q10
import androidx.appcompat.app.AppCompatActivity
import android.os.Bundle
import android.widget.Toast
import kotlinx.android.synthetic.main.activity_main.*
class MainActivity : AppCompatActivity() {
   override fun onCreate(savedInstanceState: Bundle?) {
      super.onCreate(savedInstanceState)
      setContentView(R.layout.activity_main)
      title = "KotlinApp"
      val context = this
      val db = DataBaseHandler(context)
      btnInsert.setOnClickListener {
         if (editTextName.text.toString().isNotEmpty() &&
            editTextAge.text.toString().isNotEmpty()
         ) {
            val user = User(editTextName.text.toString(), editTextAge.text.toString().toInt())
            db.insertData(user)
            clearField()
         }
         else {
            Toast.makeText(context, "Please Fill All Data's", Toast.LENGTH_SHORT).show()
         }
      }
      btnRead.setOnClickListener {
         val data = db.readData()
         tvResult.text = ""
         for (i in 0 until data.size) {
            tvResult.append(
               data[i].id.toString() + " " + data[i].name + " " + data[i].age + "
"
            )
         }
      }
   }
   private fun clearField() {
      editTextName.text.clear()
      editTextAge.text.clear()
   }
}
步骤 4 − 将以下代码添加到 src/DataBaseHelper.kt
import android.content.ContentValues
import android.content.Context
import android.database.sqlite.SQLiteDatabase
import android.database.sqlite.SQLiteOpenHelper
import android.widget.Toast
val DATABASENAME = "MY DATABASE"
val TABLENAME = "Users"
val COL_NAME = "name"
val COL_AGE = "age"
val COL_ID = "id"
class DataBaseHandler(var context: Context) : SQLiteOpenHelper(context, DATABASENAME, null,
1) {
   override fun onCreate(db: SQLiteDatabase?) {
      val createTable = "CREATE TABLE " + TABLENAME + " (" + COL_ID + " INTEGER PRIMARY KEY AUTOINCREMENT," + COL_NAME + " VARCHAR(256)," + COL_AGE + " INTEGER)"
      db?.execSQL(createTable)
   }
   override fun onUpgrade(db: SQLiteDatabase?, oldVersion: Int, newVersion: Int) {
      //onCreate(db);
   }
   fun insertData(user: User) {
      val database = this.writableDatabase
      val contentValues = ContentValues()
      contentValues.put(COL_NAME, user.name)
      contentValues.put(COL_AGE, user.age)
      val result = database.insert(TABLENAME, null, contentValues)
      if (result == (0).toLong()) {
         Toast.makeText(context, "Failed", Toast.LENGTH_SHORT).show()
      }
      else {
         Toast.makeText(context, "Success", Toast.LENGTH_SHORT).show()
      }
   }
   fun readData(): MutableList<User> {
      val list: MutableList<User> = ArrayList()
      val db = this.readableDatabase
      val query = "Select * from $TABLENAME"
      val result = db.rawQuery(query, null)
      if (result.moveToFirst()) {
         do {
            val user = User()
            user.id = result.getString(result.getColumnIndex(COL_ID)).toInt()
            user.name = result.getString(result.getColumnIndex(COL_NAME))
            user.age = result.getString(result.getColumnIndex(COL_AGE)).toInt()
            list.add(user)
         }
         while (result.moveToNext())
      }
      return list
   }
}
步骤 5 − 将以下代码添加到 androidManifest.xml
<?xml version="1.0" encoding="utf-8"?>
<manifest xmlns:android="http://schemas.android.com/apk/res/android"
   package="app.com.kotlipapp">
   <application
      android:allowBackup="true"
      android:icon="@mipmap/ic_launcher"
      android:label="@string/app_name"
      android:roundIcon="@mipmap/ic_launcher_round"
      android:supportsRtl="true"
      android:theme="@style/AppTheme">
      <activity android:name=".MainActivity">
         <intent-filter>
            <action android:name="android.intent.action.MAIN" />
            <category android:name="android.intent.category.LAUNCHER" />
         </intent-filter>
      </activity>
   </application>
</manifest>
让我们尝试运行你的应用程序。我假设你已将你的 Android 移动设备连接到你的电脑。要从 Android Studio 中运行此应用程序,请打开你的一个项目活动文件,然后单击工具栏中的 ![]() 图标。选择你的移动设备作为选项,然后查看你的移动设备,它将显示你的默认屏幕 –
图标。选择你的移动设备作为选项,然后查看你的移动设备,它将显示你的默认屏幕 –


点击 此处 下载项目代码。

广告

 数据结构
数据结构 网络
网络 RDBMS
RDBMS 操作系统
操作系统 Java
Java iOS
iOS HTML
HTML CSS
CSS Android
 Python
 C 编程
C 编程 C++
C++ C#
C# MongoDB
 MySQL
MySQL Javascript
 PHP
PHP