在 Android 中使用套接字发送和接收数据
此示例演示了如何在 Android 中使用套接字发送和接收数据。
需要服务器和客户端项目
服务器
步骤 1 - 在 Android Studio 中创建一个新项目,转到文件 ⇒ 新建项目,并填写所有必需的详细信息以创建新项目。
步骤 2 - 将以下代码添加到 res/layout/activity_main.xml 中。
<?xml version = "1.0" encoding = "utf-8"?>
<RelativeLayout xmlns:android = "http://schemas.android.com/apk/res/android"
   xmlns:tools = "http://schemas.android.com/tools"
   android:layout_width = "match_parent"
   android:layout_height = "match_parent"
   android:layout_margin = "16dp"
   tools:context = ".MainActivity">
   <TextView
      android:id = "@+id/tvIP"
      android:layout_width = "wrap_content"
      android:layout_height = "wrap_content"
      android:textAppearance = "@style/Base.TextAppearance.AppCompat.Medium" />
   <TextView
      android:id = "@+id/tvPort"
      android:layout_width = "wrap_content"
      android:layout_height = "wrap_content"
      android:layout_below = "@+id/tvIP"
      android:textAppearance = "@style/Base.TextAppearance.AppCompat.Medium" />
   <TextView
      android:id = "@+id/tvConnectionStatus"
      android:layout_width = "match_parent"
      android:layout_height = "wrap_content"
      android:layout_below = "@+id/tvPort"
      android:textAppearance = "@style/Base.TextAppearance.AppCompat.Medium" />
   <TextView
      android:id = "@+id/tvMessages"
      android:layout_width = "match_parent"
      android:layout_height = "wrap_content"
      android:layout_above = "@+id/etMessage"
      android:layout_below = "@+id/tvConnectionStatus"
      android:inputType = "textMultiLine"
      android:textAppearance = "@style/Base.TextAppearance.AppCompat.Medium" />
   <EditText
      android:id = "@+id/etMessage"
      android:layout_width = "match_parent"
      android:layout_height = "wrap_content"
      android:layout_above = "@+id/btnSend"
      android:hint = "Enter Message"
      android:inputType = "text" />
   <Button
      android:id = "@+id/btnSend"
      android:layout_width = "match_parent"
      android:layout_height = "wrap_content"
      android:layout_alignParentBottom = "true"
      android:text = "SEND" />
</RelativeLayout>
步骤 3 - 将以下代码添加到 src/MainActivity.java 中。
package com.server.myapplication.server;
import android.annotation.SuppressLint;
import android.net.wifi.WifiInfo;
import android.net.wifi.WifiManager;
import android.os.Bundle;
import android.support.v7.app.AppCompatActivity;
import android.view.View;
import android.widget.Button;
import android.widget.EditText;
import android.widget.TextView;
import java.io.BufferedReader;
import java.io.IOException;
import java.io.InputStreamReader;
import java.io.PrintWriter;
import java.net.InetAddress;
import java.net.ServerSocket;
import java.net.Socket;
import java.net.UnknownHostException;
import java.nio.ByteBuffer;
import java.nio.ByteOrder;

@SuppressLint("SetTextI18n")
public class MainActivity extends AppCompatActivity {
   ServerSocket serverSocket;
   Thread Thread1 = null;
   TextView tvIP, tvPort;
   TextView tvMessages;
   EditText etMessage;
   Button btnSend;
   public static String SERVER_IP = "";
   public static final int SERVER_PORT = 8080;
   String message;
   @Override
   protected void onCreate(Bundle savedInstanceState) {
      super.onCreate(savedInstanceState);
      setContentView(R.layout.activity_main);
      tvIP = findViewById(R.id.tvIP);
      tvPort = findViewById(R.id.tvPort);
      tvMessages = findViewById(R.id.tvMessages);
      etMessage = findViewById(R.id.etMessage);
      btnSend = findViewById(R.id.btnSend);
      try {
         SERVER_IP = getLocalIpAddress();
      } catch (UnknownHostException e) {
         e.printStackTrace();
      }
      Thread1 = new Thread(new Thread1());
      Thread1.start();
      btnSend.setOnClickListener(new View.OnClickListener() {
         @Override
         public void onClick(View v) {
            message = etMessage.getText().toString().trim();
            if (!message.isEmpty()) {
               new Thread(new Thread3(message)).start();
            }
         }
      });
   }
   private String getLocalIpAddress() throws UnknownHostException {
      WifiManager wifiManager = (WifiManager) getApplicationContext().getSystemService(WIFI_SERVICE);
      assert wifiManager ! = null;
      WifiInfo wifiInfo = wifiManager.getConnectionInfo();
      int ipInt = wifiInfo.getIpAddress();
      return InetAddress.getByAddress(ByteBuffer.allocate(4).order(ByteOrder.LITTLE_ENDIAN).putInt(ipInt).array()).getHostAddress();
   }
   private PrintWriter output;
   private BufferedReader input;
   class Thread1 implements Runnable {
      @Override
      public void run() {
         Socket socket;
         try {
            serverSocket = new ServerSocket(SERVER_PORT);
            runOnUiThread(new Runnable() {
               @Override
               public void run() {
                  tvMessages.setText("Not connected");
                  tvIP.setText("IP: " + SERVER_IP);
                  tvPort.setText("Port: " + String.valueOf(SERVER_PORT));
               }
            });
            try {
               socket = serverSocket.accept();
               output = new PrintWriter(socket.getOutputStream());
               input = new BufferedReader(new InputStreamReader(socket.getInputStream()));
               runOnUiThread(new Runnable() {
                  @Override
                  public void run() {
                     tvMessages.setText("Connected
");
                  }
               });
               new Thread(new Thread2()).start();
            } catch (IOException e) {
               e.printStackTrace();
            }
         } catch (IOException e) {
            e.printStackTrace();
         }
      }
   }
   private class Thread2 implements Runnable {
      @Override
      public void run() {
         while (true) {
            try {
               final String message = input.readLine();
               if (message ! = null) {
                  runOnUiThread(new Runnable() {
                     @Override
                     public void run() {
                        tvMessages.append("client:" + message + "
");
                     }
                  });
               } else {
                  Thread1 = new Thread(new Thread1());
                  Thread1.start();
                  return;
               }
            } catch (IOException e) {
               e.printStackTrace();
            }
         }
      }
   }
   class Thread3 implements Runnable {
      private String message;
      Thread3(String message) {
         this.message = message;
      }
      @Override
      public void run() {
         output.write(message);
         output.flush();
         runOnUiThread(new Runnable() {
            @Override
            public void run() {
               tvMessages.append("server: " + message + "
");
               etMessage.setText("");
            }
         });
      }
   }
}
步骤 4 - 将以下代码添加到 androidManifest.xml 中。
<?xml version = "1.0" encoding = "utf-8"?>
<manifest xmlns:android = "http://schemas.android.com/apk/res/android"
   package = "com.example.myapplication">
   <uses-permission android:name = "android.permission.ACCESS_WIFI_STATE" />
   <uses-permission android:name = "android.permission.ACCESS_NETWORK_STATE" />
   <uses-permission android:name = "android.permission.INTERNET"/>
   <application
      android:allowBackup = "true"
      android:icon = "@mipmap/ic_launcher"
      android:label = "@string/app_name"
      android:roundIcon = "@mipmap/ic_launcher_round"
      android:supportsRtl = "true"
      android:theme = "@style/AppTheme">
      <activity android:name = ".MainActivity"
         android:label = "Server">
         <intent-filter>
            <action android:name = "android.intent.action.MAIN" />
            <category android:name = "android.intent.category.LAUNCHER" />
         </intent-filter>
      </activity>
   </application>
</manifest>
客户端
步骤 1 - 在 Android Studio 中创建一个新项目,转到文件 ⇒ 新建项目,并填写所有必需的详细信息以创建新项目。
步骤 2 - 将以下代码添加到 res/layout/activity_main.xml 中。
<?xml version = "1.0" encoding = "utf-8"?>
<RelativeLayout xmlns:android = "http://schemas.android.com/apk/res/android"
   xmlns:tools = "http://schemas.android.com/tools"
   android:layout_width = "match_parent"
   android:layout_height = "match_parent"
   android:layout_margin = "16dp"
   tools:context = ".MainActivity">
   <EditText
      android:id = "@+id/etIP"
      android:layout_width = "match_parent"
      android:layout_height = "wrap_content"
      android:hint = "IP-Address"
      android:inputType = "text" />
   <EditText
      android:id = "@+id/etPort"
      android:layout_width = "match_parent"
      android:layout_height = "wrap_content"
      android:layout_below = "@+id/etIP"
      android:hint = "Port No"
      android:inputType = "number" />
   <Button
      android:id = "@+id/btnConnect"
      android:layout_width = "match_parent"
      android:layout_height = "wrap_content"
      android:layout_below = "@+id/etPort"
      android:layout_gravity = "center"
      android:layout_marginTop = "16dp"
      android:text = "Connect To Server" />
   <TextView
      android:id = "@+id/tvMessages"
      android:layout_width = "match_parent"
      android:layout_height = "wrap_content"
      android:layout_above = "@+id/etMessage"
      android:layout_below = "@+id/btnConnect"
      android:inputType = "textMultiLine"
      android:textAppearance = "@style/Base.TextAppearance.AppCompat.Medium" />
   <EditText
      android:id = "@+id/etMessage"
      android:layout_width = "match_parent"
      android:layout_height = "wrap_content"
      android:layout_above = "@+id/btnSend"
      android:hint = "Enter Message"
      android:inputType = "text" />
   <Button
      android:id = "@+id/btnSend"
      android:layout_width = "match_parent"
      android:layout_height = "wrap_content"
      android:layout_alignParentBottom = "true"
      android:text = "SEND" />
</RelativeLayout>
步骤 3 - 将以下代码添加到 res/layout/MainActivity.java 中。
package com.client.myapplication.client;
import android.annotation.SuppressLint;
import android.os.Bundle;
import android.support.v7.app.AppCompatActivity;
import android.view.View;
import android.widget.Button;
import android.widget.EditText;
import android.widget.TextView;
import java.io.BufferedReader;
import java.io.IOException;
import java.io.InputStreamReader;
import java.io.PrintWriter;
import java.net.Socket;

@SuppressLint("SetTextI18n")
public class MainActivity extends AppCompatActivity {
   Thread Thread1 = null;
   EditText etIP, etPort;
   TextView tvMessages;
   EditText etMessage;
   Button btnSend;
   String SERVER_IP;
   int SERVER_PORT;
   @Override
   protected void onCreate(Bundle savedInstanceState) {
      super.onCreate(savedInstanceState);
      setContentView(R.layout.activity_main);
      etIP = findViewById(R.id.etIP);
      etPort = findViewById(R.id.etPort);
      tvMessages = findViewById(R.id.tvMessages);
      etMessage = findViewById(R.id.etMessage);
      btnSend = findViewById(R.id.btnSend);
      Button btnConnect = findViewById(R.id.btnConnect);
      btnConnect.setOnClickListener(new View.OnClickListener() {
         @Override
         public void onClick(View v) {
            tvMessages.setText("");
            SERVER_IP = etIP.getText().toString().trim();
            SERVER_PORT = Integer.parseInt(etPort.getText().toString().trim());
            Thread1 = new Thread(new Thread1());
            Thread1.start();
         }
      });
      btnSend.setOnClickListener(new View.OnClickListener() {
         @Override
         public void onClick(View v) {
            String message = etMessage.getText().toString().trim();
            if (!message.isEmpty()) {
               new Thread(new Thread3(message)).start();
            }
         }
      });
   }
   private PrintWriter output;
   private BufferedReader input;
   class Thread1 implements Runnable {
      public void run() {
         Socket socket;
         try {
            socket = new Socket(SERVER_IP, SERVER_PORT);
            output = new PrintWriter(socket.getOutputStream());
            input = new BufferedReader(new InputStreamReader(socket.getInputStream()));
            runOnUiThread(new Runnable() {
               @Override
               public void run() {
                  tvMessages.setText("Connected
");
               }
            });
            new Thread(new Thread2()).start();
         } catch (IOException e) {
         e.printStackTrace();
         }
      }
   }
   class Thread2 implements Runnable {
      @Override
      public void run() {
         while (true) {
            try {
               final String message = input.readLine();
               if (message ! = null) {
                  runOnUiThread(new Runnable() {
                     @Override
                     public void run() {
                        tvMessages.append("server: " + message + "
");
                     }
                  });
               } else {
                  Thread1 = new Thread(new Thread1());
                  Thread1.start();
                  return;
               }
            } catch (IOException e) {
               e.printStackTrace();
            }
         }
      }
   }
   class Thread3 implements Runnable {
      private String message;
      Thread3(String message) {
         this.message = message;
      }
      @Override
      public void run() {
         output.write(message);
         output.flush();
         runOnUiThread(new Runnable() {
            @Override
            public void run() {
               tvMessages.append("client: " + message + "
");
               etMessage.setText("");
            }
         });
      }
   }
}
步骤 4 - 将以下代码添加到 androidManifest.xml 中。
<?xml version = "1.0" encoding = "utf-8"?>
<manifest xmlns:android = "http://schemas.android.com/apk/res/android"
   package = "com.client.myapplication.client">
   <uses-permission android:name = "android.permission.INTERNET" />
   <uses-permission android:name = "android.permission.ACCESS_NETWORK_STATE" />
   <application
      android:allowBackup = "true"
      android:icon = "@mipmap/ic_launcher"
      android:label = "@string/app_name"
      android:roundIcon = "@mipmap/ic_launcher_round"
      android:supportsRtl = "true"
      android:theme = "@style/AppTheme">
      <activity
         android:name = "com.client.myapplication.client.MainActivity"
         android:label = "Client">
         <intent-filter>
            <action android:name = "android.intent.action.MAIN" />
            <category android:name = "android.intent.category.LAUNCHER" />
         </intent-filter>
      </activity>
   </application>
</manifest>
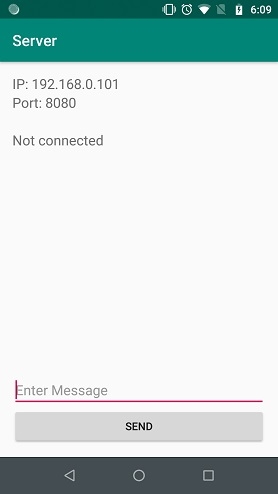
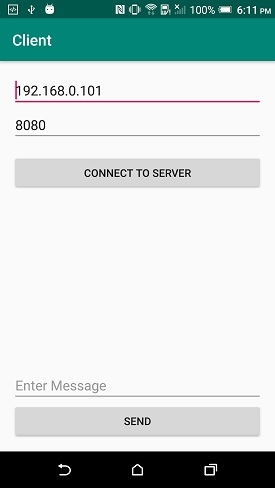
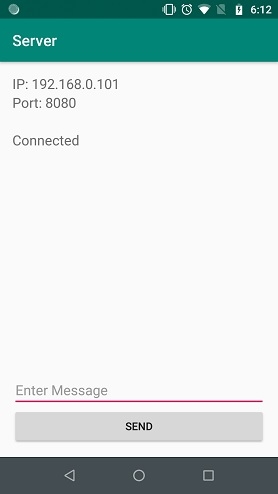
让我们尝试运行您的服务器和客户端应用程序。我假设您已将您的实际 Android 移动设备连接到您的计算机。要从 Android Studio 运行应用程序,请打开其中一个项目的活动文件,然后单击工具栏中的运行 ![]() 图标。选择您的移动设备作为选项,然后检查您的移动设备,它将显示您的默认屏幕 -
图标。选择您的移动设备作为选项,然后检查您的移动设备,它将显示您的默认屏幕 -
服务器:-

客户端:-

服务器:-

点击 此处 下载项目代码

广告

 数据结构
数据结构 网络
网络 关系数据库管理系统
 操作系统
操作系统 Java
Java iOS
iOS HTML
HTML CSS
CSS Android
 Python
 C 编程
C 编程 C++
C++ C#
C# MongoDB
 MySQL
MySQL Javascript
 PHP
PHP