JavaScript 实现 Prim 算法
Prim 算法是一种贪婪算法,用于寻找加权无向图的最小生成树。它找到边的子集,形成包含每个顶点的树,其中树中所有边的总权重最小。
该算法通过一次一个顶点地构建这棵树来运行,从一个任意的起始顶点开始,在每一步中添加从树到另一个顶点的最便宜的连接。
Prim 算法是如何工作的?
让我们来看一个 Prim 算法如何工作的示例:
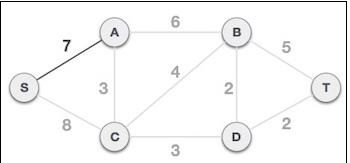
1. 选择任意节点作为根节点:在本例中,我们选择 S 节点作为 Prim 生成树的根节点。此节点是任意选择的,因此任何节点都可以是根节点。有人可能会问为什么任何视频都可以是根节点。答案是,在生成树中包含图的所有节点,并且由于它是连通的,因此必须至少有一条边将其连接到树的其余部分。
2. 检查输出边并选择成本较低的边:选择根节点 S 后,我们看到 S,A 和 S,C 是两条权重分别为 7 和 8 的边。我们选择边 S,A,因为它小于另一条边。

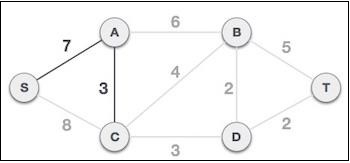
现在,树 S-7-A 被视为一个节点,我们检查所有从它出去的边。我们选择成本最低的边并将其包含在树中。

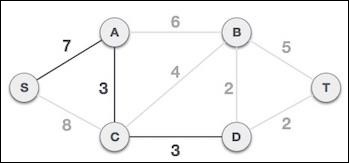
此步骤后,将形成 S-7-A-3-C 树。现在,我们将再次将其视为一个节点,并将再次检查所有边。但是,我们只选择成本最低的边。在本例中,C-3-D 是新的边,它小于其他边的成本 8、6、4 等。

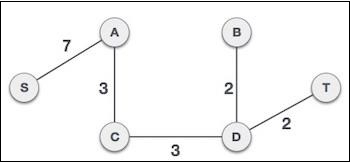
在将节点 **D** 添加到生成树后,我们现在有两条从它出去的边具有相同的成本,即 D-2-T 和 D-2-B。因此,我们可以添加任意一个。但是下一步将再次产生边 2 作为最低成本。因此,我们显示包含两条边的生成树。

现在让我们看看如何在代码中实现相同的算法:
示例
primsMST() {
   // Initialize graph that'll contain the MST
   const MST = new Graph();
   if (this.nodes.length === 0) {
      return MST;
   }


   // Select first node as starting node
   let s = this.nodes[0];


   // Create a Priority Queue and explored set
   let edgeQueue = new PriorityQueue(this.nodes.length * this.nodes.length);
   let explored = new Set();
   explored.add(s);
   MST.addNode(s);


   // Add all edges from this starting node to the PQ taking weights as priority
   this.edges[s].forEach(edge => {
      edgeQueue.enqueue([s, edge.node], edge.weight);
   });


   // Take the smallest edge and add that to the new graph
   let currentMinEdge = edgeQueue.dequeue();
   while (!edgeQueue.isEmpty()) {


      // COntinue removing edges till we get an edge with an unexplored node
      while (!edgeQueue.isEmpty() && explored.has(currentMinEdge.data[1])) {
         currentMinEdge = edgeQueue.dequeue();
      }
      let nextNode = currentMinEdge.data[1];


      // Check again as queue might get empty without giving back unexplored element
      if (!explored.has(nextNode)) {
         MST.addNode(nextNode);
         MST.addEdge(currentMinEdge.data[0], nextNode, currentMinEdge.priority);
         // Again add all edges to the PQ
         this.edges[nextNode].forEach(edge => {
            edgeQueue.enqueue([nextNode, edge.node], edge.weight);
         });


         // Mark this node as explored explored.add(nextNode);
         s = nextNode;
      }
   }
   return MST;
}
您可以使用以下方法进行测试
let g = new Graph();
g.addNode("A");
g.addNode("B");
g.addNode("C");
g.addNode("D");
g.addNode("E");
g.addNode("F");
g.addNode("G");


g.addEdge("A", "C", 100);
g.addEdge("A", "B", 3);
g.addEdge("A", "D", 4);
g.addEdge("C", "D", 3);
g.addEdge("D", "E", 8);
g.addEdge("E", "F", 10);
g.addEdge("B", "G", 9);
g.primsMST().display();
输出
这将给出以下输出:
A->B, D
B->A, G
D->A, C, E
C->D
E->D, F
G->B
F->E
请注意,我们的初始图是:
示例
/**
   *         A
   *       / | \
   *       C | B
   *       \ | |
   *         D G
   *         | /
   *         E
   *         |
   *         F
*/
输出
我们当前的图如下所示:
/**
   *         A
   *         |\
   *     C   | B
   *      \  | |
   *       D   G
   *       |
   *       E
   *       |
   *       F
   *
*/
我们已删除成本最高的边,现在有一个生成树。

广告

 数据结构
数据结构 网络
网络 关系数据库管理系统 (RDBMS)
 操作系统
操作系统 Java
Java iOS
iOS HTML
HTML CSS
CSS Android
 Python
 C语言编程
C语言编程 C++
C++ C#
C# MongoDB
 MySQL
MySQL JavaScript
 PHP
PHP