- Angular CLI 教程
- Angular CLI - 首页
- Angular CLI - 概述
- Angular CLI - 环境设置
- Angular CLI 命令
- Angular CLI - ng version
- Angular CLI - ng new
- Angular CLI - ng help
- Angular CLI - ng generate
- Angular CLI - ng build
- Angular CLI - ng run
- Angular CLI - ng serve
- Angular CLI - ng lint
- Angular CLI - ng test
- Angular CLI - ng e2e
- Angular CLI - ng add
- Angular CLI - ng analytics
- Angular CLI - ng config
- Angular CLI - ng doc
- Angular CLI - ng update
- Angular CLI - ng xi18n
- Angular CLI - 代码覆盖率
- Angular CLI 有用资源
- Angular CLI 快速指南
- Angular CLI - 有用资源
- Angular CLI - 讨论
Angular CLI 快速指南
Angular CLI - 概述
Angular 命令行界面 (CLI) 使启动任何 Angular 项目变得容易。它附带了一些命令,可以帮助我们快速创建和启动项目。现在让我们一起了解一下可用于创建项目、组件和服务、更改端口等的命令。
要使用 Angular CLI,我们需要在系统上安装它。让我们使用以下命令来完成此操作:
npm install -g @angular/cli
要创建一个新项目,我们可以在命令行中运行以下命令,项目将被创建。
ng new PROJECT-NAME
cd PROJECT-NAME
ng serve //
ng serve // 将编译项目,您可以在浏览器中看到项目的输出:
https://:4200/
4200 是创建新项目时使用的默认端口。您可以使用以下命令更改端口:
ng serve --host 0.0.0.0 --port 4201
Angular 4 命令
下表列出了一些在使用 Angular 4 项目时需要的一些重要命令。
| 序号 | 命令及描述 |
|---|---|
| 1 | 组件 ng g component new−component |
| 2 | 指令 ng g directive new−directive |
| 3 | 管道 ng g pipe new−pipe |
| 4 | 服务 ng g service new−service |
| 5 | 模块 ng g module my−module |
每当创建新的模块、组件或服务时,其引用都会在父模块 app.module.ts 中更新。
Angular CLI - 环境设置
要使用 Angular CLI,我们需要在系统上安装 Node。让我们详细了解 Angular CLI 所需的环境设置。
下载 Node.js 归档文件
从 Node.js 下载(位于 https://node.org.cn/download/)下载最新版本的 Node.js 可安装归档文件。在撰写本教程时,不同操作系统上可用的版本如下所示:
| 操作系统 | 归档文件名 |
|---|---|
| Windows | node-v6.3.1-x64.msi |
| Linux | node-v6.3.1-linux-x86.tar.gz |
| Mac | node-v6.3.1-darwin-x86.tar.gz |
| SunOS | node-v6.3.1-sunos-x86.tar.gz |
在 UNIX/Linux/Mac OS X 和 SunOS 上安装
根据您的操作系统架构,下载并解压缩归档文件 node-v6.3.1-osname.tar.gz 到 /tmp,然后最终将解压缩的文件移动到 /usr/local/nodejs 目录。
例如:
$ cd /tmp
$ wgethttps://node.org.cn/dist/v6.3.1/node-v6.3.1-linux-x64.tar.gz
$ tar xvfz node-v6.3.1-linux-x64.tar.gz
$ mkdir -p /usr/local/nodejs
$ mv node-v6.3.1-linux-x64/*/usr/local/nodejs
将 /usr/local/nodejs/bin 添加到 PATH 环境变量。
| 操作系统 | 输出 |
|---|---|
| Linux | export PATH=$PATH:/usr/local/nodejs/bin |
| Mac | export PATH=$PATH:/usr/local/nodejs/bin |
| FreeBSD | export PATH=$PATH:/usr/local/nodejs/bin |
在 Windows 上安装
使用 MSI 文件并按照提示安装 Node.js。默认情况下,安装程序在 C:\Program Files\nodejs 中使用 Node.js 分发版。
安装程序应在 Windows PATH 环境变量中设置 C:\ProgramFiles\nodejs\bin 目录。重新启动任何打开的命令提示符以使更改生效。
验证安装:执行文件
在您的机器(Windows 或 Linux)上创建一个名为 main.json 的 js 文件,其中包含以下代码:
/* Hello, World! program in node.js */
console.log("Hello, World!")
实时演示链接为 https://tutorialspoint.com/execute_nodejs_online.php。
现在,使用 Node.js 解释器执行 main.js 文件以查看结果:
$ node main.js
如果您的安装一切正常,这应该会产生以下结果:
Hello, World!
现在,Node 已安装。您可以运行以下命令来安装 Angular CLI。
npm install -g @angular/cli
验证安装
现在,运行以下命令以查看结果:
$ ng --version
如果您的安装一切正常,这应该会产生以下结果:
     _                      _                 ____ _     ___
    / \   _ __   __ _ _   _| | __ _ _ __     / ___| |   |_ _|
   / ? \ | '_ \ / _` | | | | |/ _` | '__|   | |   | |    | |
  / ___ \| | | | (_| | |_| | | (_| | |      | |___| |___ | |
 /_/   \_\_| |_|\__, |\__,_|_|\__,_|_|       \____|_____|___|
                |___/
Angular CLI: 9.1.0
Node: 12.16.1
OS: win32 x64
Angular:
...
Ivy Workspace:
Package                      Version
------------------------------------------------------
@angular-devkit/architect    0.901.0
@angular-devkit/core         9.1.0
@angular-devkit/schematics   9.1.0
@schematics/angular          9.1.0
@schematics/update           0.901.0
rxjs                         6.5.4
在 Windows 上,如果 ng 未被识别为内部或外部命令,请更新系统路径变量以包含以下路径。
C:\Users\<User Directory>\AppData\Roaming\npm
Angular CLI - ng version 命令
本章解释了 ng version 命令的语法、选项以及示例。
语法
ng version 命令的语法如下:
ng version [options]
ng v [options]
ng version 命令显示已安装的 Angular CLI 版本。
选项
选项是可选参数。
| 序号 | 选项及语法 | 描述 |
|---|---|---|
| 1 | --help=true|false|json|JSON | 在控制台中显示此命令的帮助消息。默认值:false |
示例
ng version 命令的示例如下:
\>Node ng version
     _                      _                 ____ _     ___
    / \   _ __   __ _ _   _| | __ _ _ __     / ___| |   |_ _|
   / ? \ | '_ \ / _` | | | | |/ _` | '__|   | |   | |    | |
  / ___ \| | | | (_| | |_| | | (_| | |      | |___| |___ | |
 /_/   \_\_| |_|\__, |\__,_|_|\__,_|_|       \____|_____|___|
                |___/
Angular CLI: 9.1.0
Node: 12.16.1
OS: win32 x64
Angular:
...
Ivy Workspace:
Package                      Version
------------------------------------------------------
@angular-devkit/architect    0.901.0
@angular-devkit/core         9.1.0
@angular-devkit/schematics   9.1.0
@schematics/angular          9.1.0
@schematics/update           0.901.0
rxjs                         6.5.4
Angular CLI - ng new 命令
本章解释了 ng new 命令的语法、参数和选项以及示例。
语法
ng new 命令的语法如下:
ng new <name> [options]
ng n <name> [options]
ng new 命令创建一个具有给定名称的工作区,并包含一个默认的 Angular 应用程序。
它提供交互式提示来设置可选配置。所有提示都具有默认值可供选择。
参数
ng new 命令的参数如下:
| 序号 | 参数及语法 | 描述 |
|---|---|---|
| 1 | <name> | 新工作区和初始项目的名称。 |
选项
选项是可选参数。
| 序号 | 选项及语法 | 描述 |
|---|---|---|
| 1 | --collection=collection | 用于生成初始应用程序的架构集合。 别名:-c。 |
| 2 | --commit=true|false | 初始 git 存储库提交信息。 默认值:true。 |
| 3 | --createApplication=true|false | 如果为 true(默认值),则在新工作区的 src 文件夹中创建一个新的初始应用程序项目。如果为 false,则创建一个没有初始应用程序的空工作区。然后,您可以使用生成应用程序命令,以便所有应用程序都在 projects 文件夹中创建。 默认值:true。 |
| 4 | -defaults=true|false | 如果为 true,则禁用具有默认值的选项的交互式输入提示。 |
| 5 | --directory=directory | 要在其中创建工作区的目录名称。 |
| 6 | --dryRun=true|false | 如果为 true,则运行并报告活动,而不写入结果。 默认值:false。 别名:-d。 |
| 7 | --force=true|false | 如果为 true,则强制覆盖现有文件。 默认值:false。 别名:-f。 |
| 8 | --help=true|false|json|JSON | 在控制台中显示此命令的帮助消息。 默认值:false。 |
| 9 | --inlineStyle=true|false | 如果为 true,则在组件 TS 文件中内联包含样式。默认情况下,会创建一个外部样式文件并在组件 TS 文件中引用它。 默认值:false。 |
| 10 | --inlineStyle=true|false | 如果为 true,则在组件 TS 文件中内联包含样式。默认情况下,会创建一个外部样式文件并在组件 TS 文件中引用它。 默认值:false。 别名:-t。 |
| 11 | --interactive=true|false | 如果为 true,则创建一个没有任何测试框架的项目。(仅用于学习目的。) 默认值:false。 |
| 12 | --newProjectRoot=newProjectRoot | 相对于新工作区根目录,将在其中创建新项目的路径。 默认值:projects。 |
| 13 | --packageManager=npm|yarn|pnpm|cnpm | 用于安装依赖项的包管理器。 |
| 14 | --prefix=prefix | 应用于初始项目的生成选择器的前缀。 默认值:app。 别名:-p。 |
| 15 | --prefix=prefix | 应用于初始项目的生成选择器的前缀。 默认值:app。 别名:-p。 |
| 16 | --routing=true|false | 如果为 true,则为初始项目生成一个路由模块。 |
| 17 | --skipGit=true|false | 如果为 true,则不会初始化 git 存储库。 默认值:false。 别名:-g。 |
| 18 | --skipInstall=true|false | 如果为 true,则不会安装依赖项包。 默认值:false。 |
| 19 | --skipTests=true|false | 如果为 true,则不会为新项目生成“spec.ts”测试文件。 默认值:false。 别名:-S。 |
| 20 | --strict=true|false | 创建一个具有更严格 TypeScript 编译器选项的工作区。 默认值:false。 |
| 21 | --style=css|scss|sass|less|styl | 用于样式文件的扩展名或预处理器。 |
| 22 | --verbose=true|false | 如果为 true,则向输出日志添加更多详细信息。 默认值:false。 别名:-v。 |
| 23 | -- viewEncapsulation=Emulated|Native|None|ShadowDom | 在初始项目中使用的视图封装策略。 |
示例
ng new 命令的示例如下:
\>Node ng new TutorialsPoint
? Would you like to add Angular routing? Yes
? Which stylesheet format would you like to use? CSS
CREATE TutorialsPoint/angular.json (3630 bytes)
CREATE TutorialsPoint/package.json (1291 bytes)
CREATE TutorialsPoint/README.md (1031 bytes)
CREATE TutorialsPoint/tsconfig.json (489 bytes)
CREATE TutorialsPoint/tslint.json (3125 bytes)
CREATE TutorialsPoint/.editorconfig (274 bytes)
CREATE TutorialsPoint/.gitignore (631 bytes)
CREATE TutorialsPoint/browserslist (429 bytes)
CREATE TutorialsPoint/karma.conf.js (1026 bytes)
CREATE TutorialsPoint/tsconfig.app.json (210 bytes)
CREATE TutorialsPoint/tsconfig.spec.json (270 bytes)
CREATE TutorialsPoint/src/favicon.ico (948 bytes)
CREATE TutorialsPoint/src/index.html (300 bytes)
CREATE TutorialsPoint/src/main.ts (372 bytes)
CREATE TutorialsPoint/src/polyfills.ts (2835 bytes)
CREATE TutorialsPoint/src/styles.css (80 bytes)
CREATE TutorialsPoint/src/test.ts (753 bytes)
CREATE TutorialsPoint/src/assets/.gitkeep (0 bytes)
CREATE TutorialsPoint/src/environments/environment.prod.ts (51 bytes)
CREATE TutorialsPoint/src/environments/environment.ts (662 bytes)
CREATE TutorialsPoint/src/app/app-routing.module.ts (246 bytes)
CREATE TutorialsPoint/src/app/app.module.ts (393 bytes)
CREATE TutorialsPoint/src/app/app.component.html (25755 bytes)
CREATE TutorialsPoint/src/app/app.component.spec.ts (1083 bytes)
CREATE TutorialsPoint/src/app/app.component.ts (218 bytes)
CREATE TutorialsPoint/src/app/app.component.css (0 bytes)
CREATE TutorialsPoint/e2e/protractor.conf.js (808 bytes)
CREATE TutorialsPoint/e2e/tsconfig.json (214 bytes)
CREATE TutorialsPoint/e2e/src/app.e2e-spec.ts (647 bytes)
CREATE TutorialsPoint/e2e/src/app.po.ts (301 bytes)
Packages installed successfully.
在这里,ng new 命令在我们的 Node 目录中创建了一个 Angular 工作区和一个名为 TutorialsPoint 的项目。
Angular CLI - ng help 命令
本章解释了 ng help 命令的语法和选项以及示例。
语法
ng help 命令的示例如下:
ng help [options]
ng help 命令列出可用的命令及其简短描述。
选项
选项是可选参数。
| 序号 | 选项及语法 | 描述 |
|---|---|---|
| 1 | --help= true|false|json|JSON | 在控制台中显示此命令的帮助消息。默认值:false |
示例 1
ng help 命令的示例如下:
\>Node ng help
Available Commands:
   add Adds support for an external library to your project.
   analytics Configures the gathering of Angular CLI usage metrics. See
https://v
8.angular.io/cli/usage-analytics-gathering.
   build (b) Compiles an Angular app into an output directory named dist/ at the
given output path. Must be executed from within a workspace directory.
   deploy Invokes the deploy builder for a specified project or for the default
project in the workspace.
   config Retrieves or sets Angular configuration values in the angular.json
file
   for the workspace.
      doc (d) Opens the official Angular documentation (angular.io) in a browser,
an
d searches for a given keyword.
   e2e (e) Builds and serves an Angular app, then runs end-to-end tests using
Pro
tractor.
   generate (g) Generates and/or modifies files based on a schematic.
   help Lists available commands and their short descriptions.
   lint (l) Runs linting tools on Angular app code in a given project folder.
   new (n) Creates a new workspace and an initial Angular app.
   run Runs an Architect target with an optional custom builder configuration
defined in your project.
   serve (s) Builds and serves your app, rebuilding on file changes.
   test (t) Runs unit tests in a project.
   update Updates your application and its dependencies. See
https://update.angular.io/
   version (v) Outputs Angular CLI version.
   xi18n (i18n-extract) Extracts i18n messages from source code.
For more detailed help run "ng [command name] --help"
对于单个命令,请使用 --help 或 -h 选项与命令一起使用。首先移动到使用 ng new 命令创建的 Angular 项目,然后运行命令。解释 ng new 命令的章节可在 https://tutorialspoint.com/angular_cli/angular_cli_ng_new.htm 找到。
示例 2
示例如下:
\>Node\>TutorialsPoint> ng serve --help
Builds and serves your app, rebuilding on file changes.
usage: ng serve <project> [options]
arguments:
   project
      The name of the project to build. Can be an application or a library.
options:
   --allowed-hosts
      Whitelist of hosts that are allowed to access the dev server.
   --aot
      Build using Ahead of Time compilation.
   --base-href
      Base url for the application being built.
   --browser-target
      Target to serve.
   --build-event-log
      **EXPERIMENTAL** Output file path for Build Event Protocol events
   --common-chunk
      Use a separate bundle containing code used across multiple bundles.
   --configuration (-c)
      A named build target, as specified in the "configurations" section of angular.json.
   Each named target is accompanied by a configuration of option defaults for t hat target.
   Setting this explicitly overrides the "--prod" flag
   --deploy-url
      URL where files will be deployed.
   --disable-host-check
      Don't verify connected clients are part of allowed hosts.
   --eval-source-map
      Output in-file eval sourcemaps.
   --help
      Shows a help message for this command in the console.
   --hmr
      Enable hot module replacement.
   --hmr-warning
      Show a warning when the --hmr option is enabled.
   --host
      Host to listen on.
   --live-reload
      Whether to reload the page on change, using live-reload.
   --open (-o)
      Opens the url in default browser.
   --optimization
      Enables optimization of the build output.
   --poll
      Enable and define the file watching poll time period in milliseconds.
   --port
      Port to listen on.
   --prod
      Shorthand for "--configuration=production".
      When true, sets the build configuration to the production target.
      By default, the production target is set up in the workspace
configuration such that all builds make use of bundling, limited tree-shaking, and also
limited
   dead code elimination.
   --progress
      Log progress to the console while building.
   --proxy-config
      Proxy configuration file.
   --public-host
      The URL that the browser client (or live-reload client, if enabled)
should u
see to connect to the development server. Use for a complex dev server setup,
such as one with reverse proxies.
   --serve-path
      The pathname where the app will be served.
   --serve-path-default-warning
      Show a warning when deploy-url/base-href use unsupported serve path
values.
   --source-map
      Output sourcemaps.
   --ssl
      Serve using HTTPS.
   --ssl-cert
      SSL certificate to use for serving HTTPS.
   --ssl-key
      SSL key to use for serving HTTPS.
   --vendor-chunk
      Use a separate bundle containing only vendor libraries.
   --vendor-source-map
      Resolve vendor packages sourcemaps.
   --verbose
      Adds more details to output logging.
   --watch
      Rebuild on change.
Angular CLI - ng generate 命令
本章解释了 ng generate 命令的语法、参数和选项以及示例。
语法
ng generate 命令的语法如下:
ng generate <schematic> [options]
ng g <schematic> [options]
ng generate 命令根据架构生成和/或修改文件。
参数
ng help 命令的参数如下:
| 序号 | 参数及语法 | 描述 |
|---|---|---|
| 1 | <schematic> | 要生成的架构或 collection:schematic。此选项可以采用以下子命令之一
|
选项
选项是可选参数。
| 序号 | 选项及语法 | 描述 |
|---|---|---|
| 1 | --defaults=true|false | 如果为 true,则禁用具有默认值的选项的交互式输入提示。 |
| 2 | --dryRun=true|false | 如果为 true,则运行并报告活动,而不写入结果。 默认值:false。 别名:-d。 |
| 3 | --force=true|false | 如果为 true,则强制覆盖现有文件。 默认值:false。 别名:-f。 |
| 4 | --help=true|false|json|JSON | 在控制台中显示帮助消息。 默认值:false。 |
| 5 | --interactive=true|false | 如果为 false,则禁用交互式输入提示。 |
首先移动到使用 ng new 命令创建的 Angular 项目,然后运行命令。此章节可在 https://tutorialspoint.com/angular_cli/angular_cli_ng_new.htm 找到。
示例
ng generate 命令的示例如下:
\>Node\>TutorialsPoint> ng generate component goals
CREATE src/app/goals/goals.component.html (20 bytes)
CREATE src/app/goals/goals.component.spec.ts (621 bytes)
CREATE src/app/goals/goals.component.ts (271 bytes)
CREATE src/app/goals/goals.component.css (0 bytes)
UPDATE src/app/app.module.ts (471 bytes)
在这里,ng generate 命令在我们的 TutorialsPoint 项目中创建了一个新组件,并在 app.module.ts 中添加了此新组件条目。
Angular CLI - ng build 命令
本章解释了 ng build 命令的语法、参数和选项以及示例。
语法
ng build 命令的语法如下:
ng build <project> [options]
ng b <project> [options]
ng build 命令将 Angular 应用程序/库编译到指定路径的 dist 目录中。
参数
ng build 命令的参数如下:
| 序号 | 参数及语法 | 描述 |
|---|---|---|
| 1 | <project> | 要构建的应用程序或库的名称。 |
选项
选项是可选参数。
| 序号 | 选项及语法 | 描述 |
|---|---|---|
| 1 | --aot=true|false |
使用提前编译构建。 默认值:false。 |
| 2 | --baseHref=baseHref | 正在构建的应用程序的基本 URL。 |
| 3 | --buildEventLog=buildEventLog | 实验性构建事件协议事件的输出文件路径。 |
| 4 | --buildOptimizer=true|false | 在使用“aot”选项时启用“@angular-devkit/build-optimizer”优化。 默认值:false。 |
| 5 | --commonChunk=true|false |
使用一个单独的包来包含跨多个包使用的代码。 默认值:false。 |
| 6 | --configuration=configuration | 一个命名的构建目标,如 angular.json 的“configurations”部分中指定。每个命名目标都伴随着该目标的选项默认配置。显式设置此项会覆盖“--prod”标志。 别名:-c。 |
| 7 | --crossOrigin=none|anonymous|use-credentials |
定义提供 CORS 支持的元素的 crossorigin 属性设置。 默认值:none。 |
| 8 | --deleteOutputPath=true|false |
在构建之前删除输出路径。 默认值:true。 |
| 9 | --deployUrl=deployUrl | 文件将部署到的 URL。 |
| 10 | --experimentalRollupPass=true|false |
在使用 Webpack 将模块捆绑在一起之前,使用 Rollup 将它们连接起来。 默认值:false。 |
| 11 | --extractCss=true|false |
将全局样式中的 CSS 提取到 CSS 文件中,而不是 JS 文件中。 默认值:false。 |
| 12 | --extractLicenses=true|false |
将所有许可证提取到一个单独的文件中。 默认值:false。 |
| 13 | --forkTypeChecker=true|false |
在 fork 进程中运行 TypeScript 类型检查器。 默认值:true。 |
| 14 | --help=true|false|json|JSON |
在控制台中显示此命令的帮助消息。 默认值:false。 |
| 15 | --i18nMissingTranslation=warning|error|ignore |
如何处理 i18n 的缺失翻译。 默认值:warning。 |
| 16 | --index=index | 配置应用程序 HTML index 的生成。 |
| 17 | --localize=true|false | |
| 18 | --main=main | 应用程序主入口点的完整路径,相对于当前工作区。 |
| 19 | --namedChunks=true|false |
使用文件名作为延迟加载的块名称。 默认值:true。 |
| 20 | --ngswConfigPath=ngswConfigPath | ngsw-config.json 文件的路径。 |
| 21 | --optimization=true|false | 启用构建输出的优化。 |
| 22 | --outputHashing=none|all|media|bundles |
定义输出文件名缓存清除哈希模式。 默认值:none。 |
| 23 | --outputPath=outputPath | 新输出目录的完整路径,相对于当前工作区。默认情况下,将输出写入当前项目中名为 dist/ 的文件夹中。 |
| 24 | --poll | 启用并定义文件监视轮询时间段(以毫秒为单位)。 |
| 25 | --polyfills=polyfills | polyfills 文件的完整路径,相对于当前工作区。 |
| 26 | --preserveSymlinks=true|false |
在解析模块时不使用真实路径。 默认值:false。 |
| 27 | --prod=true|false | “--configuration=production”的简写。如果为 true,则将构建配置设置为生产目标。默认情况下,生产目标在工作区配置中设置,以便所有构建都使用捆绑、有限的 tree-shaking 以及有限的死代码消除。 |
| 28 | --progress=true|false |
在构建过程中将进度日志输出到控制台。 默认值:true。 |
| 27 | --resourcesOutputPath=resourcesOutputPath | 样式资源将放置到的路径,相对于 outputPath。 |
| 28 | --serviceWorker=true|false |
为生产构建生成 Service Worker 配置。 默认值:false。 |
| 29 | --showCircularDependencies=true|false |
显示构建过程中的循环依赖警告。 默认值:true。 |
| 30 | --sourceMap=true|false |
输出 Source Map。 默认值:true。 |
| 31 | --statsJson=true|false |
生成一个“stats.json”文件,可以使用“webpack-bundle-analyzer”等工具对其进行分析。 默认值:false。 |
| 32 | --subresourceIntegrity=true|false |
启用子资源完整性验证。 默认值:false。 |
| 33 | --tsConfig=tsConfig | TypeScript 配置文件的完整路径,相对于当前工作区。 |
| 34 | --vendorChunk=true|false |
使用一个单独的包,其中仅包含供应商库。 默认值:true。 |
| 35 | --verbose=true|false |
向输出日志添加更多详细信息。 默认值:true。 |
| 36 | --watch=true|false |
文件更改时运行构建。 默认值:false。 |
| 37 | --webWorkerTsConfig=webWorkerTsConfig | Web Worker 模块的 TypeScript 配置。 |
首先,移动到使用ng generate命令更新的 Angular 项目。将 app.component.html 的内容替换为以下内容,然后运行该命令。本章可在https://tutorialspoint.com/angular_cli/angular_cli_ng_generate.htm.找到。
<app-goals></app-goals>
<router-outlet></router-outlet>
示例
下面给出了 ng build 命令的一个示例:
\>Node\>TutorialsPoint> ng build
Compiling @angular/animations : es2015 as esm2015
Compiling @angular/core : es2015 as esm2015
Compiling @angular/compiler/testing : es2015 as esm2015
Compiling @angular/animations/browser : es2015 as esm2015
Compiling @angular/core/testing : es2015 as esm2015
Compiling @angular/common : es2015 as esm2015
Compiling @angular/platform-browser : es2015 as esm2015
Compiling @angular/common/http : es2015 as esm2015
Compiling @angular/common/testing : es2015 as esm2015
Compiling @angular/platform-browser-dynamic : es2015 as esm2015
Compiling @angular/platform-browser/testing : es2015 as esm2015
Compiling @angular/router : es2015 as esm2015
Compiling @angular/animations/browser/testing : es2015 as esm2015
Compiling @angular/common/http/testing : es2015 as esm2015
Compiling @angular/forms : es2015 as esm2015
Compiling @angular/platform-browser/animations : es2015 as esm2015
Compiling @angular/platform-browser-dynamic/testing : es2015 as esm2015
Compiling @angular/router/testing : es2015 as esm2015
Generating ES5 bundles for differential loading...
ES5 bundle generation complete.
chunk {polyfills} polyfills-es2015.js, polyfills-es2015.js.map (polyfills) 141 kB [initial] [rendered]
chunk {runtime} runtime-es2015.js, runtime-es2015.js.map (runtime) 6.16 kB [entry] [rendered]
chunk {runtime} runtime-es5.js, runtime-es5.js.map (runtime) 6.16 kB [entry] [rendered]
chunk {styles} styles-es2015.js, styles-es2015.js.map (styles) 12.4 kB [initial] [rendered]
chunk {styles} styles-es5.js, styles-es5.js.map (styles) 13.9 kB [initial] [rendered]
chunk {main} main-es2015.js, main-es2015.js.map (main) 61.4 kB [initial] [rendered]
chunk {main} main-es5.js, main-es5.js.map (main) 65 kB [initial] [rendered]
chunk {polyfills-es5} polyfills-es5.js, polyfills-es5.js.map (polyfills-es5) 656 kB [initial] [rendered]
chunk {vendor} vendor-es2015.js, vendor-es2015.js.map (vendor) 2.67 MB [initial] [rendered]
chunk {vendor} vendor-es5.js, vendor-es5.js.map (vendor) 3.11 MB [initial] [rendered]
Date: 2020-06-04T01:31:35.612Z - Hash: d5fd9371cdc40ae353bc - Time: 210494ms
这里 ng build 命令已成功构建了我们的项目 TutorialsPoint。
Angular CLI - ng run 命令
本章解释了 ng run 命令的语法、参数和选项,并提供了一个示例。
语法
ng run 命令的语法如下:
ng run project:target[:configuration]
ng run 命令运行一个 Architect 目标,并可以选择在项目中的 angular.json 中定义自定义构建器配置。这里 project 是在 angular.json 中定义的应用程序的名称。
参数
ng run 命令的参数如下:
| 序号 | 参数及语法 | 描述 |
|---|---|---|
| 1 | <target> | 要运行的 Architect 目标。 |
选项
选项是可选参数。
| 序号 | 选项及语法 | 描述 |
|---|---|---|
| 1 | --configuration=configuration |
在 angular.json 的“configurations”部分中定义的命名构建器配置。构建器使用命名配置来运行给定的目标。 别名:-c。 |
| 2 | --help=true|false|json|JSON | 在控制台中显示此命令的帮助消息。 默认值:false。 |
首先移动到使用ng generate命令更新的 Angular 项目,然后运行该命令。本章可在https://tutorialspoint.com/angular_cli/angular_cli_ng_generate.htm.找到。
示例
下面给出了 ng run 命令的一个示例:
\>Node\>TutorialsPoint> ng run TutorialsPoint:build
Generating ES5 bundles for differential loading...
ES5 bundle generation complete.
chunk {polyfills} polyfills-es2015.js, polyfills-es2015.js.map (polyfills) 141 kB [initial] [rendered]
chunk {polyfills-es5} polyfills-es5.js, polyfills-es5.js.map (polyfills-es5) 656 kB [initial] [rendered]
chunk {main} main-es2015.js, main-es2015.js.map (main) 12.9 kB [initial] [rendered]
chunk {main} main-es5.js, main-es5.js.map (main) 15.1 kB [initial] [rendered]
chunk {runtime} runtime-es2015.js, runtime-es2015.js.map (runtime) 6.16 kB [entry] [rendered]
chunk {runtime} runtime-es5.js, runtime-es5.js.map (runtime) 6.16 kB [entry] [rendered]
chunk {styles} styles-es2015.js, styles-es2015.js.map (styles) 12.4 kB [initial] [rendered]
chunk {styles} styles-es5.js, styles-es5.js.map (styles) 13.9 kB [initial] [rendered]
chunk {vendor} vendor-es2015.js, vendor-es2015.js.map (vendor) 2.66 MB [initial] [rendered]
chunk {vendor} vendor-es5.js, vendor-es5.js.map (vendor) 3.11 MB [initial] [rendered]
Date: 2020-06-04T02:31:28.919Z - Hash: dd73885c28e550d01341 - Time: 13742ms
这里 ng build 命令已成功构建了我们的项目 TutorialsPoint。
Angular CLI - ng serve 命令
本章解释了 ng serve 命令的语法、参数和选项,并提供了一个示例。
语法
ng serve 命令的语法如下:
ng serve <project> [options]
ng s <project> [options]
ng serve 命令构建并启动应用程序。如果发生更改,它会重新构建应用程序。这里 project 是在 angular.json 中定义的应用程序的名称。
参数
ng serve 命令的参数如下:
| 序号 | 参数及语法 | 描述 |
|---|---|---|
| 1 | <project> | 要构建的项目的名称。可以是应用程序或库。 |
选项
选项是可选参数。
| 序号 | 选项及语法 | 描述 |
|---|---|---|
| 1 | --allowedHosts | 允许访问开发服务器的主机白名单。 |
| 2 | --aot=true|false | 使用提前编译构建。 |
| 3 | --baseHref=baseHref | 正在构建的应用程序的基本 URL。 |
| 4 | --buildEventLog=buildEventLog | 实验性:构建事件协议事件的输出文件路径 |
| 5 | --commonChunk=true|false | 使用一个单独的包来包含跨多个包使用的代码。 |
| 6 | --configuration=configuration |
一个命名的构建目标,如 angular.json 的“configurations”部分中指定。每个命名目标都伴随着该目标的选项默认配置。显式设置此项会覆盖“--prod”标志。 别名:-c |
| 7 | --deployUrl=deployUrl | 文件将部署到的 URL。 |
| 8 | --disableHostCheck=true|false |
不验证连接的客户端是否属于允许的主机。 默认值:false |
| 9 | --help=true|false|json|JSON |
在控制台中显示此命令的帮助消息。 默认值:false |
| 10 | --hmr=true|false | 启用热模块替换。 默认值:false |
| 11 | --hmrWarning=true|false |
启用 --hmr 选项时显示警告。 默认值:true |
| 12 | --host=host |
要监听的主机。 默认值:localhost |
| 13 | --liveReload=true|false |
是否在更改时使用实时重新加载重新加载页面。 默认值:true |
| 14 | --open=true|false |
在默认浏览器中打开 URL。 默认值:false 别名:-o |
| 15 | --optimization=true|false | 启用构建输出的优化。 |
| 16 | --poll | 启用并定义文件监视轮询时间段(以毫秒为单位)。 |
| 17 | --port |
要监听的端口。 默认值:4200 |
| 18 | --prod=true|false | “--configuration=production”的简写。如果为 true,则将构建配置设置为生产目标。默认情况下,生产目标在工作区配置中设置,以便所有构建都使用捆绑、有限的 tree-shaking 以及有限的死代码消除。 |
| 19 | --progress=true|false | 在构建过程中将进度日志输出到控制台。 |
| 20 | --proxyConfig=proxyConfig | 代理配置文件。 |
| 21 | --publicHost=publicHost | 浏览器客户端(或如果启用则为实时重新加载客户端)应用来连接到开发服务器的 URL。用于复杂的开发服务器设置,例如具有反向代理的设置。 |
| 22 | --servePath=servePath | 提供应用程序的路径名。 |
| 23 | --servePathDefaultWarning=true|false |
当 deploy-url/base-href 使用不受支持的 serve path 值时显示警告。 默认值:true |
| 24 | --sourceMap=true|false | 输出 Source Map。 |
| 25 | --ssl=true|false |
使用 HTTPS 提供服务。 默认值:false |
| 26 | --sslCert=sslCert | 用于提供 HTTPS 的 SSL 证书。 |
| 27 | --sslKey=sslKey | 用于提供 HTTPS 的 SSL 密钥。 |
| 28 | --vendorChunk=true|false | 使用一个单独的包,其中仅包含供应商库。 |
| 29 | --verbose=true|false | 向输出日志添加更多详细信息。 |
| 30 | --watch=true|false | 更改时重新构建。 默认值:true |
首先移动到使用ng build命令更新的 Angular 项目,然后运行该命令。本章可在https://tutorialspoint.com/angular_cli/angular_cli_ng_build.htm.找到。
示例
下面给出了 ng serve 命令的一个示例:
\>Node\>TutorialsPoint> ng serve
chunk {main} main.js, main.js.map (main) 14.3 kB [initial] [rendered]
chunk {polyfills} polyfills.js, polyfills.js.map (polyfills) 141 kB [initial] [rendered]
chunk {runtime} runtime.js, runtime.js.map (runtime) 6.15 kB [entry] [rendered]
chunk {styles} styles.js, styles.js.map (styles) 12.4 kB [initial] [rendered]
chunk {vendor} vendor.js, vendor.js.map (vendor) 3 MB [initial] [rendered]
Date: 2020-06-04T04:01:47.562Z - Hash: a90c5fc750c475cdc4d1 - Time: 10164ms
** Angular Live Development Server is listening on localhost:4200, open your browser on https://:4200/ **
: Compiled successfully.
这里 ng serve 命令已成功构建并启动了我们的项目 TutorialsPoint。现在在浏览器窗口中打开 https://:4200 并验证输出。

Angular CLI - ng lint 命令
本章解释了 ng lint 命令的语法、参数和选项,并提供了一个示例。
语法
ng lint 命令的语法如下:
ng lint <project> [options]
ng l <project> [options]
ng lint 在 Angular 应用程序代码上运行 lint 工具。它检查指定 Angular 项目的代码质量。它使用 TSLint 作为默认的 lint 工具,并使用 tslint.json 文件中提供的默认配置。
参数
ng lint 命令的参数如下:
| 序号 | 参数及语法 | 描述 |
|---|---|---|
| 1 | <project> | 要 lint 的项目的名称。 |
选项
选项是可选参数。
| 序号 | 选项及语法 | 描述 |
|---|---|---|
| 1 | --configuration=configuration |
要使用的 lint 配置。 别名:-c |
| 2 | --exclude | 要从 lint 中排除的文件。 |
| 3 | --files | 要包含在 lint 中的文件。 |
| 4 | --fix=true|false | 修复 lint 错误(可能会覆盖 lint 文件)。 默认值:false |
| 5 | --force=true|false |
即使有 lint 错误也成功。 默认值:false |
| 6 | --format=format |
输出格式(prose、json、stylish、verbose、pmd、msbuild、checkstyle、vso、fileslist)。 默认值:prose |
| 7 | --help=true|false|json|JSON |
在控制台中显示此命令的帮助消息。 默认值:false |
| 8 | --silent=true|false | 显示输出文本。 默认值:false |
| 9 | --tsConfig=tsConfig | TypeScript 配置文件的名称。 |
| 10 | --tslintConfig=tslintConfig | TSLint 配置文件的名称。 |
| 11 | --typeCheck=true|false |
控制 lint 的类型检查。 默认值:false |
首先移动到使用ng build命令更新的 Angular 项目。该章节可在https://tutorialspoint.com/angular_cli/angular_cli_ng_build.htm.找到。
按如下方式更新 goals.component.html 和 goals.component.ts:
goals.component.ts
import { Component, OnInit } from '@angular/core';
@Component({
   selector: 'app-goals',
   templateUrl: './goals.component.html',
   styleUrls: ['./goals.component.css']
})
export class GoalsComponent implements OnInit {
   title = 'Goal Component'
   constructor() { }
   ngOnInit(): void {
   }
}
goals.component.html
<p>{{title}}</p>
现在运行 lint 命令。
示例
下面给出了 ng lint 命令的一个示例:
\>Node\>TutorialsPoint> ng lint
Linting "TutorialsPoint"...
ERROR: D:/Node/TutorialsPoint/src/app/goals/goals.component.ts:9:27 - Missing semicolon
ERROR: D:/Node/TutorialsPoint/src/app/goals/goals.component.ts:13:2 - file should end with a newline
Lint errors found in the listed files.
这里 ng lint 命令已检查了应用程序的代码质量并打印了 lint 状态。
现在更正 goals.component.ts 中的错误。
goals.component.ts
import { Component, OnInit } from '@angular/core';
@Component({
   selector: 'app-goals',
   templateUrl: './goals.component.html',
   styleUrls: ['./goals.component.css']
})
export class GoalsComponent implements OnInit {
   title = 'Goal Component';
   constructor() { }
   ngOnInit(): void {
   }
}
现在运行 lint 命令。
示例
下面给出了一个示例:
\>Node\>TutorialsPoint> ng lint
Linting "TutorialsPoint"...
All files pass linting.
Angular CLI - ng test 命令
本章解释了 ng test 命令的语法、参数和选项,并提供了一个示例。
语法
ng test 命令的语法如下:
ng test <project> [options]
ng t <project> [options]
ng test 在 Angular 应用程序代码上运行单元测试用例。
参数
ng test 命令的参数如下:
| 序号 | 参数及语法 | 描述 |
|---|---|---|
| 1 | <project> | 要测试的项目的名称。 |
选项
选项是可选参数。
| 序号 | 选项及语法 | 描述 |
|---|---|---|
| 1 | --browsers=browsers | 覆盖测试针对哪些浏览器运行。 |
| 2 | --codeCoverage=true|false |
输出代码覆盖率报告。 默认值:false |
| 3 | --codeCoverageExclude | 要从代码覆盖率中排除的 glob。 |
| 4 | --configuration=configuration |
在 angular.json 的“configurations”部分中指定的命名构建目标。每个命名目标都附带该目标的选项默认值配置。显式设置此项会覆盖“--prod”标志 别名:-c |
| 5 | --help=true|false|json|JSON |
在控制台中显示此命令的帮助消息。 默认值:false |
| 6 | --include | 要包含的文件的 glob,相对于工作区或项目根目录。有两种特殊情况:
|
| 7 | --karmaConfig=karmaConfig | Karma 配置文件的名称。 |
| 8 | --main=main | 主入口点文件的名称。 |
| 9 | --poll | 启用并定义文件监视轮询时间段(以毫秒为单位)。 |
| 10 | --polyfills=polyfills | polyfills 文件的名称。 |
| 11 | --preserveSymlinks=true|false |
在解析模块时不使用真实路径。 默认值:false |
| 12 | --prod=true|false | “--configuration=production”的简写。如果为 true,则将构建配置设置为生产目标。默认情况下,生产目标在工作区配置中设置,以便所有构建都使用捆绑、有限的 tree-shaking 以及有限的死代码消除。 |
| 13 | --progress=true|false | 在构建过程中将进度日志输出到控制台。 |
| 13 | --progress=true|false | 在构建过程中将进度日志输出到控制台。 |
| 14 | --reporters | 要使用的 Karma 报告程序。直接传递给 karma 运行程序。 |
| 15 | --sourceMap=true|false |
输出 Source Map。 默认值:true |
| 16 | --tsConfig=tsConfig | TypeScript 配置文件的名称。 |
| 17 | --watch=true|false | 文件更改时运行构建。 |
| 18 | --webWorkerTsConfig=webWorkerTsConfig | Web Worker 模块的 TypeScript 配置。 |
首先移动到使用ng build命令更新的 Angular 项目。本章的链接为https://tutorialspoint.com/angular_cli/angular_cli_ng_build.htm.
现在运行测试命令。
示例
下面给出了 ng test 命令的一个示例:
\>Node\>TutorialsPoint> ng test
...
WARN: ''app-goals' is not a known element:
1. If 'app-goals' is an Angular component, then verify that it is part of this module.
2. If 'app-goals' is a Web Component then add 'CUSTOM_ELEMENTS_SCHEMA' to the '@NgModule.schemas' of this component to suppress this message.'
Chrome 83.0.4103 (Windows 7.0.0): Executed 0 of 4 SUCCESS (0 secs / 0 secs)
...
AppComponent should render title FAILED
   TypeError: Cannot read property 'textContent' of null
      at <Jasmine>
      at UserContext.<anonymous> (https://:9876/_karma_webpack_/src/app/app.component.spec.ts:33:51)
            ...
Chrome 83.0.4103 (Windows 7.0.0): Executed 1 of 4 (1 FAILED) (0 secs / 0.203 secs)
...
Chrome 83.0.4103 (Windows 7.0.0): Executed 2 of 4 (1 FAILED) (0 secs / 0.221 secs)
...
Chrome 83.0.4103 (Windows 7.0.0): Executed 4 of 4 (1 FAILED) (0 secs / 0.244 sec
Chrome 83.0.4103 (Windows 7.0.0): Executed 4 of 4 (1 FAILED) (0.282 secs / 0.244
 secs)
TOTAL: 1 FAILED, 3 SUCCESS
现在要修复失败,请更新 app.component.spec.ts
app.component.spec.ts
import { TestBed, async } from '@angular/core/testing';
import { RouterTestingModule } from '@angular/router/testing';
import { AppComponent } from './app.component';
describe('AppComponent', () => {
   beforeEach(async(() => {
      TestBed.configureTestingModule({
         imports: [
            RouterTestingModule
         ],
         declarations: [
            AppComponent
         ],
      }).compileComponents();
   }));
   it('should create the app', () => {
      const fixture = TestBed.createComponent(AppComponent);
      const app = fixture.componentInstance;
      expect(app).toBeTruthy();
   });
});
现在运行测试命令。
示例
示例如下:
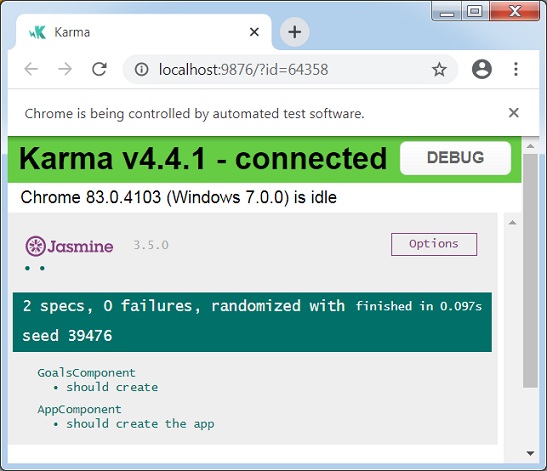
\>Node\>TutorialsPoint> ng test
...
WARN: ''app-goals' is not a known element:
1. If 'app-goals' is an Angular component, then verify that it is part of this m
odule.
2. If 'app-goals' is a Web Component then add 'CUSTOM_ELEMENTS_SCHEMA' to the '@
NgModule.schemas' of this component to suppress this message.'
Chrome 83.0.4103 (Windows 7.0.0): Executed 1 of 2 SUCCESS (0 secs / 0.053 secs)
...
Chrome 83.0.4103 (Windows 7.0.0): Executed 2 of 2 SUCCESS (0.097 secs / 0.073 se
cs)
TOTAL: 2 SUCCESS
ng test 还会打开浏览器并显示测试状态。
Angular CLI - ng e2e 命令
本章解释了 ng e2e 命令的语法、参数和选项,并提供了一个示例。这里,e2e 指的是端到端。
语法
ng e2e 命令的语法如下:
ng e2e <project> [options]
ng e <project> [options]
ng e2e 构建、启动应用程序,然后使用 protractor 运行端到端测试用例。选项是可选参数。
参数
ng e2e 命令的参数如下:
| 序号 | 参数及语法 | 描述 |
|---|---|---|
| 1 | <project> | 要测试的项目的名称。 |
选项
选项是可选参数。
| 序号 | 选项及语法 | 描述 |
|---|---|---|
| 1 | --baseUrl=baseUrl | protractor 连接到的基本 URL。 |
| 2 | --configuration=configuration |
在 angular.json 的“configurations”部分中指定的命名构建目标。每个命名目标都附带该目标的选项默认值配置。显式设置此项会覆盖“--prod”标志 别名:-c |
| 3 | --devServerTarget=devServerTarget | 要针对其运行测试的开发服务器目标。 |
| 4 | --grep=grep | 执行名称与模式匹配的规范,该模式在内部编译为 RegExp。 |
| 5 | --help=true|false|json|JSON |
在控制台中显示此命令的帮助消息。 默认值:false |
| 6 | --host=host | 要监听的主机。 |
| 7 | --invertGrep=true|false |
反转“grep”选项指定的选项。 默认值:false |
| 8 | --port | 要用来启动应用程序的端口。 |
| 9 | --prod=true|false | “--configuration=production”的简写。如果为 true,则将构建配置设置为生产目标。默认情况下,生产目标在工作区配置中设置,以便所有构建都使用捆绑、有限的 tree-shaking 以及有限的死代码消除。 |
| 10 | --protractorConfig=protractorConfig | Protractor 配置文件的名称。 |
| 11 | --specs | 覆盖 protractor 配置中的规范。 |
| 12 | --suite=suite | 覆盖 protractor 配置中的套件。 |
| 13 | --webdriverUpdate=true|false |
尝试更新 webdriver。 默认值:true |
首先移动到使用ng build命令更新的 Angular 项目。该章节可在https://tutorialspoint.com/angular_cli/angular_cli_ng_build.htm.找到。
现在运行 e2e 命令。
示例
下面给出了 ng e2e 命令的一个示例:
\>Node\>TutorialsPoint> ng e2e
...
chunk {main} main.js, main.js.map (main) 14.3 kB [initial] [rendered]
chunk {polyfills} polyfills.js, polyfills.js.map (polyfills) 141 kB [initial] [rendered]
chunk {runtime} runtime.js, runtime.js.map (runtime) 6.15 kB [entry] [rendered]
chunk {styles} styles.js, styles.js.map (styles) 12.4 kB [initial] [rendered]
chunk {vendor} vendor.js, vendor.js.map (vendor) 3 MB [initial] [rendered]
Date: 2020-06-06T04:20:15.029Z - Hash: 16f321e3d4599af26622 - Time: 20899ms
** Angular Live Development Server is listening on localhost:4200, open your bro
wser on https://:4200/ **
: Compiled successfully.
...
   workspace-project App
    x should display welcome message
      - Failed: No element found using locator: By(css selector, app-root .content span)
   ...
      From: Task: Run it("should display welcome message") in control flow
   ...
**************************************************
*                    Failures                    *
**************************************************
1) workspace-project App should display welcome message
  - Failed: No element found using locator: By(css selector, app-root .content span)
Executed 1 of 1 spec (1 FAILED) in 2 secs.
现在要修复失败,请更新 app.component.html
app.component.html
<div class="content" role="main">
   <span>{{ title }} app is running!</span>
</div>
<app-goals></app-goals>
<router-outlet></router-outlet>
现在运行 e2e 命令。
示例
下面给出了 ng e2e 命令的一个示例:
\>Node\>TutorialsPoint> ng e2e
...
chunk {main} main.js, main.js.map (main) 14.9 kB [initial] [rendered]
chunk {polyfills} polyfills.js, polyfills.js.map (polyfills) 141 kB [initial] [rendered]
chunk {runtime} runtime.js, runtime.js.map (runtime) 6.15 kB [entry] [rendered]
chunk {styles} styles.js, styles.js.map (styles) 12.4 kB [initial] [rendered]
chunk {vendor} vendor.js, vendor.js.map (vendor) 3 MB [initial] [rendered]
Date: 2020-06-06T04:28:33.514Z - Hash: 5d8bf2fc7ff59fa390b0 - Time: 10529ms
** Angular Live Development Server is listening on localhost:4200, open your browser on https://:4200/ **
: Compiled successfully.
...
   workspace-project App
      √ should display welcome message
Executed 1 of 1 spec SUCCESS in 2 secs.
ng e2e 还会打开浏览器并使用它通过 UI 运行验收测试用例。
Angular CLI - ng add 命令
本章解释了 ng add 命令的语法、参数和选项,并提供了一个示例。
语法
ng add 命令的语法如下:
ng add <collection> [options]
ng add 将 npm 包添加到工作区。
参数
ng add 命令的参数如下:
| 序号 | 参数及语法 | 描述 |
|---|---|---|
| 1 | <collection> | 要添加的包的名称。 |
选项
选项是可选参数。
| 序号 | 选项及语法 | 描述 |
|---|---|---|
| 1 | --defaults=true|false | 如果为 true,则禁用具有默认值的选项的交互式输入提示。 |
| 2 | --help=true|false|json|JSON |
在控制台中显示此命令的帮助消息。 默认值:false |
| 3 | --registry=registry | 要使用的 NPM 注册表。 |
| 4 | --verbose=true|false | 在执行期间显示有关内部操作的更多详细信息。 默认值:false |
首先转到使用ng build命令更新的 Angular 项目,该项目可在https://tutorialspoint.com/angular_cli/angular_cli_ng_build.htm.找到。
现在运行添加命令。
示例
下面给出了 ng add 命令的示例:
\>Node\>TutorialsPoint> ng add @angular/pwa
Installing packages for tooling via npm.
Installed packages for tooling via npm.
CREATE ngsw-config.json (620 bytes)
CREATE src/manifest.webmanifest (1352 bytes)
CREATE src/assets/icons/icon-128x128.png (1253 bytes)
CREATE src/assets/icons/icon-144x144.png (1394 bytes)
CREATE src/assets/icons/icon-152x152.png (1427 bytes)
CREATE src/assets/icons/icon-192x192.png (1790 bytes)
CREATE src/assets/icons/icon-384x384.png (3557 bytes)
CREATE src/assets/icons/icon-512x512.png (5008 bytes)
CREATE src/assets/icons/icon-72x72.png (792 bytes)
CREATE src/assets/icons/icon-96x96.png (958 bytes)
UPDATE angular.json (3803 bytes)
UPDATE package.json (1332 bytes)
UPDATE src/app/app.module.ts (682 bytes)
UPDATE src/index.html (482 bytes)
√ Packages installed successfully.
Angular CLI - ng analytics 命令
本章解释了 ng analytics 命令的语法、参数和选项,并提供了一个示例。
语法
ng analytics 命令的语法如下:
ng analytics <settingOrProject> <projectSetting> [options]
ng analytics 命令配置 Angular CLI 使用情况指标。
参数
ng analytics 命令的参数如下:
| 序号 | 参数及语法 | 描述 |
|---|---|---|
| 1 | <settingOrProject>=on|off|ci|project|prompt | 直接启用或禁用用户的全部使用情况分析,或提示用户以交互方式设置状态,或设置项目的默认状态。以下是选项的详细信息。
|
| 2 | <projectSetting>=on|off|prompt | 设置项目的默认分析启用状态。 |
选项
选项是可选参数。
| 序号 | 选项及语法 | 描述 |
|---|---|---|
| 1 | --help=true|false|json|JSON |
在控制台中显示此命令的帮助消息。 默认值:false |
首先转到使用ng build命令更新的 Angular 项目,该项目可在https://tutorialspoint.com/angular_cli/angular_cli_ng_build.htm.找到。
现在运行 analytics 命令。
示例
下面给出了 ng analytics 命令的示例:
\>Node\>TutorialsPoint> ng analytics off
Angular CLI - ng config 命令
本章解释了 ng config 命令的语法、参数和选项,并提供了一个示例。
语法
ng config 命令的语法如下:
ng config <jsonPath> <value> [options]
ng config 命令检索或设置 angular.json 中的 Angular 配置值。
参数
ng config 命令的参数如下:
| 序号 | 参数及语法 | 描述 |
|---|---|---|
| 1 | <jsonPath> | 要设置或查询的配置键,采用 JSON 路径格式。例如:"a[3].foo.bar[2]"。如果未提供新值,则返回此键的当前值。 |
| 2 | <value> | 如果提供,则为给定配置键的新值。 |
选项
选项是可选参数。
| 序号 | 选项及语法 | 描述 |
|---|---|---|
| 1 | --global=true|false |
如果为 true,则访问调用者主目录中的全局配置。 默认值:false 别名:-g |
| 2 | --help=true|false|json|JSON |
在控制台中显示此命令的帮助消息。 默认值:false |
首先转到使用ng build命令更新的 Angular 项目。本章可在https://tutorialspoint.com/angular_cli/angular_cli_ng_build.htm.找到。
现在运行 config 命令。
示例
下面给出了 ng config 命令的示例:
\>Node\>TutorialsPoint> ng config projects.TutorialsPoint.projectType
application
Angular CLI - ng doc 命令
本章解释了 ng doc 命令的语法、参数和选项,并提供了一个示例。
语法
ng doc 命令的语法如下:
ng doc <keyword> [options]
ng d <keyword> [options]
ng doc 命令在浏览器中打开官方 Angular 文档,并搜索给定的关键字。选项是可选参数。
参数
ng doc 命令的参数如下:
| 序号 | 参数及语法 | 描述 |
|---|---|---|
| 1 | <keyword> | 要搜索的关键字,如 angular.io 中搜索栏中提供的那样。 |
选项
选项是可选参数。
| 序号 | 选项及语法 | 描述 |
|---|---|---|
| 1 | --help=true|false|json|JSON | 在控制台中显示此命令的帮助消息。 默认值:false |
首先转到使用ng build命令更新的 Angular 项目。本章可在https://tutorialspoint.com/angular_cli/angular_cli_ng_build.htm.找到。
现在运行 doc 命令。
示例
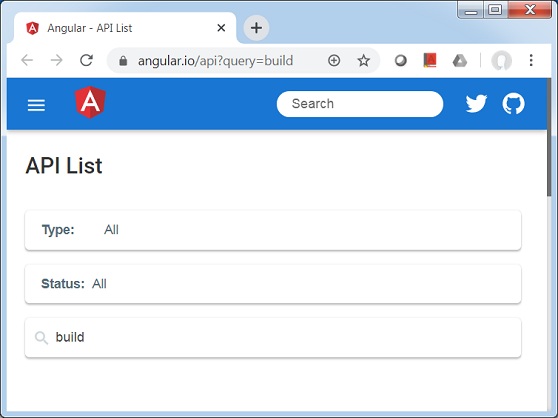
下面给出了 ng doc 命令的示例:
\>Node\>TutorialsPoint> ng doc build
现在将打开一个浏览器窗口并搜索相关的关键字。
Angular CLI - ng update 命令
本章解释了 ng update 命令的语法、参数和选项,并提供了一个示例。
语法
ng update 命令的语法如下:
ng update [options]
ng update 命令更新应用程序及其依赖项。
参数
ng update 命令的参数如下:
| 序号 | 参数及语法 | 描述 |
|---|---|---|
| 1 | <keyword> | 要搜索的关键字,如 angular.io 中搜索栏中提供的那样。 |
选项
选项是可选参数。
| 序号 | 选项及语法 | 描述 |
|---|---|---|
| 1 | --all=true|false | 是否更新 package.json 中的所有包。 默认值:false |
| 2 | --allowDirty=true|false | 存储库中包含修改或未跟踪的文件时是否允许更新。 |
| 3 | --createCommits=true|false |
为更新和迁移创建源代码管理提交。 默认值:false 别名:-C |
| 4 | --force=true|false |
如果为 false,则如果已安装的包与更新不兼容,则会出错。 默认值:false |
| 5 | --from=from | 要从中迁移的版本。仅在更新单个包时可用,并且仅在仅迁移时可用。 |
| 6 | --help=true|false|json|JSON |
在控制台中显示此命令的帮助消息。 默认值:false |
| 7 | --migrateOnly=true|false | 仅执行迁移,不更新已安装的版本。 |
| 8 | --next=true|false |
使用最大版本,包括 beta 版和 RC 版。 默认值:false |
| 9 | --packages | 要更新的包的名称。 |
| 10 | --to=to | 应用迁移的版本。仅在更新单个包时可用,并且仅在迁移时可用。需要指定 from。默认为检测到的已安装版本。 |
| 11 | --verbose=true|false |
在执行期间显示有关内部操作的更多详细信息。 默认值:false |
首先转到使用 ng build 命令更新的 Angular 项目。本章可在https://tutorialspoint.com/angular_cli/angular_cli_ng_build.htm.找到。
现在运行 update 命令。现在 ng 将使用 npm 更新依赖项。
示例
下面给出了 ng update 命令的示例:
\>Node\>TutorialsPoint> ng update
Using package manager: 'npm'
Collecting installed dependencies...
Found 31 dependencies.
   We analyzed your package.json and everything seems to be in order. Good work!
Angular CLI - ng xi18n 命令
本章解释了 ng xi18n 命令的语法、参数和选项,并提供了一个示例。
语法
ng xi18n 命令的语法如下:
ng xi18n <project> [options]
ng i18n-extract <project> [options]
ng xi18n 命令从源代码中提取 i18n 消息。
参数
ng xi18n 命令的参数如下:
| 序号 | 参数及语法 | 描述 |
|---|---|---|
| 1 | <project> | 项目的名称。它可以是应用程序或库。 |
选项
选项是可选参数。
| 序号 | 选项及语法 | 描述 |
|---|---|---|
| 1 | --browserTarget=browserTarget | 要从中提取的目标。 |
| 2 | --configuration=configuration | 一个命名的构建目标,如 angular.json 的“configurations”部分中指定。每个命名目标都伴随着该目标的选项默认配置。显式设置此项会覆盖“--prod”标志。 别名:-c |
| 3 | --createCommits=true|false |
为更新和迁移创建源代码管理提交。 默认值:false 别名:-C |
| 4 | --format=xmb|xlf|xlif|xliff|xlf2|xliff2 |
生成文件的输出格式。 默认值:xlf |
| 5 | --help=true|false|json|JSON |
在控制台中显示此命令的帮助消息。 默认值:false |
| 6 | --outFile=outFile | 要输出的文件名。 |
| 7 | --outputPath=outputPath | 输出将放置到的路径。 |
| 8 | --prod=true|false | “--configuration=production”的简写。如果为 true,则将构建配置设置为生产目标。默认情况下,生产目标在工作区配置中设置,以便所有构建都使用捆绑、有限的 tree-shaking 以及有限的死代码消除。 |
| 9 | --progress=true|false |
将进度记录到控制台。 默认值:true |
首先转到使用ng build命令更新的 Angular 项目。本章可在https://tutorialspoint.com/angular_cli/angular_cli_ng_build.htm.找到。
将 app.component.html 更新如下:
app.component.spec.ts
<div class="content" role="main">
   <span i18n>app is running!</span>
</div>
<app-goals></app-goals>
<router-outlet></router-outlet>
现在运行 xi18n 命令。
示例
下面给出了 ng xi18n 命令的示例:
\>Node\>TutorialsPoint> ng xi18n
添加本地化支持。
\>Node\>TutorialsPoint> ng add @angular/localize
Installing packages for tooling via npm.
Installed packages for tooling via npm.
UPDATE src/polyfills.ts (3064 bytes)
现在 ng 将在根文件夹中创建一个 messages.xlf 文件,这是一个行业标准的翻译文件。
messages.xlf
<?xml version="1.0" encoding="UTF-8" ?>
<xliff version="1.2" xmlns="urn:oasis:names:tc:xliff:document:1.2">
   <file source-language="en-US" datatype="plaintext" original="ng2.template">
      <body>
         <trans-unit id="6226cbeebaffaec0342459915ef7d9b0e9e92977" datatype="html">
            <source>app is running!</source>
            <context-group purpose="location">
               <context context-type="sourcefile">src/app/app.component.html</context>
               <context context-type="linenumber">2</context>
            </context-group>
         </trans-unit>
      </body>
   </file>
</xliff>
Angular CLI - 代码覆盖率
本章解释了代码覆盖率命令的语法,并提供了一个示例。
语法
代码覆盖率命令的语法如下:
ng test <project> --codeCoverage=true
ng test 命令允许使用编写的测试用例检查代码覆盖率。请参见下面的示例。
转到使用ng xi18n命令更新的 Angular 项目。本章可在https://tutorialspoint.com/angular_cli/angular_cli_ng_xi18n.htm.找到。现在,使用 codeCoverage 命令运行测试。
示例
下面给出了 ng 代码覆盖率命令的示例:
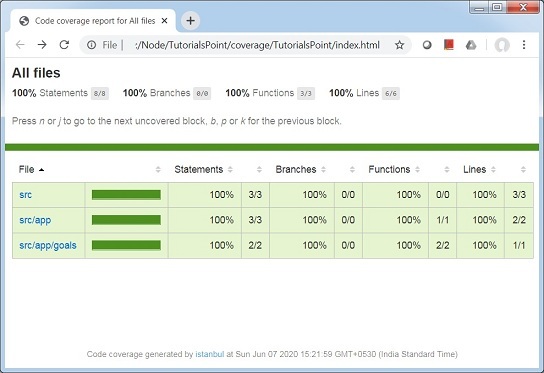
\>Node\>TutorialsPoint> ng test --codeCoverage=true
10% building 2/2 modules 0 active07 06 2020 15:21:46.292:WARN [karma]: No captur
ed browser, open https://:9876/
07 06 2020 15:21:46.299:INFO [karma-server]: Karma v4.4.1 server started at http
://0.0.0.0:9876/
07 06 2020 15:21:46.300:INFO [launcher]: Launching browsers Chrome with concurre
ncy unlimited
07 06 2020 15:21:46.312:INFO [launcher]: Starting browser Chrome
07 06 2020 15:21:55.456:WARN [karma]: No captured browser, open https://
:9876/
07 06 2020 15:21:55.533:INFO [Chrome 83.0.4103 (Windows 7.0.0)]: Connected on so
cket gJgRaX_rXI6ZqoAiAAAA with id 261512
...
Chrome 83.0.4103 (Windows 7.0.0): Executed 1 of 2 SUCCESS (0 secs / 0.053 secs)
...
Chrome 83.0.4103 (Windows 7.0.0): Executed 2 of 2 SUCCESS (0.107 secs / 0.082 se
cs)
TOTAL: 2 SUCCESS
=============================== Coverage summary ===============================
Statements   : 100% ( 8/8 )
Branches     : 100% ( 0/0 )
Functions    : 100% ( 3/3 )
Lines        : 100% ( 6/6 )
================================================================================
现在 ng test 命令已在 TutorialsPoint(项目文件夹)中创建了一个 coverage 文件夹,并已以 html 格式生成了覆盖率报告,该报告位于>Node>TutorialsPoint>coverage>TutorialsPoint>index.html。