Apache CXF - 快速指南
Apache CXF - 简介
在当今的环境下,您可以使用多种选项创建 Web 服务应用程序。您可以使用一个或多个标准且广泛接受的通信协议。例如 SOAP、XML/HTTP、RESTful HTTP 和 CORBA(公共对象请求代理体系结构,在过去非常流行,但现在使用频率不高)。
您还可以选择不同的传输方式,例如 HTTP、JMS、JBI 以及前端 API 的选择,如 JAX-RS 和 JAX-WS。由于 Web 服务开发有如此多的选择,因此需要一个开源服务框架来将上述所有选项粘合在一起,而 Apache CXF 正是为此而生。
在本教程中,您将学习如何使用 CXF 创建 Web 服务和使用该服务的客户端,并使用我们上面列出的一个或多个选项。本教程将引导您完成服务器和客户端的整个代码开发过程。由于每个应用程序只能使用每个类别中的一个选项,即前端、传输和协议,考虑到这三个选项的所有排列和组合,应用程序的数量将非常高。
本教程详细讨论了以下项目的开发 -
使用普通旧 Apache CXF 对象 (POJO) 的 CXF
CXF 与 JAX-WS
CXF 与 WSDL
CXF 与 JAX-RS
CXF 与 JMS
为了简单起见,我们使用了 Maven 及其命令行界面。您可以使用您喜欢的 IDE 创建 Maven 项目。
在下一章中,让我们开始第一个项目。
Apache CXF 与 POJO
在本章中,您将学习如何开发一个简单的 Web 应用程序,该应用程序向用户发送问候消息。Web 服务项目使用 WSDL 模型。CXF 允许您通过提供一个简单的前端将 Apache CXF API 映射到底层 WSDL 来隐藏此 WSDL 模型。
在这个最简单的项目中,Web 服务的接口将直接暴露给客户端,客户端将使用本地 Apache CXF API 调用 Web 服务。
首先,我们将创建一个 Web 服务。每个服务都有一个暴露给客户端的接口。我们可以将此接口编写为简单的 Apache CXF 接口或 WSDL 文档。在这种 Apache CXF 优先方法中,我们将通过 Apache CXF 接口公开我们的服务。
开发 Web 服务
我们将在 Web 上创建的服务将有一个名为 greetings 的单个 Web 方法。该方法采用 string 类型参数,我们将在其中发送用户的姓名。服务将向调用者发送一条问候消息,其中包含接收到的用户名。
Web 服务接口
为了公开我们 Web 服务的接口,我们将创建一个 Apache CXF 接口,如下所示 -
//HelloWorld.java
package com.tutorialspoint.cxf.pojo;
public interface HelloWorld {
   String greetings(String text);
}
该接口只有一个名为 greetings 的方法。服务器将实现此接口。在我们简单的应用程序中,此接口直接暴露给客户端。通常,在 Web 服务应用程序中,您使用 WSDL 来描述 Web 服务接口。在这个简单的应用程序中,我们将向客户端开发人员提供此直接接口。然后,客户端将在服务器对象上调用 greetings 消息。所以首先让我们创建 Web 服务。
Web 服务实现
HelloWorld 接口在 HelloWorldImpl Apache CXF 类中实现,如下所示 -
//HelloWorldImpl.java
package com.tutorialspoint.cxf.pojo;
public class HelloWorldImpl implements HelloWorld {
   @Override
   public String greetings(String text) {
      return "Hi " + text;
   }
}
greetings 方法接收 string 类型参数,将其附加到问候消息中,并将结果字符串返回给调用者。
接下来,我们编写服务器应用程序来托管 HelloWorld 服务。
创建服务器
服务器应用程序包含两个部分 -
第一部分为我们的 Web 服务创建一个工厂,以及
第二部分编写一个 main 方法来实例化它。
服务器使用 CXF 库提供的 ServerFactoryBean 类将我们的 HelloWorld 接口暴露给远程客户端。因此,我们首先实例化 ServerFactoryBean 类,然后设置其各种属性 -
ServerFactoryBean factory = new ServerFactoryBean();
我们通过在 factory 对象上调用 setServiceClass 方法来设置要调用的服务类 -
factory.setServiceClass(HelloWorld.class);
我们通过调用工厂的 setAddress 方法来设置调用我们服务的 URL。请注意,服务将在此 URL 上发布。
factory.setAddress("https://:5000/Hello");
在这种情况下,服务部署在嵌入式服务器上,并将侦听端口 5000。您可以选择任何您选择的端口号。
在创建工厂之前,您需要告诉工厂我们的服务实现类。这是通过在 factory 对象上调用 setServiceBean 方法来完成的,如下所示 -
factory.setServiceBean(new HelloWorldImpl());
服务 Bean 设置为我们服务实现类的实例。最后,我们通过调用其 create 方法来创建工厂 -
factory.create();
现在,由于我们已经开发了运行 Web 服务的工厂,接下来我们将编写一个 main 方法来实例化它并使其运行一段时间。
现在,编写一个 main 方法来实例化 HelloServer 类,如下所示 -
public static void main(String[] args) throws Exception {
   new HelloServer();
   System.out.println("Listening on port 5000 ...");
}
一旦实例化,HelloServer 类将无限期地运行。对于生产部署,您肯定会让服务器永远运行。在当前情况下,我们将按照以下方式在预定的时间后终止服务器 -
Thread.sleep(5 * 60 * 1000);
System.out.println("Server exiting ...");
System.exit(0);
HelloServer 类的完整代码如下所示 -
//HelloServer.java
//HelloServer.java
package com.tutorialspoint.cxf.pojo;
import org.apache.cxf.frontend.ServerFactoryBean;
public class HelloServer {
   protected HelloServer() throws Exception {
      ServerFactoryBean factory = new ServerFactoryBean();
      factory.setServiceClass(HelloWorld.class);
      factory.setAddress("https://:5000/Hello");
      factory.setServiceBean(new HelloWorldImpl());
      factory.create();
   }
   public static void main(String[] args) throws Exception {
      new HelloServer();
      System.out.println("Listening on port 5000 ...");
      Thread.sleep(5 * 60 * 1000);
      System.out.println("Server exiting ...");
      System.exit(0);
   }
}
我们创建的服务器应用程序使用 CXF 库中的 ServerFactoryBean 类。我们现在必须将这些库包含在我们的项目中才能成功编译 HelloServer 类。我们将使用 Maven 来设置项目依赖项。
设置 Maven 项目
要创建 Maven 项目,请在命令行窗口中键入以下命令。请注意,我们已在 Mac 机器上对此进行了测试。对于 Windows 和 Linux 安装,说明可能在某些地方有所不同。
mvn archetype:generate
当提示输入属性时,输入以下值 -
Define value for property 'groupId': : com.tutorialspoint
Define value for property 'artifactId': : cxf-pojo
Define value for property 'version': 1.0-SNAPSHOT: : 1.0
Define value for property 'package': com.tutorialspoint: : com.tutorialspoint.cxf.pojo
Maven 命令完成后,您将在当前文件夹中找到创建的相应文件夹结构以及 pom.xml 文件。
生成的目录结构如下所示 -
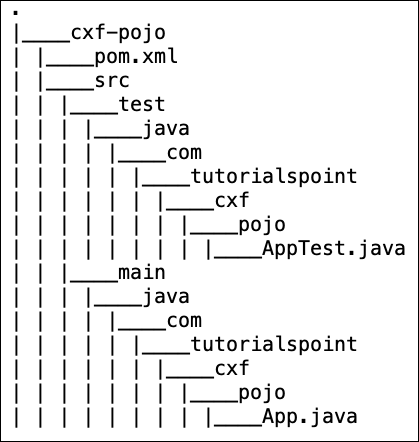
您将在 pom.xml 中添加 CXF 依赖项,并将上述创建的 Apache CXF 文件复制到 Maven 创建的结构的相应文件夹中。为了方便您参考,我们提供了在我们机器上创建的项目的 pom.xml 文件。
<?xml version = "1.0" encoding = "UTF-8"?>
<project xmlns = "http://maven.apache.org/POM/4.0.0" xmlns:xsi = "http://www.w3.org/2001/XMLSchema-instance" xsi:schemaLocation = "http://maven.apache.org/POM/4.0.0 http://maven.apache.org/xsd/maven-4.0.0.xsd">
   <modelVersion>4.0.0</modelVersion>
   <groupId>com.tutorialspoint</groupId>
   <artifactId>cxf-pojo</artifactId>
   <version>1.0</version>
   <packaging>jar</packaging>

   <profiles>
      <profile>
         <id>server</id>
         <build>
            <defaultGoal>test</defaultGoal>
            <plugins>
               <plugin>
                  <groupId>org.codehaus.mojo</groupId>
                  <artifactId>exec-maven-plugin</artifactId>
                  <executions>
                     <execution>
                        <phase>test</phase>
                        <goals>
                           <goal>java</goal>
                        </goals>
                        <configuration>
                           <mainClass>
                              com.tutorialspoint.cxf.pojo.HelloServer
                           </mainClass>
                        </configuration>
                     </execution>
                  </executions>
               </plugin>
            </plugins>
         </build>
      </profile>

      <profile>
         <id>client</id>
         <build>
            <defaultGoal>test</defaultGoal>
            <plugins>
               <plugin>
                  <groupId>org.codehaus.mojo</groupId>
                  <artifactId>exec-maven-plugin</artifactId>
                  <executions>
                     <execution>
                        <phase>test</phase>
                        <goals>
                           <goal>java</goal>
                        </goals>
                        <configuration>
                           <mainClass>
                           com.tutorialspoint.cxf.pojo.HelloClient
                           </mainClass>
                        </configuration>
                     </execution>
                  </executions>
               </plugin>
            </plugins>
         </build>
      </profile>
   </profiles>

   <dependencies>
      <dependency>
         <groupId>org.apache.cxf</groupId>
         <artifactId>cxf-rt-features-logging</artifactId>
         <version>3.3.0</version>
         <type>jar</type>
      </dependency>
      <dependency>
         <groupId>org.apache.cxf</groupId>
         <artifactId>cxf-rt-frontend-simple</artifactId>
         <version>3.3.0</version>
         <type>jar</type>
      </dependency>
      <dependency>
         <groupId>org.apache.cxf</groupId>
         <artifactId>cxf-rt-transports-http</artifactId>
         <version>3.3.0</version>
      </dependency>
      <dependency>
         <groupId>org.apache.cxf</groupId>
         <artifactId>cxf-rt-frontend-jaxws</artifactId>
         <version>3.3.0</version>
      </dependency>
      <!-- Jetty is needed if you're using the CXFServlet -->
      <dependency>
         <groupId>org.apache.cxf</groupId>
         <artifactId>cxf-rt-transports-http-jetty</artifactId>
         <version>3.3.0</version>
      </dependency>
   </dependencies>
   <properties>
      <project.build.sourceEncoding>UTF-8</project.build.sourceEncoding>
      <maven.compiler.source>1.8</maven.compiler.source>
      <maven.compiler.target>1.8</maven.compiler.target>
   </properties>
</project>
上面的 pom.xml 可能包含与此项目无关的其他依赖项,但我们的本教程中的下一个项目需要这些依赖项。无论如何,包含其他依赖项本身并无害处。
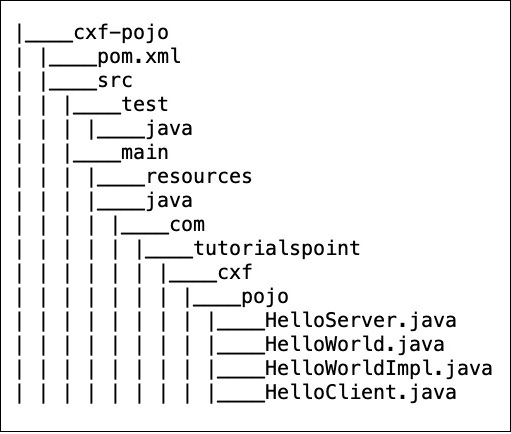
项目文件夹结构
放置服务器和客户端 Apache CXF 文件后,我机器上的项目文件夹结构如下所示,供您快速参考 -
运行服务器
要构建项目,请在命令行窗口中使用以下命令 -
mvn clean install
您可以使用以下命令启动服务器 -
mvn -Pserver
这将启动服务器,您将在控制台上看到以下提示 -
INFO: Creating Service {http://pojo.cxf.tutorialspoint.com/}HelloWorld from class com.tutorialspoint.cxf.pojo.HelloWorld
INFO: Setting the server's publish address to be https://:5000/Hello
Listening on port 5000 ...
现在,在您的浏览器窗口中指定我们发布服务的 URL。您将看到以下输出 -
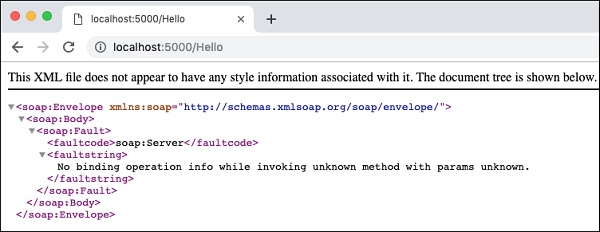
这确认我们的服务正在 localhost 上的指定端口上运行。由于我们在调用中未指定 greetings 消息,因此会将 SOAP 错误消息返回到浏览器。
您可以使用您选择的 SOAP 客户端进一步测试您的 Web 服务。在这里,我们使用了 Postman 来测试我们的服务器。
输出如下所示 -
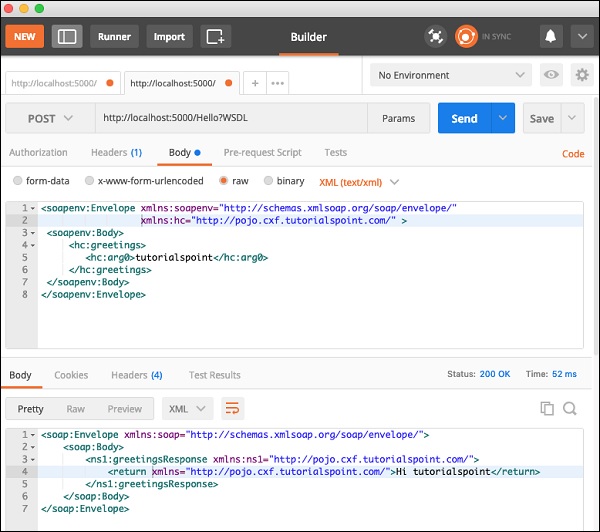
请注意,SOAP 请求是手动编码的。发布请求后,服务器发送了 SOAP 响应消息,这在屏幕截图的底部部分可见。
由此,您可以了解到 CXF 在为您提供对当今世界存在的各种 Web 技术的统一视图的同时,保持使用 SOAP 协议进行请求和响应。这大大简化了 Web 应用程序开发。
我们的下一个任务是创建一个客户端,该客户端将使用您创建的 Web 服务。
创建客户端
在服务器应用程序中,HelloWorld 是公开我们 Web 服务的接口。Web 服务本身只是向客户端提供简单的问候消息。通常,Web 服务接口使用 WSDL(Web 服务描述语言)暴露给外部世界。在这个简单的应用程序中,我们将通过直接公开服务接口,即 HelloWorld.class,来向客户端公开我们的 Web 服务。
为此,CXF 提供了一个名为 ClientProxyFactoryBean 的工厂类,该类允许我们将所需的接口附加到创建的工厂实例。
首先,我们创建一个工厂 Bean 实例,如下所示 -
ClientProxyFactoryBean factory = new ClientProxyFactoryBean();
我们调用工厂 Bean 实例上的 setAddress 方法来设置可以调用我们 Web 服务的 URL。在我们的例子中,我们将使用我们在前面步骤中创建服务器时使用的 URL -
factory.setAddress("https://:5000/Hello");
接下来,我们调用 factory 实例上的 create 方法将其附加到我们的服务接口 HelloWorld.class。
HelloWorld helloServer = factory.create(HelloWorld.class);
最后,我们调用 greetings 方法来调用远程 Web 服务。
System.out.println(helloServer.greetings(System.getProperty("user.name")));
这将在您的控制台上打印一条问候消息。
客户端应用程序的完整源代码如下所示 -
//HelloClient.java
package com.tutorialspoint.cxf.pojo;
import org.apache.cxf.frontend.ClientProxyFactoryBean;
public class HelloClient {
   public static void main(String[] args) throws Exception {
      ClientProxyFactoryBean factory = new ClientProxyFactoryBean();
      factory.setAddress("https://:5000/Hello");
      HelloWorld helloServer = factory.create(HelloWorld.class);
      System.out.println(helloServer.greetings(System.getProperty("user.name")));
   }
}
运行客户端
确保服务器仍在您的机器上运行。如果服务器超时,请使用以下命令重新启动服务器:
mvn -Pserver
您将在控制台上看到以下消息:
Listening on port 5000 ...
现在,在我们将服务器超时时间设置为 5 分钟之前,打开另一个命令行窗口并使用以下命令启动客户端:
mvn -Pclient
您将在命令行上看到类似以下的消息:
Hi tutorialspoint
请注意,tutorialspoint 是我们的用户名。您将收到带有您自己名字的问候语。
在下一章中,我们将学习如何在 JAX-WS(Apache CXF API for XML Web Services)项目中使用 CXF。
Apache CXF 与 JAX-WS
在这个 JAX-WS 应用程序中,我们将使用类似于早期 POJO 应用程序的 Apache CXF-first 方法。所以首先我们将为我们的 Web 服务创建一个接口。
声明服务接口
与之前的情况一样,我们将创建一个仅包含一个名为 greetings 的接口方法的简单服务。服务接口的代码如下所示:
//HelloWorld.java
package com.tutorialspoint.cxf.jaxws.helloworld;
import javax.jws.WebService;

@WebService
public interface HelloWorld {
   String greetings(String text);
}
我们使用@WebService标签注释接口。接下来,我们将实现此接口。
实现 Web 接口
Web 接口的实现如下所示:
//HelloWorldImpl.java
package com.tutorialspoint.cxf.jaxws.helloworld;
public class HelloWorldImpl implements HelloWorld {
   @Override
   public String greetings(String name) {
      return ("hi " + name);
   }
}
greetings 方法使用@Override标签进行注释。该方法向调用方返回“hi”消息。
接下来,我们将编写开发服务器的代码。
开发服务器
与 POJO 应用程序不同,我们现在将使用 CXF 提供的 Endpoint 类来发布我们的服务,从而解耦接口。这在以下两行代码中完成:
HelloWorld implementor = new HelloWorldImpl();
Endpoint.publish(
   "https://:9090/HelloServerPort",
   implementor,
   new LoggingFeature()
);
publish 方法的第一个参数指定我们的服务将向客户端提供的 URL。第二个参数指定我们服务的实现类。服务器的完整代码如下所示:
//Server.java
package com.tutorialspoint.cxf.jaxws.helloworld;
import javax.xml.ws.Endpoint;
import org.apache.cxf.ext.logging.LoggingFeature;
public class Server {
   public static void main(String[] args) throws Exception {
      HelloWorld implementor = new HelloWorldImpl();
      Endpoint.publish("https://:9090/HelloServerPort",
      implementor,
      new LoggingFeature());
      System.out.println("Server ready...");
      Thread.sleep(5 * 60 * 1000);
      System.out.println("Server exiting ...");
      System.exit(0);
   }
}
要部署我们的服务器,您需要对项目进行一些修改,如下所示。
部署服务器
最后,要部署服务器应用程序,您需要在 pom.xml 中进行一项修改,以将您的应用程序设置为 Web 应用程序。您需要添加到 pom.xml 中的代码如下所示:
<profiles>
   <profile>
      <id>server</id>
      <build>
         <defaultGoal>test</defaultGoal>
         <plugins>
            <plugin>
               <groupId>org.codehaus.mojo</groupId>
               <artifactId>exec-maven-plugin</artifactId>
               <version>1.6.0</version>
               <executions>
                  <execution>
                     <phase>test</phase>
                     <goals>
                        <goal>java</goal>
                     </goals>
                     <configuration>
                        <mainClass>
                           com.tutorialspoint.cxf.jaxws.helloworld.Server
                        </mainClass>
                     </configuration>
                  </execution>
               </executions>
            </plugin>
         </plugins>
      </build>
   </profile>
</profiles>
在部署应用程序之前,您需要向项目添加两个文件。这些文件在下面的屏幕截图中显示:
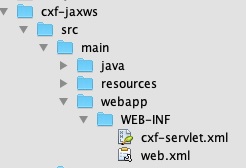
这些文件是 CXF 标准文件,用于定义 CXFServlet 的映射。为了便于您快速参考,这里显示了 web.xml 文件中的代码:
//Web.xml
<?xml version = "1.0" encoding = "UTF-8"??>
<web-app xmlns = "http://java.sun.com/xml/ns/javaee"
xmlns:xsi="http://www.w3.org/2001/XMLSchema-instance" version="2.5"
xsi:schemaLocation = "http://java.sun.com/xml/ns/javaee
http://java.sun.com/xml/ns/javaee/web-app_2_5.xsd">
   <display-name>cxf</display-name>
   <servlet>
      <description>Apache CXF Endpoint</description>
      <display-name>cxf</display-name>
      <servlet-name>cxf</servlet-name>
      <servlet-class>
         org.apache.cxf.transport.servlet.CXFServlet
      </servlet-class>
      <load-on-startup>
         1
      </load-on-startup>
   </servlet>
   <servlet-mapping>
      <servlet-name>
         cxf
      </servlet-name>
      <url-pattern>
         /services/*
      </url-pattern>
   </servlet-mapping>
   <session-config>
      <session-timeout>60</session-timeout>
   </session-config>
</web-app>
在 cxf-servlet.xml 中,您声明了服务端点的属性。这在下面的代码片段中显示:
<beans ...>
   <jaxws:endpoint xmlns:helloworld = "https://tutorialspoint.com/"
      id = "helloHTTP"
      address = "https://:9090/HelloServerPort"
      serviceName = "helloworld:HelloServiceService"
      endpointName = "helloworld:HelloServicePort">
   </jaxws:endpoint>
</beans>
在这里,我们定义了服务端点的 ID、服务可用的地址、服务名称和端点名称。现在,您了解了服务如何由 CXF servlet 路由和处理。
最终的 pom.xml
pom.xml 包含更多依赖项。我们没有描述所有依赖项,而是在下面包含了 pom.xml 的最终版本:
<?xml version = "1.0" encoding = "UTF-8"??>
<project xmlns = "http://maven.apache.org/POM/4.0.0"
   xmlns:xsi="http://www.w3.org/2001/XMLSchema-instance"
   xsi:schemaLocation = "http://maven.apache.org/POM/4.0.0
   http://maven.apache.org/xsd/maven-4.0.0.xsd">
   <modelVersion>4.0.0</modelVersion>
   <groupId>com.tutorialspoint</groupId>
   <artifactId>cxf-jaxws</artifactId>
   <version>1.0</version>
   <packaging>jar</packaging>
   <properties>
      <project.build.sourceEncoding>UTF-8</project.build.sourceEncoding>
      <maven.compiler.source>1.8</maven.compiler.source>
      <maven.compiler.target>1.8</maven.compiler.target>
   </properties>
   <profiles>
      <profile>
         <id>server</id>
         <build>
            <defaultGoal>test</defaultGoal>
            <plugins>
               <plugin>
                  <groupId>org.codehaus.mojo</groupId>
                  <artifactId>exec-maven-plugin</artifactId>
                  <version>1.6.0</version>
                  <executions>
                     <execution>
                        <phase>test</phase>
                        <goals>
                           <goal>java</goal>
                        </goals>
                        <configuration>
                           <mainClass>
                              com.tutorialspoint.cxf.jaxws.helloworld.Server
                           </mainClass>
                        </configuration>
                     </execution>
                  </executions>
               </plugin>
            </plugins>
         </build>
      </profile>
      <profile>
         <id>client</id>
         <build>
            <defaultGoal>test</defaultGoal>
            <plugins>
               <plugin>
                  <groupId>org.codehaus.mojo</groupId>
                  <artifactId>exec-maven-plugin</artifactId>
                  <executions>
                     <execution>
                        <phase>test</phase>
                        <goals>
                           <goal>java</goal>
                        <goals>
                        <configuration>
                           <mainClass>
                              com.tutorialspoint.cxf.jaxws.helloworld.Client
                           </mainClass>
                        </configuration>
                     </execution>
                  </executions>
               </plugin>
            </plugins>
         </build>
      </profile>
   </profiles>
   <dependencies>
      <dependency>
         <groupId>org.apache.cxf</groupId>
         <artifactId>cxf-rt-frontend-jaxws</artifactId>
         <version>3.3.0</version>
      </dependency>
      <dependency>
         <groupId>org.apache.cxf</groupId>
         <artifactId>cxf-rt-transports-http</artifactId>
         <version>3.3.0</version>
      </dependency>
      <dependency>
         <groupId>org.apache.cxf</groupId>
         <artifactId>cxf-rt-features-logging</artifactId>
         <version>3.3.0</version>
      </dependency>
      <dependency>
         <groupId>org.apache.cxf</groupId>
         <artifactId>cxf-rt-transports-http-jetty</artifactId>
         <version>3.3.0</version>
      </dependency>
   </dependencies>
</project>
请注意,它还包含一个用于构建客户端的配置文件,我们将在本教程的后续部分学习。
运行 HelloWorld 服务
现在,您已准备好运行 Web 应用程序。在命令窗口中,使用以下命令运行构建脚本。
mvn clean install
mvn -Pserver
您将在控制台上看到以下消息:
INFO: Setting the server's publish address to be https://:9090/HelloServerPort
Server ready…
与之前一样,您可以通过在浏览器中打开服务器 URL 来测试服务器。
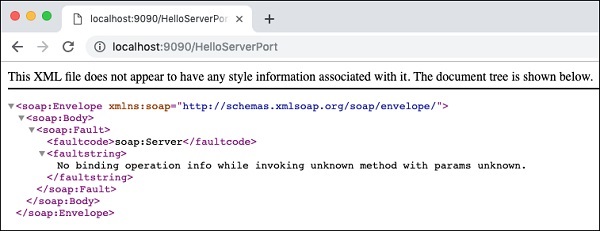
由于我们没有指定任何操作,因此我们的应用程序仅向浏览器返回错误消息。
现在,尝试将 ?wsdl 添加到您的 URL,您将看到以下输出:
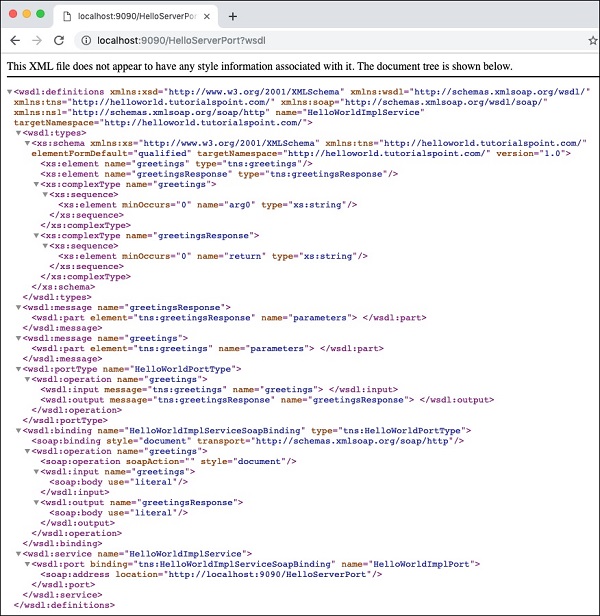
因此,我们的服务器应用程序按预期运行。您可以使用之前描述的 SOAP 客户端(例如 Postman)进一步测试您的服务。
在下一节中,我们将学习如何编写使用我们服务的客户端。
开发客户端
在 CXF 应用程序中编写客户端与编写服务器一样简单。以下是客户端的完整代码:
//Client.java
package com.tutorialspoint.cxf.jaxws.helloworld;
import javax.xml.namespace.QName;
import javax.xml.ws.Service;
import javax.xml.ws.soap.SOAPBinding;
public final class Client {
   private static final QName SERVICE_NAME
   = new QName("http://helloworld.jaxws.cxf.tutorialspoint.com/",
   "HelloWorld");
   private static final QName PORT_NAME
   = new QName("http://helloworld.jaxws.cxf.tutorialspoint.com/",
   "HelloWorldPort");
   private Client() {
   }
   public static void main(String[] args) throws Exception {
      Service service = Service.create(SERVICE_NAME);
      System.out.println("service created");
      String endpointAddress = "https://:9090/HelloServerPort";
      service.addPort(PORT_NAME, SOAPBinding.SOAP11HTTP_BINDING,
      endpointAddress);
      HelloWorld hw = service.getPort(HelloWorld.class);
      System.out.println(hw.greetings("World"));
   }
}
在这里,我们使用 CXF 提供的 Service 类绑定到已知服务。我们调用 Service 类的 create 方法以获取服务实例。我们通过调用 service 实例上的 addPort 方法来设置已知端口。
现在,我们已准备好使用服务,我们首先通过调用 service 实例上的 getPort 方法获取服务接口来实现。最后,我们调用 greetings 方法以在控制台上打印问候消息。
现在,您已经学习了使用 Apache CXF-First 方法的基本 CXF 知识,您将在下一章学习如何在 WSDL-First 方法中使用 CXF。
Apache CXF 与 WSDL 优先
您开发的 CXF-POJO 应用程序导致客户端和服务器之间存在非常紧密的耦合。直接访问服务接口也可能带来严重的安全威胁。因此,通常希望在客户端和服务器之间进行解耦,这可以通过使用 WSDL(Web Services Description Language)来实现。
我们在基于 XML 的 WSDL 文档中编写 Web 服务接口。我们将使用一个工具将此 WSDL 映射到 Apache CXF 接口,然后由我们的客户端和服务器应用程序实现和使用。为了提供解耦,从 WSDL 开始是一种首选方法。为此,您需要首先学习一门新语言 - WSDL。编写 WSDL 需要谨慎的方法,如果您在开始使用它之前能够对它有一些了解,那就更好了。
在本课中,我们将从在 WSDL 文档中定义 Web 服务接口开始。我们将学习如何使用 CXF 从 WSDL 创建服务器和客户端应用程序。我们将保持应用程序简单,以保持对 CXF 用法的关注。创建服务器应用程序后,我们将使用内置的 CXF 类将其发布到所需的 URL。
首先,让我们描述我们将要使用的 WSDL。
HelloWorld 的 WSDL
我们将要实现的 Web 服务将拥有一个名为 greetings 的 Web 方法,它接受一个包含用户名的 string 参数,并在将问候消息附加到用户名后,向调用方返回字符串消息。完整的 wsdl 如下所示:
//Hello.wsdl
<?xml version = "1.0" encoding = "UTF-8"?>
<wsdl:definitions xmlns:soap = "http://schemas.xmlsoap.org/wsdl/soap/"
   xmlns:tns = "http://helloworld.tutorialspoint.com/"
   xmlns:wsdl = "http://schemas.xmlsoap.org/wsdl/"
   xmlns:xsd = "http://www.w3.org/2001/XMLSchema"
   name = "HelloWorld"
   targetNamespace = "http://helloworld.tutorialspoint.com/">
   <wsdl:types>
      <xsd:schema attributeFormDefault = "unqualified"
         elementFormDefault = "qualified"
         targetNamespace = "http://helloworld.tutorialspoint.com/">
         <xsd:element name = "greetings" type = "tns:greetings"/>
         <xsd:complexType name = "greetings">
            <xsd:sequence>
               <xsd:element minOccurs = "0" name = "arg0" type = "xsd:string"/>
            </xsd:sequence>
         </xsd:complexType>
         <xsd:element name = "greetingsResponse"
         type = "tns:greetingsResponse"/>
         <xsd:complexType name = "greetingsResponse">
            <xsd:sequence>
               <xsd:element minOccurs = "0" name = "return" type = "xsd:string"/>
            </xsd:sequence>
         </xsd:complexType>
      </xsd:schema>
   </wsdl:types>
   <wsdl:message name = "greetings">
      <wsdl:part element = "tns:greetings" name = "parameters"> </wsdl:part>
   </wsdl:message>
   <wsdl:message name = "greetingsResponse">
      <wsdl:part element = "tns:greetingsResponse" name = "parameters"> </wsdl:part>
   </wsdl:message>
   <wsdl:portType name = "HelloWorldPortType">
      <wsdl:operation name = "greetings">
         <wsdl:input message = "tns:greetings" name = "greetings">  </wsdl:input>
         <wsdl:output message = "tns:greetingsResponse" name = "greetingsResponse">
         </wsdl:output>
      </wsdl:operation>
   </wsdl:portType>
   <wsdl:binding name = "HelloWorldSoapBinding" type = "tns:HelloWorldPortType">
      <soap:binding style = "document"
      transport = "http://schemas.xmlsoap.org/soap/http"/>
      <wsdl:operation name = "greetings">
         <soap:operation soapAction = "" style = "document"/>
         <wsdl:input name = "greetings"></wsdl:input>
         <wsdl:output name = "greetingsResponse">
            <soap:body use = "literal"/>
         </wsdl:output>
         </wsdl:operation>
   </wsdl:binding>
   <wsdl:service name = "HelloWorldService">
      <wsdl:port binding = "tns:HelloWorldSoapBinding" name = "HelloWorldPort">
         <soap:address location = "https://:9090/HelloServerPort"/>
      </wsdl:port>
   </wsdl:service>
</wsdl:definitions>
请注意,编写语法正确的 wsdl 一直是开发人员面临的挑战;有许多工具和在线编辑器可用于创建 wsdl。这些编辑器会要求您输入要实现的消息名称以及您希望在消息中传递的参数以及您希望客户端应用程序接收的返回消息类型。如果您了解 wsdl 语法,您可以手动编写整个文档或使用其中一个编辑器创建自己的文档。
在上面的 wsdl 中,我们定义了一个名为 greetings 的消息。该消息传递给名为 HelloWorldService 的服务,该服务在 https://:9090/HelloServerPort 上运行。
有了这个,我们现在将继续进行服务器开发。在开发服务器之前,我们需要将 Apache CXF 接口生成到我们的 Web 服务。这需要从给定的 wsdl 完成。为此,您使用一个名为 wsdl2java 的工具。
wsdl2java 插件
由于我们将使用 maven 构建项目,因此您需要将以下插件添加到 pom.xml 文件中。
<plugins>
   <plugin>
      <groupId>org.apache.cxf</groupId>
      <artifactId>cxf-codegen-plugin</artifactId>
      <version>3.3.0</version>
      <executions>
         <execution>
            <id>generate-sources</id>
            <phase>generate-sources</phase>
            <configuration>
               <wsdlOptions>
                  <wsdlOption>
                     <wsdl>src/main/resources/hello.wsdl</wsdl>
                     <faultSerialVersionUID> 1 </faultSerialVersionUID>
                  </wsdlOption>
               </wsdlOptions>
            </configuration>
            <goals>
               <goal>wsdl2java</goal>
            </goals>
         </execution>
      </executions>
   </plugin>
</plugins>
请注意,我们将 wsdl 文件的位置指定为 src/main/resources/Hello.wsdl。您需要确保为您的项目创建了适当的目录结构,并将前面显示的 hello.wsdl 文件添加到指定文件夹。
wsdl2java 插件将编译此 wsdl 并在预定义文件夹中创建 Apache CXF 类。为了便于您参考,这里显示了完整的项目结构。
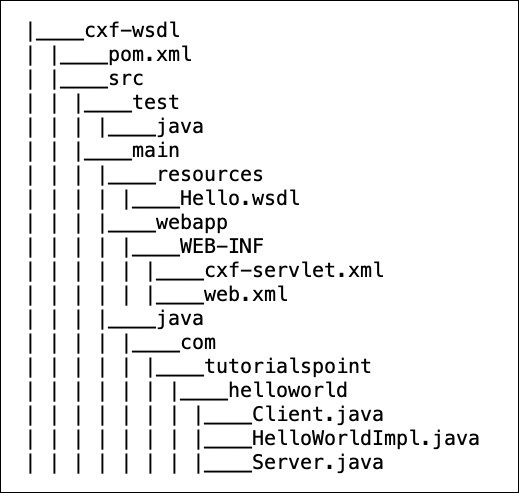
现在,您已准备好使用 wsdl2java 生成的类创建服务器。wsdl2java 创建的类在下面的图中显示:
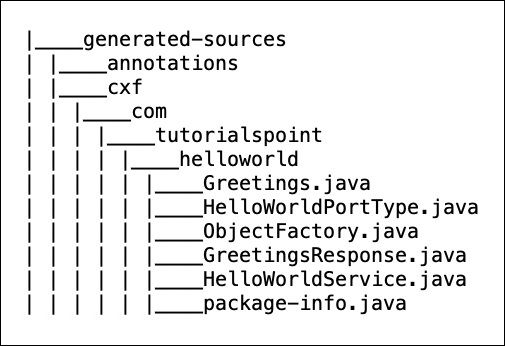
生成的 Service 接口
在生成的类列表中,您必须注意其中一个类是 Apache CXF 接口 - 即 HelloWorldPortType.java。在您的代码编辑器中检查此文件。为了便于您参考,这里显示了文件内容:
//HelloWorldPortType.java
package com.tutorialspoint.helloworld;
import javax.jws.WebMethod;
import javax.jws.WebParam;
import javax.jws.WebResult;
import javax.jws.WebService;
import javax.xml.bind.annotation.XmlSeeAlso;
import javax.xml.ws.RequestWrapper;
import javax.xml.ws.ResponseWrapper;
/**
* This class was generated by Apache CXF 3.3.0
* 2019-02-11T12:05:55.220+05:30
* Generated source version: 3.3.0
*
*/

@WebService(targetNamespace = "http://helloworld.tutorialspoint.com/",
   name = "HelloWorldPortType")
@XmlSeeAlso({ObjectFactory.class})
public interface HelloWorldPortType {
   @WebMethod
   @RequestWrapper(localName = "greetings", targetNamespace =
      "http://helloworld.tutorialspoint.com/", className =
      "com.tutorialspoint.helloworld.Greetings")
      @ResponseWrapper(localName = "greetingsResponse", targetNamespace =
         "http://helloworld.tutorialspoint.com/", className =
         "com.tutorialspoint.helloworld.GreetingsResponse")
   @WebResult(name = "return", targetNamespace =
      "http://helloworld.tutorialspoint.com/")
   public java.lang.String greetings(
      @WebParam(name = "arg0", targetNamespace =
      "http://helloworld.tutorialspoint.com/")
      java.lang.String arg0
   );
}
请注意,该接口包含一个名为 greetings 的方法。这在我们 wsdl 中是一种消息类型。wsdl2java 工具已将此方法添加到生成的接口中。现在,您可以理解,您在 wsdl 中编写的任何消息,都会在接口中生成相应的方法。
现在,您的任务是实现与您在 wsdl 中定义的各种消息相对应的方法。请注意,在 Apache CXF-First 的早期示例中,我们从 Web 服务的 Apache CXF 接口开始。在这种情况下,Apache CXF 接口是从 wsdl 创建的。
实现服务接口
服务接口的实现很简单。完整的实现如下所示:
//HelloWorldImpl.java
package com.tutorialspoint.helloworld;
public class HelloWorldImpl implements HelloWorldPortType {
   @Override
   public String greetings(String name) {
      return ("hi " + name);
   }
}
该代码实现了名为 greetings 的唯一接口方法。该方法采用一个 string 类型的参数,在其前面添加一个“hi”消息,并将结果字符串返回给调用方。
接下来,我们将编写服务器应用程序。
开发服务器
开发服务器应用程序再次很简单。在这里,我们将使用 CXF 提供的 Endpoint 类来发布我们的服务。这在以下两行代码中完成:
HelloWorldPortType implementor = new HelloWorldImpl();
   Endpoint.publish("https://:9090/HelloServerPort",
      implementor,
      new LoggingFeature());
首先,我们创建服务实现类 HelloWorldImpl 的对象。然后,我们将此引用作为第二个参数传递给 publish 方法。第一个参数是发布服务到的地址 - 客户端将使用此 URL 访问服务。以下是服务器应用程序的完整源代码:
//Server.java
package com.tutorialspoint.helloworld;
import javax.xml.ws.Endpoint;
import org.apache.cxf.ext.logging.LoggingFeature;
public class Server {
   public static void main(String[] args) throws Exception {
      HelloWorldPortType implementor = new HelloWorldImpl();
      Endpoint.publish("https://:9090/HelloServerPort",
         implementor,
         new LoggingFeature());
      System.out.println("Server ready...");
      Thread.sleep(5 * 60 * 1000);
      System.out.println("Server exiting");
      System.exit(0);
   }
}
要构建此服务器类,您需要在 pom.xml 中添加一个构建配置文件。如下所示:
<profile>
   <id>server</id>
   <build>
      <defaultGoal>test</defaultGoal>
      <plugins>
         <plugin>
            <groupId>org.codehaus.mojo</groupId>
            <artifactId>exec-maven-plugin</artifactId>
            <version>1.6.0</version>
            <executions>
               <execution>
                  <phase>test</phase>
                  <goals>
                     <goal>java</goal>
                  </goals>
                  <configuration>
                     <mainClass>
                        com.tutorialspoint.helloworld.Server
                     </mainClass>
                  </configuration>
               </execution>
            </executions>
         </plugin>
      </plugins>
   </build>
   <dependencies>
      <dependency>
         <groupId>org.apache.cxf</groupId>
         <artifactId>cxf-rt-transports-http-jetty</artifactId>
         <version>3.3.0</version>
      </dependency>
   </dependencies>
</profile>
请注意,在配置中指定了 Server 类的完全限定名称。此外,dependency 标签指定我们将使用嵌入式 jetty Web 服务器来部署服务器应用程序。
部署服务器
最后,要部署服务器应用程序,您需要在 pom.xml 中进行一项修改,以将您的应用程序设置为 Web 应用程序。您需要添加到 pom.xml 中的代码如下所示:
<defaultGoal>install</defaultGoal>
<pluginManagement>
   <plugins>
      <plugin>
         <artifactId>maven-war-plugin</artifactId>
         <version>3.2.2</version>
         <configuration>
            <webXml>src/main/webapp/WEB-INF/web.xml</webXml>
            <webResources>
               <resource>
                  <directory>src/main/resources</directory>
                  <targetPath>WEB-INF</targetPath>
                  <includes>
                     <include>*.wsdl</include>
                  </includes>
               </resource>
            </webResources>
         </configuration>
      </plugin>
   </plugins>
</pluginManagement>
在部署应用程序之前,您需要向项目添加两个文件。这些文件在下面的屏幕截图中显示:
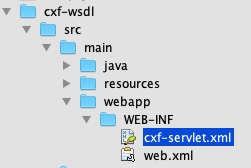
这些文件是 CXF 标准文件,用于定义 CXFServlet 的映射。为了便于您快速参考,这里显示了 web.xml 文件中的代码:
//cxf-servlet.xml
<web-app xmlns = "http://java.sun.com/xml/ns/javaee"
   xmlns:xsi = "http://www.w3.org/2001/XMLSchema-instance" version="2.5"
   xsi:schemaLocation = "http://java.sun.com/xml/ns/javaee
   http://java.sun.com/xml/ns/javaee/web-app_2_5.xsd">
   <display-name>cxf</display-name>
   <servlet>
      <description>Apache CXF Endpoint</description>
      <display-name>cxf</display-name>
      <servlet-name>cxf</servlet-name>
      <servlet-class>
         org.apache.cxf.transport.servlet.CXFServlet
      </servlet-class>
      <load-on-startup>1</load-on-startup>
   </servlet>
   <servlet-mapping>
      <servlet-name>cxf</servlet-name>
      <url-pattern>/services/*</url-pattern>
   </servlet-mapping>
   <session-config>
      <session-timeout>60</session-timeout>
   </session-config>
</web-app>
在 cxf-servlet.xml 中,您声明了服务端点的属性。这在下面的代码片段中显示:
<beans ...>
   <jaxws:endpoint xmlns:helloworld = "https://tutorialspoint.com/"
      id="helloHTTP"
      address = "https://:9090/HelloServerPort"
      serviceName = "helloworld:HelloServiceService"
      endpointName = "helloworld:HelloServicePort">
   </jaxws:endpoint>
</beans>
在这里,我们定义了服务端点的 ID、服务可用的地址、服务名称和端点名称。现在,您了解了服务如何由 CXF servlet 路由和处理。
最终的 pom.xml
pom.xml 包含更多依赖项。我们没有描述所有依赖项,而是在下面包含了 pom.xml 的最终版本:
<?xml version="1.0" encoding = "UTF-8"?>
<project xmlns = "http://maven.apache.org/POM/4.0.0"
   xmlns:xsi = "http://www.w3.org/2001/XMLSchema-instance"
   xsi:schemaLocation = "http://maven.apache.org/POM/4.0.0 http://maven.apache.org/xsd/maven-4.0.0.xsd">
   <modelVersion>4.0.0</modelVersion>
   <groupId>com.tutorialspoint</groupId>
   <artifactId>cxf-wsdl</artifactId>
   <version>1.0</version>
   <packaging>jar</packaging>
   <properties>
      <project.build.sourceEncoding>UTF-8</project.build.sourceEncoding>
      <maven.compiler.source>1.8</maven.compiler.source>
      <maven.compiler.target>1.8</maven.compiler.target>
   </properties>
   <build>
      <defaultGoal>install</defaultGoal>
      <pluginManagement>
         <plugins>
            <plugin>
               <artifactId>maven-war-plugin</artifactId>
               <version>3.2.2</version>
               <configuration>
                  <webXml>src/main/webapp/WEB-INF/web.xml</webXml>
                  <webResources>
                     <resource>
                        <directory>src/main/resources</directory>
                        <targetPath>WEB-INF</targetPath>
                        <includes>
                           <include>*.wsdl</include>
                        </includes>
                     </resource>
                  </webResources>
               </configuration>
            </plugin>
         </plugins>
      </pluginManagement>
      <plugins>
         <plugin>
            <groupId>org.apache.cxf</groupId>
            <artifactId>cxf-codegen-plugin</artifactId>
            <version>3.3.0</version>
            <executions>
               <execution>
                  <id>generate-sources</id>
                  <phase>generate-sources</phase>
                  <configuration>
                     <wsdlOptions>
                        <wsdlOption>
                           <wsdl>src/main/resources/Hello.wsdl</wsdl>
                           <faultSerialVersionUID>1</faultSerialVersionUID>
                        </wsdlOption>
                     </wsdlOptions>
                  </configuration>
                  <goals>
                     <goal>wsdl2java</goal>
                  </goals>
               </execution>
            </executions>
         </plugin>
      </plugins>
   </build>
   <profiles>
      <profile>
         <id>server</id>
         <build>
            <defaultGoal>test</defaultGoal>
            <plugins>
               <plugin>
                  <groupId>org.codehaus.mojo</groupId>
                  <artifactId>exec-maven-plugin</artifactId>
                  <version>1.6.0</version>
                  <executions>
                     <execution>
                        <phase>test</phase>
                        <goals>
                           <goal>java</goal>
                        </goals>
                        <configuration>
                           <mainClass>
                              com.tutorialspoint.helloworld.Server
                           </mainClass>
                        </configuration>
                     </execution>
                  </executions>
               </plugin>
            </plugins>
         </build>
         <dependencies>
            <dependency>
               <groupId>org.apache.cxf</groupId>
               <artifactId>cxf-rt-transports-http-jetty</artifactId>
               <version>3.3.0</version>
            </dependency>
         </dependencies>
      </profile>
      <profile>
         <id>client</id>
         <build>
            <defaultGoal>test</defaultGoal>
            <plugins>
               <plugin>
                  <groupId>org.codehaus.mojo</groupId>
                  <artifactId>exec-maven-plugin</artifactId>
                  <executions>
                     <execution>
                        <phase>test</phase>
                        <goals>
                           <goal>java</goal>
                        </goals>
                        <configuration>
                           <mainClass>
                              com.tutorialspoint.helloworld.Client
                           </mainClass>
                        </configuration>
                     </execution>
                  </executions>
               </plugin>
            </plugins>
         </build>
      </profile>
   </profiles>
   <dependencies>
      <dependency>
         <groupId>org.apache.cxf</groupId>
         <artifactId>cxf-rt-frontend-jaxws</artifactId>
         <version>3.3.0</version>
      </dependency>

      <dependency>
         <groupId>org.apache.cxf</groupId>
         <artifactId>cxf-rt-transports-http</artifactId>
         <version>3.3.0</version>
      </dependency>

      <dependency>
         <groupId>org.apache.cxf</groupId>
         <artifactId>cxf-rt-management</artifactId>
         <version>3.3.0</version>
      </dependency>

      <dependency>
         <groupId>org.apache.cxf</groupId>
         <artifactId>cxf-rt-features-metrics</artifactId>
         <version>3.3.0</version>
      </dependency>

      <dependency>
         <groupId>org.apache.cxf.xjc-utils</groupId>
         <artifactId>cxf-xjc-runtime</artifactId>
         <version>3.3.0</version>
      </dependency>

      <dependency>
         <groupId>org.apache.cxf</groupId>
         <artifactId>cxf-rt-features-logging</artifactId>
         <version>3.3.0</version>
      </dependency>

     <dependency>
         <groupId>org.codehaus.mojo</groupId>
         <artifactId>exec-maven-plugin</artifactId>
         <version>1.6.0</version>
      </dependency>

      <dependency>
         <groupId>org.slf4j</groupId>
         <artifactId>slf4j-api</artifactId>
         <version>1.8.0-beta2</version>
      </dependency>

      <dependency>
         <groupId>org.apache.cxf</groupId>
         <artifactId>cxf-rt-transports-http-jetty</artifactId>
         <version>3.3.0</version>
      </dependency>
   </dependencies>
</project>
请注意,它还包含一个用于构建客户端的配置文件,我们将在稍后的部分中学习。
运行 HelloWorld 服务
现在,您已准备好运行 Web 应用程序。在命令窗口中,使用以下命令运行构建脚本。
mvn clean install
这将从您的 wsdl 生成相应的 Apache CXF 类,编译您的 Apache CXF 类,将服务器部署到嵌入式 jetty 服务器上并运行您的应用程序。
您将在控制台上看到以下消息:
INFO: Setting the server's publish address to be
https://:9090/HelloServerPort
Server ready...
与之前一样,您可以通过在浏览器中打开服务器 URL 来测试服务器。
由于我们没有指定任何操作,因此我们的应用程序仅向浏览器返回错误消息。现在,尝试将 ?wsdl 添加到您的 URL,您将看到以下输出:
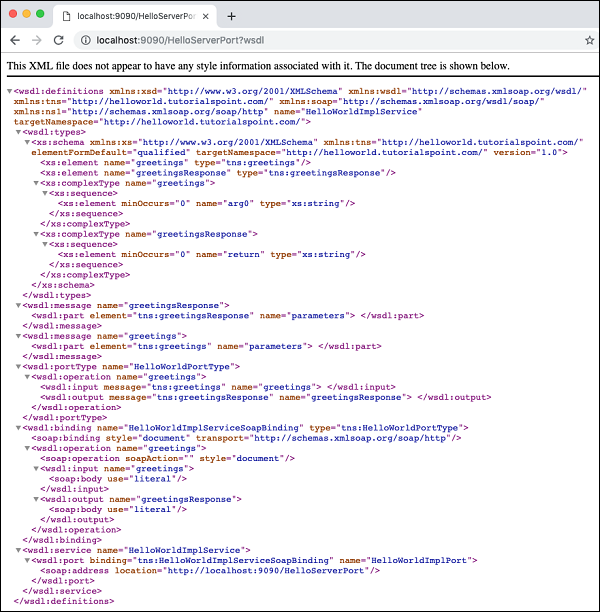
因此,我们的服务器应用程序按预期运行。您可以使用之前描述的 SOAP 客户端(例如 Postman)进一步测试您的服务。
本教程的下一部分是编写使用我们服务的客户端。
开发客户端
在 CXF 应用程序中编写客户端与编写服务器一样重要。以下是客户端的完整代码,它基本上只包含三行,其余行只是将服务信息打印给用户。
//Client.java
package com.tutorialspoint.helloworld;
public class Client {
   public static void main(String[] args) throws Exception {
      //Create the service client with its default wsdlurl
      HelloWorldService helloServiceService = new HelloWorldService();
      System.out.println("service: " +
         helloServiceService.getServiceName());
      System.out.println("wsdl location: " +
         helloServiceService.getWSDLDocumentLocation());
      HelloWorldPortType helloService =
         helloServiceService.getHelloWorldPort();
      System.out.println(helloService.greetings
      (System.getProperty("user.name")));
   }
}
在这里,我们简单地创建服务 HelloWorldService 的实例,通过调用 getHelloWorldPort 方法获取其端口,然后将 greetings 消息传递给它。运行客户端,您将看到以下输出:
service: {http://helloworld.tutorialspoint.com/}HelloWorldService
wsdl location: file:/Users/drsarang/Desktop/tutorialpoint/cxf-
wsdl/src/main/resources/Hello.wsdl
hi drsarang
到目前为止,您已经学习了如何使用 CXF 与 Apache CXF-First 和 WSDL-First 架构。在 Apache CXF-First 方法中,您使用了一个带有来自 CXF 库的 **ServerFactoryBean** 类的 POJO 来创建服务器。要创建客户端,您使用了来自 CXF 库的 **ClientProxyFactoryBean** 类。在 WSDL-First 方法中,您使用 **Endpoint** 类在所需的 URL 和指定的实现者处发布服务。现在,您可以扩展这些技术以集成不同的协议和传输。
Apache CXF 与 JAX-RS
在继续下一章之前,我们假设您知道如何在 Java 中编写 RESTful Web 服务。我将向您展示如何在 JAX-RS(Java API for RESTful Web Services)之上使用 CXF。我们将创建一个维护最新电影列表的 Web 服务。当用户请求电影时,他在请求中指定电影 ID,服务器将找到电影并将其返回给客户端。在我们的简单示例中,我们将仅向客户端返回电影名称,而不是实际的二进制 MP4 文件。因此,让我们开始创建 JAX-RS 应用程序。
声明 Movie 元素
我们将声明一个名为 Movie 的 XML 根元素,用于存储给定电影的 id 和名称。该元素在名为 Movie.java 的文件中声明。文件内容如下所示:
//Movie.java
package com.tutorialspoint.cxf.jaxrs.movie;
import javax.xml.bind.annotation.XmlRootElement;
@XmlRootElement(name = "Movie")
public class Movie {
   private long id;
   private String name;
   public long getId() {
      return id;
   }
   public void setId(long id) {
      this.id = id;
   }
   public String getName() {
      return name;
   }
   public void setName(String name) {
      this.name = name;
   }
}
请注意,使用 **XmlRootElement** 标签为 **Movie** 标签声明 XML 元素。接下来,我们将创建一个服务,在其数据库中保存电影列表。
创建 Movie 服务数据库
为了存储电影列表,我们使用 Java 提供的 **Map**,它存储键值对。如果列表很大,您将使用外部数据库存储,这将更容易管理。在我们的简单示例中,我们将在数据库中仅存储五部电影。MovieService 类的代码如下所示:
//MovieService.java
package com.tutorialspoint.cxf.jaxrs.movie;
import java.util.HashMap;
import java.util.Map;
import javax.ws.rs.GET;
import javax.ws.rs.Path;
import javax.ws.rs.PathParam;
import javax.ws.rs.Produces;
@Path("/movieservice/")
@Produces("text/xml")
public class MovieService {
   long currentId = 123;
   Map<Long, Movie> movies = new HashMap<>();
   public MovieService() {
      init();
   }
   @GET
   @Path("/movie/{id}/")
   public Movie getMovie(@PathParam("id") String id) {
      long idNumber = Long.parseLong(id);
      return movies.get(idNumber);
   }
   final void init() {
      Movie c1 = new Movie();
      c1.setName("Aquaman");
      c1.setId(1001);
      movies.put(c1.getId(), c1);

      Movie c2 = new Movie();
      c2.setName("Mission Imposssible");
      c2.setId(1002);
      movies.put(c2.getId(), c2);

      Movie c3 = new Movie();
      c3.setName("Black Panther");
      c3.setId(1003);
      movies.put(c3.getId(), c3);

      Movie c4 = new Movie();
      c4.setName("A Star is Born");
      c4.setId(1004);
      movies.put(c4.getId(), c4);

      Movie c5 = new Movie();
      c5.setName("The Meg");
      c5.setId(1005);
      movies.put(c5.getId(), c5);
   }
}
请注意,我们使用以下两个注解来指定电影服务的 URL 路径及其返回类型:
@Path("/movieservice/")
@Produces("text/xml")
我们使用 @GET 和 @Path 注解指定 GET 请求的 URL,如下所示:
@GET
@Path("/movie/{id}/")
电影数据库本身在 init 方法中初始化,我们向数据库中添加了五部电影。
我们的下一个任务是编写服务器应用程序。
开发服务器
要创建服务器,我们使用 CXF 提供的 **JAXRSServerFactoryBean** 类。
JAXRSServerFactoryBean factory = new JAXRSServerFactoryBean();
我们通过调用 **setResourceClasses** 方法设置其资源类。
factory.setResourceClasses(Movie.class);
factory.setResourceClasses(MovieService.class);
我们通过调用 **setResourceProvider** 方法设置服务提供程序。
factory.setResourceProvider(MovieService.class,
new SingletonResourceProvider(new MovieService()));
我们通过调用 **setAddress** 方法设置所需的 **发布** 地址:
factory.setAddress("https://:9000/");
最后,我们通过在 **factory** 实例上调用 create 方法来发布服务器。
factory.create();
服务器应用程序的完整代码如下所示:
//Server.java
package com.tutorialspoint.cxf.jaxrs.movie;
import org.apache.cxf.jaxrs.JAXRSServerFactoryBean;
import org.apache.cxf.jaxrs.lifecycle.SingletonResourceProvider;
public class Server {
   public static void main(String[] args) throws Exception {
      JAXRSServerFactoryBean factory = new JAXRSServerFactoryBean();
      factory.setResourceClasses(Movie.class);
      factory.setResourceClasses(MovieService.class);
      factory.setResourceProvider(MovieService.class,
         new SingletonResourceProvider(new MovieService()));
      factory.setAddress("https://:9000/");
      factory.create();

      System.out.println("Server ready...");
      Thread.sleep(5 * 60 * 1000);

      System.out.println("Server exiting ...");
      System.exit(0);
   }
}
最终的 pom.xml
这里我们包含了 pom.xml 的最终版本:
<?xml version = "1.0" encoding = "UTF-8"?>
<project xmlns = "http://maven.apache.org/POM/4.0.0"
   xmlns:xsi = "http://www.w3.org/2001/XMLSchema-instance"
   xsi:schemaLocation = "http://maven.apache.org/POM/4.0.0
   http://maven.apache.org/xsd/maven-4.0.0.xsd">
   <modelVersion>4.0.0</modelVersion>
   <groupId>com.tutorialspoint</groupId>
   <artifactId>cxf-jaxrs</artifactId>
   <version>1.0</version>
   <packaging>jar</packaging>
   <properties>
      <project.build.sourceEncoding>UTF-8</project.build.sourceEncoding>
      <maven.compiler.source>1.8</maven.compiler.source>
      <maven.compiler.target>1.8</maven.compiler.target>
   </properties>
   <profiles>
      <profile>
         <id>server</id>
         <build>
            <defaultGoal>test</defaultGoal>
            <plugins>
               <plugin>
                  <groupId>org.codehaus.mojo</groupId>
                  <artifactId>exec-maven-plugin</artifactId>
                  <version>1.6.0</version>
                  <executions>
                     <execution>
                        <phase>test</phase>
                        <goals>
                           <goal>java</goal>
                        </goals>
                        <configuration>
                           <mainClass>
                              com.tutorialspoint.cxf.jaxrs.movie.Server
                           </mainClass>
                        </configuration>
                     </execution>
                  </executions>
               </plugin>
            </plugins>
         </build>
         <dependencies>
            <dependency>
               <groupId>org.apache.cxf</groupId>
               <artifactId>cxf-rt-transports-http-jetty</artifactId>
               <version>3.3.0</version>
            </dependency>
         </dependencies>
      </profile>
      <profile>
         <id>client</id>
         <build>
            <defaultGoal>test</defaultGoal>
            <plugins>
               <plugin>
                  <groupId>org.codehaus.mojo</groupId>
                  <artifactId>exec-maven-plugin</artifactId>
                  <executions>
                     <execution>
                        <phase>test</phase>
                        <goals>
                           <goal>java</goal>
                        </goals>
                        <configuration>
                           <mainClass>
                              com.tutorialspoint.cxf.jaxrs.movie.Client
                           </mainClass>
                        </configuration>
                     </execution>
                  </executions>
               </plugin>
            </plugins>
         </build>
      </profile>
   </profiles>
   <dependencies>
      <dependency>
         <groupId>org.apache.cxf</groupId>
         <artifactId>cxf-rt-transports-http</artifactId>
         <version>3.3.0</version>
      </dependency>
      <dependency>
         <groupId>org.apache.cxf</groupId>
         <artifactId>cxf-rt-transports-http-jetty</artifactId>
         <version>3.3.0</version>
      </dependency>
      <dependency>
         <groupId>org.apache.cxf</groupId>
         <artifactId>cxf-rt-frontend-jaxrs</artifactId>
         <version>3.3.0</version>
         </dependency>
      <dependency>
         <groupId>jakarta.ws.rs</groupId>
         <artifactId>jakarta.ws.rs-api</artifactId>
         <version>2.1.5</version>
      </dependency>
      <dependency>
         <groupId>org.apache.httpcomponents</groupId>
         <artifactId>httpclient</artifactId>
         <version>4.5.7</version>
      </dependency>
   </dependencies>
</project>
开发客户端
编写 RS 客户端非常简单。我们只需创建一个 URL 对象并打开其流。我们使用 CXF 提供的 IOUtils 类将输入流的内容复制到本地流。
URL url = new URL("https://:9000/movieservice/movie/1002");
try (InputStream instream = url.openStream();
CachedOutputStream outstream = new CachedOutputStream()) {
   IOUtils.copy(instream, outstream);
}
客户端应用程序的完整代码如下所示:
//Client.java
package com.tutorialspoint.cxf.jaxrs.movie;
import java.io.InputStream;
import java.net.URL;
import org.apache.cxf.helpers.IOUtils;
import org.apache.cxf.io.CachedOutputStream;
public class Client {
   public static void main(String[] args) throws Exception {
      URL url = new URL("https://:9000/movieservice/movie/1002");
      try (InputStream instream = url.openStream();
      CachedOutputStream outstream = new CachedOutputStream()) {
         IOUtils.copy(instream, outstream);
         String str = outstream.getOut().toString();
         System.out.println(str);
      }
   }
}
测试 JAX-RS 应用程序
在命令行窗口中使用以下命令运行服务器:
mvn -Pserver
现在,您将在控制台上看到以下消息:
INFO: Setting the server's publish address to be https://:9000
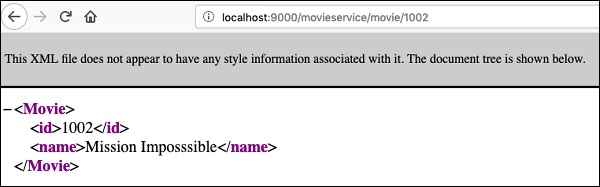
现在,打开您的浏览器并输入以下 URL:
https://:9000/movieservice/movie/1002
您将在浏览器窗口中看到以下内容。
您可以通过使用我们开发的 Java 客户端应用程序来调用服务,在单独的命令行窗口中运行以下命令。
mvn -Pclient
您将看到以下输出:
<?xml version="1.0" encoding = "UTF-8" standalone="yes"?>
<Movie><id>1002</id><name>Mission Imposssible</name></Movie>
CXF 示例提供了多个关于如何将 CXF 与 JAX-RS 一起使用的示例。鼓励感兴趣的读者学习这些示例。
Apache CXF 与 JMS
如前所述,您可以将 CXF 与 JMS 传输一起使用。在这种情况下,客户端将向已知的 Messaging Server 发送 JMS 消息。我们的服务器应用程序持续监听消息服务器以接收传入的消息。当消息到达时,它会处理消息,执行客户端请求并将响应作为另一条消息发送回客户端。
与之前一样,我们首先创建一个示例服务器应用程序,该应用程序提供一个名为 **sayHi** 的单个 Web 方法。
创建服务接口
我们的 **HelloWorld** 服务的服务接口如下所示:
//HelloWorld.java
package com.tutorialspoint.service;

import javax.jws.WebMethod;
import javax.jws.WebParam;
import javax.jws.WebService;

@WebService
public interface HelloWorld {
   @WebMethod
   String sayHi(@WebParam(name = "name") String name);
}
实现服务
服务接口的实现定义如下:
//HelloWorldImpl.java
package com.tutorialspoint.service.impl;

import javax.jws.WebService;
import com.tutorialspoint.service.HelloWorld;

@WebService
public class HelloWorldImpl implements HelloWorld {
   @Override
   public String sayHi(String name) {
      return "Hello " + name;
   }
}
实现简单地向用户返回一个 Hello 消息。如您所见,接口及其实现类似于本教程中您迄今为止学习的所有早期项目。
现在,最重要的是创建一个服务器应用程序,该应用程序设置消息队列并持续监听传入的消息。
创建服务器
在服务器应用程序中,我们首先创建一个 **JMS** 端点,如下所示:
private static final String JMS_ENDPOINT_URI =
   "jms:queue:test.cxf.jmstransport.queue?timeToLive=1000"
      + "&jndiConnectionFactoryName=ConnectionFactory"
      + "&jndiInitialContextFactory"
      + "= org.apache.activemq.jndi.ActiveMQInitialContextFactory"
      + "&jndiURL = tcp://:61616";
请注意,我们在指定的端口上设置了一个队列,该队列存在指定的时间段。我们现在通过实例化 **org.apache.activemq.broker.BrokerService** 类来创建消息服务。这是 **ActiveMQ** 消息服务器的服务器类。
BrokerService broker = new BrokerService();
您可以使用除 **ActiveMQ** 之外的任何其他您选择的消息服务器。我们现在将此服务器连接到所需的 URI。
broker.addConnector("tcp://:61616");
我们为传入消息的数据存储设置目录:
broker.setDataDirectory("target/activemq-data");
最后,我们使用 start 方法启动服务器:
broker.start();
接下来,我们使用服务器工厂 Bean 类(在我们之前的 POJO 应用程序中使用)创建服务 Bean **HelloWorld** 的实例:
Object implementor = new HelloWorldImpl();
JaxWsServerFactoryBean factory = new JaxWsServerFactoryBean();
factory.setServiceClass(HelloWorld.class);
接下来,我们在工厂中设置 JMS 端点,以便工厂将持续监听传入的消息:
factory.setTransportId
(JMSSpecConstants.SOAP_JMS_SPECIFICATION_TRANSPORTID);
factory.setAddress(JMS_ENDPOINT_URI);
最后,我们在工厂中设置实现类并开始运行它:
factory.setServiceBean(implementor);
factory.create();
此时,您的服务器已启动并正在运行。请注意,由于我们使用了与 POJO 应用程序中相同的工厂 Bean 类,因此不需要 CXFServlet 和 web.xml 文件。
完整的服务器应用程序代码如下所示:
//ServerJMS.java
package com.tutorialspoint.server;

import java.util.Collections;
import org.apache.cxf.ext.logging.LoggingFeature;
import org.apache.cxf.jaxws.JaxWsServerFactoryBean;
import org.apache.cxf.transport.jms.spec.JMSSpecConstants;
import com.tutorialspoint.service.HelloWorld;
import com.tutorialspoint.service.impl.HelloWorldImpl;
import org.apache.activemq.broker.BrokerService;

public final class ServerJMS {

   private static final String JMS_ENDPOINT_URI =
      "jms:queue:test.cxf.jmstransport.queue?timeToLive=1000"
         + "&jndiConnectionFactoryName=ConnectionFactory"
         + "&jndiInitialContextFactory"
         + "= org.apache.activemq.jndi.ActiveMQInitialContextFactory"
         + "&jndiURL = tcp://:61616";

   public static void main(String[] args) throws Exception {

      BrokerService broker = new BrokerService();
      broker.addConnector("tcp://:61616");
      broker.setDataDirectory("target/activemq-data");
      broker.start();

      Object implementor = new HelloWorldImpl();
      JaxWsServerFactoryBean factory = new JaxWsServerFactoryBean();
      factory.setServiceClass(HelloWorld.class);
      factory.setTransportId
      (JMSSpecConstants.SOAP_JMS_SPECIFICATION_TRANSPORTID);
      factory.setAddress(JMS_ENDPOINT_URI);
      factory.setServiceBean(implementor);
      factory.setFeatures(Collections.singletonList(new LoggingFeature()));
      factory.create();

      System.out.println("Server ready...");
      Thread.sleep(5 * 60 * 1000);
      System.out.println("Server exiting");
      System.exit(0);
   }
}
添加依赖项
我们创建的服务器应用程序使用 ActiveMQ 消息服务器。因此,您需要向项目中添加更多依赖项。为了让您了解所需的额外依赖项,这里显示了完整的 pom.xml 文件。
<?xml version = "1.0" encoding = "UTF-8"?>
<project xmlns = "http://maven.apache.org/POM/4.0.0"
   xmlns:xsi = "http://www.w3.org/2001/XMLSchema-instance"
   xsi:schemaLocation = "http://maven.apache.org/POM/4.0.0
   http://maven.apache.org/xsd/maven-4.0.0.xsd">
   <modelVersion>4.0.0</modelVersion>
   <groupId>com.tutorialspoint</groupId>
   <artifactId>cxf-jms</artifactId>
   <version>1.0</version>
   <packaging>jar</packaging>

   <properties>
      <project.build.sourceEncoding>UTF-8</project.build.sourceEncoding>
      <maven.compiler.source>1.8</maven.compiler.source>
      <maven.compiler.target>1.8</maven.compiler.target>
   </properties>

   <profiles>
      <profile>
         <id>server</id>
         <build>
            <defaultGoal>test</defaultGoal>
            <plugins>
               <plugin>
                  <groupId>org.codehaus.mojo</groupId>
                  <artifactId>exec-maven-plugin</artifactId>
                  <version>1.6.0</version>
                  <executions>
                     <execution>
                        <phase>test</phase>
                        <goals>
                           <goal>java</goal>
                        </goals>
                        <configuration>
                           <mainClass>
                              com.tutorialspoint.server.ServerJMS
                           </mainClass>
                        </configuration>
                     </execution>
                  </executions>
               </plugin>
            </plugins>
         </build>
      </profile>
      <profile>
         <id>client</id>
         <build>
            <defaultGoal>test</defaultGoal>
            <plugins>
               <plugin>
                  <groupId>org.codehaus.mojo</groupId>
                  <artifactId>exec-maven-plugin</artifactId>
                  <executions>
                     <execution>
                        <phase>test</phase>
                        <goals>
                           <goal>java</goal>
                        </goals>
                        <configuration>
                           <mainClass>
                              com.tutorialspoint.client.ClientJMS
                           </mainClass>
                        </configuration>
                     </execution>
                  </executions>
               </plugin>
            </plugins>
         </build>
      </profile>
   </profiles>

   <dependencies>
      <dependency>
         <groupId>org.apache.activemq</groupId>
         <artifactId>activemq-broker</artifactId>
         <version>5.15.8</version>
      </dependency>

      <dependency>
         <groupId>org.apache.activemq</groupId>
         <artifactId>activemq-kahadb-store</artifactId>
         <version>5.15.8</version>
      </dependency>

      <dependency>
         <groupId>org.apache.cxf</groupId>
         <artifactId>cxf-rt-frontend-jaxws</artifactId>
         <version>3.3.0</version>
      </dependency>

      <dependency>
         <groupId>org.apache.cxf</groupId>
         <artifactId>cxf-rt-transports-jms</artifactId>
         <version>3.3.0</version>
      </dependency>

      <dependency>
         <groupId>org.apache.cxf</groupId>
         <artifactId>cxf-rt-features-logging</artifactId>
         <version>3.3.0</version>
      </dependency>

      <dependency>
         <groupId>org.apache.cxf</groupId>
         <artifactId>cxf-rt-transports-http-jetty</artifactId>
         <version>3.3.0</version>
      </dependency>
   </dependencies>
</project>
运行服务器
要开始运行服务器,与之前的情况一样,在命令窗口中键入以下命令:
mvn -Pserver
这将启动 ActiveMQ 消息服务器,设置消息队列并创建一个持续监听此队列的工厂 Bean。
我们的下一个任务是创建客户端应用程序。
创建客户端
在客户端应用程序中,我们首先设置与服务器应用程序中使用的相同的 JMS 端点:
private static final String JMS_ENDPOINT_URI =
   "jms:queue:test.cxf.jmstransport.queue?timeToLive=1000"
      + "&jndiConnectionFactoryName=ConnectionFactory"
      + "&jndiInitialContextFactory"
      + " = org.apache.activemq.jndi.ActiveMQInitialContextFactory"
      + "&jndiURL = tcp://:61616";
我们在 POJO 应用程序中创建工厂。
JaxWsProxyFactoryBean factory = new JaxWsProxyFactoryBean();
我们设置端点 URI 和实现类,如下所示:
factory.setTransportId (JMSSpecConstants.SOAP_JMS_SPECIFICATION_TRANSPORTID);
factory.setAddress (JMS_ENDPOINT_URI);
HelloWorld client = factory.create(HelloWorld.class);
最后,我们调用服务方法并打印其结果输出:
String reply = client.sayHi("TutorialsPoint");
System.out.println(reply);
完整的客户端代码如下所示:
// ClientJMS.java
package com.tutorialspoint.client;

import com.tutorialspoint.service.HelloWorld;
import org.apache.cxf.jaxws.JaxWsProxyFactoryBean;
import org.apache.cxf.transport.jms.spec.JMSSpecConstants;

public final class ClientJMS {
   private static final String JMS_ENDPOINT_URI =
   "jms:queue:test.cxf.jmstransport.queue?timeToLive=1000"
   + "&jndiConnectionFactoryName=ConnectionFactory"
   + "&jndiInitialContextFactory"
   + " = org.apache.activemq.jndi.ActiveMQInitialContextFactory"
   + "&jndiURL = tcp://:61616";

   public static void main(String[] args) throws Exception {
      JaxWsProxyFactoryBean factory = new JaxWsProxyFactoryBean();
      factory.setTransportId(JMSSpecConstants.SOAP_JMS_SPECIFICATION_TRANSPORTID);
      factory.setAddress(JMS_ENDPOINT_URI);
      HelloWorld client = factory.create(HelloWorld.class);
      String reply = client.sayHi("TutorialsPoint");
      System.out.println(reply);
      System.exit(0);
   }
}
Apache CXF - 结论
CXF 提供了一种统一的方法来混合和匹配当今世界中存在的多种 Web 协议和传输,以创建 Web 应用程序。您学习了如何从传统的 Java 接口开始创建一个使用 CXF 的 Web 应用程序。接下来,您学习了如何从 WSDL 开始创建 Web 应用程序及其客户端。
WSDL 提供了服务接口的 XML 表示。您使用 wsdl2java 工具从 WSDL 创建 Java 接口,最后使用创建的接口编写服务器和客户端。本教程还简要介绍了如何在 RESTful Web 服务应用程序中使用 CXF。最后,我们还讨论了如何将 CXF 与 JMS 一起使用。您现在可以参考 CXF-samples 以进行进一步的研究。
注意 - 整个项目的源代码可以从此处下载。