- Apache Ivy 教程
- Apache Ivy - 首页
- Apache Ivy - 概述
- Apache Ivy - 环境设置
- Apache Ivy - 术语表
- Apache Ivy - 设置文件
- Apache Ivy - Eclipse Ivy 插件
- Ant Ivy 任务
- Apache Ivy - resolve 命令
- Apache Ivy - install 命令
- Apache Ivy - retrieve 命令
- Apache Ivy - cachepath 命令
- Apache Ivy - publish 命令
- Apache Ivy - info 命令
- 仓库
- Apache Ivy - 解析器
- Apache Ivy - 本地仓库
- Apache Ivy - 共享仓库
- Apache Ivy - 公共仓库
- Apache Ivy 有用资源
- Apache Ivy 快速指南
- Apache Ivy - 有用资源
- Apache Ivy - 讨论
Apache Ivy 快速指南
Apache Ivy - 概述
Apache Ivy是一个非常流行且功能强大的依赖管理工具,用于管理基于Ant的项目中的依赖关系,其方式与Apache Maven管理依赖关系的方式相同。
Apache Ivy基于Apache Ant,遵循相同的設計原則,是Apache Ant的一個子項目,並由Apache Ant社區積極管理和支持。
特性
以下是Apache Ivy的重要特性。
基于Ant − Apache Ivy为基于Ant的项目提供依赖管理功能。它也非常易于使用。
依赖报告 − Apache Ivy提供选项以HTML和报告格式打印依赖关系图。
非侵入式 − Apache Ivy不会强加任何必须作为发行版一部分的限制。即使构建文件也不依赖于Apache Ivy。
高度灵活 − Apache Ivy提供了许多默认配置,并且可以很容易地根据需要进行配置。
可扩展 − Apache Ivy易于扩展。您可以定义自己的仓库、冲突解析器和最新策略。
性能 − Apache Ivy构建的目标是性能。它保留已下载库的缓存。首先查看本地仓库以解析依赖项,然后再查看其他仓库。
传递依赖 − 如果一个项目或库依赖于另一个可能需要另一个库的库,Apache Ivy会自动管理传递依赖项。
Maven仓库 − Apache Ivy遵循类似于Maven仓库的约定。Apache Ivy可以使用Maven全局仓库来解析依赖项。
Maven 2 POMs − Apache Ivy可以读取Maven 2 POMs作为模块描述符,可以将ivy设置为模块描述符。因此,它可以轻松地将现有项目迁移到Ivy管理的项目。
发布 − Apache Ivy提供支持以发布您的项目,并简化多项目环境的部署过程。
免费使用 − Apache Ivy是开源的,可以免费使用。
文档 − Apache Ivy拥有非常详细的文档和教程可供学习。
Apache Ivy - 环境设置
Apache Ivy只需要在您的机器上安装Java和Ant。
Apache Ant根据Apache软件许可证(一个由开源倡议认证的成熟的开源许可证)发行。
最新的Apache Ant版本(包括其完整的源代码、类文件和文档)可以在https://ant.apache.org找到。
安装Apache Ant
假设您已经在计算机上下载并安装了Java开发工具包(JDK)。如果没有,请按照这里的说明操作。
确保已将JAVA_HOME环境变量设置为JDK安装的文件夹。
从https://ant.apache.org下载二进制文件
使用Winzip、winRAR、7-zip或类似工具将zip文件解压缩到方便的位置c:\folder。
创建一个名为ANT_HOME的新环境变量,指向Ant安装文件夹,在本例中为c:\apache-ant-1.10.12-bin文件夹。
将Apache Ant批处理文件的路径添加到PATH环境变量。在本例中,这是c:\apache-ant-1.10.12-bin\bin文件夹。
验证Apache Ant安装
要在您的计算机上验证Apache Ant的安装是否成功,请在命令提示符中键入ant。
您应该看到类似于以下的输出:
C:\>ant -version
Apache Ant(TM) version 1.10.12 compiled on October 13 2021
如果看不到上述输出,请验证您是否正确地按照安装步骤操作。
安装Apache Ivy
从https://ant.apache.org/ivy下载二进制文件
使用Winzip、winRAR、7-zip或类似工具将zip文件解压缩到方便的位置c:\folder。
将ivy-2.5.0.jar复制到c:\apache-ant-1.10.12-bin/lib文件夹。
验证Apache Ivy安装
要在您的计算机上验证Apache Ivy的安装是否成功,请在E: > ivy文件夹中创建一个以下构建文件。
<project name="test ivy installation"
   default="test" xmlns:ivy="antlib:org.apache.ivy.ant">
   <target name="test" description="Test ivy installation">
      <ivy:settings />
   </target>
</project>
您应该看到类似于以下的输出:
C:\>ant
Buildfile: E:\ivy\build.xml

test:

BUILD SUCCESSFUL
Total time: 2 seconds
安装Eclipse
本教程还介绍了Ant与Eclipse IDE的集成。因此,如果您尚未安装Eclipse,请下载并安装Eclipse
安装Eclipse:
从www.eclipse.org下载最新的Eclipse二进制文件
将Eclipse二进制文件解压缩到方便的位置,例如c:\folder
从c:\eclipse\eclipse.exe运行Eclipse
Apache Ivy - 术语表
考虑以下示例ivy.xml以了解Ivy术语。
<?xml version="1.0" encoding="ISO-8859-1"?>
<ivy-module version="2.0"
   xmlns:xsi="http://www.w3.org/2001/XMLSchema-instance"
   xsi:noNamespaceSchemaLocation="https://ant.apache.org/ivy/schemas/ivy.xsd">
   <info organisation="com.tutorialspoint" module="ivy-test" status="integration">
   </info>
   <dependencies>
      <dependency org="commons-lang" name="commons-lang" rev="2.6" />
   </dependencies>
</ivy-module>
Ivy术语
以下是Ivy生态系统中的重要术语。
组织 −顾名思义,它指的是创建项目或库的公司、个人开发者或团队的名称。例如,com.tutorialspoint。
模块 −顾名思义,它指的是可重用的单元或模块。模块通常带有与其关联的版本。例如commons-lang或ivy-test等。
模块描述符 −模块描述符指的是描述模块的ivy.xml文件。模块描述符包含标识符(组织、名称、分支和版本)、发布的工件、配置和依赖项。
工件 −工件指的是作为可交付成果的单个文件。例如,jar文件。工件可以是zip、gz等类型。Jar、源Jar、Javadoc Jar是模块的各种工件。
类型 −类型标识工件类别,例如jar、war、src、doc等。
工件文件名扩展名 −工件扩展名,例如.jar、.zip、.gz等。
模块版本 −模块的唯一版本号或其版本号。
版本的狀態 −版本的狀態指示版本的穩定性。以下是狀態的重要值:
integration −表示持续开发、夜间构建等。
milestone −表示一个发行版,但尚未最终确定。
release −表示经过测试并完成,一个主要版本。
仓库 −类似于Maven仓库,仓库表示一个分发站点,Ivy可以在其中搜索库、工件、模块等。仓库可以是公共的、私有的或共享的。
Ivy设置 −Apache Ivy遵循Maven原则,并附带许多默认配置。可以通过定义ivysettings.xml文件来覆盖默认设置。
Apache Ivy - 设置文件
Apache Ivy遵循Maven原则,并附带许多默认配置。可以通过定义ivysettings.xml文件来覆盖默认设置。
<ivysettings>
   <properties file="${ivy.settings.dir}/ivysettings-file.properties" />
   <settings defaultCache="${cache.dir}" defaultResolver="ibiblio" checkUpToDate="false" />
   <resolvers>
      <ibiblio name="ibiblio" />
      <filesystem name="internal">
         <ivy pattern="${repository.dir}/[module]/ivy-[revision].xml" />
         <artifact pattern="${repository.dir}/[module]/[artifact]-[revision].[ext]" />
      </filesystem>
   </resolvers>
   <modules>
      <module organisation="tutorialspoint" name=".*" resolver="internal" />
   </modules>
</ivysettings>
Ivy设置文件的标签
以下是Ivy设置文件的重要标签。
property −设置Ivy变量。基数:0..n
properties −使用属性文件设置Ivy变量。基数:0..n
settings −使用默认值配置Ivy。基数:0..1
include −包含另一个设置文件。基数:0..n
classpath −将位置添加到用于加载插件的类路径中。基数:0..n
typedef −在Ivy中定义新类型。基数:0..n
lock-strategies −定义锁定策略。基数:0..1
caches −定义仓库缓存管理器。基数:0..1
latest-strategies −定义最新策略。基数:0..1
parsers −定义模块描述符解析器。基数:0..1
version-matchers −定义新的版本匹配器。基数:0..1
triggers −在Ivy事件上注册触发器。基数:0..1
namespaces −定义新的命名空间。基数:0..1
macrodef −定义新的宏解析器。基数:0..n
resolvers −定义依赖项解析器。基数:0..1
conflict-managers −定义冲突管理器。基数:0..1
modules −定义模块和依赖项解析器之间的规则。基数:0..1
outputters −定义可用报表输出器的列表。基数:0..1
statuses −定义可用状态的列表。基数:0..1
Apache Ivy - Eclipse Ivy 插件
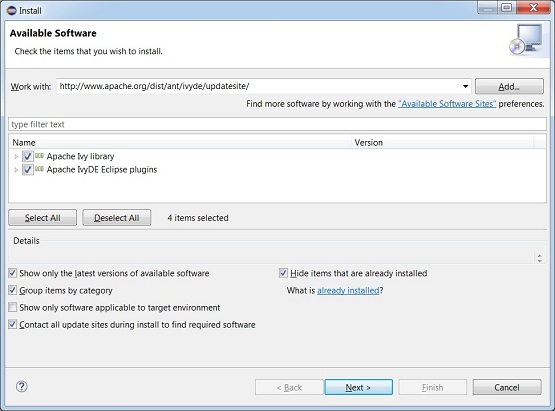
IvyDE是Apache提供的Eclipse插件。要安装IvyDE,请启动Eclipse并导航到帮助 > 安装新软件。它将显示“可用软件”窗口。输入IvyDE更新站点https://apache.org/dist/ant/ivyde/updatesite/并按Enter键。它将显示以下插件。
单击“下一步”,您将看到以下屏幕。
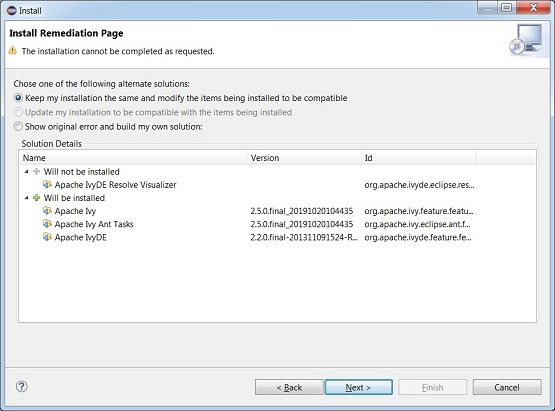
如果在安装插件时遇到任何错误,只需重新启动该过程即可。成功安装后,您将在eclipe中看到该插件。
现在您可以使用Eclipse和Ivy进行依赖管理。
Apache Ivy - Resolve 任务
Resolve任务用于解析ivy.xml中描述的依赖项,下载并将它们放入Ivy缓存。
让我们首先在E: > ivy > src > com > tutorialspoint文件夹中创建一个java文件Tester.java,它将充当ant项目的源文件夹。
Application.java
package com.tutorialspoint;
import org.apache.commons.lang.StringUtils;
public class Application {
   public static void main(String[] args) {
      String string = StringUtils.upperCase("Ivy Beginner Guide");
      System.out.println(string);
   }
}
上面的类使用apache commons lang库来使用其类StringUtils。Ivy应该下载此库,因此它应该在ivy.xml的dependencies部分中定义。以下是E: > ivy文件夹中创建的ivy.xml。
ivy.xml
<?xml version="1.0" encoding="ISO-8859-1"?>
<ivy-module version="2.0" xmlns:xsi="http://www.w3.org/2001/XMLSchema-instance"
   xsi:noNamespaceSchemaLocation="https://ant.apache.org/ivy/schemas/ivy.xsd">
   <info
      organisation="com.tutorialspoint"
      module="test"
      status="integration">
   </info>
   <dependencies>
      <dependency org="org.apache.commons" name="commons-lang3" rev="3.9"/>
   </dependencies>
</ivy-module>
以下是重要的术语。
ivy-module −根元素,用于标识Ivy版本、命名空间等。
info −元素,用于将项目标识为唯一实体。
organisation −组织的名称
module −模块的名称
status −状态,例如release、integration或milestone。
dependencies −元素,包含项目依赖项作为dependency标签,它具有以下属性。
org −依赖项组织的名称
name −依赖项的名称。
rev −依赖项的版本。
build.xml
<project name="test" default="resolve" xmlns:ivy="antlib:org.apache.ivy.ant">
   <target name="resolve" description="resolve dependencies">
      <ivy:resolve />
   </target>
</project<
以下是重要的术语。
project −根元素,用于标识项目名称、Ivy的默认任务命名空间等。
target −target元素,用于创建一个新任务及其描述。这包含一个ivy resolve任务。当ant构建项目时,它将运行ivy resolve任务,然后使用ivy解析依赖项。
构建项目
由于我们已经准备好所有文件。只需转到控制台。导航到E: > ivy文件夹并运行ant命令。
E:\ivy > ant
Ivy将开始运行,解析依赖项,您将看到以下结果。
Buildfile: E:\ivy\build.xml
resolve:
[ivy:resolve] :: Apache Ivy 2.5.0 - 20191020104435 :: https://ant.apache.org/ivy
/ ::
[ivy:resolve] :: loading settings :: url = jar:file:/E:/Apache/apache-ant-1.9.14
/lib/ivy-2.5.0.jar!/org/apache/ivy/core/settings/ivysettings.xml
[ivy:resolve] :: resolving dependencies :: com.tutorialspoint#test;working@Acer-
PC
[ivy:resolve]   confs: [default]
[ivy:resolve]   found commons-lang#commons-lang;2.6 in public
[ivy:resolve]   found junit#junit;3.8.1 in public
[ivy:resolve] :: resolution report :: resolve 375ms :: artifacts dl 79ms
      ---------------------------------------------------------------------
      |                  |            modules            ||   artifacts   |
      |       conf       | number| search|dwnlded|evicted|| number|dwnlded|
      ---------------------------------------------------------------------
      |      default     |   2   |   2   |   0   |   0   ||   4   |   0   |
      ---------------------------------------------------------------------
[ivy:retrieve] :: retrieving :: com.tutorialspoint#test [sync]
[ivy:retrieve]  confs: [default]
[ivy:retrieve]  0 artifacts copied, 2 already retrieved (0kB/101ms)
BUILD SUCCESSFUL
Total time: 1 second
E:\ivy>
Resolve输出
以下是重要的术语。
conf −配置,在本例中,我们使用默认配置。
modules −指示模块总数、下载的模块等。
artifacts −指示工件总数、下载的工件等。
您可以在Ivy缓存的默认位置${ivy.default.ivy.user.dir} > .ivy2 > cache文件夹中验证下载的文件。而${ivy.default.ivy.user.dir}默认情况下是用户主目录:$HOME。
Apache Ivy - Install 任务
Install任务用于在解析器中安装模块及其依赖项。当要下载公共工件并在私有仓库中使用时,可以使用它。默认情况下,用户的本地仓库是其私有仓库,位于${ivy.default.ivy.user.dir}/local。
让我们创建Tester.java、build.xml和ivy.xml,如Ivy - Resolve任务章节中所述。
更新build.xml以使用ivy install任务。
build.xml
<project name="test" default="resolve" xmlns:ivy="antlib:org.apache.ivy.ant">
   <target name="resolve" description="resolve dependencies">
      <ivy:resolve />
   </target>
   <target name="install" description="install dependencies">
      <ivy:install organisation="commons-lang" module="commons-lang"
         revision="2.6" transitive="true" overwrite="false"
         from="public" to="local" />
   </target>
</project>
以下是重要的术语。
组织机构 − 组织机构的名称。
模块 − 项目的模块名称。
版本 − 项目的版本。
来源 − 源代码仓库类型。
目标 − 目标代码仓库类型。
构建项目
由于我们已经准备好所有文件。只需转到控制台。导航到E: > ivy文件夹并运行ant命令。
E:\ivy > ant install
Ivy将开始运行,解析依赖项,您将看到以下结果。
E:\ivy > ant install
Buildfile: E:\ivy\build.xml
install:
[ivy:install] :: Apache Ivy 2.5.0 - 20191020104435 :: https://ant.apache.org/ivy
/ ::
[ivy:install] :: loading settings :: url = jar:file:/E:/Apache/apache-ant-1.9.14
/lib/ivy-2.5.0.jar!/org/apache/ivy/core/settings/ivysettings.xml
[ivy:install] :: installing commons-lang#commons-lang;2.6 ::
[ivy:install] :: resolving dependencies ::
[ivy:install]   found commons-lang#commons-lang;2.6 in public
[ivy:install]   found junit#junit;3.8.1 in public
[ivy:install] :: downloading artifacts to cache ::
[ivy:install] :: installing in local ::
[ivy:install]   published commons-lang to C:\Users\Acer\.ivy2\local\commons-lang
\commons-lang\2.6.part\sources\commons-lang.jar
[ivy:install]   published commons-lang to C:\Users\Acer\.ivy2\local\commons-lang
\commons-lang\2.6.part\jars\commons-lang.jar
[ivy:install]   published commons-lang to C:\Users\Acer\.ivy2\local\commons-lang
\commons-lang\2.6.part\javadocs\commons-lang.jar
[ivy:install]   published ivy to C:\Users\Acer\.ivy2\local\commons-lang\commons-
lang\2.6.part\ivys\ivy.xml
[ivy:install]   publish committed: moved C:\Users\Acer\.ivy2\local\commons-lang\
commons-lang\2.6.part
[ivy:install]           to C:\Users\Acer\.ivy2\local\commons-lang\commons-lang\2
.6
[ivy:install]   published junit to C:\Users\Acer\.ivy2\local\junit\junit\3.8.1.p
art\jars\junit.jar
[ivy:install]   published ivy to C:\Users\Acer\.ivy2\local\junit\junit\3.8.1.par
t\ivys\ivy.xml
[ivy:install]   publish committed: moved C:\Users\Acer\.ivy2\local\junit\junit\3
.8.1.part
[ivy:install]           to C:\Users\Acer\.ivy2\local\junit\junit\3.8.1
[ivy:install] :: install resolution report ::
[ivy:install] :: resolution report :: resolve 0ms :: artifacts dl 21ms
      ---------------------------------------------------------------------
      |                  |            modules            ||   artifacts   |
      |       conf       | number| search|dwnlded|evicted|| number|dwnlded|
      ---------------------------------------------------------------------
      |      default     |   2   |   0   |   0   |   0   ||   4   |   0   |
      ---------------------------------------------------------------------
BUILD SUCCESSFUL
Total time: 43 seconds
您可以验证Ivy缓存默认本地仓库位置${ivy.default.ivy.user.dir} > .ivy2 > local目录下的已下载文件。
Apache Ivy - 获取任务
获取任务用于将依赖项解析到项目工作区中的指定位置。
让我们创建Tester.java、build.xml和ivy.xml,如Ivy - Resolve任务章节中所述。
更新build.xml以使用Ivy获取任务。
build.xml
<project name="test" default="resolve" xmlns:ivy="antlib:org.apache.ivy.ant">
   <target name="resolve" description="resolve dependencies">
      <ivy:resolve />
      <ivy:retrieve sync="true" type="jar" />
   </target>
</project>
以下是重要的术语。
sync − 将sync设置为true可确保lib目录是最新的,并且任何多余的文件都会被删除。
type − type指示Ivy仅复制指定类型的构件,例如jar。源jar、javadoc jar将被忽略。源jar的类型为src或source,javadoc jar的类型为doc或bundle。
获取任务默认情况下将解析的依赖项复制到项目的lib目录中,并且可以使用pattern属性进行更改。
构建项目
由于我们已经准备好所有文件。只需转到控制台。导航到E: > ivy文件夹并运行ant命令。
E:\ivy > ant
Ivy将开始运行,解析依赖项,您将看到以下结果。
Buildfile: E:\ivy\build.xml
resolve:
[ivy:resolve] :: Apache Ivy 2.5.0 - 20191020104435 :: https://ant.apache.org/ivy
/ ::
[ivy:resolve] :: loading settings :: url = jar:file:/E:/Apache/apache-ant-1.9.14
/lib/ivy-2.5.0.jar!/org/apache/ivy/core/settings/ivysettings.xml
[ivy:resolve] :: resolving dependencies :: com.tutorialspoint#test;working@Acer-
PC
[ivy:resolve]   confs: [default]
[ivy:resolve]   found commons-lang#commons-lang;2.6 in public
[ivy:resolve]   found junit#junit;3.8.1 in public
[ivy:resolve] :: resolution report :: resolve 316ms :: artifacts dl 18ms
      ---------------------------------------------------------------------
      |                  |            modules            ||   artifacts   |
      |       conf       | number| search|dwnlded|evicted|| number|dwnlded|
      ---------------------------------------------------------------------
      |      default     |   2   |   2   |   0   |   0   ||   4   |   0   |
      ---------------------------------------------------------------------
[ivy:retrieve] :: retrieving :: com.tutorialspoint#test [sync]
[ivy:retrieve]  confs: [default]
[ivy:retrieve]  0 artifacts copied, 2 already retrieved (0kB/2756ms)
BUILD SUCCESSFUL
Total time: 31 seconds
您可以在项目lib目录中验证已下载的文件。
Apache Ivy - Cachepath任务
cachepath任务用于使用缓存中存在的已解析构件创建ANT类路径。由于ANT需要将jar添加到类路径才能编译Java文件,因此Ivy cachepath构建类路径。
让我们像在Ivy - 解析任务章节中所述的那样,创建Tester.java、build.xml和ivy.xml。
更新build.xml以使用Ivy获取任务。
build.xml
<project name="test" default="resolve" xmlns:ivy="antlib:org.apache.ivy.ant">
   <target name="resolve" description="resolve dependencies">
      <ivy:resolve />
      <ivy:cachepath pathid="new.classpath" />
   </target>
   <target name="compile" depends="resolve" description="Compile">
      <mkdir dir="build/classes" />
      <javac srcdir="src" destdir="build/classes">
         <classpath refid="new.classpath" />
      </javac>
   </target>
</project>
以下是重要的术语。
pathid − 缓存的jar所在的类路径的ID。
获取任务默认情况下将解析的依赖项复制到项目的lib目录中,并且可以使用pattern属性进行更改。
构建项目
由于我们已经准备好所有文件。只需转到控制台。导航到E: > ivy文件夹并运行ant命令。
E:\ivy > ant compile
Ivy将开始运行,解析依赖项,您将看到以下结果。
Buildfile: E:\ivy\build.xml
resolve:
[ivy:resolve] :: Apache Ivy 2.5.0 - 20191020104435 :: https://ant.apache.org/ivy
/ ::
[ivy:resolve] :: loading settings :: url = jar:file:/E:/Apache/apache-ant-1.9.14
/lib/ivy-2.5.0.jar!/org/apache/ivy/core/settings/ivysettings.xml
[ivy:resolve] :: resolving dependencies :: com.tutorialspoint#test;working@Acer-
PC
[ivy:resolve]   confs: [default]
[ivy:resolve]   found commons-lang#commons-lang;2.6 in public
[ivy:resolve]   found junit#junit;3.8.1 in public
[ivy:resolve] :: resolution report :: resolve 2314ms :: artifacts dl 15ms
      ---------------------------------------------------------------------
      |                  |            modules            ||   artifacts   |
      |       conf       | number| search|dwnlded|evicted|| number|dwnlded|
      ---------------------------------------------------------------------
      |      default     |   2   |   2   |   0   |   0   ||   4   |   0   |
      ---------------------------------------------------------------------
compile:
   [javac] E:\ivy\build.xml:13: warning: 'includeantruntime' was not set, defau
lting to build.sysclasspath=last; set to false for repeatable builds
   [javac] Compiling 1 source file to E:\ivy\build\classes
BUILD SUCCESSFUL
Total time: 3 seconds
您可以在项目build目录中验证已编译的类文件。
Apache Ivy - 发布任务
发布任务用于将当前构件及其解析的描述符文件发布到指定的仓库。
让我们像在Ivy - 解析任务章节中所述的那样,创建Tester.java、build.xml和ivy.xml。
更新build.xml以使用Ivy发布任务。首先,我们将创建一个jar文件,然后发布它。
build.xml
<project name="test" default="resolve" xmlns:ivy="antlib:org.apache.ivy.ant">
   <property name = "build.dir" value = "build"/>
   <target name="resolve" description="resolve dependencies">
      <ivy:resolve />
   </target>
   <target name = "jar">
      <jar destfile = "${build.dir}/lib/application.jar"
         basedir = "${build.dir}/classes">
         <manifest>
            <attribute name = "Main-Class" value = "com.tutorialspoint.Application"/>
         </manifest>
      </jar>
   </target>
   <target name="publish" depends="jar">
      <ivy:resolve />
      <ivy:publish resolver="local" pubrevision="1.0" overwrite="true">
         <artifacts pattern="${build.dir}/lib/[artifact].[ext]" />
      </ivy:publish>
   </target>
</project>
以下是重要的术语。
resolver − 用于发布的解析器。
pattern − 定位构件的模式。
此处,发布任务首先构建jar,然后解析依赖项,设置信息,然后将构件发布到本地仓库。
构建项目
由于我们已经准备好所有文件。只需转到控制台。导航到E: > ivy文件夹并运行ant命令。
E:\ivy > ant publish
Ivy将开始运行,解析依赖项,您将看到以下结果。
E:\ivy > ant publish
Buildfile: E:\ivy\build.xml
jar:
publish:
[ivy:resolve] :: Apache Ivy 2.5.0 - 20191020104435 :: https://ant.apache.org/ivy
/ ::
[ivy:resolve] :: loading settings :: url = jar:file:/E:/Apache/apache-ant-1.9.14
/lib/ivy-2.5.0.jar!/org/apache/ivy/core/settings/ivysettings.xml
[ivy:resolve] :: resolving dependencies :: com.tutorialspoint#test;1.0.0
[ivy:resolve]   confs: [default]
[ivy:resolve]   found commons-lang#commons-lang;2.6 in public
[ivy:resolve]   found junit#junit;3.8.1 in public
[ivy:resolve] :: resolution report :: resolve 121ms :: artifacts dl 15ms
      ---------------------------------------------------------------------
      |                  |            modules            ||   artifacts   |
      |       conf       | number| search|dwnlded|evicted|| number|dwnlded|
      ---------------------------------------------------------------------
      |      default     |   2   |   2   |   0   |   0   ||   4   |   0   |
      ---------------------------------------------------------------------
[ivy:publish] :: publishing :: com.tutorialspoint#test
[ivy:publish]   published application to C:\Users\Acer\.ivy2\local\com.tutorials
point\test\1.0\jars\application.jar
[ivy:publish]   published ivy to C:\Users\Acer\.ivy2\local\com.tutorialspoint\te
st\1.0\ivys\ivy.xml
BUILD SUCCESSFUL
Total time: 1 second
您可以在本地仓库中验证已发布的Ivy构件。
Apache Ivy - Info任务
info任务用于在文件中设置Ivy特定信息,并且可以在没有依赖项解析的情况下使用。
让我们创建Tester.java、build.xml和ivy.xml,如Ivy - Resolve任务章节中所述。
更新build.xml以使用Ivy发布任务。首先,我们将创建一个jar文件,然后发布它。在发布任务之前,我们使用info任务设置了所需的Ivy信息。
build.xml
<project name="test" default="resolve" xmlns:ivy="antlib:org.apache.ivy.ant">
   <property name = "build.dir" value = "build"/>
   <target name="resolve" description="resolve dependencies">
      <ivy:resolve />
   </target>
   <target name = "jar">
      <jar destfile = "${build.dir}/lib/application.jar"
         basedir = "${build.dir}/classes">
         <manifest>
            <attribute name = "Main-Class" value = "com.tutorialspoint.Application"/>
         </manifest>
      </jar>
   </target>
   <target name="publish" depends="jar">
      <ivy:info file="ivy.xml" />
      <ivy:publish resolver="local" pubrevision="1.0" overwrite="true">
         <artifacts pattern="${build.dir}/lib/[artifact].[ext]" />
      </ivy:publish>
   </target>
</project>
此处,发布任务首先构建jar,然后使用ivy:info任务设置信息,然后将构件发布到本地仓库。
构建项目
由于我们已经准备好所有文件。只需转到控制台。导航到E: > ivy文件夹并运行ant命令。
E:\ivy > ant publish
Ivy将开始运行,解析依赖项,您将看到以下结果。
Buildfile: E:\ivy\build.xml
jar:
publish:
 [ivy:info] :: Apache Ivy 2.5.0 - 20191020104435 :: https://ant.apache.org/ivy/
::
 [ivy:info] :: loading settings :: url = jar:file:/E:/Apache/apache-ant-1.9.14/l
ib/ivy-2.5.0.jar!/org/apache/ivy/core/settings/ivysettings.xml
[ivy:publish] :: publishing :: com.tutorialspoint#test
[ivy:publish]   published application to C:\Users\Acer\.ivy2\local\com.tutorials
point\test\1.0\jars\application.jar
[ivy:publish]   published ivy to C:\Users\Acer\.ivy2\local\com.tutorialspoint\te
st\1.0\ivys\ivy.xml
BUILD SUCCESSFUL
Total time: 0 seconds
如果我们不使用info任务,则发布任务将无法工作。使用下面修改后的build.xml,查看缺少组织机构属性等的错误。
build.xml
<project name="test" default="resolve" xmlns:ivy="antlib:org.apache.ivy.ant">
   <property name = "build.dir" value = "build"/>
   <target name="resolve" description="resolve dependencies">
      <ivy:resolve />
   </target>
   <target name = "jar">
      <jar destfile = "${build.dir}/lib/application.jar"
         basedir = "${build.dir}/classes">
         <manifest>
            <attribute name = "Main-Class" value = "com.tutorialspoint.Application"/>
         </manifest>
      </jar>
   </target>
   <target name="publish" depends="jar">
      <ivy:publish resolver="local" pubrevision="1.0" overwrite="true">
         <artifacts pattern="${build.dir}/lib/[artifact].[ext]" />
      </ivy:publish>
   </target>
</project>
导航到E: > ivy文件夹并运行ant命令。
E:\ivy > ant publish
Ivy将开始运行,解析依赖项,您将看到以下结果。
Buildfile: E:\ivy\build.xml
jar:
publish:
[ivy:publish] :: Apache Ivy 2.5.0 - 20191020104435 :: https://ant.apache.org/ivy
/ ::
[ivy:publish] :: loading settings :: url = jar:file:/E:/Apache/apache-ant-1.9.14
/lib/ivy-2.5.0.jar!/org/apache/ivy/core/settings/ivysettings.xml
BUILD FAILED
E:\ivy\build.xml:28: no organisation provided for ivy publish task: It can eithe
r be set explicitly via the attribute 'organisation' or via 'ivy.organisation' p
roperty or a prior call to <resolve/>
Total time: 3 seconds
Apache Ivy - 解析器
解析器用于查找要从中下载库的位置。依赖项解析器还处理常见任务。Ivy提供两种类型的解析器。
组合型 − 使用其他解析器来执行其任务的解析器。
标准型 − 执行所需任务的解析器。
标准解析器
下表列出了标准解析器及其用法。
| 序号 | 名称(类型)和描述 |
|---|---|
| 1 | IvyRep (标准型) 在ivyrep上查找Ivy文件,在ibiblio上查找构件。 |
| 2 | IBiblio (标准型) 在ibiblio上查找构件。 |
| 3 | BinTray (标准型) 在bintray上查找构件。 |
| 4 | Packager (标准型) 通过URL查找Ivy文件和打包说明,使用说明创建构件。 |
| 5 | FileSystem (标准型) 在本地文件系统上查找Ivy文件和构件。 |
| 6 | URL (标准型) 在可以使用URL访问的仓库上查找Ivy文件和构件。 |
| 7 | MirroredURL (标准型) 在可以使用URL从镜像列表访问的仓库上查找Ivy文件和构件。 |
| 8 | VFS (标准型) 在可以使用Apache Commons VFS访问的仓库上查找Ivy文件和构件。 |
| 9 | SSH (标准型) 在可以使用SSH访问的仓库上查找Ivy文件和构件。 |
| 10 | SFTP (标准型) 在可以使用SFTP访问的仓库上查找Ivy文件和构件。 |
| 11 | Jar (标准型) 在jar内的仓库中查找Ivy文件和构件。 |
| 12 | Chain (组合型) 将搜索委托给一系列子解析器。 |
| 13 | Dual (组合型) 将搜索委托给一个解析器,将构件委托给另一个解析器。 |
| 14 | OBR (标准型) 将模块解析为OSGi obr.xml列出的OSGi捆绑包。 |
| 15 | Eclipse updatesite (标准型) 将模块解析为托管在Eclipse更新站点上的OSGi捆绑包。 |
| 16 | OSGi-agg (组合型) 将搜索委托给一系列支持OSGi捆绑包的子解析器。 |
让我们在E: > ivy2文件夹下创建一个新项目,并在其中创建Tester.java、build.xml和ivy.xml,类似于Ivy - 解析任务章节中所述。在E: > ivy2下创建一个settings文件夹。在settings文件夹中创建ivysettings.xml。
build.xml
<project name="test" default="resolve" xmlns:ivy="antlib:org.apache.ivy.ant">
   <property name = "build.dir" value = "build"/>
   <property name = "base.dir" value = ""/>
   <target name="resolve" description="resolve dependencies">
      <ivy:resolve />
   </target>
   <target name="compile" depends="resolve" description="Compile">
      <mkdir dir="build/classes" />
      <javac srcdir="src" destdir="build/classes">
         <classpath refid="new.classpath" />
      </javac>
   </target>
</project>
ivy.xml
<?xml version="1.0" encoding="ISO-8859-1"?>
<ivy-module version="2.0" xmlns:xsi="http://www.w3.org/2001/XMLSchema-instance"
   xsi:noNamespaceSchemaLocation="https://ant.apache.org/ivy/schemas/ivy.xsd">
   <info organisation="org.apache" module="chained-resolvers"/>
   <dependencies>
      <dependency org="commons-lang" name="commons-lang" rev="2.6" conf="default"/>
      <dependency org="com.tutorialspoint" name="test" rev="1.0"/>
   </dependencies>
</ivy-module>
在这里,我们添加了两个依赖项,一个是commons-lang库,另一个是我们Ivy - 发布任务章节中发布的测试依赖项。
ivysettings.xml
<ivysettings>
   <settings defaultResolver="multiresolver"/>
   <resolvers>
      <chain name="multiresolver">
         <filesystem name="libraries">
            <artifact pattern="${ivy.settings.dir}/repository/[artifact]-[revision].[ext]"/>
         </filesystem>
         <ibiblio name="ibiblio" m2compatible="true"/>
      </chain>
   </resolvers>
</ivysettings>
在这里,我们使用chain解析器创建了一个组合型解析器,它有两个解析器,一个名为libraries,用于在本地仓库中查找库,另一个名为ibiblio,用于在Maven公共仓库中查找库。
构建项目
由于我们已经准备好了所有文件。只需转到控制台。导航到E: > ivy2文件夹并运行ant命令。
E:\ivy > ant
Ivy将开始运行,解析依赖项,您将看到以下结果。
Buildfile: E:\ivy2\build.xml
resolve:
[ivy:resolve] :: Apache Ivy 2.5.0 - 20191020104435 :: https://ant.apache.org/ivy
/ ::
[ivy:resolve] :: loading settings :: url = jar:file:/E:/Apache/apache-ant-1.9.14
/lib/ivy-2.5.0.jar!/org/apache/ivy/core/settings/ivysettings.xml
[ivy:resolve] :: resolving dependencies :: org.apache#chained-resolvers;working@
Acer-PC
[ivy:resolve]   confs: [default]
[ivy:resolve]   found commons-lang#commons-lang;2.6 in public
[ivy:resolve]   found com.tutorialspoint#test;1.0 in local
[ivy:resolve]   found junit#junit;3.8.1 in public
[ivy:resolve] downloading C:\Users\Acer\.ivy2\local\com.tutorialspoint\test\1.0\
jars\application.jar ...
[ivy:resolve] .. (1kB)
[ivy:resolve] .. (0kB)
[ivy:resolve]   [SUCCESSFUL ] com.tutorialspoint#test;1.0!application.jar (13ms)
[ivy:resolve] :: resolution report :: resolve 1085ms :: artifacts dl 22ms
      ---------------------------------------------------------------------
      |                  |            modules            ||   artifacts   |
      |       conf       | number| search|dwnlded|evicted|| number|dwnlded|
      ---------------------------------------------------------------------
      |      default     |   3   |   3   |   1   |   0   ||   5   |   1   |
      ---------------------------------------------------------------------
BUILD SUCCESSFUL
Total time: 9 seconds
在日志中,您可以验证我们使用了本地和公共仓库解析器。
Apache Ivy - 本地仓库
本地仓库是用户的私有仓库。如果用户使用的库在其他地方的版本已更改并且存在重大更改,则它非常有用。对于本地仓库,如果找到,Ivy将使用本地库中存在的库,并且不会查找公共或共享仓库。
默认位置
默认情况下,本地仓库位于${ivy.default.ivy.user.dir}/local文件夹中。如果要更改它,请在ant文件中使用ivy.local.default.root变量。
build.xml
<target name="resolve">
   <property name="ivy.local.default.root" value="/opt/ivy/repository/local"/>
   <ivy:resolve />
</target>
其他属性,如Ivy模式和构件模式,也可以如下自定义:
build.xml
<target name="resolve">
   <property name="ivy.local.default.root" value="/opt/ivy/repository/local"/>
   <property name="ivy.local.default.ivy.pattern" value="[module]/[revision]/ivy.xml"/>
   <property name="ivy.local.default.artifact.pattern" value="[module]/[revision]/[artifact].[ext]"/>
   <ivy:resolve />
</target>
覆盖ivysettings默认值
默认情况下,Ivy在其ivy.jar中存在的ivysettings.xml中具有其配置。
ivysettings.xml
<ivysettings>
   <settings defaultResolver="default"/>
   <include url="${ivy.default.settings.dir}/ivysettings-public.xml"/>
   <include url="${ivy.default.settings.dir}/ivysettings-shared.xml"/>
   <include url="${ivy.default.settings.dir}/ivysettings-local.xml"/>
   <include url="${ivy.default.settings.dir}/ivysettings-main-chain.xml"/>
   <include url="${ivy.default.settings.dir}/ivysettings-default-chain.xml"/>
</ivysettings>
要覆盖本地仓库设置,请更新ivysettings-local.xml的内容。
ivysettings-local.xml
<ivysettings>
   <property name="ivy.local.default.root" value="${ivy.default.ivy.user.dir}/local" override="false"/>
   <property name="ivy.local.default.ivy.pattern" value="[organisation]/[module]/[revision]/[type]s/[artifact].[ext]" override="false"/>
   <property name="ivy.local.default.artifact.pattern" value="[organisation]/[module]/[revision]/[type]s/[artifact].[ext]" override="false"/>
   <resolvers>
      <filesystem name="local">
         <ivy pattern="${ivy.local.default.root}/${ivy.local.default.ivy.pattern}" />
         <artifact pattern="${ivy.local.default.root}/${ivy.local.default.artifact.pattern}" />
      </filesystem>
   </resolvers>
</ivysettings>
Apache Ivy - 共享仓库
共享仓库是团队级别的共享仓库。在组织中被覆盖是很常见的。
默认位置
默认情况下,共享仓库位于${ivy.default.ivy.user.dir}/shared文件夹中。如果要更改它,请在ant文件中使用ivy.shared.default.root变量。
build.xml
<target name="resolve">
   <property name="ivy.shared.default.root" value="/opt/ivy/repository/shared"/>
   <ivy:resolve />
</target>
其他属性,如Ivy模式和构件模式,也可以如下自定义:
build.xml
<target name="resolve">
   <property name="ivy.shared.default.root" value="/opt/ivy/repository/shared"/>
   <property name="ivy.shared.default.ivy.pattern" value="[organisation]/[module]/[revision]/ivy.xml"/>
   <property name="ivy.shared.default.artifact.pattern" value="[organisation]/[module]/[revision]/[artifact].[ext]"/>
   <ivy:resolve />
</target>
覆盖ivysettings默认值
默认情况下,Ivy在其ivy.jar中存在的ivysettings.xml中具有其配置。
ivysettings.xml
<ivysettings>
   <settings defaultResolver="default"/>
   <include url="${ivy.default.settings.dir}/ivysettings-public.xml"/>
   <include url="${ivy.default.settings.dir}/ivysettings-shared.xml"/>
   <include url="${ivy.default.settings.dir}/ivysettings-local.xml"/>
   <include url="${ivy.default.settings.dir}/ivysettings-main-chain.xml"/>
   <include url="${ivy.default.settings.dir}/ivysettings-default-chain.xml"/>
</ivysettings>
要覆盖共享仓库设置,请更新ivysettings-shared.xml的内容。
ivysettings-shared.xml
<ivysettings>
   <property name="ivy.shared.default.root" value="${ivy.default.ivy.user.dir}/shared" override="false"/>
   <property name="ivy.shared.default.ivy.pattern" value="[organisation]/[module]/[revision]/[type]s/[artifact].[ext]" override="false"/>
   <property name="ivy.shared.default.artifact.pattern" value="[organisation]/[module]/[revision]/[type]s/[artifact].[ext]" override="false"/>
   <resolvers>
      <filesystem name="shared">
         <ivy pattern="${ivy.shared.default.root}/${ivy.shared.default.ivy.pattern}" />
         <artifact pattern="${ivy.shared.default.root}/${ivy.shared.default.artifact.pattern}" />
      </filesystem>
   </resolvers>
</ivysettings>
Apache Ivy - 公共仓库
公共仓库是可以使用互联网访问的仓库,并且包含第三方模块。默认情况下,以m2兼容模式的ibiblio是公共仓库。它也称为Maven 2公共仓库。
覆盖ivysettings默认值
默认情况下,Ivy在其ivy.jar中存在的ivysettings.xml中具有其配置。
ivysettings.xml
<ivysettings>
   <settings defaultResolver="default"/>
   <include url="${ivy.default.settings.dir}/ivysettings-public.xml"/>
   <include url="${ivy.default.settings.dir}/ivysettings-shared.xml"/>
   <include url="${ivy.default.settings.dir}/ivysettings-local.xml"/>
   <include url="${ivy.default.settings.dir}/ivysettings-main-chain.xml"/>
   <include url="${ivy.default.settings.dir}/ivysettings-default-chain.xml"/>
</ivysettings>
要覆盖公共仓库设置,请更新ivysettings-public.xml的内容,或在项目设置文件夹中创建ivysettings.xml。
ivysettings.xml
<ivysettings>
   <settings defaultResolver="default"/>
   <include url="http://customserver/ivy/ivysettings-public.xml"/>
   <include url="${ivy.default.settings.dir}/ivysettings-shared.xml"/>
   <include url="${ivy.default.settings.dir}/ivysettings-local.xml"/>
   <include url="${ivy.default.settings.dir}/ivysettings-main-chain.xml"/>
   <include url="${ivy.default.settings.dir}/ivysettings-default-chain.xml"/>
</ivysettings>
更新默认的ivysetting-public.xml内容。
原始 - ivysetting-public.xml
<ivysettings>
   <resolvers>
      <ibiblio name="public" m2compatible="true"/>
   </resolvers>
</ivysettings>
更新 - ivysetting-public.xml
<ivysettings>
   <resolvers>
      <filesystem name="public">
         <ivy pattern="/path/to/my/public/rep/[organisation]/[module]/ivy-[revision].xml" />
         <artifact pattern="/path/to/my/public/rep/[organisation]/[module]/[artifact]-[revision].[ext]" />
      </filesystem>
   </resolvers>
</ivysettings>