
 数据结构
数据结构 网络
网络 关系数据库管理系统
 操作系统
操作系统 Java
Java iOS
iOS HTML
HTML CSS
CSS Android
 Python
 C语言编程
C语言编程 C++
C++ C#
C# MongoDB
 MySQL
MySQL Javascript
 PHP
PHP使用Python的OpenCV绘制矩形并提取对象
OpenCV 是一个 Python 中的开源计算机视觉库。它提供了许多函数来执行各种图像和视频处理操作。该库使用 Numpy 模块将所有视频帧和图像表示为 ndarray 类型。它需要 numpy 库,我们需要确保 numpy 模块也安装在我们的 python 解释器中。
在这篇文章中,我们将了解使用 python OpenCV 绘制矩形并提取对象的不同方法。
绘制矩形
为了在图像上绘制矩形,Python OpenCV 模块提供了一个名为 cv2.rectangle() 的方法。此方法将在图像上绘制矩形。以下是语法 -
cv.rectangle(img, pt1, pt2, color[, thickness[, lineType[, shift]]] )
参数
img:要绘制矩形的源图像。
pt1:一个元组,包含矩形一个顶点的 x 和 y 坐标(矩形的左上角)。
pt2:一个元组,包含矩形另一个相对顶点的 x 和 y 坐标(矩形的右下角)。
color:指定矩形的颜色。
thickness:这是一个可选参数。它指定矩形的线宽。默认线宽为 1。
x1,y1----------|
|		   |
| 		   |
| ------------x2,y2
因此,pt1 和 pt2 的坐标分别为 (x1,y1) 和 (x2,y2)。
使用预定义尺寸
在这种方法中,我们将使用预定义的坐标在图像上绘制矩形。这意味着我们将手动定义 pt1 和 pt2 的值。
示例
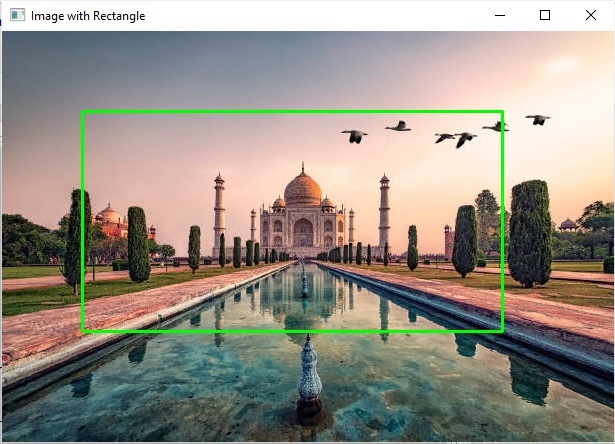
在本例中,我们将使用图像坐标从矩形中绘制和提取对象。
import cv2
import numpy as np
# Load the image
img = cv2.imread("Images/Tajmahal.jpg")
# Define the dimensions and position of the rectangle using two points
top_left = (80, 80)
bottom_right = (500, 300)
# defining the colour and thickness of the rectangle
thickness = 2
color = (0, 255, 0) # Green color
shape = cv2.rectangle(img, top_left, bottom_right, color, thickness)
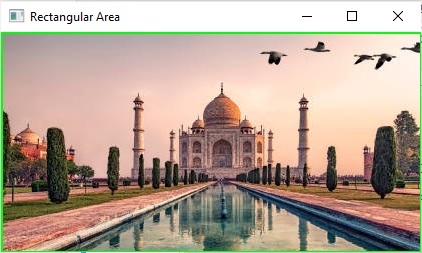
# Extracting objects from the rectangular area
rect_area = img[top_left[0]:bottom_right[1], top_left[1]:bottom_right[0]]
# Display the image with the drawn rectangle
cv2.imshow("Image with Rectangle", img)
# Display the extracted rectangular area
cv2.imshow("Rectangular Area", rect_area)
cv2.waitKey(0)
cv2.destroyAllWindows()
输出
裁剪后的图像
使用鼠标事件标志
为了在图像上绘制矩形,这里我们将使用以下鼠标事件 -
cv2.EVENT_RBUTTONDOWN:表示右键被按下。
cv2.EVENT_LBUTTONUP:表示左键被释放
此外,我们将使用 setMouseCallback() 函数为指定的窗口设置鼠标事件处理程序
setMouseCallback() 函数
该函数用于指定哪个函数必须为特定窗口调用。换句话说,该函数为指定的窗口创建了一个鼠标事件处理程序。
语法
cv2.setMouseCallback(winname, onMouse, userdata)
参数
Winname:特定窗口的名称。
OnMouse:鼠标事件的回调函数。
Userdata:传递给回调函数的可选参数。
此方法可以使用命令行界面执行。因此,这里我们将使用 argparse 模块,因为它提供了一个方便的接口来处理命令行参数。
最初,我们将为 namedWindow() 方法设置一个鼠标回调函数,以读取用户绘制的矩形坐标。并通过使用鼠标点击事件,我们将识别 x 和 y 坐标,然后使用 cv2.rectangle() 函数绘制矩形。
注意 - 要执行此代码,我们需要保存程序文件并将输入图像保存在同一位置,然后在命令提示符中运行以下命令。
Python program_file_name.py --image source_image_name.jpg
示例
让我们举一个绘制矩形以提取对象的例子。
import cv2
import argparse

point = []
crop = False

def shape_selection(event, x, y, flags, param):
   # grab references to the global variables
   global point, crop

   # Record the starting(x, y) coordinates when the left mouse button was clicked
   if event == cv2.EVENT_LBUTTONDOWN:
      point = [(x, y)]

   # check to see if the left mouse button was released
   elif event == cv2.EVENT_LBUTTONUP:
      # record the ending (x, y) coordinates
      point.append((x, y))

      # draw a rectangle
      cv2.rectangle(image, point[0], point[1], (0, 255, 0), 2)
      cv2.imshow("image", image)

# construct the argument parser and parse the arguments
ap = argparse.ArgumentParser()
ap.add_argument("-i", "--image", required = True, help ="Images/Dog.jpg")
args = vars(ap.parse_args())

# load the image
image = cv2.imread(args["image"])
clone = image.copy()
cv2.namedWindow("image")
# setting the mouse callback function
cv2.setMouseCallback("image", shape_selection)

# keep looping until the 'q' key is pressed
while True:
    # display the image and wait for a keypress
    cv2.imshow("image", image)
    key = cv2.waitKey(1) & 0xFF

    # press 'r' to reset window
    if key == ord("r"):
        image = clone.copy()

    # if the 'c' key is pressed, break from the loop
    elif key == ord("c"):
        break

if len(point) == 2:
    crop_img = clone[point[0][1]:point[1][1], point[0][0]:point[1][0]]
    cv2.imshow("crop_img", crop_img)
    cv2.waitKey(0)

    # close all open windows
cv2.destroyAllWindows()
打开命令提示符并使用以下命令执行上述程序 -
python test.py --image image5.jpg
这将生成一个窗口,显示输入图像,您可以在其中选择所需的物体,如下所示 -
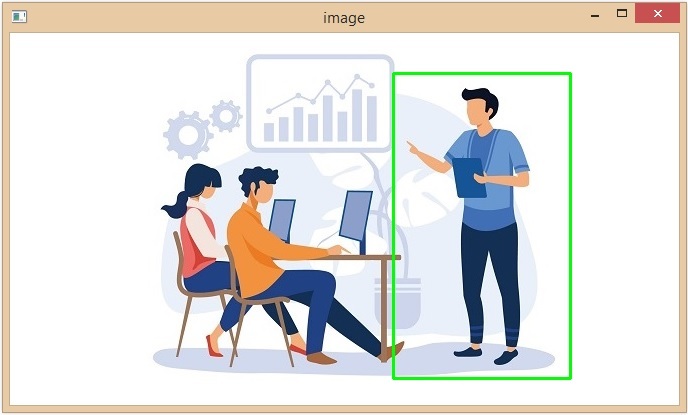
注意 - 选择所需的图像区域后,按键盘上的 C 键进行裁剪。
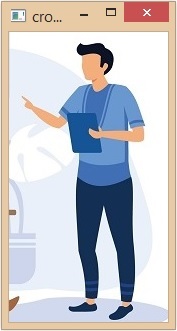
我们已成功绘制矩形并从图像中提取了所选对象。
834 次浏览
