
 数据结构
数据结构 网络
网络 关系数据库管理系统 (RDBMS)
 操作系统
操作系统 Java
Java iOS
iOS HTML
HTML CSS
CSS Android
 Python
 C 编程
C 编程 C++
C++ C#
C# MongoDB
 MySQL
MySQL Javascript
 PHP
PHP如何使用 OpenCV Python 检测人脸并在其周围绘制边界框?
我们使用 Haar 级联分类器来检测图像中的人脸。Haar 级联分类器是一种有效的基于机器学习的对象检测方法。我们可以针对训练数据训练我们自己的 Haar 级联,但在这里我们使用已经训练好的 Haar 级联进行人脸检测。
我们将使用 **haarcascade_frontalface_alt.xml** 作为人脸检测的“Haar 级联”XML 文件。
如何下载 Haar 级联?
您可以访问以下 GitHub 网站地址找到不同的 Haar 级联:
https://github.com/opencv/opencv/tree/master/data/haarcascades要下载用于人脸检测的 Haar 级联,请点击 **haarcascade_frontalface_alt.xml** 文件。以原始格式打开它,右键单击并保存。
**注意** - 将所有 Haar 级联 XML 文件保存在 **haarcascades** 文件夹中。
步骤
我们可以按照以下步骤检测图像中的人脸并在其周围绘制边界框:
导入所需的库。在以下所有示例中,所需的 Python 库是 **OpenCV**。确保您已经安装了它。
使用 **cv2.imread()** 读取输入图像。指定完整的图像路径。
为进行人脸检测,初始化 Haar 级联分类器对象 **face_cascade = cv2.CascadeClassifier()**。传递 Haar 级联 xml 文件的完整路径。您可以使用 Haar 级联文件 **haarcascade_frontalface_alt.xml** 来检测图像中的人脸。
使用 **face_cascade.detectMultiScale()** 检测输入图像中的人脸。它返回以 **(x,y,w,h)** 格式检测到的人脸的坐标。
使用 **cv2.rectangle()** 在原始图像中绘制检测到的人脸周围的边界矩形。
显示带有绘制在人脸周围的边界矩形的图像。
让我们来看一些示例,以便更好地理解。
示例
在这个 Python 程序中,我们检测人脸并在检测到的人脸周围绘制边界框。
# import required library
import cv2

# read the input image
img = cv2.imread('people.jpg')

# convert to grayscale of each frames
gray = cv2.cvtColor(img, cv2.COLOR_BGR2GRAY)

# read haacascade to detect faces in input image
face_cascade = cv2.CascadeClassifier('haarcascades\haarcascade_frontalface_alt.xml')

# detects faces in the input image
faces = face_cascade.detectMultiScale(gray, 1.1, 2)
print('Number of detected faces:', len(faces))\

# loop over all the detected faces
for (x,y,w,h) in faces:

   # To draw a rectangle around the detected face
   cv2.rectangle(img,(x,y),(x+w,y+h),(0,255,255),2)

# Display an image in a window
cv2.imshow('Face Detection',img)
cv2.waitKey(0)
cv2.destroyAllWindows()
将以下图像视为该程序的 **输入文件**:

输出
运行上述 Python 程序后,它将生成以下 **输出** 窗口:
Number of detected faces: 1
我们将得到以下 **输出** 窗口:

人脸周围的边界框以黄色绘制。
示例
在这个 Python 程序中,我们检测人脸并在输入图像中检测到的人脸周围绘制边界框。
import cv2
img = cv2.imread('window1.jpg')
img1 =cv2.cvtColor(img, cv2.COLOR_BGR2GRAY)
ret,thresh = cv2.threshold(img1,170,255,0)

# draw different shapes of ellipses
img = cv2.ellipse(img,(368,250),(100,40),30,0,180,(0,255,255),-1)
img = cv2.ellipse(img,(150,170),(86,45),-30,0,360,(0,255,0),-1)
img = cv2.ellipse(img,(578,250),(60,130),0,0,340,(0,0,255),-1)

# display the image with drawn ellipses
cv2.imshow("Ellipses", img)
cv2.waitKey(0)
cv2.destroyAllWindows()
我们将使用此图像作为该程序的 **输入文件**:

输出
运行上述 Python 程序后,它将生成以下 **输出** 窗口:
Number of detected faces: 15
我们将得到以下输出窗口:
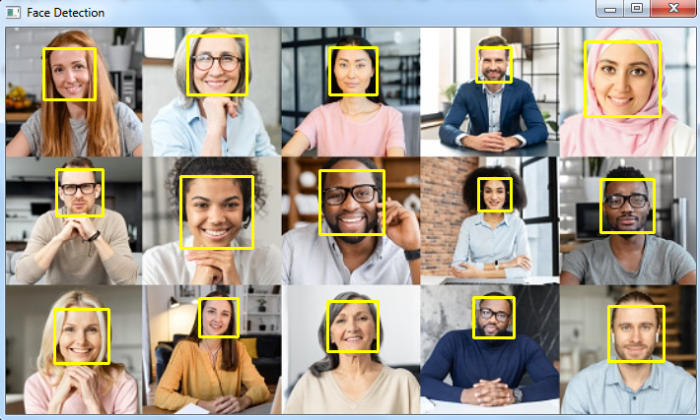
人脸周围的边界框以黄色绘制。

5K+ 次浏览
