- Hazelcast 教程
- Hazelcast - 首页
- Hazelcast - 简介
- Hazelcast - 设置
- Hazelcast - 第一个应用程序
- Hazelcast - 配置
- 设置多节点实例
- Hazelcast - 数据结构
- Hazelcast - 客户端
- Hazelcast - 序列化
- Hazelcast 高级特性
- Hazelcast - Spring 集成
- Hazelcast - 监控
- Map Reduce & 聚合
- Hazelcast - 集合监听器
- 常见问题及性能技巧
- Hazelcast 有用资源
- Hazelcast - 快速指南
- Hazelcast - 有用资源
- Hazelcast - 讨论
Hazelcast - 监控
Hazelcast 提供多种监控集群的方法。我们将了解如何通过 REST API 和 JMX 进行监控。让我们首先了解 REST API。
通过 REST API 监控 Hazelcast
要通过 REST API 监控集群的健康状况或成员状态,必须启用基于 REST API 的成员通信。这可以通过配置和编程方式完成。
让我们在 hazelcast-monitoring.xml 中通过 XML 配置启用基于 REST 的监控:
<hazelcast
   xsi:schemaLocation="http://www.hazelcast.com/schema/config
   http://www.hazelcast.com/schema/config/hazelcast-config-3.12.12.xsd"
   xmlns="http://www.hazelcast.com/schema/config"
   xmlns:xsi="http://www.w3.org/2001/XMLSchema-instance">
   <instance-name>XML_Hazelcast_Instance</instance-name>

   <network>
      <rest-api enabled="true">
         <endpoint-group name="CLUSTER_READ" enabled="true" />
         <endpoint-group name="HEALTH_CHECK" enabled="true" />
      </rest-api>
   </network>
</hazelcast>
让我们在 Server.java 文件中创建一个无限运行的 Hazelcast 实例:
public class Server {
   public static void main(String... args){
      //initialize hazelcast server/instance
      HazelcastInstance hazelcast = Hazelcast.newHazelcastInstance();
      // do not shutdown, let the server run
      //hazelcast.shutdown();
   }
}
现在让我们执行启动集群:
java '-Dhazelcast.config=hazelcast-monitoring.xml' -cp .\target\demo-0.0.1-
SNAPSHOT.jar com.example.demo.Server
启动后,可以通过调用以下 API 来了解集群的健康状况:
https://:5701/hazelcast/health
上述 API 调用的输出:
Hazelcast::NodeState=ACTIVE
Hazelcast::ClusterState=ACTIVE
Hazelcast::ClusterSafe=TRUE
Hazelcast::MigrationQueueSize=0
Hazelcast::ClusterSize=1
这显示我们的集群中有一个成员,并且它是活动的。
可以使用以下命令查找有关节点的更详细信息,例如 IP、端口、名称:
https://:5701/hazelcast/rest/cluster
上述 API 的输出:
Members {size:1, ver:1} [
   Member [localhost]:5701 - e6afefcb-6b7c-48b3-9ccb-63b4f147d79d this
]
ConnectionCount: 1
AllConnectionCount: 2
JMX 监控
Hazelcast 还支持对其内嵌数据结构(例如 IMap、IQueue 等)的 JMX 监控。
要启用 JMX 监控,我们首先需要启用基于 JVM 的 JMX 代理。这可以通过向 JVM 传递 "-Dcom.sun.management.jmxremote" 来完成。要使用不同的端口或使用身份验证,我们可以分别使用 -Dcom.sun.management.jmxremote.port、-Dcom.sun.management.jmxremote.authenticate。
除此之外,我们还必须为 Hazelcast MBeans 启用 JMX。让我们在 hazelcast-monitoring.xml 中通过 XML 配置启用基于 JMX 的监控:
<hazelcast
   xsi:schemaLocation="http://www.hazelcast.com/schema/config
   http://www.hazelcast.com/schema/config/hazelcast-config-3.12.12.xsd"
   xmlns="http://www.hazelcast.com/schema/config"
   xmlns:xsi="http://www.w3.org/2001/XMLSchema-instance">
   <instance-name>XML_Hazelcast_Instance</instance-name>

   <properties>
      <property name="hazelcast.jmx">true</property>
   </properties>
</hazelcast>
让我们在 Server.java 文件中创建一个无限运行的 Hazelcast 实例并添加一个映射:
class Server {
   public static void main(String... args){
      //initialize hazelcast server/instance
      HazelcastInstance hazelcast = Hazelcast.newHazelcastInstance();
      //create a simple map
      Map<String, String> vehicleOwners = hazelcast.getMap("vehicleOwnerMap");
      // add key-value to map
      vehicleOwners.put("John", "Honda-9235");
      // do not shutdown, let the server run
      //hazelcast.shutdown();
   }
}
现在,我们可以执行以下命令来启用 JMX:
java '-Dcom.sun.management.jmxremote' '-Dhazelcast.config=others\hazelcastmonitoring.
xml' -cp .\target\demo-0.0.1-SNAPSHOT.jar com.example.demo.Server
现在可以通过 JMX 客户端(如 jConsole、VisualVM 等)连接 JMX 端口。
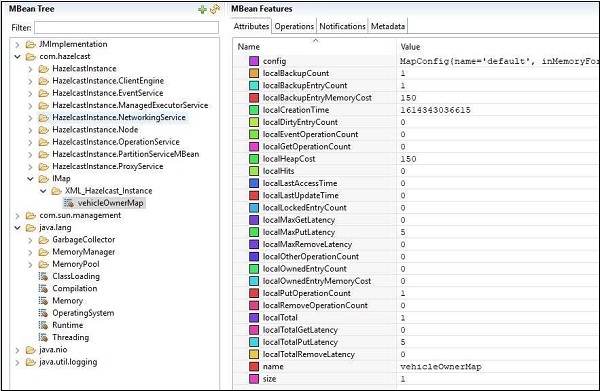
这是使用 jConsole 连接并查看 VehicleMap 属性时将获得的快照。我们可以看到,映射的名称为 vehicleOwnerMap,映射的大小为 1。
