如何在Android Studio中创建通讯录应用?
Android Studio中的通讯录应用是一个允许用户以方便易用的方式管理和组织其联系人数据的应用程序。它提供了一个创建、存储和访问联系人详细信息(例如姓名、电话号码、电子邮件地址等)的平台。用户可以添加新联系人、查看现有联系人、搜索特定联系人,并执行诸如编辑或删除联系人数据等操作。该应用程序通常使用RecyclerView以列表形式显示联系人,使用ProgressBar显示加载状态,并使用FloatingActionButton添加新联系人。通过提供简单的功能和精心设计的界面,通讯录应用程序简化了联系人管理流程,并提高了Android设备上的沟通效率。
使用的方法
手动实现
手动实现
要在Android中创建一个圆形对话框,您可以通过以下步骤手动实现它。首先,为对话框创建一个自定义布局,其中包含一个圆形进度条和您需要的任何其他组件。然后,创建一个自定义对话框类,扩展对话框并使用setContentView()设置自定义布局。接下来,在自定义对话框类中初始化并配置圆形进度条。最后,通过调用dialog.show()在需要时显示对话框。这种手动实现允许您完全控制圆形对话框的外观和行为,包括自定义例如添加文本或按钮。
算法
启动应用程序。
初始化应用程序的基本变量和数据结构,例如用于存储联系人的列表。
使用XML布局文件设置用户界面,其中包含一个RecyclerView来显示联系人,一个ProgressBar用于加载反馈,以及一个FloatingActionButton用于添加新联系人。
创建一个Contact类来表示联系人信息,包括姓名、电话号码和电子邮件等属性。
实现一个适配器类,将联系人信息绑定到RecyclerView,处理每个联系人项的视图创建和更新。
使用SQLite或其他存储选项设置数据库功能,以存储和检索联系人信息。
从数据库加载初始数据,并使用联系人填充RecyclerView。
实现使用FloatingActionButton添加新联系人的功能,并相应地更新RecyclerView。
实现删除或编辑联系人的功能,以响应用户与RecyclerView中联系人项的交互。
实现允许用户按姓名或其他条件搜索特定联系人的功能。
在模拟器或物理设备上测试应用程序,以确保其功能正常,有效处理边缘情况和用户输入。
优雅地处理任何潜在的错误或异常,以确保流畅的用户体验。
优化应用程序的性能和内存使用,考虑诸如延迟加载数据和高效的数据库操作等因素。
添加必要的权限并在运行时请求它们,例如读取/写入联系人权限以访问数据。
完成应用程序,执行全面测试,并根据用户反馈或错误报告进行任何必要的修改。
如果需要,在Google Play商店或其他平台上发布应用程序。
示例
XML程序
<?xml version="1.0" encoding="utf-8"?>
<RelativeLayout
    xmlns:android="http://schemas.android.com/apk/res/android"
    xmlns:app="http://schemas.android.com/apk/res-auto"
    xmlns:tools="http://schemas.android.com/tools"
	android:layout_width="match_parent"
	android:layout_height="match_parent"
	android:orientation="vertical"
	tools:context=".MainActivity">

	<!-- RecyclerView for displaying the list of contacts -->
	<androidx.recyclerview.widget.RecyclerView
		android:id="@+id/idRVContacts"
		android:layout_width="match_parent"
		android:layout_height="match_parent" />

	<!-- Progress bar for displaying loading feedback -->
	<ProgressBar
		android:id="@+id/idPBLoading"
		android:layout_width="wrap_content"
		android:layout_height="wrap_content"
		android:layout_centerInParent="true" />

	<!-- FloatingActionButton for adding a new contact -->
	<com.google.android.material.floatingactionbutton.FloatingActionButton
		android:id="@+id/idFABadd"
		android:layout_width="wrap_content"
		android:layout_height="wrap_content"
		android:layout_alignParentEnd="true"
		android:layout_alignParentBottom="true"
		android:layout_margin="20dp"
		android:src="@drawable/ic_account"
		app:fabCustomSize="40dp"
		app:tint="@color/white" />

</RelativeLayout>
XML程序
<?xml version="1.0" encoding="utf-8"?>
<RelativeLayout
	xmlns:android="http://schemas.android.com/apk/res/android"
	android:id="@+id/idRLContact"
	android:layout_width="match_parent"
	android:layout_height="wrap_content"
	android:layout_margin="3dp">

	<!--image view for displaying the first letter of contact-->
	<ImageView
		android:id="@+id/idIVContact"
		android:layout_width="60dp"
		android:layout_height="60dp"
		android:layout_margin="8dp"
		android:padding="3dp"
		android:src="@mipmap/ic_launcher" />

	<!--text view for displaying user name-->
	<TextView
		android:id="@+id/idTVContactName"
		android:layout_width="match_parent"
		android:layout_height="wrap_content"
		android:layout_centerVertical="true"
		android:layout_marginStart="8dp"
		android:layout_marginTop="12dp"
		android:layout_marginEnd="8dp"
		android:layout_toRightOf="@id/idIVContact"
		android:text="Contact Name"
		android:textColor="@color/black" />

</RelativeLayout>
Java程序
public class ContactsModal {

	// variables for our user name
	// and contact number.
	private String userName;
	private String contactNumber;

	// constructor
	public ContactsModal(String userName, String contactNumber) {
		this.userName = userName;
		this.contactNumber = contactNumber;
	}

	// on below line we have
	// created getter and setter
	public String getUserName() {
		return userName;
	}

	public void setUserName(String userName) {
		this.userName = userName;
	}

	public String getContactNumber() {
		return contactNumber;
	}

	public void setContactNumber(String contactNumber) {
		this.contactNumber = contactNumber;
	}

}
XML程序
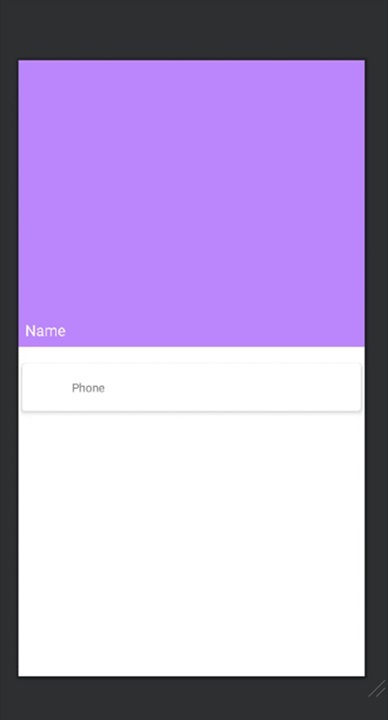
<?xml version="1.0" encoding="utf-8"?>
<RelativeLayout
	xmlns:android="http://schemas.android.com/apk/res/android"
	xmlns:app="http://schemas.android.com/apk/res-auto"
	xmlns:tools="http://schemas.android.com/tools"
	android:layout_width="match_parent"
	android:layout_height="match_parent"
	tools:context=".ContactDetailActivity">

	<!--image view for contact-->
	<ImageView
		android:id="@+id/idIVContact"
		android:layout_width="match_parent"
		android:layout_height="300dp"
		android:background="@color/purple_200"
		android:padding="50dp"
		android:src="@drawable/ic_account"
		app:tint="@color/white" />

	<!--text view for displaying user name-->
	<TextView
		android:id="@+id/idTVName"
		android:layout_width="match_parent"
		android:layout_height="wrap_content"
		android:layout_below="@id/idIVContact"
		android:background="@color/purple_200"
		android:padding="8dp"
		android:text="Name"
		android:textColor="@color/white"
		android:textSize="18sp" />

	<!--cardview for displaying user contact-->
	<androidx.cardview.widget.CardView
		android:layout_width="match_parent"
		android:layout_height="wrap_content"
		android:layout_below="@id/idTVName"
		android:layout_marginStart="4dp"
		android:layout_marginTop="20dp"
		android:layout_marginEnd="4dp"
		app:cardCornerRadius="4dp"
		app:cardElevation="4dp">

		<RelativeLayout
			android:layout_width="match_parent"
			android:layout_height="wrap_content">

			<!--image view for making a call -->
			<ImageView
				android:id="@+id/idIVCall"
				android:layout_width="40dp"
				android:layout_height="40dp"
				android:layout_margin="8dp"
				android:padding="4dp"
				android:src="@drawable/ic_account"
				app:tint="@color/purple_700" />

			<!--text view for displaying user contact-->
			<TextView
				android:id="@+id/idTVPhone"
				android:layout_width="match_parent"
				android:layout_height="wrap_content"
				android:layout_centerVertical="true"
				android:layout_marginStart="3dp"
				android:layout_marginTop="8dp"
				android:layout_toStartOf="@id/idIVMessage"
				android:layout_toEndOf="@id/idIVCall"
				android:layout_toRightOf="@id/idIVCall"
				android:text="Phone" />

			<!--image view for displaying message icon-->
			<ImageView
				android:id="@+id/idIVMessage"
				android:layout_width="40dp"
				android:layout_height="40dp"
				android:layout_alignParentEnd="true"
				android:layout_margin="8dp"
				android:padding="4dp"
				android:src="@drawable/ic_account"
				app:tint="@color/purple_700" />

		</RelativeLayout>
	</androidx.cardview.widget.CardView>
</RelativeLayout>
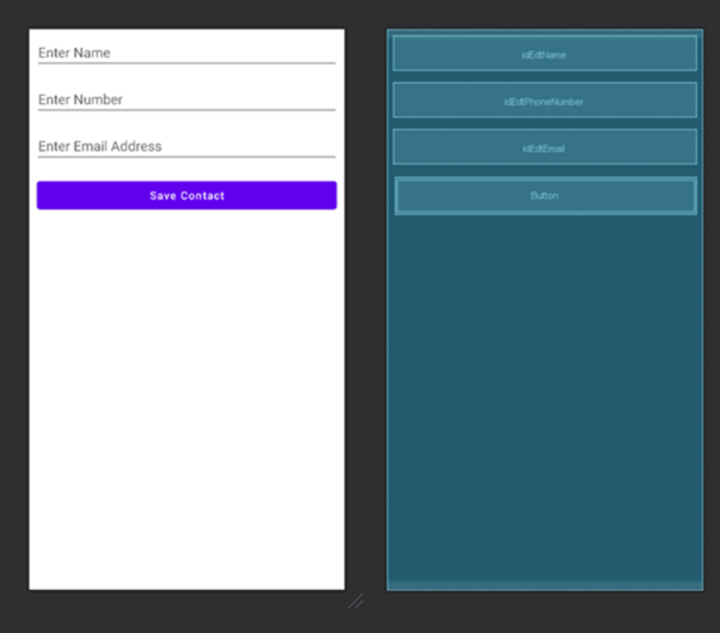
XML程序
<?xml version="1.0" encoding="utf-8"?>
<LinearLayout
	xmlns:android="http://schemas.android.com/apk/res/android"
	xmlns:tools="http://schemas.android.com/tools"
	android:layout_width="match_parent"
	android:layout_height="match_parent"
	android:orientation="vertical"
	tools:context=".CreateNewContactActivity">

	<!--edit text for user name-->
	<EditText
		android:id="@+id/idEdtName"
		android:layout_width="match_parent"
		android:layout_height="wrap_content"
		android:layout_margin="8dp"
		android:hint="Enter Name"
		android:inputType="text" />

	<!--edit text for user phone number-->
	<EditText
		android:id="@+id/idEdtPhoneNumber"
		android:layout_width="match_parent"
		android:layout_height="wrap_content"
		android:layout_margin="8dp"
		android:hint="Enter Number"
		android:inputType="phone" />

	<!--edit text for user email-->
	<EditText
		android:id="@+id/idEdtEmail"
		android:layout_width="match_parent"
		android:layout_height="wrap_content"
		android:layout_margin="8dp"
		android:hint="Enter Email Address"
		android:inputType="text" />

	<!--button for saving a new contact-->
	<Button
		android:id="@+id/idBtnAddContact"
		android:layout_width="match_parent"
		android:layout_height="wrap_content"
		android:layout_margin="10dp"
		android:text="Save Contact"
		android:textAllCaps="false" />

</LinearLayout>
输出


结论
本文提供了一个在Android Studio中创建通讯录应用程序的全面指南。它解释了通讯录应用程序允许用户管理和组织其联系人数据。文章讨论了通讯录应用程序中通常发现的功能和特性,例如添加、查看、搜索、编辑和删除联系人。它还概述了创建应用程序的步骤,包括设置用户界面、实现基本类和方法、集成数据库用于数据存储以及处理用户交互。文章强调了测试、性能优化以及将应用程序发布到Google Play商店的重要性。


 数据结构
数据结构 网络
网络 关系数据库管理系统(RDBMS)
 操作系统
操作系统 Java
Java iOS
iOS HTML
HTML CSS
CSS Android
 Python
 C语言编程
C语言编程 C++
C++ C#
C# MongoDB
 MySQL
MySQL Javascript
 PHP
PHP