如何在 OpenCV Python 中裁剪和保存检测到的面部?
我们可以使用已经训练好的 Haar 级联分类器来检测图像中的面部。为了检测面部,OpenCV 提供了不同的 Haar 级联作为 xml 文件。我们将使用haarcascade_frontalface_alt.xml 来检测图像中的人脸。检测到的面部坐标为(x,y,w,h) 格式。为了裁剪和保存检测到的面部,我们保存image[y:y+h, x:x+w]。
如何下载 Haar 级联?
您可以访问以下 GitHub 网站地址找到不同的 Haar 级联:
https://github.com/opencv/opencv/tree/master/data/haarcascades要下载用于人脸检测的 Haar 级联,请点击haarcascade_frontalface_alt.xml 文件。以原始格式打开它,右键单击并保存文件。
注意 - 将所有 Haar 级联 xml 文件保存在haarcascade 文件夹中。
步骤
要裁剪并保存图像中检测到的面部,您可以按照以下步骤操作:
导入所需的库。在以下所有示例中,所需的 Python 库是OpenCV。确保您已经安装了它。
使用cv2.imread()读取输入图像。指定完整的图像路径。将输入图像转换为灰度。
初始化一个 Haar 级联分类器对象face_cascade = cv2.CascadeClassifier() 用于面部检测。传递 Haar 级联 xml 文件的完整路径。您可以使用 Haar 级联文件haarcascade_frontalface_alt.xml 来检测图像中的面部。
使用face_cascade.detectMultiScale()检测输入图像中的面部。它返回以(x,y,w,h) 格式检测到的面部坐标。
遍历所有检测到的面部。找到image[y:y+h, x:x+w] 作为裁剪的面部,并将其赋值给一个新变量,例如face。使用cv2.imwrite()保存裁剪的面部。
可以选择显示裁剪的面部以进行可视化。
让我们来看一些例子,以便更好地理解。
示例
在这个例子中,我们使用 Haar 级联裁剪并保存输入图像中检测到的面部。
# import required libraries
import cv2

# read the input image
img = cv2.imread('woman.jpg')

# convert to grayscale of each frames
gray = cv2.cvtColor(img, cv2.COLOR_BGR2GRAY)

# read the haarcascade to detect the faces in an image
face_cascade = cv2.CascadeClassifier('haarcascades\haarcascade_frontalface_default.xml')

# detects faces in the input image
faces = face_cascade.detectMultiScale(gray, 1.3, 4)
print('Number of detected faces:', len(faces))

# loop over all detected faces
if len(faces) > 0:
   for i, (x, y, w, h) in enumerate(faces):

      # To draw a rectangle in a face
      cv2.rectangle(img, (x, y), (x + w, y + h), (0, 255, 255), 2)
      face = img[y:y + h, x:x + w]
      cv2.imshow("Cropped Face", face)
      cv2.imwrite(f'face{i}.jpg', face)
      print(f"face{i}.jpg is saved")

# display the image with detected faces
cv2.imshow("image", img)
cv2.waitKey(0)
cv2.destroyAllWindows()
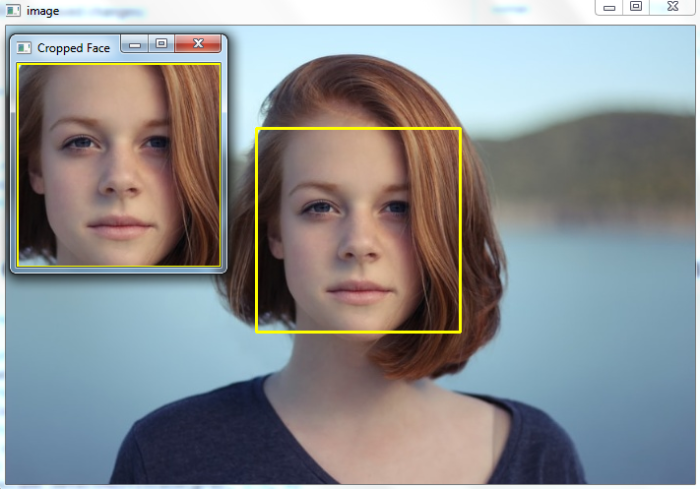
我们将使用以下图像作为该程序的输入文件:

运行上述 Python 程序后,将生成以下输出:
Number of detected faces: 1
face0.jpg is saved
我们将得到以下输出窗口:

示例
在这个 Python 示例中,我们使用 Haar 级联裁剪并保存输入图像中检测到的面部。
# import required libraries
import cv2

# read the input image
img = cv2.imread('two-men.jpg')

# convert to grayscale of each frames
gray = cv2.cvtColor(img, cv2.COLOR_BGR2GRAY)

# read the haarcascade to detect the faces in an image
face_cascade = cv2.CascadeClassifier('haarcascades\haarcascade_frontalface_alt.xml')

# detects faces in the input image
faces = face_cascade.detectMultiScale(gray, 1.1, 4)
print('Number of detected faces:', len(faces))

# loop over all detected faces
if len(faces) > 0:
   for i, (x,y,w,h) in enumerate(faces):

      # To draw a rectangle in a face
      cv2.rectangle(img,(x,y),(x+w,y+h),(0,255,255),2)
      face = img[y:y+h, x:x+w]
      cv2.imshow(f"Cropped Face {i}", face)
      cv2.imwrite(f'face{i}.jpg', face)
      print(f"face{i}.jpg is saved")

# display the image with detected faces
cv2.imshow("image", img)
cv2.waitKey(0)
cv2.destroyAllWindows()
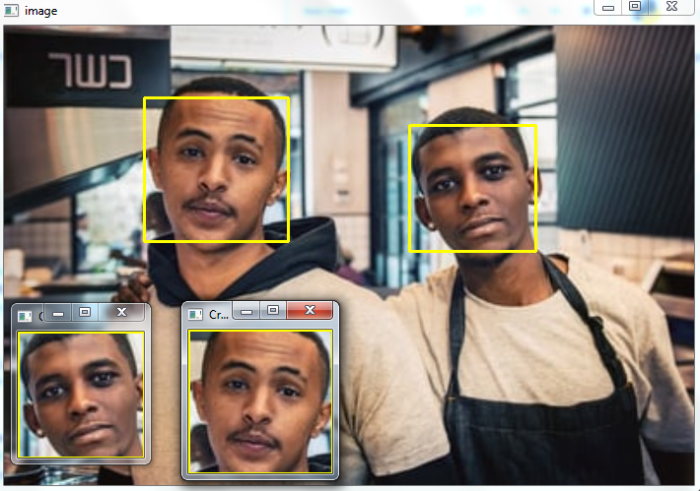
我们将使用此图像作为该程序的输入文件:

执行程序后,将生成以下输出:
Number of detected faces: 2
face0.jpg is saved
face1.jpg is saved
我们将得到以下输出窗口:


 数据结构
数据结构 网络
网络 关系数据库管理系统 (RDBMS)
 操作系统
操作系统 Java
Java iOS
iOS HTML
HTML CSS
CSS Android
 Python
 C 语言编程
 C++
C++ C#
C# MongoDB
 MySQL
MySQL Javascript
 PHP
PHP