
 数据结构
数据结构 网络
网络 RDBMS
RDBMS 操作系统
操作系统 Java
Java iOS
iOS HTML
HTML CSS
CSS Android
 Python
 C 编程
C 编程 C++
C++ C#
C# MongoDB
 MySQL
MySQL Javascript
 PHP
PHP如何在 Android 后台服务中侦听音量按钮?
本示例演示如何使用 Android 后台服务侦听音量按钮。
步骤 1 − 在 Android Studio 中创建一个新项目,转至“文件 ⇒ 新建项目”,并填入所有必需的详细信息以创建一个新项目。
步骤 2 − 将以下代码添加到 res/layout/activity_main.xml。
<?xml version="1.0" encoding="utf-8"?>
<LinearLayout xmlns:android="http://schemas.android.com/apk/res/android"
   xmlns:tools="http://schemas.android.com/tools"
   android:layout_width="match_parent"
   android:layout_height="match_parent"
   android:orientation="vertical"
   android:padding="16sp"
   tools:context=".MainActivity">
<TextView
   android:layout_width="wrap_content"
   android:layout_height="wrap_content"
   android:layout_marginTop="30dp"
   android:text="Increase and decrease Volume"
   android:textSize="24sp"
   android:textStyle="bold" />
</LinearLayout>
步骤 3 − 将以下代码添加到 src/MainActivity.java
import androidx.appcompat.app.AppCompatActivity;
import android.content.Context;
import android.database.ContentObserver;
import android.media.AudioManager;
import android.os.Bundle;
import android.os.Handler;
import android.widget.Toast;
import java.util.Objects;
public class MainActivity extends AppCompatActivity {
   SettingsContentObserver settingsContentObserver;
   @Override
   protected void onCreate(Bundle savedInstanceState) {
      super.onCreate(savedInstanceState);
      setContentView(R.layout.activity_main);
      settingsContentObserver = new SettingsContentObserver(this, new Handler());

                  getApplicationContext().getContentResolver().registerContentObserver(android.provider.Settings.System.
      CONTENT_URI, true, settingsContentObserver);
   }
   public class SettingsContentObserver extends ContentObserver {
      int previousVolume;
      Context context;
      SettingsContentObserver(Context c, Handler handler) {
         super(handler);
         context = c;
         AudioManager audio = (AudioManager) context.getSystemService(Context.AUDIO_SERVICE);
         previousVolume =
         Objects.requireNonNull(audio).getStreamVolume(AudioManager.STREAM_MUSIC);
      }
      @Override
      public boolean deliverSelfNotifications() {
         return super.deliverSelfNotifications();
      }
      @Override
      public void onChange(boolean selfChange) {
         super.onChange(selfChange);
         AudioManager audio = (AudioManager) context.getSystemService(Context.AUDIO_SERVICE);
         int currentVolume =
         Objects.requireNonNull(audio).getStreamVolume(AudioManager.STREAM_MUSIC);
         int delta = previousVolume - currentVolume;
         if (delta > 0) {
            Toast.makeText(MainActivity.this, "Volume Decreased", Toast.LENGTH_SHORT).show();
            previousVolume = currentVolume;
         }
          else if (delta < 0) {
            Toast.makeText(MainActivity.this, "Volume Increased", Toast.LENGTH_SHORT).show();
            previousVolume = currentVolume;
         }
      }
   }
   @Override
   protected void onDestroy() {
         getApplicationContext().getContentResolver().unregisterContentObserver(settingsContentObserver);
super.onDestroy();
   }
}
步骤 4 − 将以下代码添加到 androidManifest.xml
<?xml version="1.0" encoding="utf-8"?>
<manifest xmlns:android="http://schemas.android.com/apk/res/android"
   package="app.com.sample">
   <application
      android:allowBackup="true"
      android:icon="@mipmap/ic_launcher"
      android:label="@string/app_name"
      android:roundIcon="@mipmap/ic_launcher_round"
      android:supportsRtl="true"
      android:theme="@style/AppTheme">
      <activity android:name=".MainActivity">
         <intent-filter>
            <action android:name="android.intent.action.MAIN" />
            <category android:name="android.intent.category.LAUNCHER" />
         </intent-filter>
   </activity>
</application>
</manifest>
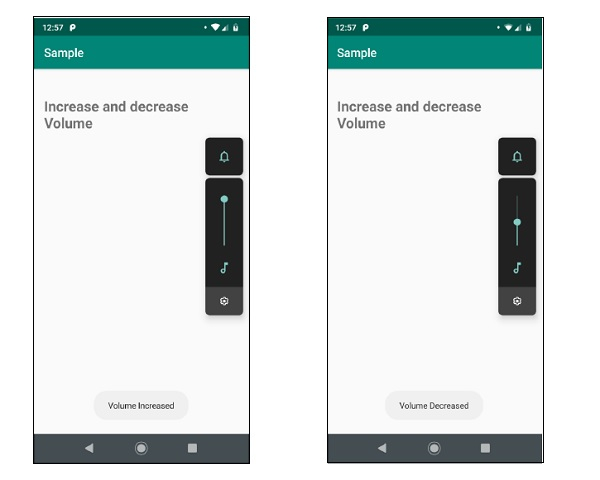
我们来尝试运行你的应用程序。我想你已经将你实际的 Android 移动设备与你的电脑连接起来了。要从 Android Studio 运行该应用,请打开其中一个项目的活动文件并单击工具栏中的运行 ![]() 图标。选择你的移动设备作为选项,然后检查你的移动设备,它会显示你的默认屏幕 −
图标。选择你的移动设备作为选项,然后检查你的移动设备,它会显示你的默认屏幕 −

更新时间:07-Jul-2020
2K+浏览

广告