如何在Android中监听传入的短信?
介绍
在许多Android应用程序中,我们可以看到用于用户身份验证的OTP会被自动检测并自动添加到应用程序中。用户无需手动添加OTP。这可以通过广播接收器在Android应用程序中实现。本文将介绍如何在Android应用程序中监听传入的短信。
实现
我们将创建一个简单的应用程序,其中我们将显示两个TextView。第一个TextView用于显示应用程序的标题。第二个TextView我们将用于显示收到的短信。现在让我们转向Android Studio创建一个新项目。
步骤1:在Android Studio中创建一个新项目
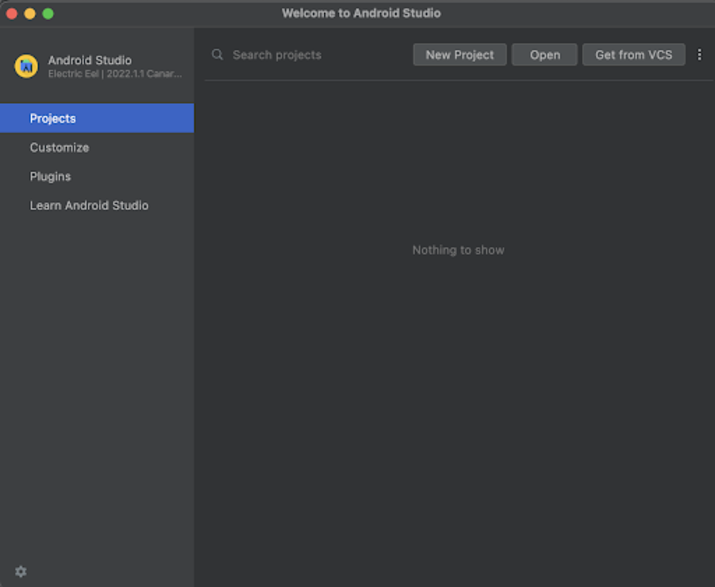
导航到Android Studio,如下图所示。在下面的屏幕中,单击“新建项目”以创建一个新的Android Studio项目。

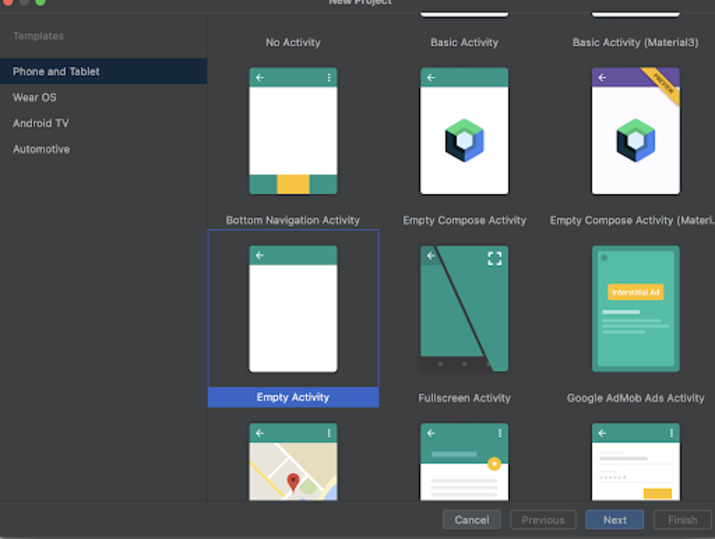
单击“新建项目”后,您将看到下面的屏幕。

在这个屏幕中,我们只需选择“空活动”,然后单击“下一步”。单击“下一步”后,您将看到下面的屏幕。

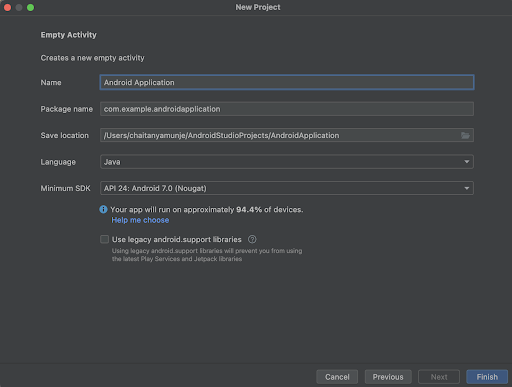
在这个屏幕中,我们只需指定项目名称。然后包名将自动生成。
注意 - 请确保将语言选择为Java。
指定所有详细信息后,单击“完成”以创建一个新的Android Studio项目。
项目创建完成后,我们将看到打开的两个文件,即activity_main.xml和MainActivity.java文件。
步骤2:使用activity_main.xml
导航到activity_main.xml。如果此文件不可见,则打开此文件。在左侧面板中导航到app>res>layout>activity_main.xml以打开此文件。打开此文件后,向其中添加以下代码。代码中添加了注释以详细了解。
<?xml version="1.0" encoding="utf-8"?>
<RelativeLayout xmlns:android="http://schemas.android.com/apk/res/android"
   xmlns:app="http://schemas.android.com/apk/res-auto"
   xmlns:tools="http://schemas.android.com/tools"
   android:layout_width="match_parent"
   android:layout_height="match_parent"
   tools:context=".MainActivity">
   <!--     creating a text view on below line-->
   <TextView
       android:id="@+id/idTVHeading"
       android:layout_width="match_parent"
       android:layout_height="wrap_content"
       android:layout_centerInParent="true"
       android:layout_marginStart="20dp"
       android:layout_marginTop="20dp"
       android:layout_marginEnd="20dp"
       android:layout_marginBottom="20dp"
       android:padding="4dp"
       android:text="Listen Incoming SMS Message in Android"
       android:textAlignment="center"
       android:textColor="@color/black"
       android:textSize="20sp"
       android:textStyle="bold" />
   <!--     creating a text view on below line-->
   <TextView
       android:id="@+id/idTVMessage"
       android:layout_width="match_parent"
       android:layout_height="wrap_content"
       android:layout_below="@id/idTVHeading"
       android:layout_centerInParent="true"
       android:layout_marginStart="20dp"
       android:layout_marginTop="20dp"
       android:layout_marginEnd="20dp"
       android:layout_marginBottom="20dp"
       android:padding="4dp"
       android:text="Message will appear here"
       android:textAlignment="center"
       android:textColor="@color/black"
       android:textSize="20sp"
       android:textStyle="bold" />
</RelativeLayout>
说明:在上面的代码中,我们创建了一个根布局作为相对布局。在这个布局中,我们创建了一个TextView,用于显示应用程序的标题。之后,我们创建了另一个TextView,我们将在其中显示收到的短信。
步骤3:创建一个接口类
导航到app>java>您的应用程序包名>右键单击它>新建接口类,并将其命名为MessageListnerInterface,然后向其中添加以下代码。代码中添加了注释以详细了解。
package com.example.java_test_application;
public interface MessageListenerInterface {
   // creating an interface method for messages received.
   void messageReceived(String message);
}
说明:在上面的代码中,我们创建了一个方法,我们将使用它来设置应用程序中接收到的消息。
步骤4:为广播接收器创建另一个类
导航到app>java>您的应用程序包名>右键单击它>新建Java类,并将其命名为MessageBroadcastReciever,然后向其中添加以下代码。代码中添加了注释以详细了解。
package com.example.java_test_application;
import android.content.BroadcastReceiver;
import android.content.Context;
import android.content.Intent;
import android.os.Bundle;
import android.telephony.SmsMessage;
public class MessageBroadcastReceiver extends BroadcastReceiver {
   // creating a variable for a message listener interface on below line.
   private static MessageListenerInterface mListener;
   @Override
   public void onReceive(Context context, Intent intent) {
       // getting bundle data on below line from intent.
       Bundle data = intent.getExtras();
       // creating an object on below line.
       Object[] pdus = (Object[]) data.get("pdus");
       // running for loop to read the sms on below line.
       for (int i = 0; i < pdus.length; i++) {
           // getting sms message on below line.
           SmsMessage smsMessage = SmsMessage.createFromPdu((byte[]) pdus[i]);
           // extracting the sms from sms message and setting it to string on below line.
           String message = "Sender : " + smsMessage.getDisplayOriginatingAddress()
                   + "
Message: " + smsMessage.getMessageBody();
           // adding the message to listener on below line.
           mListener.messageReceived(message);
       }
   }
   // on below line we are binding the listener.
   public static void bindListener(MessageListenerInterface listener) {
       mListener = listener;
   }
}
说明:在上面的代码中,我们将我们的类扩展为广播接收器,它将监听Android设备上的传入短信。收到消息后,它将在我们的onMessageReceive方法中显示。从那里我们可以读取我们的短信并在我们的应用程序中使用它。
步骤5:使用AndroidManifest.xml文件
导航到app>AndroidManifest.xml文件,然后向其中添加以下代码。代码中添加了注释以详细了解。
<?xml version="1.0" encoding="utf-8"?>
<manifest xmlns:android="http://schemas.android.com/apk/res/android"
   xmlns:tools="http://schemas.android.com/tools">
   <!-- adding permissions on below line -->
   <uses-permission android:name="android.permission.RECEIVE_SMS" />
   <uses-permission android:name="android.permission.READ_SMS" />
   <application
       android:allowBackup="true"
       android:dataExtractionRules="@xml/data_extraction_rules"
       android:fullBackupContent="@xml/backup_rules"
       android:icon="@mipmap/ic_launcher"
       android:label="@string/app_name"
       android:roundIcon="@mipmap/ic_launcher_round"
       android:supportsRtl="true"
       android:theme="@style/Theme.JavaTestApplication"
       android:usesCleartextTraffic="true"
       tools:targetApi="31">
       <activity
           android:name=".MainActivity"
           android:exported="true">
           <intent-filter>
               <action android:name="android.intent.action.MAIN" />
               <category android:name="android.intent.category.LAUNCHER" />
           </intent-filter>
           <meta-data
               android:name="android.app.lib_name"
               android:value="" />
       </activity>
       <!-- adding a broad cast receiver for message on below line -->
       <receiver
           android:name=".MessageBroadcastReceiver"
           android:exported="true">
           <!-- adding intent filter as sms received -->
           <intent-filter>
               <action android:name="android.provider.Telephony.SMS_RECEIVED" />
           </intent-filter>
       </receiver>
   </application>

</manifest>
说明:在上面的AndroidManifest.xml文件的代码中,我们添加了读取短信的权限。除此之外,我们还创建了一个接收器,在其中指定接收器的名称,并向其添加sms_received操作以在我们的应用程序中接收短信。
步骤6:使用MainActivity.java文件
导航到MainActivity.java。如果此文件不可见,则打开此文件。在左侧面板中导航到app>res>layout>MainActivity.java以打开此文件。打开此文件后,向其中添加以下代码。代码中添加了注释以详细了解。
package com.example.java_test_application;
import android.os.Bundle;
import android.util.Log;
import android.widget.TextView;
import androidx.appcompat.app.AppCompatActivity;
public class MainActivity extends AppCompatActivity implements MessageListenerInterface {
   // creating variables on below line for text view.
   private TextView msgTV;
   @Override
   protected void onCreate(Bundle savedInstanceState) {
       super.onCreate(savedInstanceState);
       setContentView(R.layout.activity_main);
       // initializing variables on below line.
       msgTV = findViewById(R.id.idTVMessage);
       // adding bind listener for message receiver on below line.
       MessageBroadcastReceiver.bindListener(this);
   }
   @Override
   public void messageReceived(String message) {
       // setting message in our text view on below line.
       msgTV.setText(message);
   }
}
说明:在上面的代码中,我们首先为TextView创建变量。现在我们将看到onCreate方法。这是每个Android应用程序的默认方法。当创建应用程序视图时,将调用此方法。在此方法中,我们设置内容视图,即名为activity_main.xml的布局文件,以设置该文件中的UI。在此onCreate方法中,我们使用我们在activity_main.xml文件中给出的ID初始化TextView的变量。之后,我们为我们的MessageBroadcastReceiver类添加一个绑定侦听器。除此之外,我们还使用MessageListnerInterface实现了我们的MainActivity文件。在messageReceived方法中,我们将收到的消息设置为我们的TextView,以便在我们的应用程序中显示。
添加上述代码后,我们只需单击顶栏中的绿色图标即可在移动设备上运行我们的应用程序。
注意:确保您已连接到您的真实设备或模拟器。
输出

结论
在本文中,我们介绍了如何在Android应用程序中监听传入的短信。


 数据结构
数据结构 网络
网络 关系数据库管理系统 (RDBMS)
 操作系统
操作系统 Java
Java iOS
iOS HTML
HTML CSS
CSS Android
 Python
 C语言编程
C语言编程 C++
C++ C#
C# MongoDB
 MySQL
MySQL Javascript
 PHP
PHP