
 数据结构
数据结构 网络
网络 关系型数据库管理系统
 操作系统
操作系统 Java
Java iOS
iOS HTML
HTML CSS
CSS Android
 Python
 C 编程
C 编程 C++
C++ C#
C# MongoDB
 MySQL
MySQL JavaScript
 PHP
PHP如何在 Android 中以编程的方式应答来电?
本例演示如何在 Android 中以编程方式应答来电。
步骤 1 − 在 Android Studio 中创建一个新项目,转到 File ⇒ New Project 并填写所有必需的详细信息以创建一个新项目。
步骤 2 − 将以下代码添加到 res/layout/activity_main.xml 中。
<?xml version="1.0" encoding="utf-8"?>
<androidx.constraintlayout.widget.ConstraintLayout
   xmlns:android="http://schemas.android.com/apk/res/android"
   xmlns:tools="http://schemas.android.com/tools"
   xmlns:app="http://schemas.android.com/apk/res-auto"
   android:layout_width="match_parent"
   android:layout_height="match_parent"
   tools:context=".MainActivity">
   <TextView
      android:layout_width="wrap_content"
      android:layout_height="wrap_content"
      android:text="Hello World!"
      app:layout_constraintBottom_toBottomOf="parent"
      app:layout_constraintLeft_toLeftOf="parent"
      app:layout_constraintRight_toRightOf="parent"
      app:layout_constraintTop_toTopOf="parent" />
</androidx.constraintlayout.widget.ConstraintLayout>
步骤 3 − 将以下代码添加到 src/MainActivity.java 中
package com.app.sample;
import androidx.appcompat.app.AppCompatActivity;
import android.content.Context;
import android.content.Intent;
import android.os.Build;
import android.os.Bundle;
public class MainActivity extends AppCompatActivity {
   @Override
   protected void onCreate(Bundle savedInstanceState) {
      super.onCreate(savedInstanceState);
      setContentView(R.layout.activity_main);
   }
   public void acceptCall() {
      Context context = null;
      if (Build.VERSION.SDK_INT >= 21) {
         Intent answerCalintent = new Intent(context, AcceptCallActivity.class);
         answerCalintent.addFlags(Intent.FLAG_ACTIVITY_NEW_TASK | Intent.FLAG_ACTIVITY_CLEAR_TASK | Intent.FLAG_ACTIVITY_EXCLUDE_FROM_RECENTS);
         answerCalintent.setFlags(Intent.FLAG_ACTIVITY_NEW_TASK);
         context.startActivity(answerCalintent);
      }
       else {
         Intent intent = new Intent(context, AcceptCallActivity.class);
         intent.addFlags(Intent.FLAG_ACTIVITY_NEW_TASK | Intent.FLAG_ACTIVITY_CLEAR_TASK | Intent.FLAG_ACTIVITY_EXCLUDE_FROM_RECENTS);
         intent.setFlags(Intent.FLAG_ACTIVITY_NEW_TASK);
         context.startActivity(intent);
      }
   }
}
步骤 4 − 将以下代码添加到 src/AcceptCallActivity.java 中
package com.app.sample;
import android.app.Activity;
import android.app.KeyguardManager;
import android.content.BroadcastReceiver;
import android.content.Context;
import android.content.Intent;
import android.content.IntentFilter;
import android.media.AudioManager;
import android.os.Build;
import android.os.Bundle;
import android.telephony.TelephonyManager;
import android.view.KeyEvent;
import android.view.WindowManager;
import java.io.IOException;
import java.util.logging.Logger;
public class AcceptCallActivity extends Activity {
   private static Logger logger =
   Logger.getLogger(String.valueOf(AcceptCallActivity.class));
   private static final String MANUFACTURER_HTC = "HTC";
   private KeyguardManager keyguardManager;
   private AudioManager audioManager;
   private CallStateReceiver callStateReceiver;
   @Override
   protected void onCreate(Bundle savedInstanceState) {
      super.onCreate(savedInstanceState);
      keyguardManager = (KeyguardManager) getSystemService(Context.KEYGUARD_SERVICE);
      audioManager = (AudioManager) getSystemService(Context.AUDIO_SERVICE);
   }
   @Override
   protected void onResume() {
      super.onResume();
      registerCallStateReceiver();
      updateWindowFlags();
      acceptCall();
   }
   @Override
   protected void onPause() {
      super.onPause();
      if (callStateReceiver != null) {
         unregisterReceiver(callStateReceiver);
         callStateReceiver = null;
      }
   }
   private void registerCallStateReceiver() {
      callStateReceiver = new CallStateReceiver();
      IntentFilter intentFilter = new IntentFilter();
      intentFilter.addAction(TelephonyManager.ACTION_PHONE_STATE_CHANGED);
      registerReceiver(callStateReceiver, intentFilter);
   }
   private void updateWindowFlags() {
      if (keyguardManager.inKeyguardRestrictedInputMode()) {
         getWindow().addFlags( WindowManager.LayoutParams.FLAG_DISMISS_KEYGUARD | WindowManager.LayoutParams.FLAG_TURN_SCREEN_ON | WindowManager.LayoutParams.FLAG_SHOW_WHEN_LOCKED);
      } else {
         getWindow().clearFlags( WindowManager.LayoutParams.FLAG_DISMISS_KEYGUARD | WindowManager.LayoutParams.FLAG_KEEP_SCREEN_ON | WindowManager.LayoutParams.FLAG_SHOW_WHEN_LOCKED);
      }
   }
   private void acceptCall() {
      boolean broadcastConnected = MANUFACTURER_HTC.equalsIgnoreCase(Build.MANUFACTURER) && !audioManager.isWiredHeadsetOn();
      if (broadcastConnected) {
         broadcastHeadsetConnected(false);
      }
      try {
         try {
            Runtime.getRuntime().exec("input keyevent " + Integer.toString(KeyEvent.KEYCODE_HEADSETHOOK));
         }
         catch (IOException e) {
            String enforcedPerm = "android.permission.CALL_PRIVILEGED";
            Intent btnDown = new Intent(Intent.ACTION_MEDIA_BUTTON).putExtra( Intent.EXTRA_KEY_EVENT, new KeyEvent(KeyEvent.ACTION_DOWN, KeyEvent.KEYCODE_HEADSETHOOK));
            Intent btnUp = new Intent(Intent.ACTION_MEDIA_BUTTON).putExtra( Intent.EXTRA_KEY_EVENT, new KeyEvent(KeyEvent.ACTION_UP, KeyEvent.KEYCODE_HEADSETHOOK));
            sendOrderedBroadcast(btnDown, enforcedPerm);
            sendOrderedBroadcast(btnUp, enforcedPerm);
         }
      }
      finally {
         if (broadcastConnected) {
               broadcastHeadsetConnected(false);
         }
      }
   }
   private void broadcastHeadsetConnected(boolean connected) {
      Intent i = new Intent(Intent.ACTION_HEADSET_PLUG);
      i.addFlags(Intent.FLAG_RECEIVER_REGISTERED_ONLY);
      i.putExtra("state", connected ? 1 : 0);
      i.putExtra("name", "mysms");
      try {
         sendOrderedBroadcast(i, null);
      }
      catch (Exception e) {
      }
   }
   private class CallStateReceiver extends BroadcastReceiver {
      @Override
      public void onReceive(Context context, Intent intent) {
         finish();
      }
   }
}
步骤 5 − 将以下代码添加到 Manifests/AndroidManifest.xml 中
<?xml version="1.0" encoding="utf-8"?>
<manifest xmlns:android="http://schemas.android.com/apk/res/android"  package="com.app.sample" >
   <application
      android:allowBackup="true"
      android:icon="@mipmap/ic_launcher"
      android:label="@string/app_name"
      android:roundIcon="@mipmap/ic_launcher_round"
      android:supportsRtl="true"
      android:theme="@style/AppTheme" >
      <activity android:name=".MainActivity" >
         <intent-filter>
            <action android:name="android.intent.action.MAIN" />
            <category android:name="android.intent.category.LAUNCHER" />
         </intent-filter>
      </activity>
   </application>
</manifest>
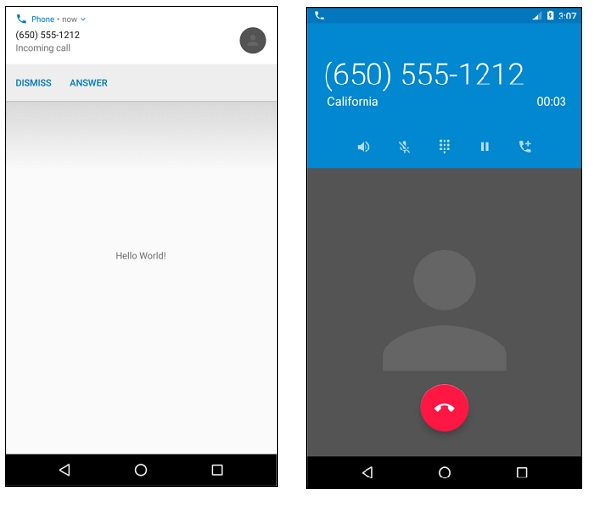
让我们尝试运行你的应用程序。我假设你已经将你的实际 Android 移动设备与计算机连接。要从 Android Studio 运行应用程序,请打开你的一个项目活动文件,然后单击工具栏中的 Run ![]() 图标。选择你的移动设备作为选项,然后查看你的移动设备,它将显示你的默认屏幕 −
图标。选择你的移动设备作为选项,然后查看你的移动设备,它将显示你的默认屏幕 −
点击 此处 下载项目代码。

更新时间: 15-11-2019
2 千次查看

广告