如何在Android中以编程方式设置视图的样式属性?
简介
在开发Android应用程序的过程中,我们经常会遇到需要为应用程序中的多个视图设置相同样式的情况。我们发现需要多次编写设置样式的代码。为了减少代码重复和优化代码,我们可以在styles.xml文件中为特定视图创建样式,并以编程方式将该样式设置为我们的视图。本文将介绍如何在Android中以编程方式设置视图的样式属性。
实现
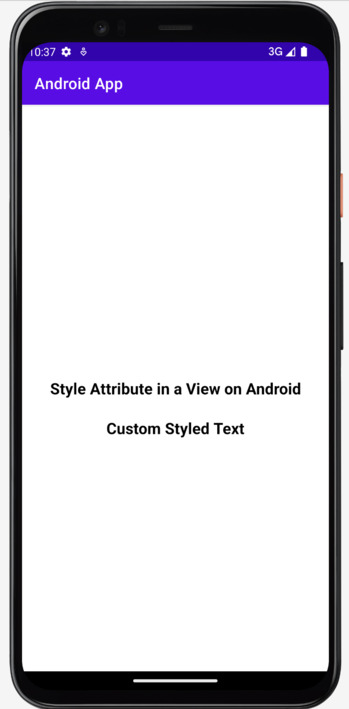
我们将创建一个简单的应用程序,其中我们将创建两个TextView。第一个TextView将显示应用程序的标题,第二个TextView将显示另一段文本,我们将为此文本应用自定义样式,并将此样式添加到我们的styles.xml文件中。
步骤1:在Android Studio中创建一个新项目
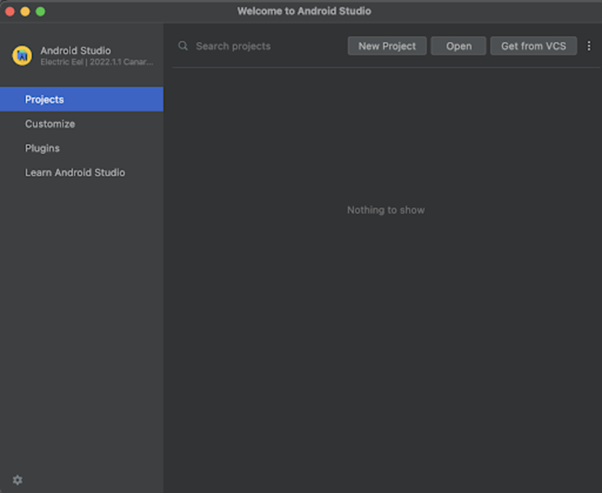
导航到Android Studio,如下图所示。在下面的屏幕中,单击“新建项目”以创建一个新的Android Studio项目。

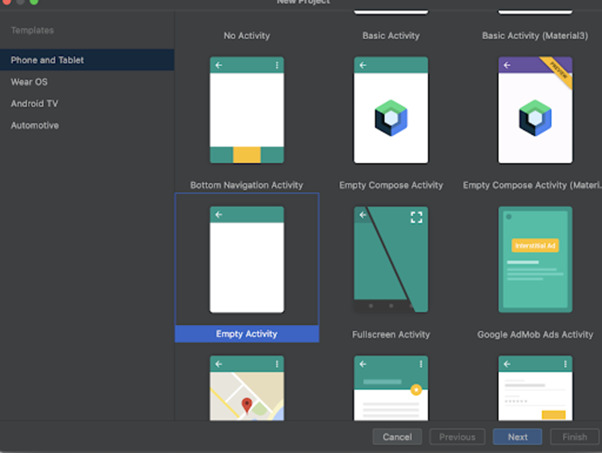
单击“新建项目”后,您将看到下面的屏幕。

在这个屏幕中,我们只需选择“Empty Activity”并单击“Next”。单击“Next”后,您将看到下面的屏幕。

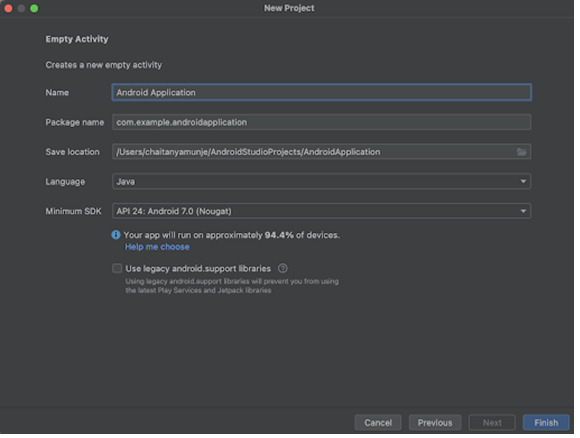
在这个屏幕中,我们只需指定项目名称。然后包名将自动生成。
注意:确保选择Java作为语言。
指定所有详细信息后,单击“Finish”以创建一个新的Android Studio项目。
项目创建完成后,我们将看到打开的两个文件:activity_main.xml和MainActivity.java文件。
步骤2:使用activity_main.xml
导航到activity_main.xml。如果此文件不可见,则要打开此文件。在左侧窗格中导航到app>res>layout>activity_main.xml以打开此文件。打开此文件后,将以下代码添加到其中。代码中添加了注释以详细了解。
<?xml version="1.0" encoding="utf-8"?>
<RelativeLayout xmlns:android="http://schemas.android.com/apk/res/android"
   xmlns:app="http://schemas.android.com/apk/res-auto"
   xmlns:tools="http://schemas.android.com/tools"
   android:layout_width="match_parent"
   android:layout_height="match_parent"
   tools:context=".MainActivity">

   <!-- creating a text view on below line-->
   <TextView
       android:id="@+id/idTVHeading"
       android:layout_width="match_parent"
       android:layout_height="wrap_content"
       android:layout_centerInParent="true"
       android:layout_marginStart="20dp"
       android:layout_marginTop="20dp"
       android:layout_marginEnd="20dp"
       android:layout_marginBottom="20dp"
       android:padding="4dp"
       android:text="Style Attribute in a View on Android"
       android:textAlignment="center"
       android:textColor="@color/black"
       android:textSize="20sp"
       android:textStyle="bold" />

   <!-- creating a text view to display custom styled text view-->
   <TextView
       android:id="@+id/idTVMessage"
       android:layout_width="wrap_content"
       android:layout_height="wrap_content"
       android:layout_below="@id/idTVHeading"
       android:layout_centerHorizontal="true"
       android:text="Custom Styled Text" />

</RelativeLayout>
说明:在上面的代码中,我们创建一个根布局作为相对布局。在这个布局中,我们创建一个TextView来显示应用程序的标题。之后,我们创建另一个TextView来显示简单的文本,并为这个TextView指定id、宽度和高度。我们将在Java文件中使用此id来为此TextView设置样式。
步骤3:在styles.xml文件中创建自定义样式
导航到app>res>values>styles.xml文件,并将以下代码添加到其中。代码中添加了注释以详细了解。
<resources xmlns:tools="http://schemas.android.com/tools">
   <!-- Base application theme. -->
   <style name="Theme.JavaTestApplication" parent="Theme.MaterialComponents.DayNight.DarkActionBar">
       <!-- Primary brand color. -->
       <item name="colorPrimary">@color/purple_500</item>
       <item name="colorPrimaryVariant">@color/purple_700</item>
       <item name="colorOnPrimary">@color/white</item>
       <!-- Secondary brand color. -->
       <item name="colorSecondary">@color/teal_200</item>
       <item name="colorSecondaryVariant">@color/teal_700</item>
       <item name="colorOnSecondary">@color/black</item>
       <!-- Status bar color. -->
       <item name="android:statusBarColor">?attr/colorPrimaryVariant</item>
       <!-- Customize your theme here. -->
   </style>
   <!-- creating a custom style for our text view on below line -->
   <style name="TextStyle" parent="Widget.AppCompat.TextView">
       <!-- specifying text size on below line -->
       <item name="android:textSize">20sp</item>
       <!-- specifying margin for text view on below line -->
       <item name="android:layout_margin">4dp</item>
       <!-- specifying padding for text view on below line -->
       <item name="android:padding">4dp</item>
       <!-- specifying text all caps as false on below line -->
       <item name="textAllCaps">false</item>
       <!-- specifying text color on below line -->
       <item name="android:textColor">@color/black</item>
       <!-- specifying text style on below line -->
       <item name="android:textStyle">bold</item>
   </style>
</resources>
说明:在上面的代码中,首先我们将看到用于设置应用程序主题的默认主题。之后,我们创建一个名为TextStyle的自定义主题,在这个主题中,我们添加了一些不同的样式属性,这些属性将用于我们的TextView,例如填充、边距、文本大小、文本颜色、文本样式等。
步骤4:使用MainActivity.java文件
导航到MainActivity.java。如果此文件不可见,则要打开此文件。在左侧窗格中导航到app>java>your_package_name>MainActivity.java以打开此文件。打开此文件后,将以下代码添加到其中。代码中添加了注释以详细了解。
package com.example.java_test_application;

import android.os.Bundle;
import android.widget.TextView;

import androidx.appcompat.app.AppCompatActivity;
import androidx.core.widget.TextViewCompat;

public class MainActivity extends AppCompatActivity {
   // creating variables on below line for text view.
   private TextView msgTV;

   @Override
   protected void onCreate(Bundle savedInstanceState) {
       super.onCreate(savedInstanceState);
       setContentView(R.layout.activity_main);
       // initializing variables on below line.
       msgTV = findViewById(R.id.idTVMessage);
       // on below line setting custom style for our text view.
       TextViewCompat.setTextAppearance(msgTV, R.style.TextStyle);
   }
}
说明:在上面的代码中,首先我们为要设置样式的TextView创建变量。现在我们将看到onCreate方法。这是每个Android应用程序的默认方法。此方法在创建应用程序视图时调用。在这个方法中,我们设置contentView,即名为activity_main.xml的布局文件,以设置来自该文件的UI。在这个onCreate方法中,我们使用我们在activity_main.xml文件中指定的id初始化TextView变量。之后,我们通过调用textAppearance方法来设置TextView的样式。
添加上述代码后,我们只需单击顶部栏中的绿色图标即可在移动设备上运行我们的应用程序。
注意:确保已连接到您的真实设备或模拟器。
输出

结论
在本文中,我们介绍了如何在Android中以编程方式设置视图的样式属性。


 数据结构
数据结构 网络
网络 关系数据库管理系统 (RDBMS)
 操作系统
操作系统 Java
Java iOS
iOS HTML
HTML CSS
CSS Android
 Python
 C语言编程
C语言编程 C++
C++ C#
C# MongoDB
 MySQL
MySQL Javascript
 PHP
PHP