
 数据结构
数据结构 网络
网络 关系数据库管理系统 (RDBMS)
 操作系统
操作系统 Java
Java iOS
iOS HTML
HTML CSS
CSS Android
 Python
 C语言编程
C语言编程 C++
C++ C#
C# MongoDB
 MySQL
MySQL Javascript
 PHP
PHP如何在Android中使用Volley发送包含JSON数据的POST请求?
我们在Google Play商店上看到的许多Android应用程序都会进行API调用,以便从其数据库中收集数据并在我们的应用程序中显示这些数据。同样,许多应用程序通过表单获取用户数据并将其存储在其数据库中。许多应用程序获取用户的地址等详细信息,以便将特定产品交付到他们的地址。为了发布这些数据,有不同的方法,例如使用Volley、Retrofit等。在本文中,我们将了解如何在Android中使用Volley发送包含JSON数据的POST请求。
实现
我们将创建一个简单的应用程序,在这个应用程序中,我们将显示两个EditText字段和一个按钮。用户必须在这些文本字段中输入姓名和职位,然后单击按钮提交这些数据。然后,我们将使用Android中的Volley通过发出POST请求将这些数据发送到API。我们将使用一个示例API来进行此POST请求API调用,这将帮助我们发布数据。发布这些数据后,我们还将收到来自API的响应,这些响应将在我们的应用程序中显示。
步骤1:在Android Studio中创建一个新项目
导航到Android Studio,如下图所示。在下图中,单击“新建项目”以创建一个新的Android Studio项目。

单击“新建项目”后,您将看到如下屏幕。
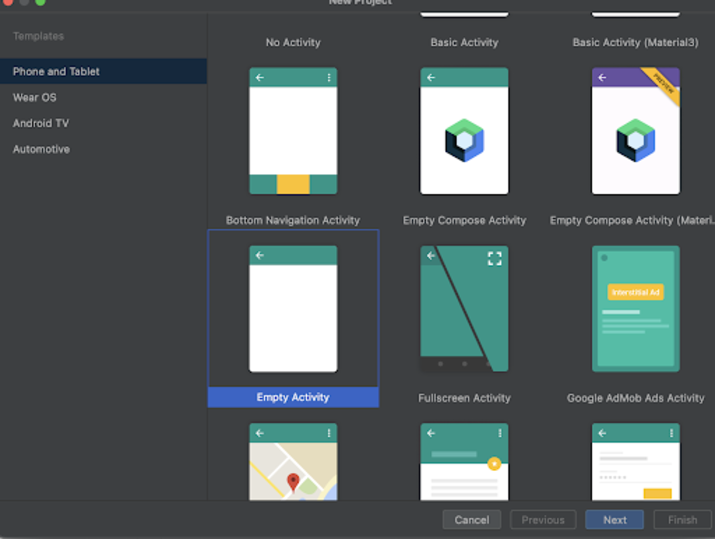
在此屏幕中,我们只需选择“Empty Activity”并单击“Next”。单击“Next”后,您将看到如下屏幕。
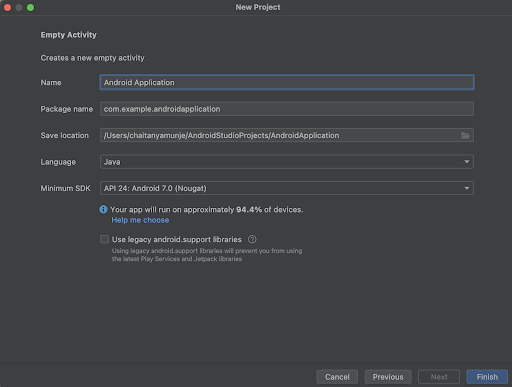
在此屏幕中,我们只需指定项目名称。然后包名将自动生成。
注意:确保选择Java作为语言。
指定所有详细信息后,单击“Finish”以创建一个新的Android Studio项目。
创建项目后,我们将看到打开的两个文件,即activity_main.xml和MainActivity.java文件。
步骤2:在build.gradle文件中添加依赖项以使用此库。
导航到Gradle Scripts>build.gradle文件,并在dependencies部分添加以下依赖项。
implementation 'com.android.volley:volley:1.2.1'
在dependencies部分,我们将添加一个依赖项,该依赖项用于从API调用获取数据以将其加载到我们的应用程序中。
添加上述依赖项后,您将在IDE的右上角看到“Sync Now”选项。只需单击它即可同步您的项目并在您的项目中安装此依赖项。
步骤3:使用activity_main.xml
导航到activity_main.xml。如果此文件不可见,则要打开此文件。在左侧窗格中,导航到app>res>layout>activity_main.xml以打开此文件。打开此文件后,向其中添加以下代码。代码中添加了注释,以便详细了解。
<?xml version="1.0" encoding="utf-8"?>
<RelativeLayout xmlns:android="http://schemas.android.com/apk/res/android"
   xmlns:app="http://schemas.android.com/apk/res-auto"
   xmlns:tools="http://schemas.android.com/tools"
   android:id="@+id/idRLLayout"
   android:layout_width="match_parent"
   android:layout_height="match_parent"
   android:orientation="vertical"
   tools:context=".MainActivity">

   <!-- on below line creating a text view for displaying a heading-->
   <TextView
       android:id="@+id/idTVHeading"
       android:layout_width="match_parent"
       android:layout_height="wrap_content"
       android:layout_marginStart="10dp"
       android:layout_marginTop="100dp"
       android:layout_marginEnd="10dp"
       android:gravity="center"
       android:text="POST Request using Volley"
       android:textAlignment="center"
       android:textColor="@color/black"
       android:textSize="18sp"
       android:textStyle="bold" />

   <!-- on below line creating edit text for name -->
   <EditText
       android:id="@+id/idEdtName"
       android:layout_width="match_parent"
       android:layout_height="wrap_content"
       android:layout_below="@id/idTVHeading"
       android:layout_margin="10dp"
       android:hint="Enter your Name"
       android:textAllCaps="false" />

   <!-- on below line creating edit text for name -->
   <EditText
       android:id="@+id/idEdtJob"
       android:layout_width="match_parent"
       android:layout_height="wrap_content"
       android:layout_below="@id/idEdtName"
       android:layout_margin="10dp"
       android:hint="Enter your Job"
       android:textAllCaps="false" />

   <!-- progress bar for displaying a loading indicator -->
   <ProgressBar
       android:id="@+id/idPBLoading"
       android:layout_width="wrap_content"
       android:layout_height="wrap_content"
       android:layout_centerInParent="true"
       android:indeterminate="true"
       android:indeterminateTint="@color/black"
       android:visibility="gone" />

   <!-- button for posting the data -->
   <Button
       android:id="@+id/idBtnPostData"
       android:layout_width="match_parent"
       android:layout_height="wrap_content"
       android:layout_below="@id/idEdtJob"
       android:layout_margin="10dp"
       android:text="Post Data"
       android:textAllCaps="false" />

   <!-- tyext view for displaying the response -->
   <TextView
       android:id="@+id/idTVResponse"
       android:layout_width="match_parent"
       android:layout_height="wrap_content"
       android:layout_below="@id/idBtnPostData"
       android:layout_margin="10dp"
       android:gravity="center"
       android:textAlignment="center"
       android:textColor="@color/black"
       android:textSize="18sp"
       android:textStyle="bold" />
</RelativeLayout>
说明:在上面的代码中,根元素是Android中的相对布局。在这个相对布局中,我们正在创建一个简单的TextView,我们将使用它来显示应用程序的标题。之后,我们正在创建两个EditText字段,这些字段将用于通过键盘从用户那里获取我们必须发布的数据。第一个EditText将用于获取姓名,第二个EditText将用于从用户那里获取职位。之后,我们显示一个进度条,该进度条用作发布数据时的加载指示器。在这个进度条之后,我们显示一个按钮,该按钮用于发布数据,单击此按钮时,我们将数据发布到我们的服务器。之后,我们将创建一个TextView,我们将在其中显示来自我们API的响应。
步骤4:在AndroidManifest.xml文件中添加互联网权限
由于我们正在从互联网获取数据,因此我们必须在我们的Android应用程序中添加互联网权限才能访问互联网以加载此数据。因此,我们必须添加互联网权限。要添加互联网权限,请导航到app>AndroidManifest.xml文件,并在application标签上方添加以下权限。
<uses-permission android:name="android.permission.INTERNET"/>
步骤7:使用MainActivity.java
导航到MainActivity.java。如果此文件不可见,则要打开此文件。在左侧窗格中,导航到app>java>您的应用程序包名>MainActivity.java以打开此文件。打开此文件后,向其中添加以下代码。代码中添加了注释,以便详细了解。
package com.example.androidjavaapp;
import android.os.Bundle;
import android.util.Log;
import android.view.View;
import android.widget.Button;
import android.widget.EditText;
import android.widget.ProgressBar;
import android.widget.TextView;
import android.widget.Toast;
import androidx.annotation.Nullable;
import androidx.appcompat.app.AppCompatActivity;
import com.android.volley.AuthFailureError;
import com.android.volley.Request;
import com.android.volley.RequestQueue;
import com.android.volley.Response;
import com.android.volley.VolleyError;
import com.android.volley.toolbox.StringRequest;
import com.android.volley.toolbox.Volley;
import java.util.HashMap;
import java.util.Map;
public class MainActivity extends AppCompatActivity {
   // on below line we are creating variables
   private EditText nameEdt, jobEdt;
   private Button postDataBtn;
   private ProgressBar loadingPB;
   private TextView responseTV;
   @Override
   protected void onCreate(Bundle savedInstanceState) {
       super.onCreate(savedInstanceState);
       setContentView(R.layout.activity_main);
       // on below line initializing variable with id.
       nameEdt = findViewById(R.id.idEdtName);
       jobEdt = findViewById(R.id.idEdtJob);
       postDataBtn = findViewById(R.id.idBtnPostData);
       loadingPB = findViewById(R.id.idPBLoading);
       responseTV = findViewById(R.id.idTVResponse);
       // on below line adding click listner for our post data button.
       postDataBtn.setOnClickListener(new View.OnClickListener() {
           @Override
           public void onClick(View v) {
               // on below line checking of the edit text is empty or not.
               if (nameEdt.getText().toString().isEmpty() && jobEdt.getText().toString().isEmpty()) {
                   Toast.makeText(MainActivity.this, "Pplease enter name and job..", Toast.LENGTH_SHORT).show();
               } else {
                   // on below line calling method to post the data.
                   postDataUsingVolley(nameEdt.getText().toString(), jobEdt.getText().toString());
               }
           }
       });
   }
   private void postDataUsingVolley(String name, String job) {
       // on below line specifying the url at which we have to make a post request
       String url = "https://reqres.in/api/users";
       // setting progress bar visibility on below line.
       loadingPB.setVisibility(View.VISIBLE);
       // creating a new variable for our request queue
       RequestQueue queue = Volley.newRequestQueue(MainActivity.this);
       // making a string request on below line.
       StringRequest request = new StringRequest(Request.Method.POST, url, new Response.Listener<String>() {
           @Override
           public void onResponse(String response) {
               // channing progress bar visibility on below line.
               loadingPB.setVisibility(View.GONE);
               // setting response to text view.
               responseTV.setText("Response from the API is :
" + response);
               // displaying toast message.
               Toast.makeText(MainActivity.this, "Data posted succesfully..", Toast.LENGTH_SHORT).show();
           }
       }, new Response.ErrorListener() {
           @Override
           public void onErrorResponse(VolleyError error) {
               // handling error on below line.
               loadingPB.setVisibility(View.GONE);
               responseTV.setText(error.getMessage());
               Toast.makeText(MainActivity.this, "Fail to get response..", Toast.LENGTH_SHORT).show();
           }
       }) {
           @Nullable
           @Override
           protected Map<String, String> getParams() throws AuthFailureError {
               Map<String, String> params = new HashMap<String, String>();
               // on below line we are passing our key
               // and value pair to our parameters.
               params.put("name", name);
               params.put("job", job);
               return params;
           }
       };
       // adding request to queue to post the data.
       queue.add(request);
   }
}
说明:在上面的MainActivity.java文件的代码中。首先,我们为我们的TextView、按钮、进度条和EditText创建变量。在onCreate方法中,我们使用我们在activity_main.xml文件中给出的ID初始化我们的变量。初始化所有变量后,我们为我们的按钮添加一个点击侦听器。在点击侦听器方法中,我们检查EditText是否为空。如果EditText字段为空,则我们将显示一条吐司消息,要求在EditText字段中输入数据。如果文本字段不为空,则我们将调用postData方法来发布数据。
在使用Volley的postData方法中,我们传递name和job两个变量。在此方法中,我们首先为必须在其上发出post请求的API的URL创建一个字符串变量。之后,我们更改进度条的可见性。然后,我们初始化我们的RequestQueue变量并创建一个新的RequestQueue。然后,我们发出一个字符串请求,在其中我们将请求类型指定为post请求,然后指定URL。现在,在response方法中,我们在我们的TextView中显示响应。同样,我们处理错误方法。我们在我们的TextView上显示错误消息。然后,我们调用getParams方法,在其中设置我们必须发布到API的数据。在这里,我们传递我们的name和job以发布到API。最后,我们将此请求添加到队列以发布数据。
添加上述代码后,我们现在只需单击顶栏中的绿色图标即可在移动设备上运行我们的应用程序。
注意:确保您已连接到您的真实设备或模拟器。
输出
结论
在上面的代码中,我们了解了如何在Android中使用JSON响应将数据发布到API。同时,我们还了解了如何使用Volley库发布数据。

4K+ 浏览量
