- Java 并发教程
- 并发 - 首页
- 并发 - 概述
- 并发 - 环境设置
- 并发 - 主要操作
- 线程间通信
- 并发 - 同步
- 并发 - 死锁
- 实用类示例
- 并发 - ThreadLocal
- 并发 - ThreadLocalRandom
- 锁示例
- 并发 - 锁
- 并发 - 读写锁
- 并发 - 条件
- 原子变量示例
- 并发 - AtomicInteger
- 并发 - AtomicLong
- 并发 - AtomicBoolean
- 并发 - AtomicReference
- 并发 - AtomicIntegerArray
- 并发 - AtomicLongArray
- 并发 - AtomicReferenceArray
- 执行器示例
- 并发 - 执行器
- 并发 - ExecutorService
- ScheduledExecutorService
- 线程池示例
- 并发 - newFixedThreadPool
- 并发 - newCachedThreadPool
- newScheduledThreadPool
- newSingleThreadExecutor
- 并发 - ThreadPoolExecutor
- ScheduledThreadPoolExecutor
- 高级示例
- 并发 - Futures 和 Callables
- 并发 - Fork-Join 框架
- 并发集合
- 并发 - BlockingQueue
- 并发 - ConcurrentMap
- ConcurrentNavigableMap
- 并发有用资源
- 并发 - 快速指南
- 并发 - 有用资源
- 并发 - 讨论
Java 并发 - 快速指南
Java 并发 - 概述
Java 是一种多线程编程语言,这意味着我们可以使用 Java 开发多线程程序。多线程程序包含两个或多个可以并发运行的部分,并且每个部分可以同时处理不同的任务,从而优化可用资源的使用,尤其是在您的计算机具有多个 CPU 时。
根据定义,多任务处理是指多个进程共享 CPU 等公共处理资源。多线程将多任务处理的概念扩展到应用程序中,您可以在其中将单个应用程序内的特定操作细分为各个线程。每个线程都可以并行运行。操作系统不仅在不同的应用程序之间分配处理时间,还在应用程序内的每个线程之间分配处理时间。
多线程使您能够以一种方式编写代码,其中多个活动可以在同一个程序中并发进行。
线程的生命周期
线程在其生命周期中会经历不同的阶段。例如,线程诞生、启动、运行,然后死亡。下图显示了线程的完整生命周期。
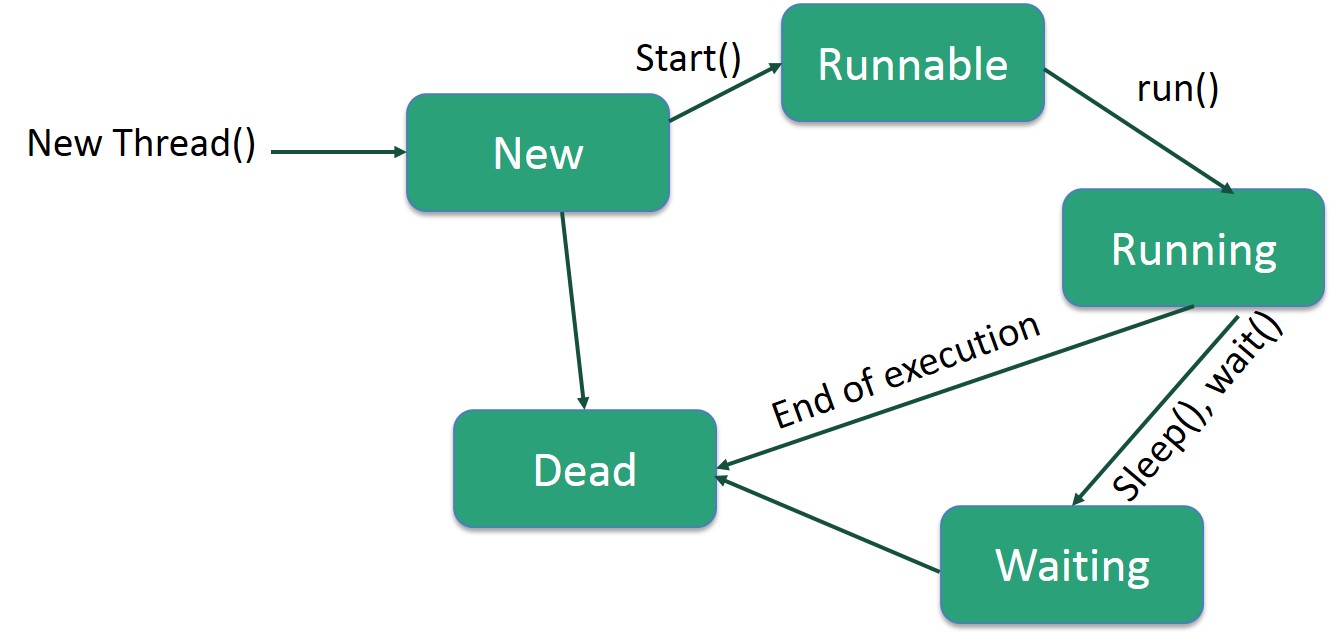
以下是生命周期的阶段:
新建 - 新线程从新建状态开始其生命周期。它保持在此状态,直到程序启动线程。它也被称为新生线程。
可运行 - 新生线程启动后,线程变为可运行状态。处于此状态的线程被认为正在执行其任务。
等待 - 有时,线程在等待另一个线程执行任务时会转换到等待状态。线程只有在另一个线程发出信号让等待线程继续执行时才会转换回可运行状态。
计时等待 - 可运行线程可以为指定的时间间隔进入计时等待状态。处于此状态的线程在该时间间隔到期或其正在等待的事件发生时转换回可运行状态。
终止(死亡) - 可运行线程在完成其任务或以其他方式终止时进入终止状态。
线程优先级
每个 Java 线程都具有一个优先级,这有助于操作系统确定调度线程的顺序。
Java 线程优先级介于 MIN_PRIORITY(常量 1)和 MAX_PRIORITY(常量 10)之间。默认情况下,每个线程都被赋予 NORM_PRIORITY(常量 5)优先级。
优先级较高的线程对程序更重要,应在优先级较低的线程之前分配处理器时间。但是,线程优先级不能保证线程执行的顺序,并且在很大程度上依赖于平台。
通过实现 Runnable 接口创建线程
如果您的类旨在作为线程执行,那么您可以通过实现Runnable接口来实现。您需要遵循三个基本步骤:
步骤 1
作为第一步,您需要实现Runnable接口提供的 run() 方法。此方法为线程提供了一个入口点,您将在此方法中放置您的完整业务逻辑。以下是 run() 方法的简单语法:
public void run( )
步骤 2
作为第二步,您将使用以下构造函数实例化一个Thread对象:
Thread(Runnable threadObj, String threadName);
其中,threadObj 是实现Runnable接口的类的实例,threadName 是赋予新线程的名称。
步骤 3
创建 Thread 对象后,您可以通过调用start()方法启动它,该方法执行对 run() 方法的调用。以下是 start() 方法的简单语法:
void start();
示例
以下是一个创建新线程并开始运行它的示例:
实时演示class RunnableDemo implements Runnable {
private Thread t;
private String threadName;
RunnableDemo(String name) {
threadName = name;
System.out.println("Creating " + threadName );
}
public void run() {
System.out.println("Running " + threadName );
try {
for(int i = 4; i > 0; i--) {
System.out.println("Thread: " + threadName + ", " + i);
// Let the thread sleep for a while.
Thread.sleep(50);
}
} catch (InterruptedException e) {
System.out.println("Thread " + threadName + " interrupted.");
}
System.out.println("Thread " + threadName + " exiting.");
}
public void start () {
System.out.println("Starting " + threadName );
if (t == null) {
t = new Thread (this, threadName);
t.start ();
}
}
}
public class TestThread {
public static void main(String args[]) {
RunnableDemo R1 = new RunnableDemo("Thread-1");
R1.start();
RunnableDemo R2 = new RunnableDemo("Thread-2");
R2.start();
}
}
这将产生以下结果:
输出
Creating Thread-1
Starting Thread-1
Creating Thread-2
Starting Thread-2
Running Thread-1
Thread: Thread-1, 4
Running Thread-2
Thread: Thread-2, 4
Thread: Thread-1, 3
Thread: Thread-2, 3
Thread: Thread-1, 2
Thread: Thread-2, 2
Thread: Thread-1, 1
Thread: Thread-2, 1
Thread Thread-1 exiting.
Thread Thread-2 exiting.
通过扩展 Thread 类创建线程
创建线程的第二种方法是创建一个扩展Thread类的新的类,使用以下两个简单的步骤。这种方法在处理使用 Thread 类中可用方法创建的多个线程方面提供了更大的灵活性。
步骤 1
您需要覆盖 Thread 类中可用的run()方法。此方法为线程提供了一个入口点,您将在此方法中放置您的完整业务逻辑。以下是 run() 方法的简单语法:
public void run( )
步骤 2
创建 Thread 对象后,您可以通过调用start()方法启动它,该方法执行对 run() 方法的调用。以下是 start() 方法的简单语法:
void start( );
示例
以下是重写为扩展 Thread 的前一个程序:
实时演示class ThreadDemo extends Thread {
private Thread t;
private String threadName;
ThreadDemo(String name) {
threadName = name;
System.out.println("Creating " + threadName );
}
public void run() {
System.out.println("Running " + threadName );
try {
for(int i = 4; i > 0; i--) {
System.out.println("Thread: " + threadName + ", " + i);
// Let the thread sleep for a while.
Thread.sleep(50);
}
} catch (InterruptedException e) {
System.out.println("Thread " + threadName + " interrupted.");
}
System.out.println("Thread " + threadName + " exiting.");
}
public void start () {
System.out.println("Starting " + threadName );
if (t == null) {
t = new Thread (this, threadName);
t.start ();
}
}
}
public class TestThread {
public static void main(String args[]) {
ThreadDemo T1 = new ThreadDemo("Thread-1");
T1.start();
ThreadDemo T2 = new ThreadDemo("Thread-2");
T2.start();
}
}
这将产生以下结果:
输出
Creating Thread-1
Starting Thread-1
Creating Thread-2
Starting Thread-2
Running Thread-1
Thread: Thread-1, 4
Running Thread-2
Thread: Thread-2, 4
Thread: Thread-1, 3
Thread: Thread-2, 3
Thread: Thread-1, 2
Thread: Thread-2, 2
Thread: Thread-1, 1
Thread: Thread-2, 1
Thread Thread-1 exiting.
Thread Thread-2 exiting.
Java 并发 - 环境设置
在本章中,我们将讨论为 Java 设置一个融洽的环境的不同方面。
本地环境设置
如果您仍然希望为 Java 编程语言设置环境,那么本节将指导您如何在机器上下载和设置 Java。以下是设置环境的步骤。
Java SE 可从以下链接免费获取 下载 Java。您可以根据您的操作系统下载版本。
按照说明下载 Java 并运行.exe以在您的机器上安装 Java。在您的机器上安装 Java 后,您需要设置环境变量以指向正确的安装目录:
为 Windows 设置路径
假设您已将 Java 安装在c:\Program Files\java\jdk目录中:
右键单击“我的电脑”,然后选择“属性”。
在“高级”选项卡下单击“环境变量”按钮。
现在,更改“Path”变量,使其还包含 Java 可执行文件的路径。例如,如果路径当前设置为“C:\WINDOWS\SYSTEM32”,则将路径更改为“C:\WINDOWS\SYSTEM32;c:\Program Files\java\jdk\bin”。
为 Linux、UNIX、Solaris、FreeBSD 设置路径
环境变量 PATH 应设置为指向 Java 二进制文件安装的位置。如果您在执行此操作时遇到问题,请参阅您的 shell 文档。
例如,如果您使用bash作为您的 shell,则您将在您的 '.bashrc' 的末尾添加以下行:'export PATH = /path/to/java:$PATH'
流行的 Java 编辑器
要编写 Java 程序,您需要一个文本编辑器。市场上甚至还有更复杂的 IDE。但目前,您可以考虑以下其中之一:
记事本 - 在 Windows 机器上,您可以使用任何简单的文本编辑器,如记事本(推荐用于本教程)、TextPad。
Netbeans - 一个开源且免费的 Java IDE,可以从 https://netbeans.org/index.html 下载。
Eclipse - 由 Eclipse 开源社区开发的 Java IDE,可以从 https://www.eclipse.org/ 下载。
Java 并发 - 主要操作
核心 Java 提供对多线程程序的完全控制。您可以开发一个多线程程序,该程序可以根据您的要求完全暂停、恢复或停止。有各种静态方法可以在线程对象上使用以控制其行为。下表列出了这些方法:
| 序号 | 方法及描述 |
|---|---|
| 1 | public void suspend() 此方法将线程置于挂起状态,可以使用 resume() 方法恢复。 |
| 2 | public void stop() 此方法完全停止线程。 |
| 3 | public void resume() 此方法恢复线程,该线程使用 suspend() 方法挂起。 |
| 4 | public void wait() 导致当前线程等待,直到另一个线程调用 notify()。 |
| 5 | public void notify() 唤醒一个正在等待此对象监视器的线程。 |
请注意,最新版本的 Java 已弃用 suspend()、resume() 和 stop() 方法的使用,因此您需要使用可用的替代方法。
示例
实时演示class RunnableDemo implements Runnable {
public Thread t;
private String threadName;
boolean suspended = false;
RunnableDemo(String name) {
threadName = name;
System.out.println("Creating " + threadName );
}
public void run() {
System.out.println("Running " + threadName );
try {
for(int i = 10; i > 0; i--) {
System.out.println("Thread: " + threadName + ", " + i);
// Let the thread sleep for a while.
Thread.sleep(300);
synchronized(this) {
while(suspended) {
wait();
}
}
}
} catch (InterruptedException e) {
System.out.println("Thread " + threadName + " interrupted.");
}
System.out.println("Thread " + threadName + " exiting.");
}
public void start () {
System.out.println("Starting " + threadName );
if (t == null) {
t = new Thread (this, threadName);
t.start ();
}
}
void suspend() {
suspended = true;
}
synchronized void resume() {
suspended = false;
notify();
}
}
public class TestThread {
public static void main(String args[]) {
RunnableDemo R1 = new RunnableDemo("Thread-1");
R1.start();
RunnableDemo R2 = new RunnableDemo("Thread-2");
R2.start();
try {
Thread.sleep(1000);
R1.suspend();
System.out.println("Suspending First Thread");
Thread.sleep(1000);
R1.resume();
System.out.println("Resuming First Thread");
R2.suspend();
System.out.println("Suspending thread Two");
Thread.sleep(1000);
R2.resume();
System.out.println("Resuming thread Two");
} catch (InterruptedException e) {
System.out.println("Main thread Interrupted");
} try {
System.out.println("Waiting for threads to finish.");
R1.t.join();
R2.t.join();
} catch (InterruptedException e) {
System.out.println("Main thread Interrupted");
}
System.out.println("Main thread exiting.");
}
}
以上程序产生以下输出:
输出
Creating Thread-1
Starting Thread-1
Creating Thread-2
Starting Thread-2
Running Thread-1
Thread: Thread-1, 10
Running Thread-2
Thread: Thread-2, 10
Thread: Thread-1, 9
Thread: Thread-2, 9
Thread: Thread-1, 8
Thread: Thread-2, 8
Thread: Thread-1, 7
Thread: Thread-2, 7
Suspending First Thread
Thread: Thread-2, 6
Thread: Thread-2, 5
Thread: Thread-2, 4
Resuming First Thread
Suspending thread Two
Thread: Thread-1, 6
Thread: Thread-1, 5
Thread: Thread-1, 4
Thread: Thread-1, 3
Resuming thread Two
Thread: Thread-2, 3
Waiting for threads to finish.
Thread: Thread-1, 2
Thread: Thread-2, 2
Thread: Thread-1, 1
Thread: Thread-2, 1
Thread Thread-1 exiting.
Thread Thread-2 exiting.
Main thread exiting.
线程间通信
如果您了解进程间通信,那么理解线程间通信将很容易。当您开发一个两个或多个线程交换某些信息的应用程序时,线程间通信非常重要。
有三种简单的方法和一个小技巧可以使线程通信成为可能。所有三种方法都列在下面:
| 序号 | 方法及描述 |
|---|---|
| 1 | public void wait() 导致当前线程等待,直到另一个线程调用 notify()。 |
| 2 | public void notify() 唤醒一个正在等待此对象监视器的线程。 |
| 3 | public void notifyAll() 唤醒所有在同一对象上调用 wait() 的线程。 |
这些方法已在 Object 中实现为final方法,因此它们在所有类中都可用。所有三个方法只能在synchronized上下文中调用。
示例
此示例显示了两个线程如何使用wait()和notify()方法进行通信。您可以使用相同的概念创建复杂的系统。
实时演示class Chat {
boolean flag = false;
public synchronized void Question(String msg) {
if (flag) {
try {
wait();
} catch (InterruptedException e) {
e.printStackTrace();
}
}
System.out.println(msg);
flag = true;
notify();
}
public synchronized void Answer(String msg) {
if (!flag) {
try {
wait();
} catch (InterruptedException e) {
e.printStackTrace();
}
}
System.out.println(msg);
flag = false;
notify();
}
}
class T1 implements Runnable {
Chat m;
String[] s1 = { "Hi", "How are you ?", "I am also doing fine!" };
public T1(Chat m1) {
this.m = m1;
new Thread(this, "Question").start();
}
public void run() {
for (int i = 0; i < s1.length; i++) {
m.Question(s1[i]);
}
}
}
class T2 implements Runnable {
Chat m;
String[] s2 = { "Hi", "I am good, what about you?", "Great!" };
public T2(Chat m2) {
this.m = m2;
new Thread(this, "Answer").start();
}
public void run() {
for (int i = 0; i < s2.length; i++) {
m.Answer(s2[i]);
}
}
}
public class TestThread {
public static void main(String[] args) {
Chat m = new Chat();
new T1(m);
new T2(m);
}
}
当以上程序编译并执行时,它会产生以下结果:
输出
Hi
Hi
How are you ?
I am good, what about you?
I am also doing fine!
Great!
以上示例取自 [https://stackoverflow.com/questions/2170520/inter-thread-communication-in-java] 并进行了修改。
Java 并发 - 同步
带同步的多线程示例
这是同一个示例,它按顺序打印计数器值,并且每次我们运行它时,它都会产生相同的结果。
示例
实时演示class PrintDemo {
public void printCount() {
try {
for(int i = 5; i > 0; i--) {
System.out.println("Counter --- " + i );
}
} catch (Exception e) {
System.out.println("Thread interrupted.");
}
}
}
class ThreadDemo extends Thread {
private Thread t;
private String threadName;
PrintDemo PD;
ThreadDemo(String name, PrintDemo pd) {
threadName = name;
PD = pd;
}
public void run() {
synchronized(PD) {
PD.printCount();
}
System.out.println("Thread " + threadName + " exiting.");
}
public void start () {
System.out.println("Starting " + threadName );
if (t == null) {
t = new Thread (this, threadName);
t.start ();
}
}
}
public class TestThread {
public static void main(String args[]) {
PrintDemo PD = new PrintDemo();
ThreadDemo T1 = new ThreadDemo("Thread - 1 ", PD);
ThreadDemo T2 = new ThreadDemo("Thread - 2 ", PD);
T1.start();
T2.start();
// wait for threads to end
try {
T1.join();
T2.join();
} catch (Exception e) {
System.out.println("Interrupted");
}
}
}
每次运行此程序都会产生相同的结果 -
输出
Starting Thread - 1
Starting Thread - 2
Counter   ---   5
Counter   ---   4
Counter   ---   3
Counter   ---   2
Counter   ---   1
Thread Thread - 1  exiting.
Counter   ---   5
Counter   ---   4
Counter   ---   3
Counter   ---   2
Counter   ---   1
Thread Thread - 2  exiting.
Java 并发 - 死锁
死锁描述了一种情况,其中两个或多个线程被永远阻塞,等待彼此。当多个线程需要相同的锁但以不同的顺序获取它们时,就会发生死锁。Java 多线程程序可能会遇到死锁情况,因为synchronized关键字会导致执行线程在等待与指定对象关联的锁或监视器时阻塞。这是一个示例。
示例
实时演示public class TestThread {
public static Object Lock1 = new Object();
public static Object Lock2 = new Object();
public static void main(String args[]) {
ThreadDemo1 T1 = new ThreadDemo1();
ThreadDemo2 T2 = new ThreadDemo2();
T1.start();
T2.start();
}
private static class ThreadDemo1 extends Thread {
public void run() {
synchronized (Lock1) {
System.out.println("Thread 1: Holding lock 1...");
try {
Thread.sleep(10);
} catch (InterruptedException e) {}
System.out.println("Thread 1: Waiting for lock 2...");
synchronized (Lock2) {
System.out.println("Thread 1: Holding lock 1 & 2...");
}
}
}
}
private static class ThreadDemo2 extends Thread {
public void run() {
synchronized (Lock2) {
System.out.println("Thread 2: Holding lock 2...");
try {
Thread.sleep(10);
} catch (InterruptedException e) {}
System.out.println("Thread 2: Waiting for lock 1...");
synchronized (Lock1) {
System.out.println("Thread 2: Holding lock 1 & 2...");
}
}
}
}
}
编译并执行上述程序时,您会发现死锁情况,以下是程序产生的输出 -
输出
Thread 1: Holding lock 1...
Thread 2: Holding lock 2...
Thread 1: Waiting for lock 2...
Thread 2: Waiting for lock 1...
上述程序将永远挂起,因为两个线程都无法继续执行并等待彼此释放锁,因此您可以通过按 CTRL+C 退出程序。
死锁解决方案示例
让我们更改锁的顺序并运行相同的程序,看看这两个线程是否仍然相互等待 -
示例
实时演示public class TestThread {
public static Object Lock1 = new Object();
public static Object Lock2 = new Object();
public static void main(String args[]) {
ThreadDemo1 T1 = new ThreadDemo1();
ThreadDemo2 T2 = new ThreadDemo2();
T1.start();
T2.start();
}
private static class ThreadDemo1 extends Thread {
public void run() {
synchronized (Lock1) {
System.out.println("Thread 1: Holding lock 1...");
try {
Thread.sleep(10);
} catch (InterruptedException e) {}
System.out.println("Thread 1: Waiting for lock 2...");
synchronized (Lock2) {
System.out.println("Thread 1: Holding lock 1 & 2...");
}
}
}
}
private static class ThreadDemo2 extends Thread {
public void run() {
synchronized (Lock1) {
System.out.println("Thread 2: Holding lock 1...");
try {
Thread.sleep(10);
} catch (InterruptedException e) {}
System.out.println("Thread 2: Waiting for lock 2...");
synchronized (Lock2) {
System.out.println("Thread 2: Holding lock 1 & 2...");
}
}
}
}
}
因此,只需更改锁的顺序即可防止程序陷入死锁情况,并以以下结果完成 -
输出
Thread 1: Holding lock 1...
Thread 1: Waiting for lock 2...
Thread 1: Holding lock 1 & 2...
Thread 2: Holding lock 1...
Thread 2: Waiting for lock 2...
Thread 2: Holding lock 1 & 2...
以上示例只是为了使概念清晰,但是,这是一个复杂的概念,在开发应用程序以处理死锁情况之前,您应该深入研究它。
Java 并发 - ThreadLocal 类
ThreadLocal 类用于创建线程局部变量,这些变量只能由同一线程读取和写入。例如,如果两个线程访问包含对相同 threadLocal 变量的引用的代码,则每个线程都不会看到其他线程对 threadLocal 变量所做的任何修改。
ThreadLocal 方法
以下是 ThreadLocal 类中可用的一些重要方法。
| 序号 | 方法及描述 |
|---|---|
| 1 | public T get() 返回此线程局部变量在当前线程副本中的值。 |
| 2 | protected T initialValue() 返回此线程局部变量的当前线程的“初始值”。 |
| 3 | public void remove() 删除此线程局部变量的当前线程的值。 |
| 4 | public void set(T value) 将此线程局部变量的当前线程副本设置为指定的值。 |
示例
以下 TestThread 程序演示了 ThreadLocal 类的一些方法。这里我们使用了两个计数器变量,一个是普通变量,另一个是 ThreadLocal。
实时演示class RunnableDemo implements Runnable {
int counter;
ThreadLocal<Integer> threadLocalCounter = new ThreadLocal<Integer>();
public void run() {
counter++;
if(threadLocalCounter.get() != null) {
threadLocalCounter.set(threadLocalCounter.get().intValue() + 1);
} else {
threadLocalCounter.set(0);
}
System.out.println("Counter: " + counter);
System.out.println("threadLocalCounter: " + threadLocalCounter.get());
}
}
public class TestThread {
public static void main(String args[]) {
RunnableDemo commonInstance = new RunnableDemo();
Thread t1 = new Thread(commonInstance);
Thread t2 = new Thread(commonInstance);
Thread t3 = new Thread(commonInstance);
Thread t4 = new Thread(commonInstance);
t1.start();
t2.start();
t3.start();
t4.start();
// wait for threads to end
try {
t1.join();
t2.join();
t3.join();
t4.join();
} catch (Exception e) {
System.out.println("Interrupted");
}
}
}
这将产生以下结果。
输出
Counter: 1
threadLocalCounter: 0
Counter: 2
threadLocalCounter: 0
Counter: 3
threadLocalCounter: 0
Counter: 4
threadLocalCounter: 0
您可以看到 counter 的值被每个线程递增,但 threadLocalCounter 对每个线程都保持为 0。
ThreadLocalRandom 类
java.util.concurrent.ThreadLocalRandom 是从 jdk 1.7 开始引入的一个实用程序类,当多个线程或 ForkJoinTasks 需要生成随机数时很有用。它提高了性能,并且与 Math.random() 方法相比争用更少。
ThreadLocalRandom 方法
以下是 ThreadLocalRandom 类中可用的一些重要方法。
| 序号 | 方法及描述 |
|---|---|
| 1 | public static ThreadLocalRandom current() 返回当前线程的 ThreadLocalRandom。 |
| 2 | protected int next(int bits) 生成下一个伪随机数。 |
| 3 | public double nextDouble(double n) 返回一个伪随机的、均匀分布的 double 值,该值介于 0(包含)和指定值(不包含)之间。 |
| 4 | public double nextDouble(double least, double bound) 返回一个伪随机的、均匀分布的值,该值介于给定的最小值(包含)和边界(不包含)之间。 |
| 5 | public int nextInt(int least, int bound) 返回一个伪随机的、均匀分布的值,该值介于给定的最小值(包含)和边界(不包含)之间。 |
| 6 | public long nextLong(long n) 返回一个伪随机的、均匀分布的值,该值介于 0(包含)和指定值(不包含)之间。 |
| 7 | public long nextLong(long least, long bound) 返回一个伪随机的、均匀分布的值,该值介于给定的最小值(包含)和边界(不包含)之间。 |
| 8 | public void setSeed(long seed) 抛出 UnsupportedOperationException。 |
示例
以下 TestThread 程序演示了 Lock 接口的一些方法。这里我们使用了 lock() 来获取锁,使用 unlock() 来释放锁。
实时演示import java.util.Random;
import java.util.concurrent.locks.Condition;
import java.util.concurrent.locks.Lock;
import java.util.concurrent.locks.ReentrantLock;
import java.util.concurrent.ThreadLocalRandom;
public class TestThread {
public static void main(final String[] arguments) {
System.out.println("Random Integer: " + new Random().nextInt());
System.out.println("Seeded Random Integer: " + new Random(15).nextInt());
System.out.println(
"Thread Local Random Integer: " + ThreadLocalRandom.current().nextInt());
final ThreadLocalRandom random = ThreadLocalRandom.current();
random.setSeed(15); //exception will come as seeding is not allowed in ThreadLocalRandom.
System.out.println("Seeded Thread Local Random Integer: " + random.nextInt());
}
}
这将产生以下结果。
输出
Random Integer: 1566889198
Seeded Random Integer: -1159716814
Thread Local Random Integer: 358693993
Exception in thread "main" java.lang.UnsupportedOperationException
        at java.util.concurrent.ThreadLocalRandom.setSeed(Unknown Source)
        at TestThread.main(TestThread.java:21)
这里我们使用了 ThreadLocalRandom 和 Random 类来获取随机数。
Java 并发 - Lock 接口
java.util.concurrent.locks.Lock 接口用作线程同步机制,类似于同步块。新的锁定机制比同步块更灵活,并提供更多选项。Lock 和同步块之间的主要区别如下 -
顺序保证 - 同步块不提供任何关于等待线程将获得访问权限的顺序的保证。Lock 接口处理此问题。
无超时 - 如果未授予锁,则同步块没有超时选项。Lock 接口提供此选项。
单一方法 - 同步块必须完全包含在单个方法中,而 lock 接口的 lock() 和 unlock() 方法可以在不同的方法中调用。
Lock 方法
以下是 Lock 类中可用的一些重要方法。
| 序号 | 方法及描述 |
|---|---|
| 1 | public void lock() 获取锁。 |
| 2 | public void lockInterruptibly() 除非当前线程被中断,否则获取锁。 |
| 3 | public Condition newCondition() 返回一个新的 Condition 实例,该实例绑定到此 Lock 实例。 |
| 4 | public boolean tryLock() 仅当调用时锁为空闲时才获取锁。 |
| 5 | public boolean tryLock(long time, TimeUnit unit) 如果在给定的等待时间内锁为空闲并且当前线程未被中断,则获取锁。 |
| 6 | public void unlock() 释放锁。 |
示例
以下 TestThread 程序演示了 Lock 接口的一些方法。这里我们使用了 lock() 来获取锁,使用 unlock() 来释放锁。
实时演示import java.util.concurrent.locks.Lock;
import java.util.concurrent.locks.ReentrantLock;
class PrintDemo {
private final Lock queueLock = new ReentrantLock();
public void print() {
queueLock.lock();
try {
Long duration = (long) (Math.random() * 10000);
System.out.println(Thread.currentThread().getName()
+ " Time Taken " + (duration / 1000) + " seconds.");
Thread.sleep(duration);
} catch (InterruptedException e) {
e.printStackTrace();
} finally {
System.out.printf(
"%s printed the document successfully.\n", Thread.currentThread().getName());
queueLock.unlock();
}
}
}
class ThreadDemo extends Thread {
PrintDemo printDemo;
ThreadDemo(String name, PrintDemo printDemo) {
super(name);
this.printDemo = printDemo;
}
@Override
public void run() {
System.out.printf(
"%s starts printing a document\n", Thread.currentThread().getName());
printDemo.print();
}
}
public class TestThread {
public static void main(String args[]) {
PrintDemo PD = new PrintDemo();
ThreadDemo t1 = new ThreadDemo("Thread - 1 ", PD);
ThreadDemo t2 = new ThreadDemo("Thread - 2 ", PD);
ThreadDemo t3 = new ThreadDemo("Thread - 3 ", PD);
ThreadDemo t4 = new ThreadDemo("Thread - 4 ", PD);
t1.start();
t2.start();
t3.start();
t4.start();
}
}
这将产生以下结果。
输出
Thread - 1  starts printing a document
Thread - 4  starts printing a document
Thread - 3  starts printing a document
Thread - 2  starts printing a document
Thread - 1   Time Taken 4 seconds.
Thread - 1  printed the document successfully.
Thread - 4   Time Taken 3 seconds.
Thread - 4  printed the document successfully.
Thread - 3   Time Taken 5 seconds.
Thread - 3  printed the document successfully.
Thread - 2   Time Taken 4 seconds.
Thread - 2  printed the document successfully.
这里我们使用 ReentrantLock 类作为 Lock 接口的实现。ReentrantLock 类允许线程锁定一个方法,即使它已经拥有另一个方法的锁。
Java 并发 - ReadWriteLock 接口
java.util.concurrent.locks.ReadWriteLock 接口允许多个线程同时读取,但一次只能有一个线程写入。
读取锁 - 如果没有线程锁定 ReadWriteLock 以进行写入,则多个线程可以访问读取锁。
写入锁 - 如果没有线程正在读取或写入,则一个线程可以访问写入锁。
Lock 方法
以下是 Lock 类中可用的一些重要方法。
| 序号 | 方法及描述 |
|---|---|
| 1 | public Lock readLock() 返回用于读取的锁。 |
| 2 | public Lock writeLock() 返回用于写入的锁。 |
示例
以下 TestThread 程序演示了 ReadWriteLock 接口的这些方法。这里我们使用了 readlock() 来获取读取锁,使用 writeLock() 来获取写入锁。 实时演示import java.util.concurrent.locks.ReentrantReadWriteLock;
public class TestThread {
private static final ReentrantReadWriteLock lock = new ReentrantReadWriteLock(true);
private static String message = "a";
public static void main(String[] args) throws InterruptedException {
Thread t1 = new Thread(new WriterA());
t1.setName("Writer A");
Thread t2 = new Thread(new WriterB());
t2.setName("Writer B");
Thread t3 = new Thread(new Reader());
t3.setName("Reader");
t1.start();
t2.start();
t3.start();
t1.join();
t2.join();
t3.join();
}
static class Reader implements Runnable {
public void run() {
if(lock.isWriteLocked()) {
System.out.println("Write Lock Present.");
}
lock.readLock().lock();
try {
Long duration = (long) (Math.random() * 10000);
System.out.println(Thread.currentThread().getName()
+ " Time Taken " + (duration / 1000) + " seconds.");
Thread.sleep(duration);
} catch (InterruptedException e) {
e.printStackTrace();
} finally {
System.out.println(Thread.currentThread().getName() +": "+ message );
lock.readLock().unlock();
}
}
}
static class WriterA implements Runnable {
public void run() {
lock.writeLock().lock();
try {
Long duration = (long) (Math.random() * 10000);
System.out.println(Thread.currentThread().getName()
+ " Time Taken " + (duration / 1000) + " seconds.");
Thread.sleep(duration);
} catch (InterruptedException e) {
e.printStackTrace();
} finally {
message = message.concat("a");
lock.writeLock().unlock();
}
}
}
static class WriterB implements Runnable {
public void run() {
lock.writeLock().lock();
try {
Long duration = (long) (Math.random() * 10000);
System.out.println(Thread.currentThread().getName()
+ " Time Taken " + (duration / 1000) + " seconds.");
Thread.sleep(duration);
} catch (InterruptedException e) {
e.printStackTrace();
} finally {
message = message.concat("b");
lock.writeLock().unlock();
}
}
}
}
这将产生以下结果。
输出
Writer A  Time Taken 6 seconds.
Write Lock Present.
Writer B  Time Taken 2 seconds.
Reader  Time Taken 0 seconds.
Reader: aab
Java 并发 - Condition 接口
java.util.concurrent.locks.Condition 接口提供了一种线程能力,可以暂停其执行,直到给定条件为真。Condition 对象必然绑定到一个 Lock,并且必须使用 newCondition() 方法获取。
Condition 方法
以下是 Condition 类中可用的一些重要方法。
| 序号 | 方法及描述 |
|---|---|
| 1 | public void await() 导致当前线程等待,直到它被信号通知或中断。 |
| 2 | public boolean await(long time, TimeUnit unit) 导致当前线程等待,直到它被信号通知或中断,或者指定的等待时间过去。 |
| 3 | public long awaitNanos(long nanosTimeout) 导致当前线程等待,直到它被信号通知或中断,或者指定的等待时间过去。 |
| 4 | public long awaitUninterruptibly() 导致当前线程等待,直到它被信号通知。 |
| 5 | public long awaitUntil() 导致当前线程等待,直到它被信号通知或中断,或者指定的截止日期过去。 |
| 6 | public void signal() 唤醒一个等待线程。 |
| 7 | public void signalAll() 唤醒所有等待线程。 |
示例
以下 TestThread 程序演示了 Condition 接口的这些方法。这里我们使用了 signal() 来通知,使用 await() 来暂停线程。 实时演示import java.util.concurrent.locks.Condition;
import java.util.concurrent.locks.Lock;
import java.util.concurrent.locks.ReentrantLock;
public class TestThread {
public static void main(String[] args) throws InterruptedException {
ItemQueue itemQueue = new ItemQueue(10);
//Create a producer and a consumer.
Thread producer = new Producer(itemQueue);
Thread consumer = new Consumer(itemQueue);
//Start both threads.
producer.start();
consumer.start();
//Wait for both threads to terminate.
producer.join();
consumer.join();
}
static class ItemQueue {
private Object[] items = null;
private int current = 0;
private int placeIndex = 0;
private int removeIndex = 0;
private final Lock lock;
private final Condition isEmpty;
private final Condition isFull;
public ItemQueue(int capacity) {
this.items = new Object[capacity];
lock = new ReentrantLock();
isEmpty = lock.newCondition();
isFull = lock.newCondition();
}
public void add(Object item) throws InterruptedException {
lock.lock();
while(current >= items.length)
isFull.await();
items[placeIndex] = item;
placeIndex = (placeIndex + 1) % items.length;
++current;
//Notify the consumer that there is data available.
isEmpty.signal();
lock.unlock();
}
public Object remove() throws InterruptedException {
Object item = null;
lock.lock();
while(current <= 0) {
isEmpty.await();
}
item = items[removeIndex];
removeIndex = (removeIndex + 1) % items.length;
--current;
//Notify the producer that there is space available.
isFull.signal();
lock.unlock();
return item;
}
public boolean isEmpty() {
return (items.length == 0);
}
}
static class Producer extends Thread {
private final ItemQueue queue;
public Producer(ItemQueue queue) {
this.queue = queue;
}
@Override
public void run() {
String[] numbers =
{"1", "2", "3", "4", "5", "6", "7", "8", "9", "10", "11", "12"};
try {
for(String number: numbers) {
System.out.println("[Producer]: " + number);
}
queue.add(null);
} catch (InterruptedException ex) {
ex.printStackTrace();
}
}
}
static class Consumer extends Thread {
private final ItemQueue queue;
public Consumer(ItemQueue queue) {
this.queue = queue;
}
@Override
public void run() {
try {
do {
Object number = queue.remove();
System.out.println("[Consumer]: " + number);
if(number == null) {
return;
}
} while(!queue.isEmpty());
} catch (InterruptedException ex) {
ex.printStackTrace();
}
}
}
}
这将产生以下结果。
输出
[Producer]: 1
[Producer]: 2
[Producer]: 3
[Producer]: 4
[Producer]: 5
[Producer]: 6
[Producer]: 7
[Producer]: 8
[Producer]: 9
[Producer]: 10
[Producer]: 11
[Producer]: 12
[Consumer]: null
Java 并发 - AtomicInteger 类
java.util.concurrent.atomic.AtomicInteger 类提供对底层 int 值的操作,这些操作可以原子地读取和写入,并且还包含高级原子操作。AtomicInteger 支持对底层 int 变量进行原子操作。它具有 get 和 set 方法,这些方法的工作方式类似于对 volatile 变量的读取和写入。也就是说,set 与随后对同一变量的任何 get 具有 happens-before 关系。原子 compareAndSet 方法也具有这些内存一致性特性。
AtomicInteger 方法
以下是 AtomicInteger 类中可用的一些重要方法。
| 序号 | 方法及描述 |
|---|---|
| 1 | public int addAndGet(int delta) 原子地将给定值添加到当前值。 |
| 2 | public boolean compareAndSet(int expect, int update) 如果当前值与预期值相同,则原子地将值设置为给定的更新值。 |
| 3 | public int decrementAndGet() 原子地将当前值减 1。 |
| 4 | public double doubleValue() 将指定数字的值作为 double 返回。 |
| 5 | public float floatValue() 将指定数字的值作为 float 返回。 |
| 6 | public int get() 获取当前值。 |
| 7 | public int getAndAdd(int delta) 原子地将给定值添加到当前值。 |
| 8 | public int getAndDecrement() 原子地将当前值减 1。 |
| 9 | public int getAndIncrement() 原子地将当前值加 1。 |
| 10 | public int getAndSet(int newValue) 原子地设置为给定值并返回旧值。 |
| 11 | public int incrementAndGet() 原子地将当前值加 1。 |
| 12 | public int intValue() 将指定数字的值作为 int 返回。 |
| 13 | public void lazySet(int newValue) 最终设置为给定值。 |
| 14 | public long longValue() 将指定数字的值作为 long 返回。 |
| 15 | public void set(int newValue) 设置为给定值。 |
| 16 | public String toString() 返回当前值的字符串表示形式。 |
| 17 | public boolean weakCompareAndSet(int expect, int update) 如果当前值与预期值相同,则原子地将值设置为给定的更新值。 |
示例
以下 TestThread 程序显示了在基于线程的环境中计数器的非安全实现。
实时演示public class TestThread {
static class Counter {
private int c = 0;
public void increment() {
c++;
}
public int value() {
return c;
}
}
public static void main(final String[] arguments) throws InterruptedException {
final Counter counter = new Counter();
//1000 threads
for(int i = 0; i < 1000 ; i++) {
new Thread(new Runnable() {
public void run() {
counter.increment();
}
}).start();
}
Thread.sleep(6000);
System.out.println("Final number (should be 1000): " + counter.value());
}
}
这可能会根据计算机的速度和线程交错产生以下结果。
输出
Final number (should be 1000): 1000
示例
以下 TestThread 程序显示了在基于线程的环境中使用 AtomicInteger 对计数器进行安全实现。 实时演示import java.util.concurrent.atomic.AtomicInteger;
public class TestThread {
static class Counter {
private AtomicInteger c = new AtomicInteger(0);
public void increment() {
c.getAndIncrement();
}
public int value() {
return c.get();
}
}
public static void main(final String[] arguments) throws InterruptedException {
final Counter counter = new Counter();
//1000 threads
for(int i = 0; i < 1000 ; i++) {
new Thread(new Runnable() {
public void run() {
counter.increment();
}
}).start();
}
Thread.sleep(6000);
System.out.println("Final number (should be 1000): " + counter.value());
}
}
这将产生以下结果。
输出
Final number (should be 1000): 1000
Java 并发 - AtomicLong 类
java.util.concurrent.atomic.AtomicLong 类提供对底层 long 值的操作,这些操作可以原子地读取和写入,并且还包含高级原子操作。AtomicLong 支持对底层 long 变量进行原子操作。它具有 get 和 set 方法,这些方法的工作方式类似于对 volatile 变量的读取和写入。也就是说,set 与随后对同一变量的任何 get 具有 happens-before 关系。原子 compareAndSet 方法也具有这些内存一致性特性。
AtomicLong 方法
以下是 AtomicLong 类中可用的一些重要方法。
| 序号 | 方法及描述 |
|---|---|
| 1 | public long addAndGet(long delta) 原子地将给定值添加到当前值。 |
| 2 | public boolean compareAndSet(long expect, long update) 如果当前值与预期值相同,则原子地将值设置为给定的更新值。 |
| 3 | public long decrementAndGet() 原子地将当前值减 1。 |
| 4 | public double doubleValue() 将指定数字的值作为 double 返回。 |
| 5 | public float floatValue() 将指定数字的值作为 float 返回。 |
| 6 | public long get() 获取当前值。 |
| 7 | public long getAndAdd(long delta) 原子地将给定值添加到当前值。 |
| 8 | public long getAndDecrement() 原子地将当前值减 1。 |
| 9 | public long getAndIncrement() 原子地将当前值加 1。 |
| 10 | public long getAndSet(long newValue) 原子地设置为给定值并返回旧值。 |
| 11 | public long incrementAndGet() 原子地将当前值加 1。 |
| 12 | public int intValue() 将指定数字的值作为 int 返回。 |
| 13 | public void lazySet(long newValue) 最终设置为给定值。 |
| 14 | public long longValue() 将指定数字的值作为 long 返回。 |
| 15 | public void set(long newValue) 设置为给定值。 |
| 16 | public String toString() 返回当前值的字符串表示形式。 |
| 17 | public boolean weakCompareAndSet(long expect, long update) 如果当前值与预期值相同,则原子地将值设置为给定的更新值。 |
示例
以下 TestThread 程序展示了在基于线程的环境中使用 AtomicLong 安全实现计数器的示例。
实时演示import java.util.concurrent.atomic.AtomicLong;
public class TestThread {
static class Counter {
private AtomicLong c = new AtomicLong(0);
public void increment() {
c.getAndIncrement();
}
public long value() {
return c.get();
}
}
public static void main(final String[] arguments) throws InterruptedException {
final Counter counter = new Counter();
//1000 threads
for(int i = 0; i < 1000 ; i++) {
new Thread(new Runnable() {
public void run() {
counter.increment();
}
}).start();
}
Thread.sleep(6000);
System.out.println("Final number (should be 1000): " + counter.value());
}
}
这将产生以下结果。
输出
Final number (should be 1000): 1000
Java 并发 - AtomicBoolean 类
java.util.concurrent.atomic.AtomicBoolean 类提供对底层布尔值进行原子操作的方法,包括原子读写以及高级原子操作。AtomicBoolean 支持对底层布尔变量进行原子操作。它具有 get 和 set 方法,这些方法的工作方式类似于对 volatile 变量的读写操作。也就是说,set 操作与随后对同一变量的任何 get 操作之间存在 happens-before 关系。原子 compareAndSet 方法也具有这些内存一致性特性。
AtomicBoolean 方法
以下是 AtomicBoolean 类中一些重要方法的列表。
| 序号 | 方法及描述 |
|---|---|
| 1 | public boolean compareAndSet(boolean expect, boolean update) 如果当前值 == 预期值,则以原子方式将值设置为给定的更新值。 |
| 2 | public boolean get() 返回当前值。 |
| 3 | public boolean getAndSet(boolean newValue) 以原子方式设置为给定值并返回先前的值。 |
| 4 | public void lazySet(boolean newValue) 最终设置为给定值。 |
| 5 | public void set(boolean newValue) 无条件地设置为给定值。 |
| 6 | public String toString() 返回当前值的字符串表示形式。 |
| 7 | public boolean weakCompareAndSet(boolean expect, boolean update) 如果当前值 == 预期值,则以原子方式将值设置为给定的更新值。 |
示例
以下 TestThread 程序展示了在基于线程的环境中使用 AtomicBoolean 变量的示例。
实时演示import java.util.concurrent.atomic.AtomicBoolean;
public class TestThread {
public static void main(final String[] arguments) throws InterruptedException {
final AtomicBoolean atomicBoolean = new AtomicBoolean(false);
new Thread("Thread 1") {
public void run() {
while(true) {
System.out.println(Thread.currentThread().getName()
+" Waiting for Thread 2 to set Atomic variable to true. Current value is "
+ atomicBoolean.get());
if(atomicBoolean.compareAndSet(true, false)) {
System.out.println("Done!");
break;
}
}
};
}.start();
new Thread("Thread 2") {
public void run() {
System.out.println(Thread.currentThread().getName() +
", Atomic Variable: " +atomicBoolean.get());
System.out.println(Thread.currentThread().getName() +
" is setting the variable to true ");
atomicBoolean.set(true);
System.out.println(Thread.currentThread().getName() +
", Atomic Variable: " +atomicBoolean.get());
};
}.start();
}
}
这将产生以下结果。
输出
Thread 1 Waiting for Thread 2 to set Atomic variable to true. Current value is false
Thread 1 Waiting for Thread 2 to set Atomic variable to true. Current value is false
Thread 1 Waiting for Thread 2 to set Atomic variable to true. Current value is false
Thread 2, Atomic Variable: false
Thread 1 Waiting for Thread 2 to set Atomic variable to true. Current value is false
Thread 2 is setting the variable to true
Thread 2, Atomic Variable: true
Thread 1 Waiting for Thread 2 to set Atomic variable to true. Current value is false
Done!
Java 并发 - AtomicReference 类
java.util.concurrent.atomic.AtomicReference 类提供对底层对象引用进行原子操作的方法,包括原子读写以及高级原子操作。AtomicReference 支持对底层对象引用变量进行原子操作。它具有 get 和 set 方法,这些方法的工作方式类似于对 volatile 变量的读写操作。也就是说,set 操作与随后对同一变量的任何 get 操作之间存在 happens-before 关系。原子 compareAndSet 方法也具有这些内存一致性特性。
AtomicReference 方法
以下是 AtomicReference 类中一些重要方法的列表。
| 序号 | 方法及描述 |
|---|---|
| 1 | public boolean compareAndSet(V expect, V update) 如果当前值 == 预期值,则以原子方式将值设置为给定的更新值。 |
| 2 | public boolean get() 返回当前值。 |
| 3 | public boolean getAndSet(V newValue) 以原子方式设置为给定值并返回先前的值。 |
| 4 | public void lazySet(V newValue) 最终设置为给定值。 |
| 5 | public void set(V newValue) 无条件地设置为给定值。 |
| 6 | public String toString() 返回当前值的字符串表示形式。 |
| 7 | public boolean weakCompareAndSet(V expect, V update) 如果当前值 == 预期值,则以原子方式将值设置为给定的更新值。 |
示例
以下 TestThread 程序展示了在基于线程的环境中使用 AtomicReference 变量的示例。
实时演示import java.util.concurrent.atomic.AtomicReference;
public class TestThread {
private static String message = "hello";
private static AtomicReference<String> atomicReference;
public static void main(final String[] arguments) throws InterruptedException {
atomicReference = new AtomicReference<String>(message);
new Thread("Thread 1") {
public void run() {
atomicReference.compareAndSet(message, "Thread 1");
message = message.concat("-Thread 1!");
};
}.start();
System.out.println("Message is: " + message);
System.out.println("Atomic Reference of Message is: " + atomicReference.get());
}
}
这将产生以下结果。
输出
Message is: hello
Atomic Reference of Message is: Thread 1
Java 并发 - AtomicIntegerArray 类
java.util.concurrent.atomic.AtomicIntegerArray 类提供对底层 int 数组进行原子操作的方法,包括原子读写以及高级原子操作。AtomicIntegerArray 支持对底层 int 数组变量进行原子操作。它具有 get 和 set 方法,这些方法的工作方式类似于对 volatile 变量的读写操作。也就是说,set 操作与随后对同一变量的任何 get 操作之间存在 happens-before 关系。原子 compareAndSet 方法也具有这些内存一致性特性。
AtomicIntegerArray 方法
以下是 AtomicIntegerArray 类中一些重要方法的列表。
| 序号 | 方法及描述 |
|---|---|
| 1 | public int addAndGet(int i, int delta) 以原子方式将给定值添加到索引 i 处的元素。 |
| 2 | public boolean compareAndSet(int i, int expect, int update) 如果当前值 == 预期值,则以原子方式将位置 i 处的元素设置为给定的更新值。 |
| 3 | public int decrementAndGet(int i) 以原子方式将索引 i 处的元素减 1。 |
| 4 | public int get(int i) 获取位置 i 处的当前值。 |
| 5 | public int getAndAdd(int i, int delta) 以原子方式将给定值添加到索引 i 处的元素。 |
| 6 | public int getAndDecrement(int i) 以原子方式将索引 i 处的元素减 1。 |
| 7 | public int getAndIncrement(int i) 以原子方式将索引 i 处的元素加 1。 |
| 8 | public int getAndSet(int i, int newValue) 以原子方式将位置 i 处的元素设置为给定值并返回旧值。 |
| 9 | public int incrementAndGet(int i) 以原子方式将索引 i 处的元素加 1。 |
| 10 | public void lazySet(int i, int newValue) 最终将位置 i 处的元素设置为给定值。 |
| 11 | public int length() 返回数组的长度。 |
| 12 | public void set(int i, int newValue) 将位置 i 处的元素设置为给定值。 |
| 13 | public String toString() 返回数组当前值的字符串表示形式。 |
| 14 | public boolean weakCompareAndSet(int i, int expect, int update) 如果当前值 == 预期值,则以原子方式将位置 i 处的元素设置为给定的更新值。 |
示例
以下 TestThread 程序展示了在基于线程的环境中使用 AtomicIntegerArray 变量的示例。
实时演示import java.util.concurrent.atomic.AtomicIntegerArray;
public class TestThread {
private static AtomicIntegerArray atomicIntegerArray = new AtomicIntegerArray(10);
public static void main(final String[] arguments) throws InterruptedException {
for (int i = 0; i<atomicIntegerArray.length(); i++) {
atomicIntegerArray.set(i, 1);
}
Thread t1 = new Thread(new Increment());
Thread t2 = new Thread(new Compare());
t1.start();
t2.start();
t1.join();
t2.join();
System.out.println("Values: ");
for (int i = 0; i<atomicIntegerArray.length(); i++) {
System.out.print(atomicIntegerArray.get(i) + " ");
}
}
static class Increment implements Runnable {
public void run() {
for(int i = 0; i<atomicIntegerArray.length(); i++) {
int add = atomicIntegerArray.incrementAndGet(i);
System.out.println("Thread " + Thread.currentThread().getId()
+ ", index " +i + ", value: "+ add);
}
}
}
static class Compare implements Runnable {
public void run() {
for(int i = 0; i<atomicIntegerArray.length(); i++) {
boolean swapped = atomicIntegerArray.compareAndSet(i, 2, 3);
if(swapped) {
System.out.println("Thread " + Thread.currentThread().getId()
+ ", index " +i + ", value: 3");
}
}
}
}
}
这将产生以下结果。
输出
Thread 10, index 0, value: 2
Thread 10, index 1, value: 2
Thread 10, index 2, value: 2
Thread 11, index 0, value: 3
Thread 10, index 3, value: 2
Thread 11, index 1, value: 3
Thread 11, index 2, value: 3
Thread 10, index 4, value: 2
Thread 11, index 3, value: 3
Thread 10, index 5, value: 2
Thread 10, index 6, value: 2
Thread 11, index 4, value: 3
Thread 10, index 7, value: 2
Thread 11, index 5, value: 3
Thread 10, index 8, value: 2
Thread 11, index 6, value: 3
Thread 10, index 9, value: 2
Thread 11, index 7, value: 3
Thread 11, index 8, value: 3
Thread 11, index 9, value: 3
Values:
3 3 3 3 3 3 3 3 3 3
Java 并发 - AtomicLongArray 类
java.util.concurrent.atomic.AtomicLongArray 类提供对底层 long 数组进行原子操作的方法,包括原子读写以及高级原子操作。AtomicLongArray 支持对底层 long 数组变量进行原子操作。它具有 get 和 set 方法,这些方法的工作方式类似于对 volatile 变量的读写操作。也就是说,set 操作与随后对同一变量的任何 get 操作之间存在 happens-before 关系。原子 compareAndSet 方法也具有这些内存一致性特性。
AtomicLongArray 方法
以下是 AtomicLongArray 类中一些重要方法的列表。
| 序号 | 方法及描述 |
|---|---|
| 1 | public long addAndGet(int i, long delta) 以原子方式将给定值添加到索引 i 处的元素。 |
| 2 | public boolean compareAndSet(int i, long expect, long update) 如果当前值 == 预期值,则以原子方式将位置 i 处的元素设置为给定的更新值。 |
| 3 | public long decrementAndGet(int i) 以原子方式将索引 i 处的元素减 1。 |
| 4 | public long get(int i) 获取位置 i 处的当前值。 |
| 5 | public long getAndAdd(int i, long delta) 以原子方式将给定值添加到索引 i 处的元素。 |
| 6 | public long getAndDecrement(int i) 以原子方式将索引 i 处的元素减 1。 |
| 7 | public long getAndIncrement(int i) 以原子方式将索引 i 处的元素加 1。 |
| 8 | public long getAndSet(int i, long newValue) 以原子方式将位置 i 处的元素设置为给定值并返回旧值。 |
| 9 | public long incrementAndGet(int i) 以原子方式将索引 i 处的元素加 1。 |
| 10 | public void lazySet(int i, long newValue) 最终将位置 i 处的元素设置为给定值。 |
| 11 | public int length() 返回数组的长度。 |
| 12 | public void set(int i, long newValue) 将位置 i 处的元素设置为给定值。 |
| 13 | public String toString() 返回数组当前值的字符串表示形式。 |
| 14 | public boolean weakCompareAndSet(int i, long expect, long update) 如果当前值 == 预期值,则以原子方式将位置 i 处的元素设置为给定的更新值。 |
示例
以下 TestThread 程序展示了在基于线程的环境中使用 AtomicIntegerArray 变量的示例。
实时演示import java.util.concurrent.atomic.AtomicLongArray;
public class TestThread {
private static AtomicLongArray atomicLongArray = new AtomicLongArray(10);
public static void main(final String[] arguments) throws InterruptedException {
for (int i = 0; i<atomicLongArray.length(); i++) {
atomicLongArray.set(i, 1);
}
Thread t1 = new Thread(new Increment());
Thread t2 = new Thread(new Compare());
t1.start();
t2.start();
t1.join();
t2.join();
System.out.println("Values: ");
for (int i = 0; i<atomicLongArray.length(); i++) {
System.out.print(atomicLongArray.get(i) + " ");
}
}
static class Increment implements Runnable {
public void run() {
for(int i = 0; i<atomicLongArray.length(); i++) {
long add = atomicLongArray.incrementAndGet(i);
System.out.println("Thread " + Thread.currentThread().getId()
+ ", index " +i + ", value: "+ add);
}
}
}
static class Compare implements Runnable {
public void run() {
for(int i = 0; i<atomicLongArray.length(); i++) {
boolean swapped = atomicLongArray.compareAndSet(i, 2, 3);
if(swapped) {
System.out.println("Thread " + Thread.currentThread().getId()
+ ", index " +i + ", value: 3");
}
}
}
}
}
这将产生以下结果。
输出
Thread 9, index 0, value: 2
Thread 10, index 0, value: 3
Thread 9, index 1, value: 2
Thread 9, index 2, value: 2
Thread 9, index 3, value: 2
Thread 9, index 4, value: 2
Thread 10, index 1, value: 3
Thread 9, index 5, value: 2
Thread 10, index 2, value: 3
Thread 9, index 6, value: 2
Thread 10, index 3, value: 3
Thread 9, index 7, value: 2
Thread 10, index 4, value: 3
Thread 9, index 8, value: 2
Thread 9, index 9, value: 2
Thread 10, index 5, value: 3
Thread 10, index 6, value: 3
Thread 10, index 7, value: 3
Thread 10, index 8, value: 3
Thread 10, index 9, value: 3
Values:
3 3 3 3 3 3 3 3 3 3
AtomicReferenceArray 类
java.util.concurrent.atomic.AtomicReferenceArray 类提供对底层引用数组进行原子操作的方法,包括原子读写以及高级原子操作。AtomicReferenceArray 支持对底层引用数组变量进行原子操作。它具有 get 和 set 方法,这些方法的工作方式类似于对 volatile 变量的读写操作。也就是说,set 操作与随后对同一变量的任何 get 操作之间存在 happens-before 关系。原子 compareAndSet 方法也具有这些内存一致性特性。
AtomicReferenceArray 方法
以下是 AtomicReferenceArray 类中一些重要方法的列表。
| 序号 | 方法及描述 |
|---|---|
| 1 | public boolean compareAndSet(int i, E expect, E update) 如果当前值 == 预期值,则以原子方式将位置 i 处的元素设置为给定的更新值。 |
| 2 | public E get(int i) 获取位置 i 处的当前值。 |
| 3 | public E getAndSet(int i, E newValue) 以原子方式将位置 i 处的元素设置为给定值并返回旧值。 |
| 4 | public void lazySet(int i, E newValue) 最终将位置 i 处的元素设置为给定值。 |
| 5 | public int length() 返回数组的长度。 |
| 6 | public void set(int i, E newValue) 将位置 i 处的元素设置为给定值。 |
| 7 | public String toString() 返回数组当前值的字符串表示形式。 |
| 8 | public boolean weakCompareAndSet(int i, E expect, E update) 如果当前值 == 预期值,则以原子方式将位置 i 处的元素设置为给定的更新值。 |
示例
以下 TestThread 程序展示了在基于线程的环境中使用 AtomicReferenceArray 变量的示例。
实时演示import java.util.concurrent.atomic.AtomicReferenceArray;
public class TestThread {
private static String[] source = new String[10];
private static AtomicReferenceArray<String> atomicReferenceArray
= new AtomicReferenceArray<String>(source);
public static void main(final String[] arguments) throws InterruptedException {
for (int i = 0; i<atomicReferenceArray.length(); i++) {
atomicReferenceArray.set(i, "item-2");
}
Thread t1 = new Thread(new Increment());
Thread t2 = new Thread(new Compare());
t1.start();
t2.start();
t1.join();
t2.join();
}
static class Increment implements Runnable {
public void run() {
for(int i = 0; i<atomicReferenceArray.length(); i++) {
String add = atomicReferenceArray.getAndSet(i,"item-"+ (i+1));
System.out.println("Thread " + Thread.currentThread().getId()
+ ", index " +i + ", value: "+ add);
}
}
}
static class Compare implements Runnable {
public void run() {
for(int i = 0; i<atomicReferenceArray.length(); i++) {
System.out.println("Thread " + Thread.currentThread().getId()
+ ", index " +i + ", value: "+ atomicReferenceArray.get(i));
boolean swapped = atomicReferenceArray.compareAndSet(i, "item-2", "updated-item-2");
System.out.println("Item swapped: " + swapped);
if(swapped) {
System.out.println("Thread " + Thread.currentThread().getId()
+ ", index " +i + ", updated-item-2");
}
}
}
}
}
这将产生以下结果。
输出
Thread 9, index 0, value: item-2
Thread 10, index 0, value: item-1
Item swapped: false
Thread 10, index 1, value: item-2
Item swapped: true
Thread 9, index 1, value: updated-item-2
Thread 10, index 1, updated-item-2
Thread 10, index 2, value: item-3
Item swapped: false
Thread 10, index 3, value: item-2
Item swapped: true
Thread 10, index 3, updated-item-2
Thread 10, index 4, value: item-2
Item swapped: true
Thread 10, index 4, updated-item-2
Thread 10, index 5, value: item-2
Item swapped: true
Thread 10, index 5, updated-item-2
Thread 10, index 6, value: item-2
Thread 9, index 2, value: item-2
Item swapped: true
Thread 9, index 3, value: updated-item-2
Thread 10, index 6, updated-item-2
Thread 10, index 7, value: item-2
Thread 9, index 4, value: updated-item-2
Item swapped: true
Thread 9, index 5, value: updated-item-2
Thread 10, index 7, updated-item-2
Thread 9, index 6, value: updated-item-2
Thread 10, index 8, value: item-2
Thread 9, index 7, value: updated-item-2
Item swapped: true
Thread 9, index 8, value: updated-item-2
Thread 10, index 8, updated-item-2
Thread 9, index 9, value: item-2
Thread 10, index 9, value: item-10
Item swapped: false
Java 并发 - Executor 接口
java.util.concurrent.Executor 接口是一个简单的接口,用于支持启动新任务。
ExecutorService 方法
| 序号 | 方法及描述 |
|---|---|
| 1 | void execute(Runnable command) 在将来的某个时间执行给定的命令。 |
示例
以下 TestThread 程序展示了在基于线程的环境中使用 Executor 接口的示例。
实时演示import java.util.concurrent.Executor;
import java.util.concurrent.Executors;
import java.util.concurrent.ThreadPoolExecutor;
import java.util.concurrent.TimeUnit;
public class TestThread {
public static void main(final String[] arguments) throws InterruptedException {
Executor executor = Executors.newCachedThreadPool();
executor.execute(new Task());
ThreadPoolExecutor pool = (ThreadPoolExecutor)executor;
pool.shutdown();
}
static class Task implements Runnable {
public void run() {
try {
Long duration = (long) (Math.random() * 5);
System.out.println("Running Task!");
TimeUnit.SECONDS.sleep(duration);
System.out.println("Task Completed");
} catch (InterruptedException e) {
e.printStackTrace();
}
}
}
}
这将产生以下结果。
输出
Running Task!
Task Completed
ExecutorService 接口
java.util.concurrent.ExecutorService 接口是 Executor 接口的子接口,它添加了管理单个任务和执行器本身生命周期的功能。
ExecutorService 方法
| 序号 | 方法及描述 |
|---|---|
| 1 | boolean awaitTermination(long timeout, TimeUnit unit) 在关闭请求后阻塞,直到所有任务都已完成执行,或者超时发生,或者当前线程被中断,以先发生者为准。 |
| 2 | <T> List<Future<T>> invokeAll(Collection<? extends Callable<T>> tasks) 执行给定的任务,并在所有任务完成后返回一个包含其状态和结果的 Future 列表。 |
| 3 | <T> List<Future<T>> invokeAll(Collection<? extends Callable<T>> tasks, long timeout, TimeUnit unit) 执行给定的任务,并在所有任务完成后或超时过期时返回一个包含其状态和结果的 Future 列表,以先发生者为准。 |
| 4 | <T> T invokeAny(Collection<? extends Callable<T>> tasks) 执行给定的任务,如果任何任务已成功完成(即,没有抛出异常),则返回其中一个已成功完成的任务的结果。 |
| 5 | <T> T invokeAny(Collection<? extends Callable<T>> tasks, long timeout, TimeUnit unit) 执行给定的任务,如果任何任务在给定超时时间过去之前已成功完成(即,没有抛出异常),则返回其中一个已成功完成的任务的结果。 |
| 6 | boolean isShutdown() 如果此执行器已关闭,则返回 true。 |
| 7 | boolean isTerminated() 如果所有任务在关闭后都已完成,则返回 true。 |
| 8 | void shutdown() 启动有序关闭,其中先前提交的任务将被执行,但不会接受任何新任务。 |
| 9 | List<Runnable> shutdownNow() 尝试停止所有正在积极执行的任务,停止等待任务的处理,并返回正在等待执行的任务列表。 |
| 10 | <T> Future<T> submit(Callable<T> task) 提交一个返回值的任务以供执行,并返回一个表示任务的待处理结果的 Future。 |
| 11 | Future<?> submit(Runnable task) 提交一个 Runnable 任务以供执行,并返回一个表示该任务的 Future。 |
| 12 | <T> Future<T> submit(Runnable task, T result) 提交一个 Runnable 任务以供执行,并返回一个表示该任务的 Future。 |
示例
以下 TestThread 程序展示了在基于线程的环境中使用 ExecutorService 接口的示例。
实时演示import java.util.concurrent.ExecutorService;
import java.util.concurrent.Executors;
import java.util.concurrent.TimeUnit;
public class TestThread {
public static void main(final String[] arguments) throws InterruptedException {
ExecutorService executor = Executors.newSingleThreadExecutor();
try {
executor.submit(new Task());
System.out.println("Shutdown executor");
executor.shutdown();
executor.awaitTermination(5, TimeUnit.SECONDS);
} catch (InterruptedException e) {
System.err.println("tasks interrupted");
} finally {
if (!executor.isTerminated()) {
System.err.println("cancel non-finished tasks");
}
executor.shutdownNow();
System.out.println("shutdown finished");
}
}
static class Task implements Runnable {
public void run() {
try {
Long duration = (long) (Math.random() * 20);
System.out.println("Running Task!");
TimeUnit.SECONDS.sleep(duration);
} catch (InterruptedException e) {
e.printStackTrace();
}
}
}
}
这将产生以下结果。
输出
Shutdown executor
Running Task!
shutdown finished
cancel non-finished tasks
java.lang.InterruptedException: sleep interrupted
	at java.lang.Thread.sleep(Native Method)
	at java.lang.Thread.sleep(Thread.java:302)
	at java.util.concurrent.TimeUnit.sleep(TimeUnit.java:328)
	at TestThread$Task.run(TestThread.java:39)
	at java.util.concurrent.Executors$RunnableAdapter.call(Executors.java:439)
	at java.util.concurrent.FutureTask$Sync.innerRun(FutureTask.java:303)
	at java.util.concurrent.FutureTask.run(FutureTask.java:138)
	at java.util.concurrent.ThreadPoolExecutor$Worker.runTask(ThreadPoolExecutor.java:895)
	at java.util.concurrent.ThreadPoolExecutor$Worker.run(ThreadPoolExecutor.java:918)
	at java.lang.Thread.run(Thread.java:662)
ScheduledExecutorService 接口
java.util.concurrent.ScheduledExecutorService 接口是 ExecutorService 接口的子接口,它支持任务的未来和/或周期性执行。
ScheduledExecutorService 方法
| 序号 | 方法及描述 |
|---|---|
| 1 | <V> ScheduledFuture<V> schedule(Callable<V> callable, long delay, TimeUnit unit) 创建并执行一个 ScheduledFuture,该 Future 在给定的延迟后启用。 |
| 2 | ScheduledFuture<?> schedule(Runnable command, long delay, TimeUnit unit) 创建并执行一个一次性操作,该操作在给定的延迟后启用。 |
| 3 | ScheduledFuture<?> scheduleAtFixedRate(Runnable command, long initialDelay, long period, TimeUnit unit) 创建并执行一个周期性操作,该操作在给定的初始延迟后第一次启用,随后以给定的周期启用;也就是说,执行将在 initialDelay 后开始,然后是 initialDelay+period,然后是 initialDelay + 2 * period,依此类推。 |
| 4 | ScheduledFuture<?> scheduleWithFixedDelay(Runnable command, long initialDelay, long delay, TimeUnit unit) 创建并执行一个周期性操作,该操作在给定的初始延迟后第一次启用,随后在一次执行终止与下一次执行开始之间以给定的延迟启用。 |
示例
以下 TestThread 程序展示了在基于线程的环境中使用 ScheduledExecutorService 接口的示例。
实时演示import java.util.concurrent.Executors;
import java.util.concurrent.ScheduledExecutorService;
import java.util.concurrent.ScheduledFuture;
import java.util.concurrent.TimeUnit;
public class TestThread {
public static void main(final String[] arguments) throws InterruptedException {
final ScheduledExecutorService scheduler = Executors.newScheduledThreadPool(1);
final ScheduledFuture<?> beepHandler =
scheduler.scheduleAtFixedRate(new BeepTask(), 2, 2, TimeUnit.SECONDS);
scheduler.schedule(new Runnable() {
@Override
public void run() {
beepHandler.cancel(true);
scheduler.shutdown();
}
}, 10, TimeUnit.SECONDS);
}
static class BeepTask implements Runnable {
public void run() {
System.out.println("beep");
}
}
}
这将产生以下结果。
输出
beep
beep
beep
beep
newFixedThreadPool 方法
可以通过调用 Executors 类的静态 newFixedThreadPool() 方法来获取固定线程池。
语法
ExecutorService fixedPool = Executors.newFixedThreadPool(2);
其中
最多 2 个线程将处于活动状态以处理任务。
如果提交了超过 2 个线程,则它们将保存在队列中,直到线程可用。
如果线程因执行期间发生故障而终止,并且尚未调用执行器的关闭操作,则会创建一个新线程来代替它。
任何线程都存在,直到池关闭。
示例
以下 TestThread 程序展示了在基于线程的环境中使用 newFixedThreadPool 方法的示例。
实时演示import java.util.concurrent.ExecutorService;
import java.util.concurrent.Executors;
import java.util.concurrent.ThreadPoolExecutor;
import java.util.concurrent.TimeUnit;
public class TestThread {
public static void main(final String[] arguments) throws InterruptedException {
ExecutorService executor = Executors.newFixedThreadPool(2);
// Cast the object to its class type
ThreadPoolExecutor pool = (ThreadPoolExecutor) executor;
//Stats before tasks execution
System.out.println("Largest executions: "
+ pool.getLargestPoolSize());
System.out.println("Maximum allowed threads: "
+ pool.getMaximumPoolSize());
System.out.println("Current threads in pool: "
+ pool.getPoolSize());
System.out.println("Currently executing threads: "
+ pool.getActiveCount());
System.out.println("Total number of threads(ever scheduled): "
+ pool.getTaskCount());
executor.submit(new Task());
executor.submit(new Task());
//Stats after tasks execution
System.out.println("Core threads: " + pool.getCorePoolSize());
System.out.println("Largest executions: "
+ pool.getLargestPoolSize());
System.out.println("Maximum allowed threads: "
+ pool.getMaximumPoolSize());
System.out.println("Current threads in pool: "
+ pool.getPoolSize());
System.out.println("Currently executing threads: "
+ pool.getActiveCount());
System.out.println("Total number of threads(ever scheduled): "
+ pool.getTaskCount());
executor.shutdown();
}
static class Task implements Runnable {
public void run() {
try {
Long duration = (long) (Math.random() * 5);
System.out.println("Running Task! Thread Name: " +
Thread.currentThread().getName());
TimeUnit.SECONDS.sleep(duration);
System.out.println("Task Completed! Thread Name: " +
Thread.currentThread().getName());
} catch (InterruptedException e) {
e.printStackTrace();
}
}
}
}
这将产生以下结果。
输出
Largest executions: 0
Maximum allowed threads: 2
Current threads in pool: 0
Currently executing threads: 0
Total number of threads(ever scheduled): 0
Core threads: 2
Largest executions: 2
Maximum allowed threads: 2
Current threads in pool: 2
Currently executing threads: 1
Total number of threads(ever scheduled): 2
Running Task! Thread Name: pool-1-thread-1
Running Task! Thread Name: pool-1-thread-2
Task Completed! Thread Name: pool-1-thread-2
Task Completed! Thread Name: pool-1-thread-1
newCachedThreadPool 方法
可以通过调用 Executors 类的静态方法 newCachedThreadPool() 获取一个缓存线程池。
语法
ExecutorService executor = Executors.newCachedThreadPool();
其中
newCachedThreadPool 方法创建一个具有可扩展线程池的执行器。
此类执行器适用于启动许多短暂任务的应用程序。
示例
以下 TestThread 程序展示了在基于线程的环境中使用 newCachedThreadPool 方法。
实时演示import java.util.concurrent.ExecutorService;
import java.util.concurrent.Executors;
import java.util.concurrent.ThreadPoolExecutor;
import java.util.concurrent.TimeUnit;
public class TestThread {
public static void main(final String[] arguments) throws InterruptedException {
ExecutorService executor = Executors.newCachedThreadPool();
// Cast the object to its class type
ThreadPoolExecutor pool = (ThreadPoolExecutor) executor;
//Stats before tasks execution
System.out.println("Largest executions: "
+ pool.getLargestPoolSize());
System.out.println("Maximum allowed threads: "
+ pool.getMaximumPoolSize());
System.out.println("Current threads in pool: "
+ pool.getPoolSize());
System.out.println("Currently executing threads: "
+ pool.getActiveCount());
System.out.println("Total number of threads(ever scheduled): "
+ pool.getTaskCount());
executor.submit(new Task());
executor.submit(new Task());
//Stats after tasks execution
System.out.println("Core threads: " + pool.getCorePoolSize());
System.out.println("Largest executions: "
+ pool.getLargestPoolSize());
System.out.println("Maximum allowed threads: "
+ pool.getMaximumPoolSize());
System.out.println("Current threads in pool: "
+ pool.getPoolSize());
System.out.println("Currently executing threads: "
+ pool.getActiveCount());
System.out.println("Total number of threads(ever scheduled): "
+ pool.getTaskCount());
executor.shutdown();
}
static class Task implements Runnable {
public void run() {
try {
Long duration = (long) (Math.random() * 5);
System.out.println("Running Task! Thread Name: " +
Thread.currentThread().getName());
TimeUnit.SECONDS.sleep(duration);
System.out.println("Task Completed! Thread Name: " +
Thread.currentThread().getName());
} catch (InterruptedException e) {
e.printStackTrace();
}
}
}
}
这将产生以下结果。
输出
Largest executions: 0
Maximum allowed threads: 2147483647
Current threads in pool: 0
Currently executing threads: 0
Total number of threads(ever scheduled): 0
Core threads: 0
Largest executions: 2
Maximum allowed threads: 2147483647
Current threads in pool: 2
Currently executing threads: 2
Total number of threads(ever scheduled): 2
Running Task! Thread Name: pool-1-thread-1
Running Task! Thread Name: pool-1-thread-2
Task Completed! Thread Name: pool-1-thread-2
Task Completed! Thread Name: pool-1-thread-1
newScheduledThreadPool 方法
可以通过调用 Executors 类的静态方法 newScheduledThreadPool() 获取一个调度线程池。
语法
ExecutorService executor = Executors.newScheduledThreadPool(1);
示例
以下 TestThread 程序展示了在基于线程的环境中使用 newScheduledThreadPool 方法。
实时演示import java.util.concurrent.Executors;
import java.util.concurrent.ScheduledExecutorService;
import java.util.concurrent.ScheduledFuture;
import java.util.concurrent.TimeUnit;
public class TestThread {
public static void main(final String[] arguments) throws InterruptedException {
final ScheduledExecutorService scheduler = Executors.newScheduledThreadPool(1);
final ScheduledFuture<?> beepHandler =
scheduler.scheduleAtFixedRate(new BeepTask(), 2, 2, TimeUnit.SECONDS);
scheduler.schedule(new Runnable() {
@Override
public void run() {
beepHandler.cancel(true);
scheduler.shutdown();
}
}, 10, TimeUnit.SECONDS);
}
static class BeepTask implements Runnable {
public void run() {
System.out.println("beep");
}
}
}
这将产生以下结果。
输出
beep
beep
beep
beep
newSingleThreadExecutor 方法
可以通过调用 Executors 类的静态方法 newSingleThreadExecutor() 获取一个单线程池。
语法
ExecutorService executor = Executors.newSingleThreadExecutor();
其中,newSingleThreadExecutor 方法创建一个每次执行一个任务的执行器。
示例
以下 TestThread 程序展示了在基于线程的环境中使用 newSingleThreadExecutor 方法。
实时演示import java.util.concurrent.ExecutorService;
import java.util.concurrent.Executors;
import java.util.concurrent.TimeUnit;
public class TestThread {
public static void main(final String[] arguments) throws InterruptedException {
ExecutorService executor = Executors.newSingleThreadExecutor();
try {
executor.submit(new Task());
System.out.println("Shutdown executor");
executor.shutdown();
executor.awaitTermination(5, TimeUnit.SECONDS);
} catch (InterruptedException e) {
System.err.println("tasks interrupted");
} finally {
if (!executor.isTerminated()) {
System.err.println("cancel non-finished tasks");
}
executor.shutdownNow();
System.out.println("shutdown finished");
}
}
static class Task implements Runnable {
public void run() {
try {
Long duration = (long) (Math.random() * 20);
System.out.println("Running Task!");
TimeUnit.SECONDS.sleep(duration);
} catch (InterruptedException e) {
e.printStackTrace();
}
}
}
}
这将产生以下结果。
输出
Shutdown executor
Running Task!
shutdown finished
cancel non-finished tasks
java.lang.InterruptedException: sleep interrupted
	at java.lang.Thread.sleep(Native Method)
	at java.lang.Thread.sleep(Thread.java:302)
	at java.util.concurrent.TimeUnit.sleep(TimeUnit.java:328)
	at TestThread$Task.run(TestThread.java:39)
	at java.util.concurrent.Executors$RunnableAdapter.call(Executors.java:439)
	at java.util.concurrent.FutureTask$Sync.innerRun(FutureTask.java:303)
	at java.util.concurrent.FutureTask.run(FutureTask.java:138)
	at java.util.concurrent.ThreadPoolExecutor$Worker.runTask(ThreadPoolExecutor.java:895)
	at java.util.concurrent.ThreadPoolExecutor$Worker.run(ThreadPoolExecutor.java:918)
	at java.lang.Thread.run(Thread.java:662)
ThreadPoolExecutor 类
java.util.concurrent.ThreadPoolExecutor 是一个 ExecutorService,用于使用可能存在的多个池化线程中的一个来执行每个提交的任务,通常使用 Executors 工厂方法进行配置。它还提供各种实用程序方法来检查当前线程的统计信息并控制它们。
ThreadPoolExecutor 方法
| 序号 | 方法及描述 |
|---|---|
| 1 | protected void afterExecute(Runnable r, Throwable t) 在执行给定 Runnable 完成后调用的方法。 |
| 2 | void allowCoreThreadTimeOut(boolean value) 设置控制核心线程是否可能超时并终止的策略,如果在保持活动时间内没有到达任务,则在需要时由新任务替换。 |
| 3 | boolean allowsCoreThreadTimeOut() 如果此池允许核心线程超时并在保持活动时间内没有到达任务时终止,则返回 true,如果需要,则在到达新任务时替换。 |
| 4 | boolean awaitTermination(long timeout, TimeUnit unit) 在关闭请求后阻塞,直到所有任务都已完成执行,或者超时发生,或者当前线程被中断,以先发生者为准。 |
| 5 | protected void beforeExecute(Thread t, Runnable r) 在给定线程中执行给定 Runnable 之前调用的方法。 |
| 6 | void execute(Runnable command) 在将来的某个时间执行给定的任务。 |
| 7 | protected void finalize() 当不再引用此执行器且它没有线程时,调用 shutdown。 |
| 8 | int getActiveCount() 返回正在积极执行任务的线程的大致数量。 |
| 9 | long getCompletedTaskCount() 返回已完成执行的任务的大致总数。 |
| 10 | int getCorePoolSize() 返回核心线程数。 |
| 11 | long getKeepAliveTime(TimeUnit unit) 返回线程保持活动时间,即超过核心池大小的线程在被终止之前可以保持空闲的时间量。 |
| 12 | int getLargestPoolSize() 返回池中曾经同时存在的线程的最大数量。 |
| 13 | int getMaximumPoolSize() 返回允许的最大线程数。 |
| 14 | int getPoolSize() 返回池中当前的线程数。 |
| 15 | BlockingQueue 返回此执行器使用的任务队列。 |
| 15 | RejectedExecutionHandler getRejectedExecutionHandler() 返回当前无法执行任务的处理程序。 |
| 16 | long getTaskCount() 返回曾经安排执行的任务的大致总数。 |
| 17 | ThreadFactory getThreadFactory() 返回用于创建新线程的线程工厂。 |
| 18 | boolean isShutdown() 如果此执行器已关闭,则返回 true。 |
| 19 | boolean isTerminated() 如果所有任务在关闭后都已完成,则返回 true。 |
| 20 | boolean isTerminating() 如果此执行器在 shutdown() 或 shutdownNow() 后正在终止过程中但尚未完全终止,则返回 true。 |
| 21 | int prestartAllCoreThreads() 启动所有核心线程,使它们空闲等待工作。 |
| 22 | boolean prestartCoreThread() 启动一个核心线程,使它空闲等待工作。 |
| 23 | void purge() 尝试从工作队列中删除所有已取消的 Future 任务。 |
| 24 | boolean remove(Runnable task) 如果存在,则从执行器的内部队列中删除此任务,从而导致它在尚未启动的情况下不运行。 |
| 25 | void setCorePoolSize(int corePoolSize) 设置核心线程数。 |
| 26 | void setKeepAliveTime(long time, TimeUnit unit) 设置线程在被终止之前可以保持空闲的时间限制。 |
| 27 | void setMaximumPoolSize(int maximumPoolSize) 设置允许的最大线程数。 |
| 28 | void setRejectedExecutionHandler(RejectedExecutionHandler handler) 设置无法执行任务的新处理程序。 |
| 29 | void setThreadFactory(ThreadFactory threadFactory) 设置用于创建新线程的线程工厂。 |
| 30 | void shutdown() 启动有序关闭,其中先前提交的任务将被执行,但不会接受任何新任务。 |
| 31 | List<Runnable> shutdownNow() 尝试停止所有正在积极执行的任务,停止等待任务的处理,并返回正在等待执行的任务列表。 |
| 32 | protected void terminated() 执行器终止时调用的方法。 |
| 33 | String toString() 返回一个字符串,标识此池及其状态,包括运行状态和估计的工作线程和任务计数的指示。 |
示例
以下 TestThread 程序展示了在基于线程的环境中使用 ThreadPoolExecutor 接口。
实时演示import java.util.concurrent.Executors;
import java.util.concurrent.ThreadPoolExecutor;
import java.util.concurrent.TimeUnit;
public class TestThread {
public static void main(final String[] arguments) throws InterruptedException {
ThreadPoolExecutor executor = (ThreadPoolExecutor)Executors.newCachedThreadPool();
//Stats before tasks execution
System.out.println("Largest executions: "
+ executor.getLargestPoolSize());
System.out.println("Maximum allowed threads: "
+ executor.getMaximumPoolSize());
System.out.println("Current threads in pool: "
+ executor.getPoolSize());
System.out.println("Currently executing threads: "
+ executor.getActiveCount());
System.out.println("Total number of threads(ever scheduled): "
+ executor.getTaskCount());
executor.submit(new Task());
executor.submit(new Task());
//Stats after tasks execution
System.out.println("Core threads: " + executor.getCorePoolSize());
System.out.println("Largest executions: "
+ executor.getLargestPoolSize());
System.out.println("Maximum allowed threads: "
+ executor.getMaximumPoolSize());
System.out.println("Current threads in pool: "
+ executor.getPoolSize());
System.out.println("Currently executing threads: "
+ executor.getActiveCount());
System.out.println("Total number of threads(ever scheduled): "
+ executor.getTaskCount());
executor.shutdown();
}
static class Task implements Runnable {
public void run() {
try {
Long duration = (long) (Math.random() * 5);
System.out.println("Running Task! Thread Name: " +
Thread.currentThread().getName());
TimeUnit.SECONDS.sleep(duration);
System.out.println("Task Completed! Thread Name: " +
Thread.currentThread().getName());
} catch (InterruptedException e) {
e.printStackTrace();
}
}
}
}
这将产生以下结果。
输出
Largest executions: 0
Maximum allowed threads: 2147483647
Current threads in pool: 0
Currently executing threads: 0
Total number of threads(ever scheduled): 0
Core threads: 0
Largest executions: 2
Maximum allowed threads: 2147483647
Current threads in pool: 2
Currently executing threads: 2
Total number of threads(ever scheduled): 2
Running Task! Thread Name: pool-1-thread-2
Running Task! Thread Name: pool-1-thread-1
Task Completed! Thread Name: pool-1-thread-1
Task Completed! Thread Name: pool-1-thread-2
ScheduledThreadPoolExecutor 类
java.util.concurrent.ScheduledThreadPoolExecutor 是 ThreadPoolExecutor 的子类,此外还可以调度命令在给定延迟后运行,或定期执行。
ScheduledThreadPoolExecutor 方法
| 序号 | 方法及描述 |
|---|---|
| 1 | protected <V> RunnableScheduledFuture<V> decorateTask(Callable<V> callable, RunnableScheduledFuture<V> task) 修改或替换用于执行可调用的任务。 |
| 2 | protected <V> RunnableScheduledFuture<V> decorateTask(Runnable runnable, RunnableScheduledFuture<V> task) 修改或替换用于执行可运行的任务。 |
| 3 | void execute(Runnable command) 执行命令,无需延迟。 |
| 4 | boolean getContinueExistingPeriodicTasksAfterShutdownPolicy() 获取有关即使在此执行器已关闭后是否继续执行现有定期任务的策略。 |
| 5 | boolean getExecuteExistingDelayedTasksAfterShutdownPolicy() 获取有关即使在此执行器已关闭后是否执行现有延迟任务的策略。 |
| 6 | BlockingQueue<Runnable> getQueue() 返回此执行器使用的任务队列。 |
| 7 | boolean getRemoveOnCancelPolicy() 获取有关在取消时是否应立即从工作队列中删除取消的任务的策略。 |
| 8 | <V> ScheduledFuture<V> schedule(Callable<V> callable, long delay, TimeUnit unit) 创建并执行一个 ScheduledFuture,该 Future 在给定的延迟后启用。 |
| 9 | ScheduledFuture<?> schedule(Runnable command, long delay, TimeUnit unit) 创建并执行一个一次性操作,该操作在给定的延迟后启用。 |
| 10 | ScheduledFuture<?> scheduleAtFixedRate(Runnable command, long initialDelay, long period, TimeUnit unit) 创建并执行一个周期性操作,该操作在给定的初始延迟后第一次启用,随后以给定的周期启用;也就是说,执行将在 initialDelay 后开始,然后是 initialDelay+period,然后是 initialDelay + 2 * period,依此类推。 |
| 11 | ScheduledFuture<?> scheduleWithFixedDelay(Runnable command, long initialDelay, long delay, TimeUnit unit) 创建并执行一个周期性操作,该操作在给定的初始延迟后第一次启用,随后在一次执行终止与下一次执行开始之间以给定的延迟启用。 |
| 12 | void setContinueExistingPeriodicTasksAfterShutdownPolicy (boolean value) 设置有关即使在此执行器已关闭后是否继续执行现有定期任务的策略。 |
| 13 | void setExecuteExistingDelayedTasksAfterShutdownPolicy (boolean value) 设置有关即使在此执行器已关闭后是否执行现有延迟任务的策略。 |
| 14 | void setRemoveOnCancelPolicy(boolean value) 设置有关在取消时是否应立即从工作队列中删除取消的任务的策略。 |
| 15 | void shutdown() 启动有序关闭,其中先前提交的任务将被执行,但不会接受任何新任务。 |
| 16 | List<Runnable> shutdownNow() 尝试停止所有正在积极执行的任务,停止等待任务的处理,并返回正在等待执行的任务列表。 |
| 17 | <T> Future<T> submit(Callable<T> task) 提交一个返回值的任务以供执行,并返回一个表示任务的待处理结果的 Future。 |
| 18 | Future<?> submit(Runnable task) 提交一个 Runnable 任务以供执行,并返回一个表示该任务的 Future。 |
| 19 | <T> Future<T> submit(Runnable task, T result) 提交一个 Runnable 任务以供执行,并返回一个表示该任务的 Future。 |
示例
以下 TestThread 程序展示了在基于线程的环境中使用 ScheduledThreadPoolExecutor 接口。
实时演示import java.util.concurrent.Executors;
import java.util.concurrent.ScheduledThreadPoolExecutor;
import java.util.concurrent.ScheduledFuture;
import java.util.concurrent.TimeUnit;
public class TestThread {
public static void main(final String[] arguments) throws InterruptedException {
final ScheduledThreadPoolExecutor scheduler =
(ScheduledThreadPoolExecutor)Executors.newScheduledThreadPool(1);
final ScheduledFuture<?> beepHandler =
scheduler.scheduleAtFixedRate(new BeepTask(), 2, 2, TimeUnit.SECONDS);
scheduler.schedule(new Runnable() {
@Override
public void run() {
beepHandler.cancel(true);
scheduler.shutdown();
}
}, 10, TimeUnit.SECONDS);
}
static class BeepTask implements Runnable {
public void run() {
System.out.println("beep");
}
}
}
这将产生以下结果。
输出
beep
beep
beep
beep
Java 并发 - Futures 和 Callables
java.util.concurrent.Callable 对象可以返回线程完成的计算结果,这与只能运行线程的可运行接口形成对比。Callable 对象返回 Future 对象,该对象提供方法来监视线程执行的任务的进度。Future 对象可用于检查 Callable 的状态,然后在线程完成时从 Callable 中检索结果。它还提供超时功能。
语法
//submit the callable using ThreadExecutor
//and get the result as a Future object
Future<Long> result10 = executor.submit(new FactorialService(10));

//get the result using get method of the Future object
//get method waits till the thread execution and then return the result of the execution.
Long factorial10 = result10.get();
示例
以下 TestThread 程序展示了在基于线程的环境中使用 Futures 和 Callables。
实时演示import java.util.concurrent.Callable;
import java.util.concurrent.ExecutionException;
import java.util.concurrent.ExecutorService;
import java.util.concurrent.Executors;
import java.util.concurrent.Future;
public class TestThread {
public static void main(final String[] arguments) throws InterruptedException,
ExecutionException {
ExecutorService executor = Executors.newSingleThreadExecutor();
System.out.println("Factorial Service called for 10!");
Future<Long> result10 = executor.submit(new FactorialService(10));
System.out.println("Factorial Service called for 20!");
Future<Long> result20 = executor.submit(new FactorialService(20));
Long factorial10 = result10.get();
System.out.println("10! = " + factorial10);
Long factorial20 = result20.get();
System.out.println("20! = " + factorial20);
executor.shutdown();
}
static class FactorialService implements Callable<Long> {
private int number;
public FactorialService(int number) {
this.number = number;
}
@Override
public Long call() throws Exception {
return factorial();
}
private Long factorial() throws InterruptedException {
long result = 1;
while (number != 0) {
result = number * result;
number--;
Thread.sleep(100);
}
return result;
}
}
}
这将产生以下结果。
输出
Factorial Service called for 10!
Factorial Service called for 20!
10! = 3628800
20! = 2432902008176640000
Java 并发 - Fork-Join 框架
Fork-Join 框架允许将某个任务分解成多个工作线程,然后等待结果并将它们组合起来。它在很大程度上利用了多处理器机器的容量。以下是 Fork-Join 框架中使用的核心概念和对象。
Fork(分叉)
Fork 是一个任务将自身拆分成更小且独立的子任务的过程,这些子任务可以并发执行。
语法
Sum left  = new Sum(array, low, mid);
left.fork();
这里 Sum 是 RecursiveTask 的子类,left.fork() 将任务拆分成子任务。
Join(合并)
Join 是一个任务在子任务完成执行后合并所有子任务结果的过程,否则它将继续等待。
语法
left.join();
这里 left 是 Sum 类的对象。
ForkJoinPool
它是一个专为 Fork-Join 任务拆分而设计的特殊线程池。
语法
ForkJoinPool forkJoinPool = new ForkJoinPool(4);
这里是一个新的 ForkJoinPool,其并行级别为 4 个 CPU。
RecursiveAction
RecursiveAction 表示一个不返回值的任务。
语法
class Writer extends RecursiveAction {
   @Override
   protected void compute() { }
}
RecursiveTask
RecursiveTask 表示一个返回值的任务。
语法
class Sum extends RecursiveTask<Long> {
   @Override
   protected Long compute() { return null; }
}
示例
以下 TestThread 程序展示了在基于线程的环境中使用 Fork-Join 框架。
实时演示import java.util.concurrent.ExecutionException;
import java.util.concurrent.ForkJoinPool;
import java.util.concurrent.RecursiveTask;
public class TestThread {
public static void main(final String[] arguments) throws InterruptedException,
ExecutionException {
int nThreads = Runtime.getRuntime().availableProcessors();
System.out.println(nThreads);
int[] numbers = new int[1000];
for(int i = 0; i < numbers.length; i++) {
numbers[i] = i;
}
ForkJoinPool forkJoinPool = new ForkJoinPool(nThreads);
Long result = forkJoinPool.invoke(new Sum(numbers,0,numbers.length));
System.out.println(result);
}
static class Sum extends RecursiveTask<Long> {
int low;
int high;
int[] array;
Sum(int[] array, int low, int high) {
this.array = array;
this.low = low;
this.high = high;
}
protected Long compute() {
if(high - low <= 10) {
long sum = 0;
for(int i = low; i < high; ++i)
sum += array[i];
return sum;
} else {
int mid = low + (high - low) / 2;
Sum left = new Sum(array, low, mid);
Sum right = new Sum(array, mid, high);
left.fork();
long rightResult = right.compute();
long leftResult = left.join();
return leftResult + rightResult;
}
}
}
}
这将产生以下结果。
输出
32
499500
Java 并发 - BlockingQueue 接口
java.util.concurrent.BlockingQueue 接口是 Queue 接口的子接口,此外还支持诸如在队列变为空之前等待检索元素以及在存储元素之前等待队列中有空间的操作。
BlockingQueue 方法
| 序号 | 方法及描述 |
|---|---|
| 1 | boolean add(E e) 如果可以在不违反容量限制的情况下立即将指定的元素插入此队列,则插入指定的元素,成功时返回 true,如果当前没有可用空间,则抛出 IllegalStateException。 |
| 2 | boolean contains(Object o) 如果此队列包含指定的元素,则返回 true。 |
| 3 | int drainTo(Collection<? super E> c) 从此队列中删除所有可用元素,并将它们添加到给定的集合中。 |
| 4 | int drainTo(Collection<? super E> c, int maxElements) 从此队列中删除最多给定数量的可用元素,并将它们添加到给定的集合中。 |
| 5 | boolean offer(E e) 如果可以在不违反容量限制的情况下立即将指定的元素插入此队列,则插入指定的元素,成功时返回 true,如果当前没有可用空间,则返回 false。 |
| 6 | boolean offer(E e, long timeout, TimeUnit unit) 将指定的元素插入此队列,如果必要,等待最多指定等待时间,直到有空间可用。 |
| 7 | E poll(long timeout, TimeUnit unit) 检索并删除此队列的头,如果必要,等待最多指定等待时间,直到有元素可用。 |
| 8 | void put(E e) 将指定的元素插入此队列,如果必要,等待直到有空间可用。 |
| 9 | int remainingCapacity() 返回此队列在理想情况下(在没有内存或资源限制的情况下)可以接受的额外元素的数量,如果没有内在限制,则返回 Integer.MAX_VALUE。 |
| 10 | boolean remove(Object o) 如果存在,则从此队列中删除指定元素的单个实例。 |
| 11 | E take() 检索并移除此队列的头部,如有必要,等待直到有元素可用。 |
示例
以下 TestThread 程序展示了在基于线程的环境中使用 BlockingQueue 接口。
实时演示import java.util.Random;
import java.util.concurrent.ArrayBlockingQueue;
import java.util.concurrent.BlockingQueue;
public class TestThread {
public static void main(final String[] arguments) throws InterruptedException {
BlockingQueue<Integer> queue = new ArrayBlockingQueue<Integer>(10);
Producer producer = new Producer(queue);
Consumer consumer = new Consumer(queue);
new Thread(producer).start();
new Thread(consumer).start();
Thread.sleep(4000);
}
static class Producer implements Runnable {
private BlockingQueue<Integer> queue;
public Producer(BlockingQueue queue) {
this.queue = queue;
}
@Override
public void run() {
Random random = new Random();
try {
int result = random.nextInt(100);
Thread.sleep(1000);
queue.put(result);
System.out.println("Added: " + result);
result = random.nextInt(100);
Thread.sleep(1000);
queue.put(result);
System.out.println("Added: " + result);
result = random.nextInt(100);
Thread.sleep(1000);
queue.put(result);
System.out.println("Added: " + result);
} catch (InterruptedException e) {
e.printStackTrace();
}
}
}
static class Consumer implements Runnable {
private BlockingQueue<Integer> queue;
public Consumer(BlockingQueue queue) {
this.queue = queue;
}
@Override
public void run() {
try {
System.out.println("Removed: " + queue.take());
System.out.println("Removed: " + queue.take());
System.out.println("Removed: " + queue.take());
} catch (InterruptedException e) {
e.printStackTrace();
}
}
}
}
这将产生以下结果。
输出
Added: 52
Removed: 52
Added: 70
Removed: 70
Added: 27
Removed: 27
Java 并发 - ConcurrentMap 接口
java.util.concurrent.ConcurrentMap 接口是 Map 接口的子接口,支持对底层 map 变量进行原子操作。它具有 get 和 set 方法,其工作方式类似于对 volatile 变量的读写。也就是说,set 与随后对同一变量的任何 get 之间存在 happens-before 关系。此接口确保线程安全性和原子性保证。
ConcurrentMap 方法
| 序号 | 方法及描述 |
|---|---|
| 1 | default V compute(K key, BiFunction<? super K,? super V,? extends V> remappingFunction) 尝试为指定的键及其当前映射值(如果当前没有映射则为 null)计算映射。 |
| 2 | default V computeIfAbsent(K key, Function<? super K,? extends V> mappingFunction) 如果指定的键尚未与值关联(或映射到 null),则尝试使用给定的映射函数计算其值,并将其输入到此映射中,除非为 null。 |
| 3 | default V computeIfPresent(K key, BiFunction<? super K,? super V,? extends V> remappingFunction) 如果指定键的值存在且不为 null,则尝试根据键及其当前映射值计算新的映射。 |
| 4 | default void forEach(BiConsumer<? super K,? super V> action) 对该映射中的每个条目执行给定的操作,直到所有条目都已处理或操作引发异常。 |
| 5 | default V getOrDefault(Object key, V defaultValue) 返回指定键映射到的值,如果此映射不包含该键的映射,则返回 defaultValue。 |
| 6 | default V merge(K key, V value, BiFunction<? super V,? super V,? extends V> remappingFunction) 如果指定的键尚未与值关联或与 null 关联,则将其与给定的非 null 值关联。 |
| 7 | V putIfAbsent(K key, V value) 如果指定的键尚未与值关联,则将其与给定的值关联。 |
| 8 | boolean remove(Object key, Object value) 仅当当前映射到给定值时,才移除键的条目。 |
| 9 | V replace(K key, V value) 仅当当前映射到某个值时,才替换键的条目。 |
| 10 | boolean replace(K key, V oldValue, V newValue) 仅当当前映射到给定值时,才替换键的条目。 |
| 11 | default void replaceAll(BiFunction<? super K,? super V,? extends V> function) 将每个条目的值替换为对该条目调用给定函数的结果,直到所有条目都已处理或函数引发异常。 |
示例
以下 TestThread 程序展示了 ConcurrentMap 与 HashMap 的用法。
实时演示import java.util.ConcurrentModificationException;
import java.util.HashMap;
import java.util.Iterator;
import java.util.Map;
import java.util.concurrent.ConcurrentHashMap;
public class TestThread {
public static void main(final String[] arguments) {
Map<String,String> map = new ConcurrentHashMap<String, String>();
map.put("1", "One");
map.put("2", "Two");
map.put("3", "Three");
map.put("5", "Five");
map.put("6", "Six");
System.out.println("Initial ConcurrentHashMap: " + map);
Iterator<String> iterator = map.keySet().iterator();
try {
while(iterator.hasNext()) {
String key = iterator.next();
if(key.equals("3")) {
map.put("4", "Four");
}
}
} catch(ConcurrentModificationException cme) {
cme.printStackTrace();
}
System.out.println("ConcurrentHashMap after modification: " + map);
map = new HashMap<String, String>();
map.put("1", "One");
map.put("2", "Two");
map.put("3", "Three");
map.put("5", "Five");
map.put("6", "Six");
System.out.println("Initial HashMap: " + map);
iterator = map.keySet().iterator();
try {
while(iterator.hasNext()) {
String key = iterator.next();
if(key.equals("3")) {
map.put("4", "Four");
}
}
System.out.println("HashMap after modification: " + map);
} catch(ConcurrentModificationException cme) {
cme.printStackTrace();
}
}
}
这将产生以下结果。
输出
Initial ConcurrentHashMap: {1 = One, 2 = Two, 3 = Three, 5 = Five, 6 = Six}
ConcurrentHashMap after modification: {1 = One, 2 = Two, 3 = Three, 4 = Four, 5 = Five, 6 = Six}
Initial HashMap: {1 = One, 2 = Two, 3 = Three, 5 = Five, 6 = Six}
java.util.ConcurrentModificationException
	at java.util.HashMap$HashIterator.nextNode(Unknown Source)
	at java.util.HashMap$KeyIterator.next(Unknown Source)
	at TestThread.main(TestThread.java:48)
ConcurrentNavigableMap 接口
java.util.concurrent.ConcurrentNavigableMap 接口是 ConcurrentMap 接口的子接口,支持 NavigableMap 操作,并且对其可导航子映射递归执行此操作,以及近似匹配。
ConcurrentMap 方法
| 序号 | 方法及描述 |
|---|---|
| 1 | NavigableSet<K> descendingKeySet() 返回此映射中包含的键的反向顺序 NavigableSet 视图。 |
| 2 | ConcurrentNavigableMap<K,V> descendingMap() 返回此映射中包含的映射的反向顺序视图。 |
| 3 | ConcurrentNavigableMap<K,V> headMap(K toKey) 返回此映射的一部分的视图,其键严格小于 toKey。 |
| 4 | ConcurrentNavigableMap<K,V> headMap(K toKey, boolean inclusive) 返回此映射的一部分的视图,其键小于(如果 inclusive 为 true,则小于或等于)toKey。 |
| 5 | NavigableSet<K> keySet() 返回此映射中包含的键的 NavigableSet 视图。 |
| 6 | NavigableSet<K> navigableKeySet() 返回此映射中包含的键的 NavigableSet 视图。 |
| 7 | ConcurrentNavigableMap<K,V> subMap(K fromKey, boolean fromInclusive, K toKey, boolean toInclusive) 返回此映射的一部分的视图,其键范围从 fromKey 到 toKey。 |
| 8 | ConcurrentNavigableMap<K,V> subMap(K fromKey, K toKey) 返回此映射的一部分的视图,其键范围从 fromKey(包含)到 toKey(不包含)。 |
| 9 | ConcurrentNavigableMap<K,V> tailMap(K fromKey) 返回此映射的一部分的视图,其键大于或等于 fromKey。 |
| 10 | ConcurrentNavigableMap<K,V> tailMap(K fromKey, boolean inclusive) 返回此映射的一部分的视图,其键大于(如果 inclusive 为 true,则大于或等于)fromKey。 |
示例
以下 TestThread 程序展示了 ConcurrentNavigableMap 的用法。
实时演示import java.util.concurrent.ConcurrentNavigableMap;
import java.util.concurrent.ConcurrentSkipListMap;
public class TestThread {
public static void main(final String[] arguments) {
ConcurrentNavigableMap<String,String> map =
new ConcurrentSkipListMap<String, String>();
map.put("1", "One");
map.put("2", "Two");
map.put("3", "Three");
map.put("5", "Five");
map.put("6", "Six");
System.out.println("Initial ConcurrentHashMap: "+map);
System.out.println("HeadMap(\"2\") of ConcurrentHashMap: "+map.headMap("2"));
System.out.println("TailMap(\"2\") of ConcurrentHashMap: "+map.tailMap("2"));
System.out.println(
"SubMap(\"2\", \"4\") of ConcurrentHashMap: "+map.subMap("2","4"));
}
}
这将产生以下结果。
输出
Initial ConcurrentHashMap: {1 = One, 2 = Two, 3 = Three, 5 = Five, 6 = Six}
HeadMap("2") of ConcurrentHashMap: {1 = One}
TailMap("2") of ConcurrentHashMap: {2 = Two, 3 = Three, 5 = Five, 6 = Six}
SubMap("2", "4") of ConcurrentHashMap: {2 = Two, 3 = Three}