- 微服务架构教程
- 微服务架构 - 首页
- 介绍
- 微服务架构 - 扩展
- 微服务架构 - 蓝图
- 不同元素
- 组合模式
- 实践SOA
- 实践MSA
微服务架构 - 实践SOA
在本节中,我们将开发一个基于CRUD的应用程序,使用SOA架构。在后续章节中,我们将把此服务分解成微服务,并学习SOA和微服务架构之间的基本区别。
系统配置和设置
在本节中,我们将构建一个示例CRUD应用程序,每当我们调用我们的服务时,它将返回一个JSON对象作为响应。我们将使用Jersey框架来开发它。以下是设置本地系统环境的步骤。
开发CRUD应用程序
步骤1 − 我们将使用NetBeans作为开发IDE。请下载并安装NetBeans官方网站上提供的最新版本 https://netbeans.org/downloads/。
步骤2 − 打开你的NetBeans IDE。转到“文件 -> 新建项目”。以下屏幕截图将弹出。选择“Maven”作为类别,选择“从ArchType创建项目”作为项目,然后点击下一步。
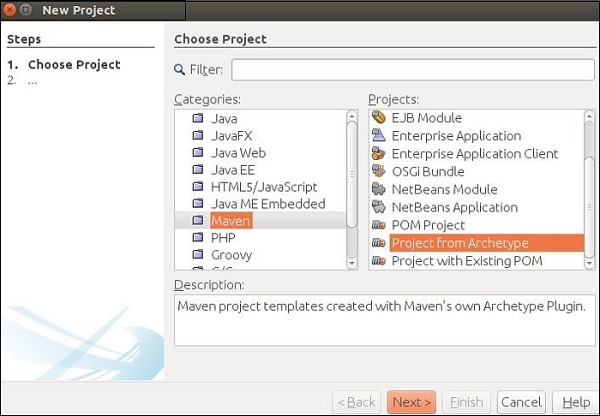
这将下载创建你的第一个Maven项目和RESTful Web服务所需的所有jar文件。
步骤3 − 在上一步中点击下一步按钮后,将出现以下屏幕截图。在这里,您需要指定Maven原型。
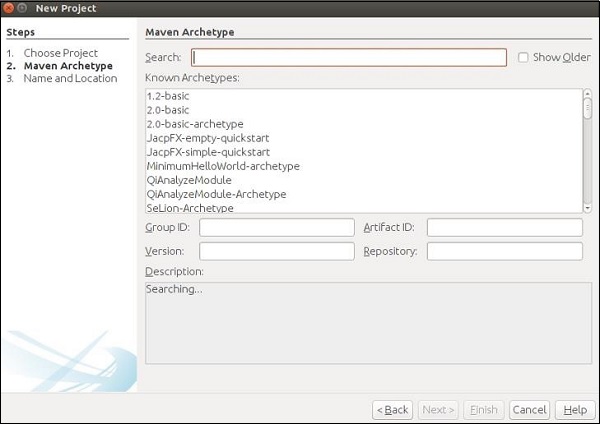
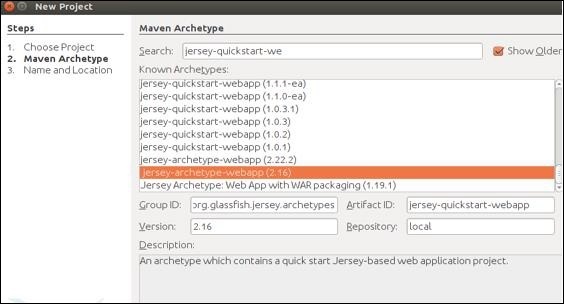
在搜索框中,搜索“Jersey-archType-Webapp(2.16)”并勾选“显示旧版本”复选框。
步骤4 − 选择后,您将被重定向到以下屏幕。从列表中选择首选jar,然后点击下一步继续。
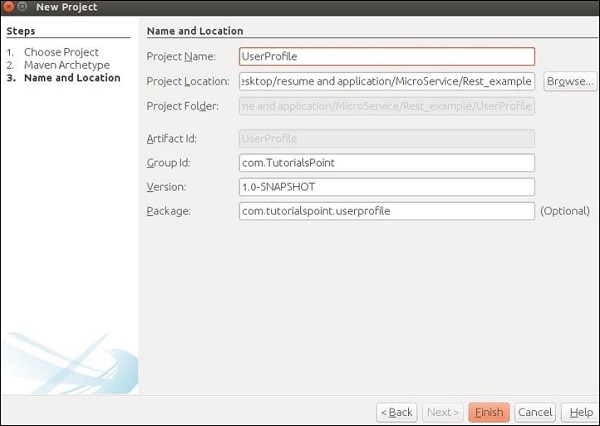
步骤5 − 在此步骤中,您需要提供项目名称及其GroupId以及包详细信息。提供所有这些信息后,点击完成继续。
步骤6 − 工作区设置完成。项目目录将如下所示。
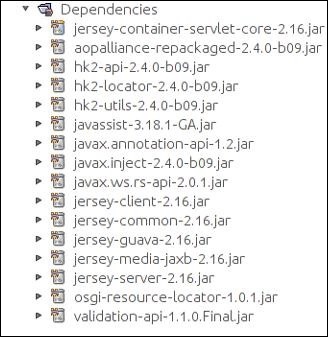
查看你的“依赖项”文件夹,您会发现Maven已自动下载此项目所需的所有jar文件。
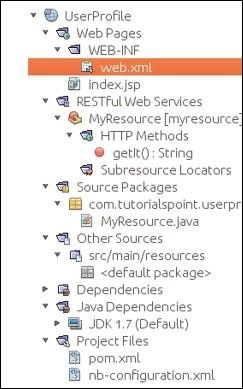
步骤7 − 您的工作区已设置好,您可以开始编码了。继续创建四个类和包,如以下屏幕截图所示。您可以发现MyResource.java已由Maven创建,因为Maven足够智能,可以检测到您将要构建自己的Web服务。

步骤8 − 完成上述步骤后,我们将构造我们的POJO类UserProfile.java,如下所示。
package com.tutorialspoint.userprofile.Model;

import javax.xml.bind.annotation.XmlRootElement;

@XmlRootElement
public class UserProfile {
   private long ProId;
   private String FName;
   private String LName;
   private String Add;
   public UserProfile(){}

   public UserProfile(long Proid, String Fname, String Lname,String Add) {
      this.ProId = Proid;
      this.FName = Fname;
      this.LName = Lname;
      this.Add = Add;
   }
   public long getProId() {
      return ProId;
   }
   public void setProId(long ProId) {
      this.ProId = ProId;
   }
   public String getFName() {
      return FName;
   }
   public void setFName(String FName) {
      this.FName = FName;
   }
   public String getLName() {
      return LName;
   }
   public void setLName(String LName) {
      this.LName = LName;
   }
   public String getAdd() {
      return Add;
   }
   public void setAdd(String Add) {
      this.Add = Add;
   }
}
步骤9 − 现在我们将创建我们的数据库类。由于这是学习资料的一部分,我们不会使用任何数据库作为我们的数据库。我们将使用内置的Java内存作为我们的临时内存。如您在以下代码集中看到的,我们将使用MAP作为我们的数据库。我们执行的所有Web服务操作都将在此类中定义的MAP上进行。
package com.tutorialspoint.userprofile.DAO;

import com.tutorialspoint.userprofile.Model.UserProfile;

import java.util.HashMap;
import java.util.Map;

public class DatabaseClass {
   private static Map<Long,UserProfile> messages = new HashMap<Long,UserProfile>();
   public static Map<Long,UserProfile> getUsers() {
      return messages;
      // Each time this method will return entire map as an instance of database
   }
}
步骤10 − 现在让我们构建我们的服务类。继续并在“ProfileService.java”类中复制粘贴以下代码集。这是我们将声明所有要公开给外部世界的Web服务方法的类。我们需要创建我们数据库类的一个引用,以便可以在此类中访问我们的临时数据库。
package com.tutorialspoint.userprofile.service;

import com.tutorialspoint.userprofile.DAO.DatabaseClass;
import com.tutorialspoint.userprofile.Model.UserProfile;

import java.util.ArrayList;
import java.util.List;
import java.util.Map;

public class ProfileService {
   private Map<Long,UserProfile> Userprofiles = DatabaseClass.getUsers();

   // Creating some predefine profile and populating the same in the map
   public ProfileService() {
      UserProfile m1 = new UserProfile(1L,"Tutorials1","Point1","TutorialsPoint.com");
      UserProfile m2 = new UserProfile(2L,"Tutorials2","Point2","TutorialsPoint.com2");
      UserProfile m3 = new UserProfile(3L,"Tutorials3","Point3","TutorialsPoint.com3");
      UserProfile m4 = new UserProfile(4L,"Tutorials4","Point4","TutorialsPoint.com4");

      Userprofiles.put(1L, m1);
      Userprofiles.put(2L, m2);
      Userprofiles.put(1L, m3);
      Userprofiles.put(2L, m4);
   }

   //Method to fetch all profile
   public List<UserProfile> getAllProfile() {
      List<UserProfile> list = new ArrayList<UserProfile>(Userprofiles.values());
      return list;
   }  // Method to fetch only one profile depending on the ID provided

   public UserProfile getProfile(long id) {
      return Userprofiles.get(id);
   }  //Method to add profile

   public UserProfile addProfile(UserProfile UserProfile) {
      UserProfile.setProId(Userprofiles.size()+1);
      Userprofiles.put(UserProfile.getProId(), UserProfile);
      return UserProfile;
   }  //method to update Profile

   public UserProfile UpdateProfile(UserProfile UserProfile) {
      if(UserProfile.getProId()<=0) {
         return null;
      } else {
         Userprofiles.put(UserProfile.getProId(), UserProfile);
         return UserProfile;
      }
   } //method to delete profile

   public void RemoveProfile(long Id) {
      Userprofiles.remove(Id);
   }
}
步骤11 − 在此步骤中,我们将创建我们的资源类,该类将与URL链接,并调用相应的服务。
package com.tutorialspoint.userprofile.Resource;

import com.tutorialspoint.userprofile.Model.UserProfile;
import com.tutorialspoint.userprofile.service.ProfileService;

import java.util.List;
import javax.ws.rs.Consumes;
import javax.ws.rs.DELETE;
import javax.ws.rs.GET;
import javax.ws.rs.POST;
import javax.ws.rs.PUT;
import javax.ws.rs.Path;
import javax.ws.rs.PathParam;
import javax.ws.rs.Produces;
import javax.ws.rs.core.MediaType;

@Path("/Profile")
@Consumes(MediaType.APPLICATION_XML)
@Produces(MediaType.APPLICATION_XML)

public class ProfileResource {
   ProfileService messageService = new ProfileService();

   @GET
   public List<UserProfile> getProfile() {
      return messageService.getAllProfile();
   }

   @GET
   @Path("/{ProID}")
   public UserProfile getProfile(@PathParam("ProID")long Id) {
      return messageService.getProfile(Id);
   }

   @POST
   public UserProfile addProfile(UserProfile profile) {
      return messageService.addProfile(profile);
   }

   @PUT
   @Path("/{proID}")
   public UserProfile UpdateProfile(@PathParam("proID")long Id,UserProfile UserProfile) {
      UserProfile.setProId(Id);
      return messageService.UpdateProfile(UserProfile);
   }

   @DELETE
   @Path("/{ProID}")
   public void deleteProfile(@PathParam("ProID")long Id) {
      messageService.RemoveProfile(Id);
   }
}
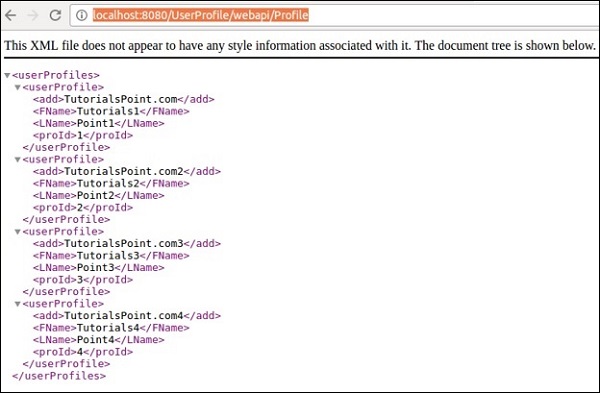
步骤12 − 清理构建项目并运行它。如果一切顺利,则在访问https://:8080/UserProfile/webapi/Profile”URL时,您应该在浏览器中获得以下输出。
您可以看到使用XML表示法填充了不同的条目。
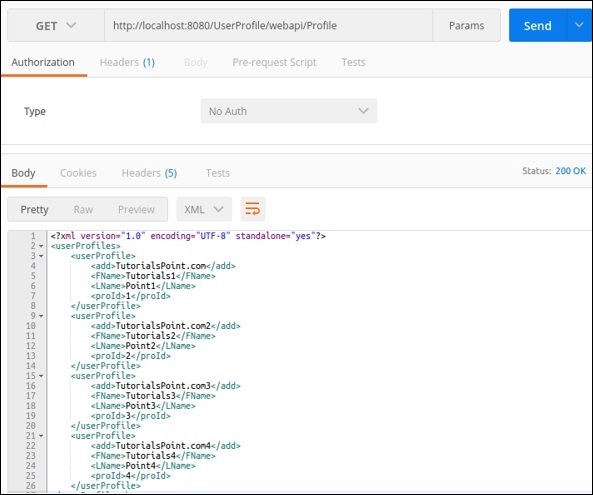
可以通过使用适当的方法URL应用Postman来测试不同的方法。
@GET方法 − 以下屏幕截图演示了如何获得get请求的所需结果,该请求返回所有用户详细信息。
@POST − 以下请求可用于测试我们的Post方法。请注意proId是如何自动生成的。

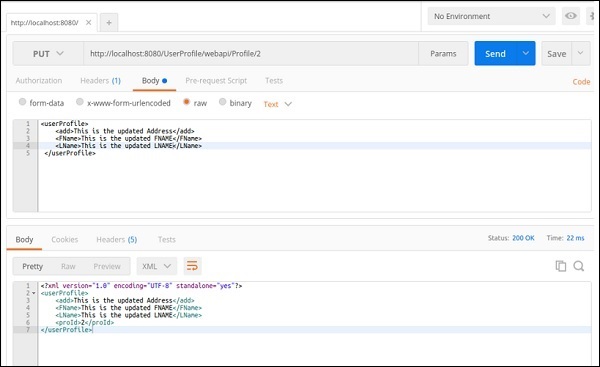
@PUT − 此方法将更新条目。以下屏幕截图演示了Jersey如何从请求URL中获取proId并更新相同用户配置文件回复。
同样,您可以检查Web服务中可用的其他方法。
在上一节中,我们开发了一个服务,它将公开CRUD功能。现在,每当我们尝试在应用程序中实现此服务时,都需要创建此应用程序的客户端并将其附加到我们的应用程序。在本节中,我们将学习如何使用微服务概念构建此功能。以下是使用上述步骤构建的应用程序的示意图。

参与者应该是我们服务的入口点。在这种情况下,“ProfileResource.java”承担参与者的职责。此类将调用不同的方法来执行不同的操作,例如添加、更新和删除。
CRUD应用程序的分解
根据微服务的主要原则,每个模块都应该只有一个业务任务,因此一个参与者不应该负责所有四个CRUD功能。请考虑以下示例,我们在此示例中引入了一些新角色,以便您可以清楚地了解微服务是SOA的架构表示。
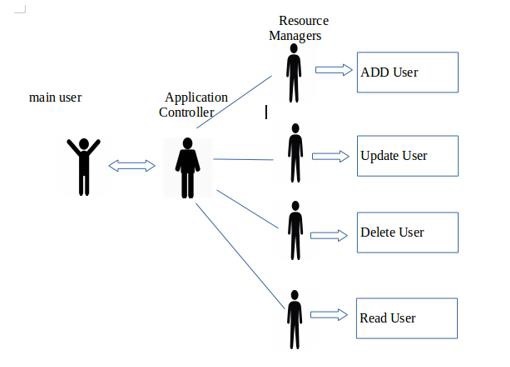
“主要用户”是与“应用程序控制器”通信以满足其需求的用户。“应用程序控制器”只是根据最终用户的请求调用不同的“资源管理器”。“资源管理器”完成需要完成的工作。让我们快速了解应用程序不同单元的不同角色。
最终用户/主要用户 − 向应用程序控制器请求某些资源。
应用程序 − 接收请求并将其转发到特定的资源管理器。
资源管理器 − 执行更新、删除和添加用户的实际工作。
请参阅一个类的总责任是如何分布在其他不同类中的。