
 数据结构
数据结构 网络
网络 关系数据库管理系统
 操作系统
操作系统 Java
Java iOS
iOS HTML
HTML CSS
CSS Android
 Python
 C 编程
C 编程 C++
C++ C#
C# MongoDB
 MySQL
MySQL Javascript
 PHP
PHPNetdata – Linux 系统的实时性能监控工具
Netdata 是一款经过高度优化的 Linux 实用程序,它可以实时(每秒)监控 Linux 系统、应用程序、SNMP 设备等的性能,并通过 Web 浏览器显示完整的交互式图表,以便用户查看收集到的所有值。本文介绍了如何为 Linux 系统找到一个实时性能监控工具。
功能
它监控总 CPU 使用率和每个内核的 CPU 使用率、中断、软中断以及频率。
它监控内存、RAM、交换分区和内核的使用情况。
它监控磁盘 I/O(每个磁盘:带宽、操作、积压、利用率等)。
它监控网络接口,包括:带宽、数据包、错误、丢弃等)。
它监控 Netfilter/iptables Linux 防火墙连接、事件、错误等。
它监控进程(运行、阻塞、分叉、活动等)。
它使用进程树监控系统应用程序(CPU、内存、交换分区、磁盘读写、线程等)。
使用 mod_status 监控 Apache 和 Nginx 状态。
监控 MySQL 数据库:查询、更新、锁定、问题、线程等。
它监控 Postfix 邮件服务器的消息队列。
监控 Squid 代理服务器的带宽和请求。
它监控硬件传感器(温度、电压、风扇、电源、湿度等)。
它监控 SNMP 设备。
在安装 netdata 实用程序之前,请确保系统上已安装以下基本构建环境软件包,如果没有,请安装它们。使用以下命令安装通用构建环境:
$ sudo apt-get install zlib1g-dev gcc make git autoconf autogen automake pkg-config
示例输出应如下所示:
Reading package lists... Done
Building dependency tree
Reading state information... Done
gcc is already the newest version (4:5.3.1-1ubuntu1).
gcc set to manually installed.
make is already the newest version (4.1-6).
make set to manually installed.
pkg-config is already the newest version (0.29.1-0ubuntu1).
pkg-config set to manually installed.
The following additional packages will be installed:
autogen-doc autotools-dev git-man liberror-perl libopts25 libopts25-dev
libsigsegv2 m4
Suggested packages:
autoconf-archive gnu-standards autoconf-doc libtool git-daemon-run
| git-daemon-sysvinit git-doc git-el git-email git-gui gitk gitweb git-arch
git-cvs git-mediawiki git-svn
The following NEW packages will be installed:
autoconf autogen autogen-doc automake autotools-dev git git-man
liberror-perl libopts25 libopts25-dev libsigsegv2 m4 zlib1g-dev
0 upgraded, 13 newly installed, 0 to remove and 7 not upgraded.
Need to get 6,721 kB of archives.
After this operation, 35.2 MB of additional disk space will be used.
Do you want to continue? [Y/n] y
Get:1 http://in.archive.ubuntu.com/ubuntu xenial/main amd64 libsigsegv2 amd64 2.10-4 [14.1 kB]
Get:2 http://in.archive.ubuntu.com/ubuntu xenial/main amd64 m4 amd64 1.4.17-5 [195 kB]
Get:3 http://in.archive.ubuntu.com/ubuntu xenial/main amd64 autoconf all 2.69-9 [321 kB]
Get:4 http://in.archive.ubuntu.com/ubuntu xenial/main amd64 libopts25 amd64 1:5.18.7-3 [57.8 kB]
Get:5 http://in.archive.ubuntu.com/ubuntu xenial/main amd64 libopts25-dev amd64 1:5.18.7-3 [93.0 kB]
Get:6 http://in.archive.ubuntu.com/ubuntu xenial/universe amd64 autogen amd64 1:5.18.7-3 [550 kB]
.................................................................................................
从 git 克隆 netdata 存储库,并运行以下命令安装 netdata 安装程序脚本以构建它。
$ sudo git clone https://github.com/firehol/netdata.git --depth=1
示例输出应如下所示:
Cloning into 'netdata'...
remote: Counting objects: 253, done.
remote: Compressing objects: 100% (241/241), done.
remote: Total 253 (delta 10), reused 137 (delta 1), pack-reused 0
Receiving objects: 100% (253/253), 1.33 MiB | 471.00 KiB/s, done.
Resolving deltas: 100% (10/10), done.
Checking connectivity... done.
现在进入 netdata 目录并使用以下命令安装 netdata 安装程序:
$ cd netdata
$ sudo ./netdata-installer.sh
示例输出应如下所示:
Welcome to netdata!
Nice to see you are giving it a try!
You are about to build and install netdata to your system.
It will be installed at these locations:

- the daemon at /usr/sbin/netdata
- config files at /etc/netdata
- web files at /usr/share/netdata
- plugins at /usr/libexec/netdata
- cache files at /var/cache/netdata
- log files at /var/log/netdata
- pid file at /var/run

This installer allows you to change the installation path.
Press Control-C and run the same command with --help for help.
Press ENTER to build and install netdata to your system >

:-----------------------------------------------------------------------------
Running command:

./autogen.sh

autoreconf: Entering directory `.'
autoreconf: configure.ac: not using Gettext
autoreconf: running: aclocal --force -I m4
autoreconf: configure.ac: tracing
autoreconf: configure.ac: not using Libtool
autoreconf: running: /usr/bin/autoconf --force
autoreconf: running: /usr/bin/autoheader --force
autoreconf: running: automake --add-missing --copy --force-missing
configure.ac:33: installing './compile'
configure.ac:32: installing './config.guess'
configure.ac:32: installing './config.sub'
configure.ac:31: installing './install-sh'
configure.ac:31: installing './missing'
src/Makefile.am: installing './depcomp'
autoreconf: Leaving directory `.'

:-----------------------------------------------------------------------------
Running the command:

./configure --prefix=/usr --sysconfdir=/etc --localstatedir=/var --with-zlib --with-math --with-user=netdata CFLAGS=-O3

checking whether to enable maintainer-specific portions of Makefiles... no
checking for a BSD-compatible install... /usr/bin/install -c
checking whether build environment is sane... yes
checking for a thread-safe mkdir -p... /bin/mkdir -p
checking for gawk... no
checking for mawk... mawk
checking whether make sets $(MAKE)... yes
checking whether make supports nested variables... yes
checking build system type... x86_64-pc-linux-gnu
checking host system type... x86_64-pc-linux-gnu
checking for gcc... gcc
checking whether the C compiler works... yes
checking for C compiler default output file name... a.out
checking for suffix of executables...
checking whether we are cross compiling... no
checking for suffix of object files... o
checking whether we are using the GNU C compiler... yes
checking whether gcc accepts -g... yes
checking for gcc option to accept ISO C89... none needed
checking whether gcc understands -c and -o together... yes
checking for style of include used by make... GNU
checking dependency style of gcc... gcc3
checking for pkg-config... /usr/bin/pkg-config
checking pkg-config is at least version 0.9.0... yes
checking how to run the C preprocessor... gcc -E
checking for grep that handles long lines and -e... /bin/grep
checking for egrep... /bin/grep -E
checking for ANSI C header files... yes
checking for sys/types.h... yes
checking for sys/stat.h... yes
checking for stdlib.h... yes
checking for string.h... yes
checking for memory.h... yes
checking for strings.h... yes
checking for inttypes.h... yes
checking for stdint.h... yes
checking for unistd.h... yes
checking minix/config.h usability... no
checking minix/config.h presence... no
checking for minix/config.h... no
checking whether it is safe to define __EXTENSIONS__... yes
checking if compiler needs -Werror to reject unknown flags... no
checking for the pthreads library -lpthreads... no
checking whether pthreads work without any flags... no
checking whether pthreads work with -Kthread... no
checking whether pthreads work with -kthread... no
checking for the pthreads library -llthread... no
checking whether pthreads work with -pthread... yes
checking for joinable pthread attribute... PTHREAD_CREATE_JOINABLE
checking if more special flags are required for pthreads... no
checking for PTHREAD_PRIO_INHERIT... yes
checking for uint8_t... yes
checking for uint16_t... yes
checking for uint32_t... yes
checking for inline... inline
checking for sin in -lm... yes
checking for ZLIB... yes
checking that generated files are newer than configure... done
configure: creating ./config.status
config.status: creating Makefile
config.status: creating charts.d/Makefile
config.status: creating conf.d/Makefile
config.status: creating netdata.spec
config.status: creating node.d/Makefile
config.status: creating plugins.d/Makefile
config.status: creating src/Makefile
config.status: creating system/Makefile
config.status: creating web/Makefile
config.status: creating contrib/Makefile
.............................................
要启动 netdata,请使用以下命令:
# /usr/sbin/netdata
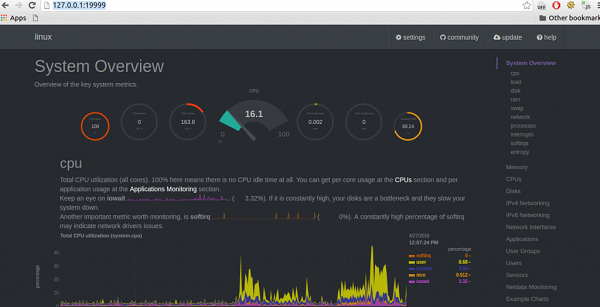
现在打开您喜欢的 Web 浏览器,并输入以下 URL:
http://127.0.0.1:19999/
示例输出应如下所示:
要停止 netdata,请使用以下命令:
$ sudo killall netdata
您也可以随时使用以下 URL 查看 netdata 的运行配置:
http://127.0.0.1:19999/netdata.conf
示例输出应如下所示:
# NetData Configuration
# You can uncomment and change any of the options below.
# The value shown in the commented settings, is the default value.
# global netdata configuration

[global]
# config directory = /etc/netdata
# plugins directory = /usr/libexec/netdata/plugins.d
# web files directory = /usr/share/netdata/web
# cache directory = /var/cache/netdata
# log directory = /var/log/netdata
# host access prefix =
# debug flags = 0x00000000
# memory deduplication (ksm) = yes
# debug log = /var/log/netdata/debug.log
# error log = /var/log/netdata/error.log
# errors flood protection period = 1200
# errors to trigger flood protection = 200
# access log = /var/log/netdata/access.log
# memory mode = save
# hostname = linux
# history = 3600
# update every = 1
# pthread stack size = 8388608
# run as user = netdata
# web files owner = netdata
# web files group = netdata
# http port listen backlog = 100
# port = 19999
# ip version = any
# bind socket to IP = *
# disconnect idle web clients after seconds = 60
# enable web responses gzip compression = yes

[plugins]
# tc = yes
# idlejitter = yes
# proc = yes
# cgroups = yes
# checks = no
# plugins directory = /usr/libexec/netdata/plugins.d
# enable running new plugins = yes
# check for new plugins every = 60
# apps = yes
# charts.d = yes
# node.d = yes


# per plugin configuration

[plugin:tc]
# script to run to get tc values = /usr/libexec/netdata/plugins.d/tc-qos-helper.sh
# enable new interfaces detected at runtime = yes
# cleanup unused classes every = 60

[plugin:idlejitter]
# loop time in ms = 20
要更新 netdata,请使用以下命令:
# cd /path/to/netdata.git
# git pull
# ./netdata-installer.sh
恭喜!现在,您了解了“Netdata – Linux 系统的实时性能监控工具”。我们将在下一篇文章中学习更多关于此类命令的知识。继续关注!

368 次浏览
