
 数据结构
数据结构 网络
网络 关系数据库管理系统 (RDBMS)
 操作系统
操作系统 Java
Java iOS
iOS HTML
HTML CSS
CSS Android
 Python
 C语言编程
C语言编程 C++
C++ C#
C# MongoDB
 MySQL
MySQL Javascript
 PHP
PHP使用ESP32的WiFi模式
ESP32微控制器可以连接到互联网并使用WiFi。它可以用来查看可用网络的网络详细信息。它还可以用于更高级的功能,例如更改ESP32的MAC地址。本文通过三个不同的示例,给出了使用ESP32的WiFi的程序。示例1中,使用C程序扫描可用的WiFi网络并显示详细信息。示例2中,通过提供SSID详细信息来建立WiFi连接,示例3中,查看ESP32当前的MAC地址,然后使用ESP32的WiFi模块更改它。
示例1 − 使用ESP32 WiFi模块查找可用的WiFi网络。
示例2 − 使用ESP32 WiFi模块与无线网络建立互联网连接。
示例3 − 使用ESP32 WiFi模块设置ESP32的新MAC地址。
电路设计步骤和编码
步骤1 − 将ESP32连接到面包板,然后使用USB数据线将其连接到电脑。
步骤2 − 如果电脑上未安装Arduino IDE,请下载并安装。
步骤3 − 启动Arduino IDE。编写C程序并使用勾号进行编译。
步骤4 − 按下勾号旁边的右箭头,将程序上传到ESP32。
步骤5 − 在串口监视器上检查结果。
示例1:使用ESP32 WiFi模块查找可用的WiFi网络
ESP32可以使用其WiFi模块连接到互联网。这里首先使用它扫描可用的WiFi网络,然后显示SSID、RSSI、信号强度以及加密类型。为此,使用wifi.h库。
代码
//library needed for wifi connectivity Using the WiFi Mode with ESP32
#include "WiFi.h"
void setup() {
   //set the baud rate
   Serial.begin(115200);
   //set wifi to the station mode
   WiFi.mode(WIFI_STA);
   //disconnect to start again
   WiFi.disconnect();
   delay(100);
}
void loop() {
   Serial.println("starting to scan now");
   // finding the networks available nearby
   int netCount = WiFi.scanNetworks();
   Serial.println("scan completed");
   if (netCount == 0) {
      Serial.println("no network detected");
   } else {
      Serial.print(netCount);
      Serial.println(" networks found");
      for (int nn = 0; nn < netCount; ++nn) {
         //The number should start from 1 and not 0
         Serial.print(nn + 1);
         Serial.print(" ---- ");
         // Print SSID(Service Set Identifier)
         Serial.print(WiFi.SSID(nn));
         Serial.print(" ---- ");
         //Print RSSI(Received Signal Strength Indicator)
         Serial.print(WiFi.RSSI(nn));
         // print the unit
         Serial.print(" dB ---- ");
         String enType="";
         wifi_auth_mode_t encryp_type=WiFi.encryptionType(nn);
         if (encryp_type == WIFI_AUTH_WPA_WPA2_PSK){
            enType="WPA_WPA2_PSK";
         }
         else if (encryp_type == WIFI_AUTH_WPA2_ENTERPRISE){
            enType="WPA2_ENTERPRISE";
         }
         else if (encryp_type == WIFI_AUTH_OPEN){
            enType="Open";
         }
         else if (encryp_type == WIFI_AUTH_WPA_PSK){
            enType="WPA_PSK";
         }
         else if (encryp_type == WIFI_AUTH_WPA2_PSK){
            enType="WPA2_PSK";
         }
         else if (encryp_type == WIFI_AUTH_WEP){
            enType="WEP";
         }
         //display encryption type
         Serial.println(enType);
         delay(50);
      }
   }
   Serial.println("");
   // Wait and scan again
   delay(5000);
}
查看结果
程序编译后,上传到ESP32,结果可以在串口监视器上看到。
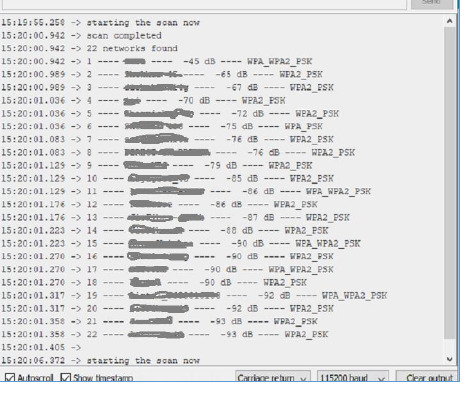
图1:显示串口监视器上的结果
示例2:使用ESP32 WiFi模块与无线网络建立互联网连接。
ESP32可以使用其WiFi模块连接到互联网。在此示例中,通过提供无线网络的SSID和WiFi密码来建立与无线网络的连接。为此,使用wifi.h库。
代码
//library required for wifi connection
#include <WiFi.h>
//specify your wifi ssid and its password
#define WIFI_SSID "ABCD"
#define WIFI_PASSWORD "EFGH"
void setup(){
   Serial.begin(115200);
   delay(500);
   WiFi.begin(WIFI_SSID, WIFI_PASSWORD);
   while(WiFi.status() != WL_CONNECTED){
      Serial.print(".");
      delay(200);
   }
   if(WiFi.status() == WL_CONNECTED) {
      Serial.println("
Now Connected to the WiFi ");
      //print SSID of wifi
      Serial.print("Wireless Network: ");
      Serial.println(WIFI_SSID);
      //print the MAC address of wireless router or access point (Basic Service Set Identifier)
      Serial.print("The Current MAC address is : " );
      Serial.println(WiFi.BSSIDstr());
      //print the private address of wireless router(Gateway IP)
      Serial.print("The router IP is : ");
      Serial.println(WiFi.gatewayIP());
      //print a 32-bit number by setting host bits to 0s and network bits to 1s.(Subnet Mask)
      Serial.print("This is the Subnet Mask : ");
      Serial.println(WiFi.subnetMask());
      //print received signal strength
      Serial.print("This is the signal strength : ");
      Serial.println(WiFi.RSSI() );
      //print ESP32 IP address
      Serial.print("This is the IP address of ESP32 : ");
      Serial.println(WiFi.localIP());
   }
}
查看结果
程序编译后,上传到ESP32,结果可以在串口监视器上看到。
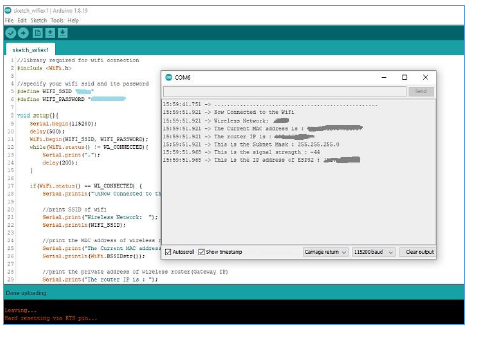
图2:串口监视器上显示的结果
示例3:使用ESP32 WiFi模块设置ESP32的新MAC地址。
ESP32可以使用其WiFi模块连接到互联网。MAC(媒体访问控制)地址是一个12个字符的物理地址,用于在网络上识别设备。这里使用WiFi库函数首先显示ESP32当前的MAC地址。其次,它用于指定一个新的MAC地址,然后设置新的MAC地址并显示它。这里使用的库是WiFi.h和esp_wifi.h
代码
//library required for wifi connection
//first library
#include <esp_wifi.h>
//second libray
#include <WiFi.h>
//specify the new mac address of ESP32
uint8_t new_mac_addr[] = {0x67C, 0x9D, 0xC2, 0x08, 0x5B, 0x33};
void setup(){
   Serial.begin(115200);
   WiFi.mode(WIFI_STA);
   //display the new MAC address
   Serial.print("This is the current MAC Address of ESP32: ");
   Serial.println(WiFi.macAddress());
   //setting the new MAC address
   esp_wifi_set_mac(ESP_IF_WIFI_STA, new_mac_addr);
   //display the new MAC address
   Serial.print("The new MAC Address is set now: ");
   Serial.println(WiFi.macAddress());
   delay(1500);
}
void loop(){}
查看结果
程序编译后,上传到ESP32,结果可以在串口监视器上看到。
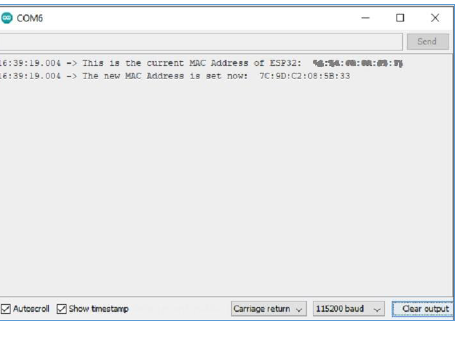
图3:显示串口监视器上的结果
本文介绍了如何使用ESP32的WiFi模块。示例1中,指定了显示所有可用WiFi网络的方法。示例2中,解释了与特定无线网络建立连接的方法。此外,示例3中介绍了更改MAC地址的更高级方法。

2K+ 次浏览
