
 数据结构
数据结构 网络
网络 关系数据库管理系统
 操作系统
操作系统 Java
Java iOS
iOS HTML
HTML CSS
CSS Android
 Python
 C 编程
C 编程 C++
C++ C#
C# MongoDB
 MySQL
MySQL Javascript
 PHP
PHPKotlin 中的 Android ListView 示例
简介
Android 中的 ListView 具有 adapterView 属性。此视图将显示一个垂直的可滚动视图列表,这些视图彼此叠加。借助适配器,可以将数组或数据库中的项目导入列表。setAdaptor() 函数用于显示列表的内容,并将列表和适配器组合在一起以创建列表。
ViewGroup 是 ListView 的组件,用于在 Android 应用程序中显示对象列表。它提供了一个适配器,允许动态地向列表中添加项目。适配器的主要职责是从数据库或数组中获取数据,并将每个项目添加到列表中。最重要的数据来源是 strings.xml 文件,其中包含用 Java 或 XML 编写的文件中所有必要的字符串。
Android ListView
视图组是 ListView 的一个组件,它以类似于列表的方式显示项目,并且能够垂直滚动。Android 应用程序通常使用 listview 组件。
ListView 的一个简单示例是,我们手机上的联系人应用程序以 ListView 的格式显示联系人列表,该列表是可滚动的。
Android 中的适配器
从数组中获得的信息存储在适配器中,然后适配器迭代数据集中的每个元素,并为列表中的每个项目创建相应的视图。通过这种方式,它充当连接各种数据源和适配器视图(如 ListView 和 GridView)的桥梁。
适配器类型
ArrayAdapter - 输入可以是列表或数组,但始终接受后者。此外,我们能够使用 strings.xml 文件保存列表组件。
CursorAdapter - 它从不将输入限制为除游标实例以外的任何内容。
SimpleAdapter - 其主要功能是管理非动态数据,而是存储在资源(如数据库或数组)中。
BaseAdapter - 它是一个通用的实现,适用于所有三种不同类型的适配器,并且可以在需要时应用于视图。
算法
步骤 1 - 打开位于 path\re\layout 中的 XML 文件
步骤 2 - 将上面给出的代码粘贴到 XML 文件中
步骤 3 - 从那里有一个 java 文件夹,选择 MainActivity.java 文件并将上述代码粘贴到其中。
步骤 4 - 选择一个模拟器或连接要运行应用程序的设备
步骤 5 - 通过单击屏幕顶部的运行按钮来部署代码。
步骤 6 - 应用程序将自动在设备或模拟器上打开,您可以在其中看到包含运动项目名称的 ListView。
让我们看看 Kotlin 中 ListView 的一个示例 -
在这种情况下,首先需要打开名为 activity_main.xml 的 xml 文件,该文件位于 res/layout 文件夹中。
activity_main.xml-
我们在位于 LinearLayout 部分的此文件中定义和配置 ListView。将来,我们将使用 id 提取包含在 Kotlin 代码中的 ListView。我们在位于 LinearLayout 部分的此文件中定义和配置 ListView。将来,我们将使用 id 提取包含在 Kotlin 代码中的 ListView。
在这里,我们使用 onCreate() 回调方法加载了 activity_main.xml 文件。然后,我们使用 findViewById 检索文件的内容。
<?xml version="1.0" encoding="utf-8"?>
<LinearLayout xmlns:android="http://schemas.android.com/apk/res/android"
   xmlns:tools="http://schemas.android.com/tools"
   android:layout_width="match_parent"
   android:layout_height="match_parent"
   android:orientation="vertical">
   <ListView
      android:id="@+id/sportslist"
      android:layout_width="match_parent"
      android:layout_height="wrap_content" >
   </ListView>
</LinearLayout>
MainActivity.kt-
package com.example.myapplication
import android.os.Bundle
import com.google.android.material.snackbar.Snackbar
import androidx.appcompat.app.AppCompatActivity
import androidx.navigation.findNavController
import androidx.navigation.ui.AppBarConfiguration
import androidx.navigation.ui.navigateUp
import androidx.navigation.ui.setupActionBarWithNavController
import android.view.Menu
import android.view.MenuItem
import com.example.myapplication.databinding.ActivityMainBinding
import android.widget.ArrayAdapter
import android.widget.ListView
class MainActivity : AppCompatActivity() {
   override fun onCreate(savedInstanceState: Bundle?) {
      super.onCreate(savedInstanceState)
      setContentView(R.layout.activity_main)

      // use arrayadapter and define an array
      val arrayAdapter: ArrayAdapter<*>
      val users = arrayOf(
         "Football", "Cricket", "Basketball",
         "Hockey", "Golf","Tennis","Baseball"
      )
      // access the listView from xml file
      var mListView = findViewById <ListView>(R.id.sportslist)
      arrayAdapter = ArrayAdapter(this,
         android.R.layout.simple_list_item_1, users)
      mListView.adapter = arrayAdapter
   }
}
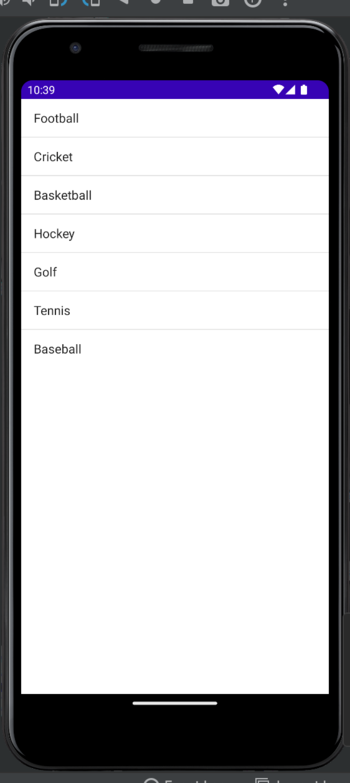
输出
在这里,我们使用 Android 虚拟设备 (AVD) 或模拟器来运行应用程序。您也可以在您的设备上运行此应用程序。
结论
我们已经了解了如何在 Android 中使用 Kotlin 创建 ListView。您可以从算法开始,然后转到文档的代码部分。我们还熟悉了使用 ListView 显示数组项目的过程。之后,我们选择了一个模拟器用于运行程序,然后我们部署了代码。

2K+ 浏览量
