
 数据结构
数据结构 网络
网络 关系数据库管理系统 (RDBMS)
 操作系统
操作系统 Java
Java iOS
iOS HTML
HTML CSS
CSS Android
 Python
 C语言编程
C语言编程 C++
C++ C#
C# MongoDB
 MySQL
MySQL Javascript
 PHP
PHPAndroid RecyclerView 使用
RecyclerView 是 ListView 的一个更高级的版本,它基于 ViewHolder 设计模式工作。使用 RecyclerView,我们可以显示网格以及项目列表。
此示例演示如何通过创建一个显示学生姓名和年龄的漂亮学生记录应用程序来集成 RecyclerView。
步骤 1 - 在 Android Studio 中创建一个新项目,转到 文件 ⇒ 新建项目,然后填写所有必需的详细信息以创建新项目。
步骤 2 - 打开 build.gradle 并添加 RecyclerView 库依赖项。
apply plugin: 'com.android.application'
android {
   compileSdkVersion 28
   defaultConfig {
      applicationId "com.example.andy.tutorialspoint"
      minSdkVersion 19
      targetSdkVersion 28
      versionCode 1
      versionName "1.0"
      testInstrumentationRunner "android.support.test.runner.AndroidJUnitRunner"
   }
   buildTypes {
      release {
         minifyEnabled false
         proguardFiles getDefaultProguardFile('proguard-android.txt'), 'proguard-rules.pro'
      }
   }
}
dependencies {
   implementation fileTree(dir: 'libs', include: ['*.jar'])
   implementation 'com.android.support:appcompat-v7:28.0.0'
   implementation 'com.android.support:design:28.0.0'
   implementation 'com.android.support.constraint:constraint-layout:1.1.3'
   implementation 'com.android.support:recyclerview-v7:28.0.0'
   testImplementation 'junit:junit:4.12'
   androidTestImplementation 'com.android.support.test:runner:1.0.2'
   androidTestImplementation 'com.android.support.test.espresso:espresso-core:3.0.2'
}
步骤 3 - 将以下代码添加到 res/layout/activity_main.xml。
<?xml version="1.0" encoding="utf-8"?>
<RelativeLayout
   xmlns:android="http://schemas.android.com/apk/res/android"
   xmlns:tools="http://schemas.android.com/tools"
   xmlns:app="http://schemas.android.com/apk/res-auto"
   android:layout_width="match_parent"
   android:layout_height="match_parent"
   app:layout_behavior="@string/appbar_scrolling_view_behavior"
   tools:showIn="@layout/activity_main"
   tools:context=".MainActivity">
   <android.support.v7.widget.RecyclerView
      android:id="@+id/recycler_view"
      android:layout_width="match_parent"
      android:layout_height="wrap_content"
      android:scrollbars="vertical"
    />
</RelativeLayout>
在上面的代码中,我们已将 RecyclerView 添加到窗口管理器作为相对父布局。
步骤 4 - 将以下代码添加到 src/MainActivity.java
package com.example.andy.tutorialspoint;
import android.annotation.TargetApi;
import android.os.Build;
import android.os.Bundle;
import android.support.design.widget.TabLayout;
import android.support.v4.view.ViewPager;
import android.support.v7.app.AppCompatActivity;
import android.support.v7.widget.DividerItemDecoration;
import android.support.v7.widget.LinearLayoutManager;
import android.support.v7.widget.RecyclerView;
import android.support.v7.widget.Toolbar;
import java.util.ArrayList;
import java.util.List;
public class MainActivity extends AppCompatActivity {
   private RecyclerView recyclerView;
   private StudentAdapter studentAdapter;
   private List studentDataList =new ArrayList<>();
   @TargetApi(Build.VERSION_CODES.O)
   @Override
   protected void onCreate(Bundle savedInstanceState) {
      super.onCreate(savedInstanceState);
      setContentView(R.layout.activity_main);
      recyclerView = findViewById(R.id.recycler_view);
      studentAdapter=new StudentAdapter(studentDataList);
      RecyclerView.LayoutManager manager=new LinearLayoutManager(this);
      recyclerView.setLayoutManager(manager);
      recyclerView.addItemDecoration(new DividerItemDecoration(this, LinearLayoutManager.VERTICAL));
      recyclerView.setAdapter(studentAdapter);
      StudentDataPrepare();
   }
   private void StudentDataPrepare() {
      studentData data=new studentData("sai",25);
      studentDataList.add(data);
      data=new studentData("sai",25);
      studentDataList.add(data);
      data=new studentData("raghu",20);
      studentDataList.add(data);
      data=new studentData("raj",28);
      studentDataList.add(data);
      data=new studentData("amar",15);
      studentDataList.add(data);
      data=new studentData("bapu",19);
      studentDataList.add(data);
      data=new studentData("chandra",52);
      studentDataList.add(data);
      data=new studentData("deraj",30);
      studentDataList.add(data);
      data=new studentData("eshanth",28);
      studentDataList.add(data);
   }
}
在上面的代码中,我们添加了一个 RecyclerView 和 StudentAdapter。在 StudentAdapter 中,我们传递了 studentDataList 作为 ArrayList。Student 数据列表包含学生姓名和年龄。
步骤 5 - 以下是修改后的文件 src/StudentAdapter.java 的内容。
package com.example.andy.tutorialspoint;
import android.support.annotation.NonNull;
import android.support.v7.widget.RecyclerView;
import android.view.LayoutInflater;
import android.view.View;
import android.view.ViewGroup;
import android.widget.TextView;
import java.util.List;
class StudentAdapter extends RecyclerView.Adapter {
   List studentDataList;
   public StudentAdapter(List studentDataList) {
      this.studentDataList=studentDataList;
   }
   @NonNull
   @Override
   public MyViewHolder onCreateViewHolder(@NonNull ViewGroup viewGroup, int i) {
      View itemView = LayoutInflater.from(viewGroup.getContext())
      .inflate(R.layout.student_list_row, viewGroup, false);
      return new MyViewHolder(itemView);
   }
   @Override
   public void onBindViewHolder(MyViewHolder viewHolder, int i) {
      studentData data=studentDataList.get(i);
      viewHolder.name.setText(data.name);
      viewHolder.age.setText(String.valueOf(data.age));
   }
   @Override
   public int getItemCount() {
      return studentDataList.size();
   }
   class MyViewHolder extends RecyclerView.ViewHolder {
      TextView name,age;
      public MyViewHolder(View itemView) {
         super(itemView);
         name=itemView.findViewById(R.id.name);
         age=itemView.findViewById(R.id.age);
      }
   }
}
在适配器类中,我们有四个方法,如下所示:
onCreateViewHolder() - 用于创建一个 ViewHolder 并返回一个视图。
onBindViewHolder() - 用于绑定已创建的 ViewHolder。
getItemCount() - 包含列表的大小。
MyViewHolder 类 - 这是一个继承自 RecyclerView.ViewHolder 的内部 ViewHolder 类。
步骤 6 - 以下是修改后的 xml 文件 res/layout/student_list_row.xml 的内容。
<?xml version="1.0" encoding="utf-8"?>
<LinearLayout xmlns:android="http://schemas.android.com/apk/res/android"
   android:orientation="horizontal" android:layout_width="match_parent"
   android:weightSum="1"
   android:layout_height="wrap_content">
<TextView
   android:id="@+id/name"
   android:layout_width="0dp"
   android:layout_weight="0.5"
   android:gravity="center"
   android:textSize="15sp"
   android:layout_height="100dp" />
   <TextView
      android:id="@+id/age"
      android:layout_width="0dp"
      android:layout_weight="0.5"
      android:gravity="center"
      android:textSize="15sp"
      android:layout_height="100dp" />
</LinearLayout>
在上面的列表项视图中,我们为姓名和年龄创建了两个 TextView。
步骤 7 - 以下是修改后的文件 src/studentData.java 的内容。
package com.example.andy.tutorialspoint;
class studentData {
String name;
int age;
public studentData(String name, int age) {
this.name=name;
this.age=age;
}
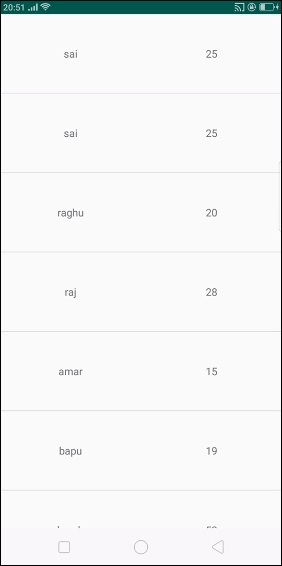
}上面的代码介绍了学生数据对象。让我们尝试运行您的应用程序。我假设您已将您的实际 Android 移动设备连接到您的计算机。要在 Android Studio 中运行该应用程序,请打开您的一个项目活动文件,然后点击运行 ![]() 工具栏中的图标。选择您的移动设备作为选项,然后检查您的移动设备,它将显示您的默认屏幕 -
工具栏中的图标。选择您的移动设备作为选项,然后检查您的移动设备,它将显示您的默认屏幕 -
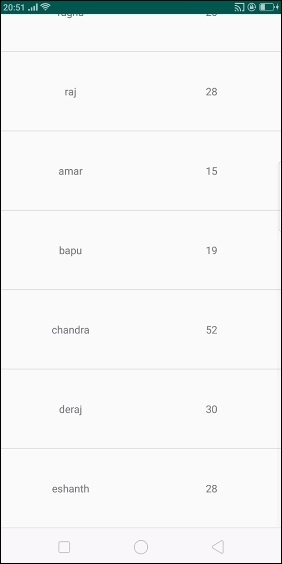
现在向下滚动。它显示的结果如下所示:
点击 这里 下载项目代码

2K+ 浏览量
