
 数据结构
数据结构 网络
网络 关系型数据库管理系统
 操作系统
操作系统 Java
Java iOS
iOS HTML
HTML CSS
CSS Android
 Python
 C 编程
C 编程 C++
C++ C#
C# MongoDB
 MySQL
MySQL Javascript
 PHP
PHP在 Swift 中以编程方式更改 UIButton 的文本
要更改 Swift 中 UIButton 的文本,可以使用按钮的 setTitle() 方法。此方法接受一个参数来为特定状态设置按钮标题。通常,我们使用普通按钮状态。
我们将通过以下步骤以编程方式更改按钮的文本:
步骤 1 − 在此步骤中,我们将创建两个按钮(登录和条款与条件)并添加基本自定义。
步骤 2 − 在此步骤中,我们将更改登录按钮的文本。
步骤 3 − 在此步骤中,我们将更改条款和条件按钮的文本。
示例
在此示例中,我们将创建两个按钮。第一个用于设置普通文本,另一个用于设置属性文本。在此步骤中,我们将添加和自定义按钮。之后,我们将向这两个按钮添加约束。以下是代码。
import UIKit
class TestController: UIViewController {
   private let loginButton = UIButton()
   private let termsConditionButton = UIButton()
   override func viewDidLoad() {
      super.viewDidLoad()
      initialSetup()
   }
   private func initialSetup() {
      // basic setup
      view.backgroundColor = .white
      navigationItem.title = "UIButton"

      // login button customization
      loginButton.backgroundColor = UIColor.gray
      loginButton.setTitleColor(.white, for: .normal)
      loginButton.layer.cornerRadius = 8
      loginButton.clipsToBounds = true

      // terms and conditions button customization
      termsConditionButton.backgroundColor = UIColor.gray
      termsConditionButton.setTitleColor(.white, for: .normal)
      termsConditionButton.layer.cornerRadius = 8
      termsConditionButton.clipsToBounds = true

      // adding the constraints to login button
      view.addSubview(loginButton)
      loginButton.translatesAutoresizingMaskIntoConstraints = false
      loginButton.centerYAnchor.constraint(equalTo: view.centerYAnchor).isActive = true
      loginButton.centerXAnchor.constraint(equalTo: view.centerXAnchor).isActive = true
      loginButton.heightAnchor.constraint(equalToConstant: 50).isActive = true
      loginButton.widthAnchor.constraint(equalToConstant: 280).isActive = true

      // adding the constraints to the terms & conditions button
      view.addSubview(termsConditionButton)
      termsConditionButton.translatesAutoresizingMaskIntoConstraints = false
      termsConditionButton.centerXAnchor.constraint(equalTo: view.centerXAnchor).isActive = true
      termsConditionButton.heightAnchor.constraint(equalToConstant: 50).isActive = true
      termsConditionButton.widthAnchor.constraint(equalToConstant: 280).isActive = true
      termsConditionButton.topAnchor.constraint(equalTo: loginButton.bottomAnchor, constant: 30).isActive = true
   }
}
输出
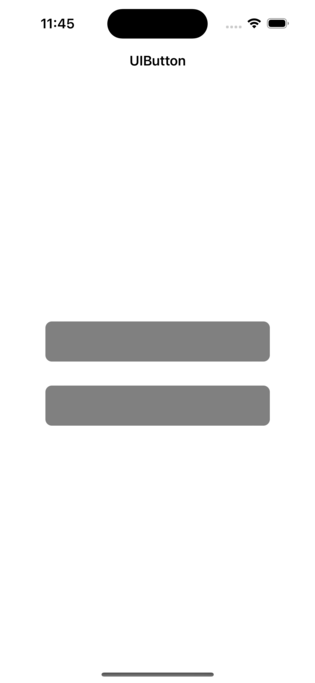
在上面的示例中,两个按钮都已通过编程约束自定义并添加到视图中。现在,我们将设置文本。
更改登录按钮的文本
在下面的示例中,我们将使用 setTitle() 方法更改文本。这是一个示例。
示例
private func initialSetup() {
   // other statements
   setLoginButtonTitle()
}
private func setLoginButtonTitle() {
   loginButton.setTitle("Login", for: .normal)
}
输出
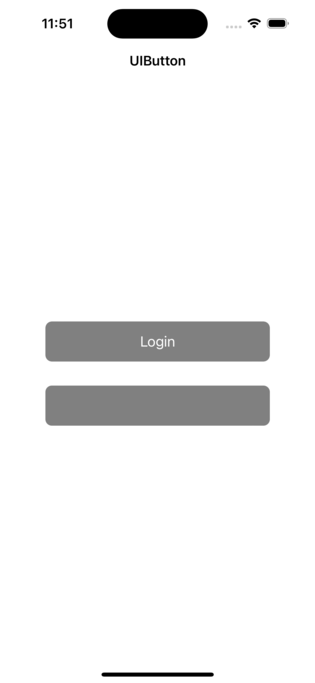
在上面的代码中,我们通过调用 setTitle() 方法设置按钮的文本。在此方法中,我们传递要设置文本的按钮状态。这是因为按钮元素中提供了不同的状态。但大多数情况下,我们处理的是普通状态。按钮处于正常模式下的默认状态。对于不同的状态,将使用相同的方法来设置文本。
更改条款和条件按钮的文本
在此示例中,我们将设置按钮的属性标题。这是一个示例。
示例
private func initialSetup() {
   // other statements
   setConditionsButtonTitle()
}
private func setConditionsButtonTitle() {
   termsConditionButton.backgroundColor = .clear
   let attributes: [NSAttributedString.Key: Any] = [
      .foregroundColor: UIColor.blue,
      .font: UIFont.systemFont(ofSize: 18, weight: .semibold),
      .underlineStyle: NSUnderlineStyle.single.rawValue
   ]
   let attributedText = NSAttributedString(string: "Terms & Conditions", attributes: attributes)
   termsConditionButton.setAttributedTitle(attributedText, for: .normal)
}
输出
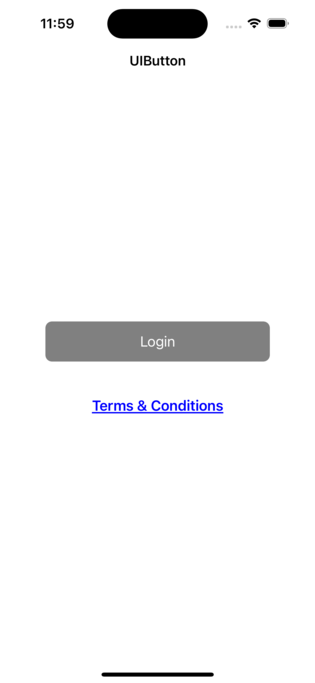
在上面的代码中,我们设置了按钮的属性标题。我们将前景色和下划线样式应用于按钮。
结论
在本文中,您了解了设置文本和属性文本的 setTitle() 方法。可以使用相同的方法应用文本。您可以使用相同的方法为不同的状态设置标题。

更新于: 2023年2月28日
7K+ 浏览量

广告