- CherryPy 教程
- CherryPy - 首页
- CherryPy - 简介
- CherryPy - 环境设置
- CherryPy - 词汇表
- 内置HTTP服务器
- CherryPy - 工具箱
- CherryPy - 一个可运行的应用程序
- CherryPy - Web服务
- CherryPy - 表现层
- CherryPy - Ajax的使用
- CherryPy - 演示应用程序
- CherryPy - 测试
- 应用程序部署
- CherryPy 有用资源
- CherryPy - 快速指南
- CherryPy - 有用资源
- CherryPy - 讨论
CherryPy - 一个可运行的应用程序
全栈应用程序提供了一种通过某些命令或文件执行来创建新应用程序的功能。
考虑一下像web2py框架这样的Python应用程序;整个项目/应用程序都是根据MVC框架创建的。同样,CherryPy允许用户根据自己的需求设置和配置代码的布局。
在本章中,我们将详细学习如何创建CherryPy应用程序并运行它。
文件系统
应用程序的文件系统如下面的屏幕截图所示:
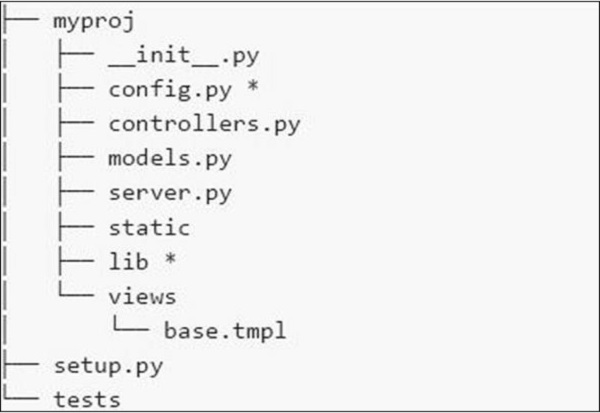
以下是我们文件系统中各种文件的简要说明:
config.py - 每个应用程序都需要一个配置文件和一种加载它的方法。此功能可以在config.py中定义。
controllers.py - MVC是一种流行的设计模式,用户遵循该模式。controllers.py是所有将在cherrypy.tree上挂载的对象实现的地方。
models.py - 此文件直接与数据库交互以提供某些服务或存储持久性数据。
server.py - 此文件与生产就绪的Web服务器交互,该服务器可以与负载均衡代理正常工作。
Static - 它包含所有CSS和图像文件。
Views - 它包含给定应用程序的所有模板文件。
示例
让我们详细了解创建CherryPy应用程序的步骤。
步骤1 - 创建一个应该包含应用程序的应用程序目录。
步骤2 - 在目录内,创建一个与项目对应的Python包。创建gedit目录并在其中包含_init_.py文件。
步骤3 - 在包内,包含controllers.py文件,内容如下:
#!/usr/bin/env python

import cherrypy

class Root(object):

   def __init__(self, data):
      self.data = data

   @cherrypy.expose
   def index(self):
      return 'Hi! Welcome to your application'

def main(filename):
   data = {} # will be replaced with proper functionality later

   # configuration file
   cherrypy.config.update({
      'tools.encode.on': True, 'tools.encode.encoding': 'utf-8',
      'tools.decode.on': True,
      'tools.trailing_slash.on': True,
      'tools.staticdir.root': os.path.abspath(os.path.dirname(__file__)),
   })

   cherrypy.quickstart(Root(data), '/', {
      '/media': {
         'tools.staticdir.on': True,
         'tools.staticdir.dir': 'static'
      }
   })

if __name__ == '__main__':
main(sys.argv[1])
步骤4 - 考虑一个用户通过表单输入值的应用程序。让我们在应用程序中包含两个表单——index.html和submit.html。
步骤5 - 在上面controllers的代码中,我们有index(),这是一个默认函数,如果调用特定控制器,则首先加载。
步骤6 - index()方法的实现可以按以下方式更改:
@cherrypy.expose
   def index(self):
      tmpl = loader.load('index.html')

      return tmpl.generate(title='Sample').render('html', doctype='html')
步骤7 - 这将在启动给定应用程序时加载index.html并将其定向到给定的输出流。index.html文件如下:
index.html
<!DOCTYPE html >
<html>
   <head>
      <title>Sample</title>
   </head>

   <body class = "index">
      <div id = "header">
         <h1>Sample Application</h1>
      </div>

      <p>Welcome!</p>

      <div id = "footer">
         <hr>
      </div>

   </body>

</html>
步骤8 - 如果要创建接受名称和标题等值的表单,则必须在controller.py中的Root类中添加一个方法。
@cherrypy.expose
   def submit(self, cancel = False, **value):

      if cherrypy.request.method == 'POST':
         if cancel:
            raise cherrypy.HTTPRedirect('/') # to cancel the action
         link = Link(**value)
         self.data[link.id] = link
         raise cherrypy.HTTPRedirect('/')
      tmp = loader.load('submit.html')
      streamValue = tmp.generate()

      return streamValue.render('html', doctype='html')
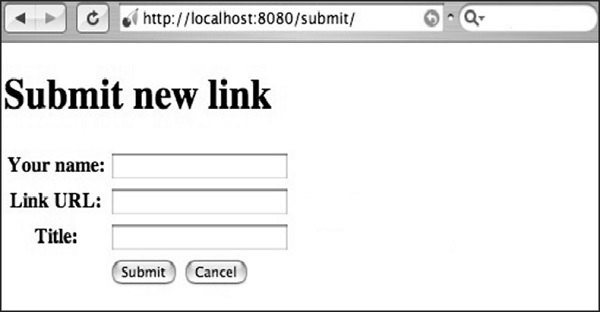
步骤9 - 要包含在submit.html中的代码如下:
<!DOCTYPE html>
   <head>
      <title>Input the new link</title>
   </head>

   <body class = "submit">
      <div id = " header">
         <h1>Submit new link</h1>
      </div>

      <form action = "" method = "post">
         <table summary = "">
            <tr>
               <th><label for = " username">Your name:</label></th>
               <td><input type = " text" id = " username" name = " username" /></td>
            </tr>

            <tr>
               <th><label for = " url">Link URL:</label></th>
               <td><input type = " text" id=" url" name= " url" /></td>
            </tr>

            <tr>
               <th><label for = " title">Title:</label></th>
               <td><input type = " text" name = " title" /></td>
            </tr>

            <tr>
               <td></td>
               <td>
                  <input type = " submit" value = " Submit" />
                  <input type = " submit" name = " cancel" value = "Cancel" />
               </td>
            </tr>

         </table>

      </form>
      <div id = "footer">
      </div>

   </body>

</html>
步骤10 - 您将收到以下输出:
此处,方法名称定义为“POST”。始终务必交叉验证文件中指定的方法。如果方法包含“POST”方法,则应在适当的字段中重新检查数据库中的值。
如果方法包含“GET”方法,则要保存的值将显示在URL中。