
 数据结构
数据结构 网络
网络 关系数据库管理系统 (RDBMS)
 操作系统
操作系统 Java
Java iOS
iOS HTML
HTML CSS
CSS Android
 Python
 C语言编程
C语言编程 C++
C++ C#
C# MongoDB
 MySQL
MySQL Javascript
 PHP
PHP在iOS中创建圆形进度条
对于iOS开发者来说,掌握如何创建圆形进度条非常重要,几乎每个应用程序都会用到它。
这主要用于显示下载状态、加载状态或任何其他与进度相关的事情。
创建圆形进度条对于新手程序员来说可能会非常繁琐,他们可能会在使用过程中遇到困难。
创建圆形进度条有多种方法。在这篇文章中,我们将介绍一种创建圆形进度条最简单、最容易的方法。
让我们开始吧!
步骤1 - 打开Xcode,选择“单视图应用程序”,将其命名为CircularProgress。
我们将创建一个包含三个带有百分比的按钮和一个圆形进度视图的应用程序,点击按钮后,进度视图将根据百分比进行更改。
步骤2 - 创建新类,文件 -→ 添加新文件 -→ Cocoa Touch类 -→ 以UIView类创建CircularProgressView。

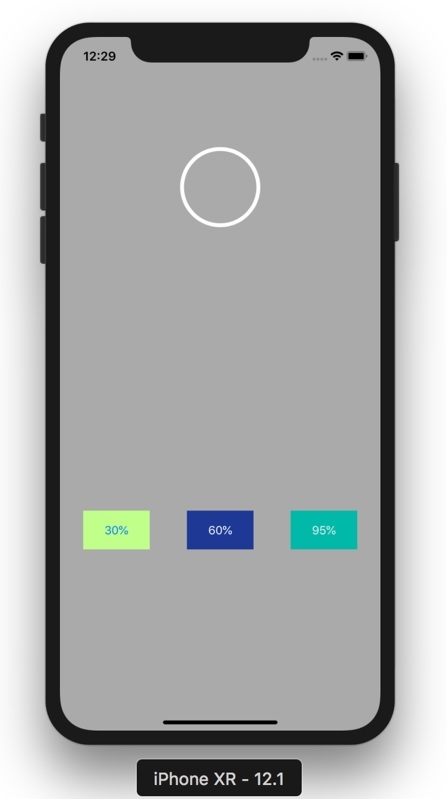
步骤3 - 创建UI,添加UI视图并添加与下图所示相同的CircularProgressView类,添加三个按钮并将其命名为30%、60%和95%。
在ViewController.swift中为所有三个按钮创建@IBAction,并按如下所示命名它们。
@IBAction func btn95(_ sender: Any) {
}
@IBAction func btn30(_ sender: Any) {
}
@IBAction func btn60(_ sender: Any) {
}
在ViewController.swift中为UI视图创建@IBoutlet,并按如下所示命名它。
@IBOutlet weak var circularProgress: CircularProgressView!

步骤4 - 在CircularProgressView.swift中,创建两个对象progressLayer和trackLayer,类型为CAShapeLayer()。
var progressLyr = CAShapeLayer()
var trackLyr = CAShapeLayer()
步骤5 - 按如下所示设置progressLyr和trackLyr的didSet方法。
var progressClr = UIColor.white {
   didSet {
      progressLyr.strokeColor = progressClr.cgColor
   }
}
var trackClr = UIColor.white {
   didSet {
      trackLyr.strokeColor = trackClr.cgColor
   }
}
在这里,我们正在设置progressLyr和trackLyr属性。
didSet是一个属性观察器,属性观察器观察并响应属性值的变化。每次设置属性值时都会调用属性观察器,即使新值与属性的当前值相同。
步骤5 - 添加makeCircularPath函数并添加以下代码。
func makeCircularPath() {
   self.backgroundColor = UIColor.clear
   self.layer.cornerRadius = self.frame.size.width/2
   let circlePath = UIBezierPath(arcCenter: CGPoint(x: frame.size.width/2, y: frame.size.height/2), radius: (frame.size.width - 1.5)/2, startAngle: CGFloat(-0.5 * .pi), endAngle: CGFloat(1.5 * .pi), clockwise: true)
   trackLyr.path = circlePath.cgPath
   trackLyr.fillColor = UIColor.clear.cgColor
   trackLyr.strokeColor = trackClr.cgColor
   trackLyr.lineWidth = 5.0
   trackLyr.strokeEnd = 1.0
   layer.addSublayer(trackLyr)
   progressLyr.path = circlePath.cgPath
   progressLyr.fillColor = UIColor.clear.cgColor
   progressLyr.strokeColor = progressClr.cgColor
   progressLyr.lineWidth = 10.0
   progressLyr.strokeEnd = 0.0
   layer.addSublayer(progressLyr)
}
在这个函数中,我们正在创建一个圆形路径,定义它的参数及其行为。
步骤6 - 添加required init函数,当我们从故事板设计UI时,我们应该使用required init;当我们以编程方式设计UI时,我们将使用override init;在我们的例子中,我们将使用required init。
required init?(coder aDecoder: NSCoder) {
   super.init(coder: aDecoder)
   makeCircularPath()
}
步骤7 - 现在我们要对进度进行动画处理,所以创建一个新的函数setProgressWithAnimation并编写以下代码。
func setProgressWithAnimation(duration: TimeInterval, value: Float) {
   let animation = CABasicAnimation(keyPath: "strokeEnd")
   animation.duration = duration
   animation.fromValue = 0
   animation.toValue = value
   animation.timingFunction = CAMediaTimingFunction(name: kCAMediaTimingFunctionLinear)
   progressLyr.strokeEnd = CGFloat(value)
   progressLyr.add(animation, forKey: "animateprogress")
}
我们完成了,你最终的CircularProgressView.swift代码应该如下所示。
import UIKit
class CircularProgressView: UIView {
   var progressLyr = CAShapeLayer()
   var trackLyr = CAShapeLayer()
   required init?(coder aDecoder: NSCoder) {
      super.init(coder: aDecoder)
      makeCircularPath()
   }
   var progressClr = UIColor.white {
      didSet {
         progressLyr.strokeColor = progressClr.cgColor
      }
   }
   var trackClr = UIColor.white {
      didSet {
         trackLyr.strokeColor = trackClr.cgColor
      }
   }
   func makeCircularPath() {
      self.backgroundColor = UIColor.clear
      self.layer.cornerRadius = self.frame.size.width/2
      let circlePath = UIBezierPath(arcCenter: CGPoint(x: frame.size.width/2, y: frame.size.height/2), radius: (frame.size.width - 1.5)/2, startAngle: CGFloat(-0.5 * .pi), endAngle: CGFloat(1.5 * .pi), clockwise: true)
      trackLyr.path = circlePath.cgPath
      trackLyr.fillColor = UIColor.clear.cgColor
      trackLyr.strokeColor = trackClr.cgColor
      trackLyr.lineWidth = 5.0
      trackLyr.strokeEnd = 1.0
      layer.addSublayer(trackLyr)
      progressLyr.path = circlePath.cgPath
      progressLyr.fillColor = UIColor.clear.cgColor
      progressLyr.strokeColor = progressClr.cgColor
      progressLyr.lineWidth = 10.0
      progressLyr.strokeEnd = 0.0
      layer.addSublayer(progressLyr)
   }
   func setProgressWithAnimation(duration: TimeInterval, value: Float) {
      let animation = CABasicAnimation(keyPath: "strokeEnd")
      animation.duration = duration
      animation.fromValue = 0
      animation.toValue = value
      animation.timingFunction = CAMediaTimingFunction(name: kCAMediaTimingFunctionLinear)
      progressLyr.strokeEnd = CGFloat(value)
      progressLyr.add(animation, forKey: "animateprogress")
   }
}
步骤8 - 运行以上代码以检查一切是否正常工作,你应该会看到你的UI如下所示,但它没有功能,因为我们还没有在ViewController.swift中添加任何代码。
步骤9 - 让我们在ViewController.swift中添加一些代码。
在viewDidLoad()中编写以下代码行,这将指定进度条的颜色。
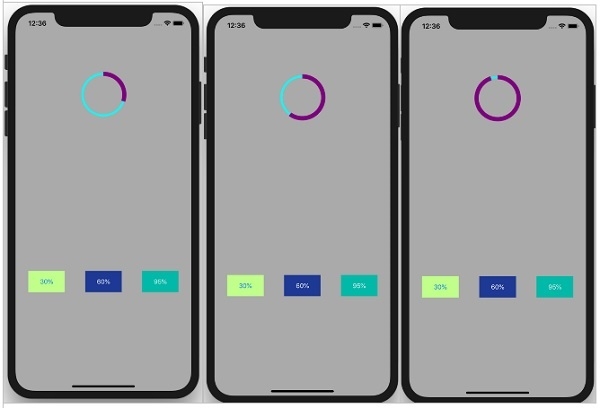
circularProgress.trackClr = UIColor.cyan
circularProgress.progressClr = UIColor.purple
在你的按钮功能中添加以下几行,持续时间为95%、30%和60%。
@IBAction func btn95(_ sender: Any) {
   circularProgress.setProgressWithAnimation(duration: 1.0, value: 0.95)
}
@IBAction func btn30(_ sender: Any) {
   circularProgress.setProgressWithAnimation(duration: 1.0, value: 0.30)
}
@IBAction func btn60(_ sender: Any) {
   circularProgress.setProgressWithAnimation(duration: 1.0, value: 0.60)

}
最后,你的ViewController.swift应该包含以下代码。
import UIKit
class ViewController: UIViewController {
   @IBOutlet weak var circularProgress: CircularProgressView!
   override func viewDidLoad() {
      super.viewDidLoad()
      circularProgress.trackClr = UIColor.cyan
      circularProgress.progressClr = UIColor.purple
   }
   @IBAction func btn95(_ sender: Any) {
      circularProgress.setProgressWithAnimation(duration: 1.0, value: 0.95)
   }
   @IBAction func btn30(_ sender: Any) {
      circularProgress.setProgressWithAnimation(duration: 1.0, value: 0.30)
   }
   @IBAction func btn60(_ sender: Any) {
      circularProgress.setProgressWithAnimation(duration: 1.0, value: 0.60)
   }
}
在按钮函数中,我们使用值和持续时间调用setProgressWithAnimation。
就是这样,我们完成了,运行应用程序并点击30%、60%或95%。你将看到视图正在动画。

2K+浏览量
