使用 Firebase 获取 URL
Firebase 是一种后端即服务 (BAAS),提供多种服务。其服务包括身份验证、云存储、托管等。基本上,它使开发人员能够轻松地在移动或 Web 应用程序中集成身份验证、数据库等。
在本教程中,我们将探讨 Firebase 的云存储。我们将学习如何将图像上传到 Firebase 云存储并获取图像的 URL,以便在任何地方使用。
用户应按照以下步骤设置 Firebase 帐户并将其与单页 Web 应用程序集成。
步骤 1 − 首先,访问 Firebase 网站并创建帐户。
步骤 2 − 现在,访问 https://console.firebase.google.com/u/0/ 打开 Firebase 控制台。
步骤 3 − 现在,单击“创建项目”按钮开始创建新项目。

步骤 4 − 在这里,添加项目名称,接受条款和条件,然后单击“继续”按钮。

步骤 5 − 选择首选位置,接受条款和条件,然后单击“创建项目”按钮。
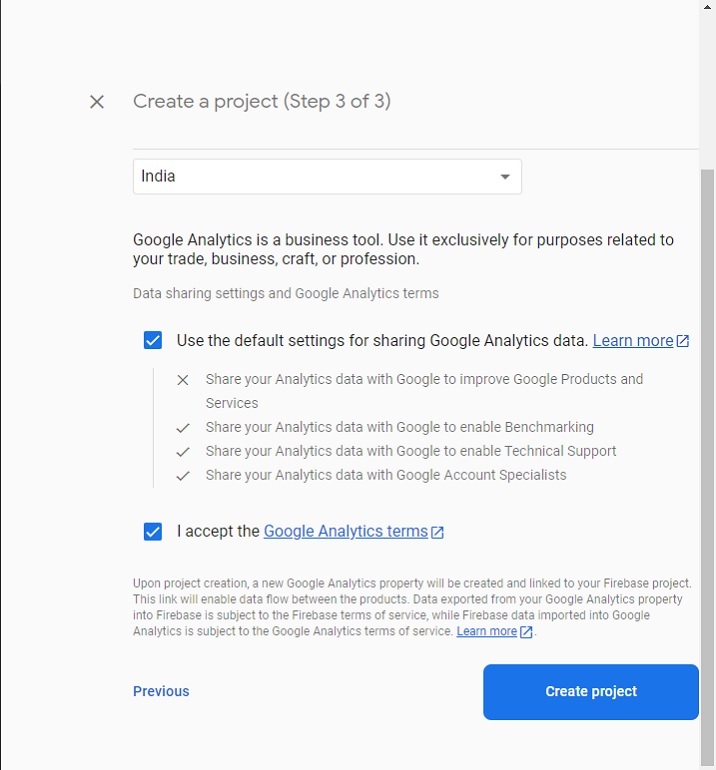
步骤 6 − 它将重定向到以下页面。在这里,单击“存储”卡片元素。之后,单击“开始使用”按钮。

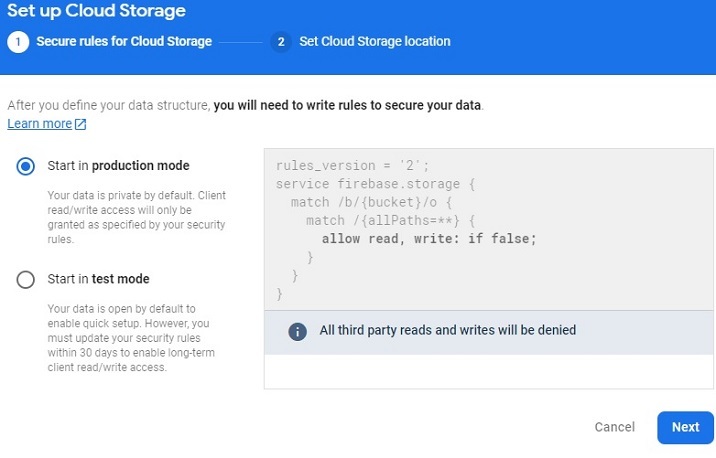
步骤 7 − 在这里,选择以“测试”或“生产”模式启动。在这里,我们将选择“测试”模式进行测试,然后单击“下一步”按钮。
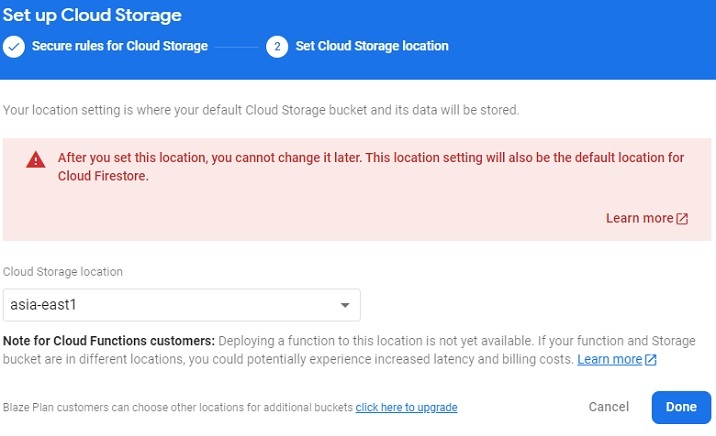
步骤 8 − 现在,选择最靠近您的存储首选位置,然后单击“完成”按钮。它将开始为存储创建默认存储桶。
步骤 9 − 创建存储桶将重定向到以下页面。从此处复制存储桶 ID,我们将在示例中使用它。
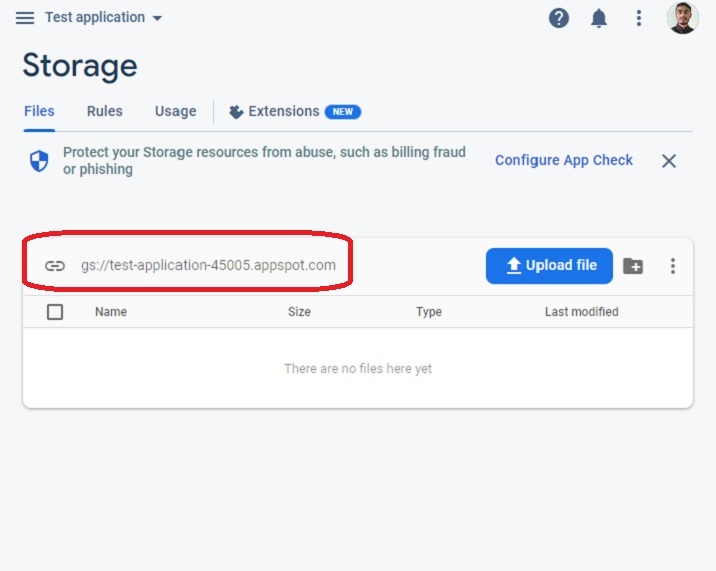
步骤 10 − 现在,转到“规则”选项卡并编辑规则。之后,添加以下代码以允许所有用户在未经身份验证的情况下上传图像文件。
rules_version = '2';
service firebase.storage {
   match /b/{bucket}/o {
      match /{allPaths=**} {
         // Allow access by all users
         allow read, write;
      }
   }
}
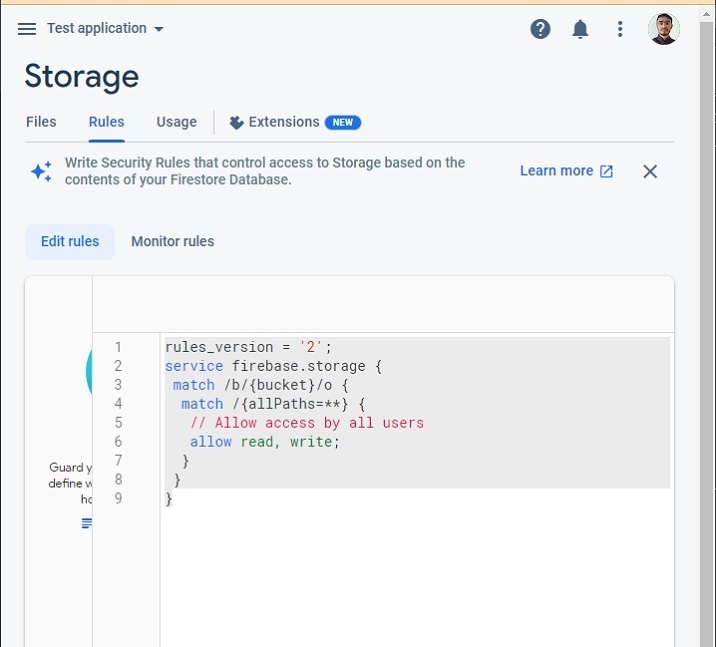
我们现在已完成 Firebase 项目设置,以便将图像上传到存储桶。
示例
以下示例在用户上传任何图像文件时调用 uploadFile() 函数。在 uploadFile() 函数中,我们将图像文件上传到 Firebase 存储,获取图像 URL,并使用 URL 更改图像的“src”属性的值。
用户应按照以下步骤操作给定示例。
步骤 1 − 在 <head> 标记中添加 Firebase CDN,以便在单页网站中使用 Firebase。
步骤 2 − 在 HTML 中,添加一个进度条,我们将根据图像上传百分比从 JavaScript 更新其进度。此外,添加用于上传文件的输入,该输入应在用户上传文件时调用 uplaodFile() 函数。此外,添加具有空“src”值的“img”元素,并在获取下载 URL 后初始化“src”值。
步骤 3 − 在 JavaScript 中,当用户上传文件时访问它,并使用 Date() 对象将唯一的文件名存储到“fileName”变量中。
步骤 4 − 现在,初始化 Firebase 存储。
步骤 5 − 现在开始将图像文件上传到存储桶中的首选位置,并根据上传的百分比上传进度值。
步骤 6 − 上传完成后,使用 getDownalodURL() 方法获取图像 URL 并将其设置为图像的“src”属性的值,以便在网页上显示。
在输出中,用户可以观察到它显示了上传的图像。
<html>
<head>
   <!-- Include Firebase SDK -->
   <script src="https://www.gstatic.com/firebasejs/8.6.8/firebase-app.js"></script>
   <script src="https://www.gstatic.com/firebasejs/8.6.8/firebase-storage.js"></script>
   <style>
      img {
         width: 500px;
         height: auto;
      }
   </style>
</head>
<body>
   <h2>Uploading image to <i>Firebase and getting URL.</i></h2>
   <h3>Upload image file below.</h3>
   <form>
      <!-- Showing image uploading progress bar -->
      <progress value = "0" id = "progressBar" max = "100"> 0% </progress> <br> <br>
      <!-- file input -->
      <input id = "file" type = "file" onchange = "uploadFile()"> <br> <br>
      <!-- Showing uploaded image -->
      <img src = "" alt = "" id = "uploadedImage">
   </form>
   <script>
      // Firebase configurations
      var config = {
         apiKey: "AIzaSyBsYILuhF4wOGOe0rFhPudhVWO3cGh2z18",
         authDomain: "localhost",
         projectId: "test-application-45005",
         storageBucket: "gs://test-application-45005.appspot.com",
      };

      // Initialize the Firebase app
      firebase.initializeApp(config);
      var currentFile;
      function uploadFile() {
         var fileInput = document.getElementById("file");

         // select the uploaded file
         currentFile = fileInput.files[0];

         // give a unique name to the file
         var fileName = "image-" + Date.now();

         // Give reference to the bucket path where we require to store the uploaded image
         var storageRef = firebase.storage().ref('/images/' + fileName);

         // upload file to selected storage reference
         var uploadingElement = storageRef.put(currentFile);

         // When uploading of the image starts, change the value of the progress bar
         uploadingElement.on('state_changed', (uploadingImage) => {
            var progress =
            (uploadingImage.bytesTransferred / uploadingImage.totalBytes) * 100;
            var progressBar = document.getElementById('progressBar');
            progressBar.value = progress;
         }, function (error) {
            console.log(error);
         }, function () {

            // Get the image URL
            uploadingElement.snapshot.ref.getDownloadURL().then(
            function (imageURL) {
               // set image URL as a value of the 'src' attribute of the image element
               let img = document.getElementById('uploadedImage');
               img.src = imageURL;
            });
         });
      }
   </script>
</body>
</html>
用户学习了如何使用 JavaScript 将图像上传到 Firebase 云存储并获取图像 URL。在实时应用程序中,使用 Firebase 时,获取上传图像(例如用户个人资料照片和其他图像)的 URL 非常有用。
此外,Firebase 允许开发人员非常快速地设置上传图像并获取其 URL。


 数据结构
数据结构 网络
网络 RDBMS
RDBMS 操作系统
操作系统 Java
Java iOS
iOS HTML
HTML CSS
CSS Android
 Python
 C 编程
C 编程 C++
C++ C#
C# MongoDB
 MySQL
MySQL Javascript
 PHP
PHP