- FuelPHP 教程
- FuelPHP - 首页
- FuelPHP - 简介
- FuelPHP - 安装
- FuelPHP - 架构概述
- FuelPHP - 简单Web应用程序
- FuelPHP - 配置
- FuelPHP - 控制器
- FuelPHP - 路由
- FuelPHP - 请求与响应
- FuelPHP - 视图
- FuelPHP - 展示器
- FuelPHP - 模型与数据库
- FuelPHP - 表单编程
- FuelPHP - 验证
- 高级表单编程
- FuelPHP - 文件上传
- FuelPHP - Ajax
- FuelPHP - HMVC 请求
- FuelPHP - 主题
- FuelPHP - 模块
- FuelPHP - 包
- Cookie 与 Session 管理
- FuelPHP - 事件
- FuelPHP - 邮件管理
- FuelPHP - 性能分析器
- 错误处理与调试
- FuelPHP - 单元测试
- 完整的运行示例
- FuelPHP 有用资源
- FuelPHP - 快速指南
- FuelPHP - 有用资源
- FuelPHP - 讨论
FuelPHP - 高级表单编程
FuelPHP 通过 Fieldset 和 Fieldset_Field 类提供高级表单编程。Fieldset 提供了一种面向对象的方式来创建表单。它完全支持模型,并内置支持客户端和服务器端验证。要创建一个完整的表单,只需创建一个具有适当表单和验证设置的模型即可。本章让我们学习 Fieldset 类以及如何使用它来创建表单。
Fieldset
Fieldset 是Fieldset_Field 对象的集合。Fieldset_Field 定义表单的单个条目,例如名字、姓氏等,以及验证规则。Fieldset 类具有添加/编辑/删除字段的方法。它可以选择识别模型中定义的字段,并根据给定的模型创建字段。Fieldset 在后台使用 Form 和 Validation 类来完成实际工作。让我们看看 Fieldset 类的一些重要方法。
forge
forge 创建一个新的 Fieldset 实例。它有两个参数:
$name - fieldset 的标识符
$config - 配置数组。可能的选项包括validation_instance 和 form_instance。validation_instance 可以包含Validation 对象,form_instance 可以包含 Form 对象。
$employee_form = Fieldset::forge('employee');
instance
instance 通过标识符返回之前创建的 Fieldset 实例。
$employee_form = Fieldset::instance('employee');
get_name
获取 fieldset 实例的标识符。
$employee_form = Fieldset::forge('employee');
$name = $employee_form->get_name();
add
add 创建一个新的 Fieldset_Field 实例并将其添加到当前 fieldset。它包含以下四个参数:
$name - 字段的名称
$label - 字段的标签
$attributes - HTML 标签属性
$rules - 验证规则
$employee_field = $employee_form-> add (
   'employee_lastname',
   'Lastname',
   array ('class' => 'pretty_input')
);

// with validation rules
$employee_form->add (
   'email', 'E-mail',
   array('type' => 'email', 'class' => 'pretty_input'),
   array('required', 'valid_email')
);
add_before
add_before 与 add 类似,但它还有一个额外的参数,用于指定在哪个字段之前添加新创建的字段。
$employee_form->add_before (
   'employee_firstname',
   'Firstname',
   array ('class' => 'pretty_input'),
   array(),
   'employee_lastname'
);
delete
delete 从 fieldset 中删除指定的字段。
$employee_form->delete('employee_firstname');
field
field 获取 fieldset 中的所有字段或指定的字段。
$fields = $employee_form->field();
$lastname_field = $employee_form->field('employee_lastname');
build
build 是$this->form()->build() 的别名。生成表单的 HTML 标记。
$employee_form->build(Uri::create('employee/add'));
enable
enable 重新启用之前禁用的字段。
$employee_form->enable('employee_firstname');
disable
disable 允许禁用 fieldset 中的字段,使其不被构建。
$employee_form->disable('employee_firstname');
form
form 返回当前 fieldset 的 Form 实例。
$form = employee_form->form();
add_model
add_model 将模型的字段添加到 fieldset。它有以下三个参数:
$class - 类名
$instance - 类的实例,用于填充字段的值
$method - 类中的方法名称。此方法用于将字段添加到 fieldset。Orm\Model 具有所需的方法。默认方法名称设置为 set_form_fields。
$employee_form = Fieldset::forge('employee');
$employee_form->add_model('Model_Employee');
populate
populate 使用模型实例设置 fieldset 中字段的初始值。
$emp = new Model_Employee();
$emp->name = "Jon";
$employee_form->populate($emp);
repopulate
repopulate 与 populate 相同,只是它重新填充 fieldset 中的字段。
validation
validation 获取当前 fieldset 的验证实例。
$validation = $employee_form->validation();
validated
$this->validation()->validated() 的别名。
input
$this->validation()->input() 的别名。
error
$this->validation()->error() 的别名。
show_errors
$this->validation()->show_errors() 的别名。
工作示例
让我们使用 Fieldset 类创建一个高级表单,以在我们的示例员工应用程序中添加新员工。
更新模型
使用必要的验证规则更新员工模型,并添加一个验证观察者,如下所示。
<?php
   class Model_Employee extends Orm\Model {
      protected static $_connection = 'production';
      protected static $_table_name = 'employee';
      protected static $_primary_key = array('id');

      protected static $_properties = array (
         'id',
         'name' => array (
            'data_type' => 'varchar',
            'label' => 'Employee Name',
            'validation' => array (
               'required',
               'min_length' => array(3),
               'max_length' => array(80)
            ),
            'form' => array (
               'type' => 'text'
            ),
         ),
         'age' => array (
            'data_type' => 'int',
            'label' => 'Employee Age',
            'validation' => array (
               'required',
            ),
            'form' => array ('type' => 'text' ),
         ),
      );

      // Just add the Observer, and define the required event
      protected static $_observers = array('Orm\\Observer_Validation' => array (
         'events' => array('before_save')));
   }
在这里,我们定义了 name 和 age 字段的验证规则,并添加了一个新的观察者,在将模型保存到数据库之前执行服务器端验证。相同的验证规则也会在表单中创建必要的输入验证属性。
创建表单
在员工控制器中创建一个新的操作,action_advancedform,如下所示。
public function action_advancedform() {

   // create a new fieldset and add employee model
   $fieldset = Fieldset::forge('employee')->add_model('Model_Employee');

   // get form from fieldset
   $form = $fieldset->form();

   // add submit button to the form
   $form->add('Submit', '', array('type' => 'submit', 'value' => 'Submit'));

   // build the form  and set the current page as action
   $formHtml = $fieldset->build(Uri::create('employee/advancedform'));

   // set form in data
   $data = array();
   $data['form'] = $formHtml;
   return Response::forge(View::forge('employee/advancedform', $data, false));
}
在这里,我们使用 fieldset 创建了表单,并将表单发送到视图。接下来,为该操作添加视图,fuel/app/views/employee/advancedform.php,如下所示。
<!DOCTYPE html>
<html lang = "en">

   <head>
      <title>Employee :: add page</title>
      <meta charset = "utf-8">
      <meta name = "viewport" content = "width = device-width, initial-scale = 1">
      <?php echo Asset::css('bootstrap.css'); ?>

      <style>
         table {
            width: 90%;
         }
         table tr {
            width: 90%
         }
         table tr td {
            width: 50%
         }
         input[type = text], select {
            width: 100%;
            padding: 12px 20px;
            margin: 8px 0;
            display: inline-block;
            border: 1px solid #ccc;
            border-radius: 4px;
            box-sizing: border-box;
         }
         input[type = submit] {
            width: 100%;
            background-color: #3c3c3c;
            color: white;
            padding: 14px 20px;
            margin: 8px 0;
            border: none;
            border-radius: 4px;
            cursor: pointer;
         }
         div {
            border-radius: 5px;
            background-color: #f2f2f2;
            padding: 20px;
         }
      </style>
   </head>

   <body>
      <div class = "container">
         <?php
            if(isset($errors)) {
               echo $errors;
            }
            echo $form;
         ?>
      </div>
   </body>

</html>
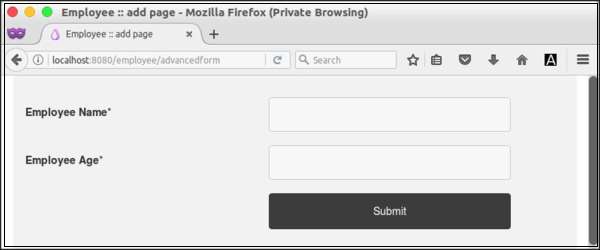
现在,请求页面https://:8080/employee/add 将显示以下表单。

处理表单
更新操作方法action_advancedform 以处理表单,并将用户输入的员工数据添加到员工控制器中的数据库中,如下所示。
public function action_advancedform() {

   // create a new fieldset and add employee model
   $fieldset = Fieldset::forge('employee')->add_model('Model_Employee');

   // get form from fieldset
   $form = $fieldset->form();

   // add submit button to the form
   $form->add('Submit', '', array('type' => 'submit', 'value' => 'Submit'));

   // build the form  and set the current page as action
   $formHtml = $fieldset->build(Uri::create('employee/advancedform'));

   if (Input::param() != array()) {
      try {
         $article = Model_Employee::forge();
         $article->name = Input::param('name');
         $article->url = Input::param('age');
         $article->save();
         Response::redirect('employee/list');

      }
      catch (Orm\ValidationFailed $e) {
         $view = View::forge('employee/advancedform');
         $view->set('form', $formHtml, false);
         $view->set('errors', $e->getMessage(), false);
      }
   }

   return Response::forge($view);
}
在这里,一旦用户输入的数据经过验证并保存到数据库中,我们就将其重定向到员工列表页面。否则,我们将再次显示表单。
创建表单
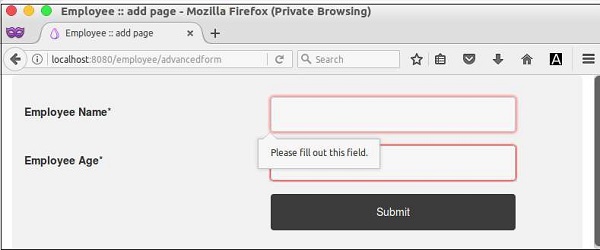
现在,请求 URL,https://:8080/employee/add,输入一些员工数据并提交表单。如果未提供数据,则表单将提示用户输入数据,如下面的屏幕截图所示。

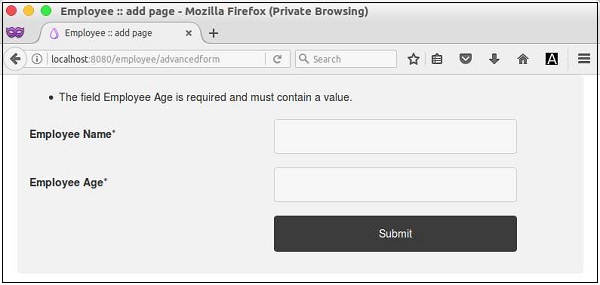
如果用户绕过客户端验证,则服务器将验证表单并显示错误,如下面的屏幕截图所示。

如果数据通过了客户端和服务器端验证,则员工数据将保存到数据库中,并且页面将重定向到列表页面。