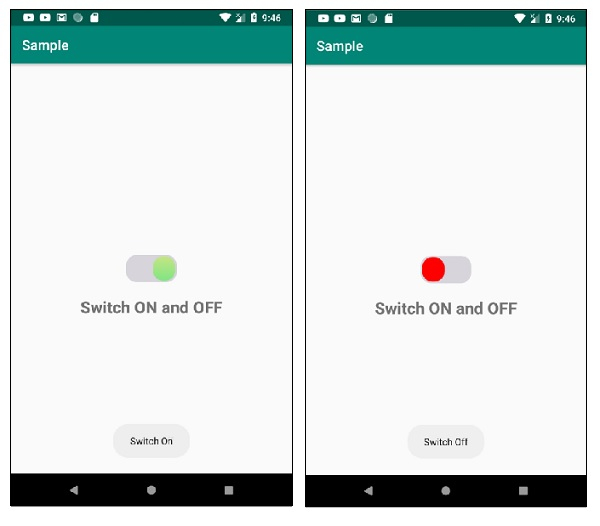
如何为 Android Switch 控件设置样式?
此示例演示了如何在 Android 中为 Android Switch 控件设置样式。
步骤 1 - 在 Android Studio 中创建一个新项目,转到文件 ⇒ 新建项目,并填写所有必要的信息以创建一个新项目。
步骤 2 - 将以下代码添加到 res/layout/activity_main.xml 中。
<?xml version="1.0" encoding="utf-8"?>
<RelativeLayout xmlns:android="http://schemas.android.com/apk/res/android"
xmlns:tools="http://schemas.android.com/tools"
   android:layout_width="match_parent"
   android:layout_height="match_parent"
   android:padding="4dp"
   android:id="@+id/relativeLayout"
   tools:context=".MainActivity">
   <Switch
      android:id="@+id/switchBtn"
      android:layout_width="wrap_content"
      android:layout_height="wrap_content"
      android:textOn="ON"
      android:thumb="@drawable/customswitchselector"
      android:track="@drawable/custom_track"
      android:layout_centerInParent="true"
      android:textOff="OFF"/>
   <TextView
      android:layout_width="match_parent"
      android:layout_height="wrap_content"
      android:layout_below="@id/switchBtn"
      android:layout_marginTop="20dp"
      android:text="Switch ON and OFF"
      android:textSize="24sp"
      android:textAlignment="center"
      android:textStyle="bold"/>
</RelativeLayout>
步骤 3 - 创建一个可绘制资源文件 (customswitchselector.xml) 并添加以下代码 -
<?xml version="1.0" encoding="utf-8"?>
<selector xmlns:android="http://schemas.android.com/apk/res/android">
   <item android:state_checked="true">
      <shape android:dither="true" android:shape="rectangle" android:useLevel="false" android:visible="true">
         <corners android:radius="15dp" />
         <gradient android:angle="270" android:endColor="#6600FF00" android:startColor="#66AAFF00" />
         <size android:width="37dp" android:height="37dp" />
         <stroke android:width="4dp" android:color="#0000ffff" />
      </shape>
   </item>
   <item android:state_checked="false">
      <shape android:dither="true" android:shape="rectangle" android:useLevel="false" android:visible="true">
         <corners android:radius="15dp" />
         <gradient android:angle="270" android:endColor="#ff0000" android:startColor="#ff0000" />
         <size android:width="37dp" android:height="37dp" />
         <stroke android:width="4dp" android:color="#0000ffff" />
      </shape>
   </item>
</selector>
步骤 4 - 创建一个可绘制资源文件 (custom_track.xml) 并添加以下代码 -
<?xml version="1.0" encoding="utf-8"?>
<shape xmlns:android="http://schemas.android.com/apk/res/android"
   android:shape="rectangle"
   android:visible="true"
   android:dither="true"
   android:useLevel="false">
   <gradient
      android:startColor="#27170432"
      android:endColor="#27170432"
      android:angle="270"/>
   <corners
      android:radius="15dp"/>
   <size
      android:width="80dp"
      android:height="40dp" />
</shape>
步骤 5 - 将以下代码添加到 src/MainActivity.java 中
import androidx.appcompat.app.AppCompatActivity;
import android.os.Bundle;
import android.widget.CompoundButton;
import android.widget.Switch;
import android.widget.Toast;
public class MainActivity extends AppCompatActivity {
   Switch aSwitch;
   @Override
   protected void onCreate(Bundle savedInstanceState) {
      super.onCreate(savedInstanceState);
      setContentView(R.layout.activity_main);
      aSwitch = findViewById(R.id.switchBtn);
      aSwitch.setOnCheckedChangeListener(new CompoundButton.OnCheckedChangeListener() {
         public void onCheckedChanged(CompoundButton buttonView, boolean isChecked) {
            if (isChecked) {
               Toast.makeText(MainActivity.this, "Switch On", Toast.LENGTH_SHORT).show();
            } else {
               Toast.makeText(MainActivity.this, "Switch Off", Toast.LENGTH_SHORT).show();
            }
         }
      });
   }
}
步骤 6 - 将以下代码添加到 androidManifest.xml 中
<?xml version="1.0" encoding="utf-8"?>
<manifest xmlns:android="http://schemas.android.com/apk/res/android" package="app.com.sample">
   <application
      android:allowBackup="true"
      android:icon="@mipmap/ic_launcher"
      android:label="@string/app_name"
      android:roundIcon="@mipmap/ic_launcher_round"
      android:supportsRtl="true"
      android:theme="@style/AppTheme">
         <activity android:name=".MainActivity">
            <intent-filter>
               <action android:name="android.intent.action.MAIN" />
               <category android:name="android.intent.category.LAUNCHER" />
            </intent-filter>
         </activity>
      </application>
</manifest>
让我们尝试运行您的应用程序。我假设您已将您的实际 Android 移动设备连接到您的计算机。要从 Android Studio 运行应用程序,请打开您的项目中的一个活动文件,然后点击工具栏中的运行 ![]() 图标。选择您的移动设备作为选项,然后检查您的移动设备,它将显示您的默认屏幕 -
图标。选择您的移动设备作为选项,然后检查您的移动设备,它将显示您的默认屏幕 -

点击这里下载项目代码。

广告

 数据结构
数据结构 网络
网络 关系型数据库管理系统
 操作系统
操作系统 Java
Java iOS
iOS HTML
HTML CSS
CSS Android
 Python
 C 编程
C 编程 C++
C++ C#
C# MongoDB
 MySQL
MySQL Javascript
 PHP
PHP