
 数据结构
数据结构 网络
网络 关系型数据库管理系统
 操作系统
操作系统 Java
Java iOS
iOS HTML
HTML CSS
CSS Android
 Python
 C 编程
C 编程 C++
C++ C#
C# MongoDB
 MySQL
MySQL Javascript
 PHP
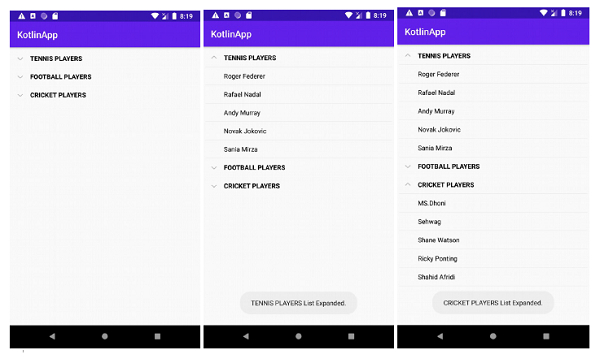
PHP如何使用 Kotlin 创建可扩展的 ListView?
此示例演示了如何使用 Kotlin 创建可扩展的 ListView。
步骤 1 - 在 Android Studio 中创建一个新项目,转到文件?新建项目并填写所有必要信息以创建新项目。
步骤 2 - 将以下代码添加到 res/layout/activity_main.xml。
示例
<RelativeLayout xmlns:android="http://schemas.android.com/apk/res/android"
xmlns:tools="http://schemas.android.com/tools"
   android:layout_width="match_parent"
   android:layout_height="match_parent"
   android:padding="4dp"
   tools:context=".MainActivity">
   <ExpandableListView
      android:id="@+id/expendableList"
      android:layout_width="match_parent"
      android:layout_height="match_parent"
      android:divider="@android:color/background_light"
      android:dividerHeight="0.5dp" />
</RelativeLayout>
步骤 3 - 创建一个新的 Kotlin 类 CustomExpandableListAdapter.kt 并添加以下代码 -
示例
import android.content.Context
import android.graphics.Typeface
import android.view.LayoutInflater
import android.view.View
import android.view.ViewGroup
import android.widget.BaseExpandableListAdapter
import android.widget.TextView
import java.util.HashMap
class CustomExpandableListAdapter internal constructor(
   private val context: Context,
   private val titleList: List<String>,
   private val dataList: HashMap<String, List<String>>
   ) : BaseExpandableListAdapter() {
      override fun getChild(listPosition: Int, expandedListPosition: Int): Any {
         return this.dataList[this.titleList[listPosition]]!![expandedListPosition]
      }
      override fun getChildId(listPosition: Int, expandedListPosition: Int): Long {
         return expandedListPosition.toLong()
      }
      override fun getChildView(
      listPosition: Int,
      expandedListPosition: Int,
      isLastChild: Boolean,
      convertView: View?,
      parent: ViewGroup
      ): View {
         var convertView = convertView
         val expandedListText = getChild(listPosition, expandedListPosition) as String
         if (convertView == null) {
            val layoutInflater =
            this.context.getSystemService(Context.LAYOUT_INFLATER_SERVICE) as LayoutInflater
            convertView = layoutInflater.inflate(R.layout.list_item, null)
         }
         val expandedListTextView = convertView!!.findViewById<TextView>(R.id.listView)
         expandedListTextView.text = expandedListText
         return convertView
      }
      override fun getChildrenCount(listPosition: Int): Int {
         return this.dataList[this.titleList[listPosition]]!!.size
      }
      override fun getGroup(listPosition: Int): Any {
         return this.titleList[listPosition]
      }
      override fun getGroupCount(): Int {
         return this.titleList.size
      }
      override fun getGroupId(listPosition: Int): Long {
         return listPosition.toLong()
      }
      override fun getGroupView(
      listPosition: Int,
      isExpanded: Boolean,
      convertView: View?,
      parent: ViewGroup
      ): View {
      var convertView = convertView
      val listTitle = getGroup(listPosition) as String
      if (convertView == null) {
         val layoutInflater =
         this.context.getSystemService(Context.LAYOUT_INFLATER_SERVICE) as LayoutInflater
            convertView = layoutInflater.inflate(R.layout.list_item, null)
      }
      val listTitleTextView = convertView!!.findViewById<TextView>(R.id.listView)
      istTitleTextView.setTypeface(null, Typeface.BOLD)
      listTitleTextView.text = listTitle
      return convertView
   }
   override fun hasStableIds(): Boolean {
      return false
   }
   override fun isChildSelectable(listPosition: Int, expandedListPosition: Int): Boolean {
      return true
  }
}
步骤 4 - 创建一个新的类 ExpandableListData.kt 并添加以下代码 -
示例
import java.util.*
internal object ExpandableListData {
   val data: HashMap<String, List<String>>
   get() {
      val expandableListDetail =
      HashMap<String, List<String>>()
      val myFavCricketPlayers: MutableList<String> =
      ArrayList()
      myFavCricketPlayers.add("MS.Dhoni")
      myFavCricketPlayers.add("Sehwag")
      myFavCricketPlayers.add("Shane Watson")
      myFavCricketPlayers.add("Ricky Ponting")
      myFavCricketPlayers.add("Shahid Afridi")
      val myFavFootballPlayers: MutableList<String> = ArrayList()
      myFavFootballPlayers.add("Cristiano Ronaldo")
      myFavFootballPlayers.add("Lionel Messi")
      myFavFootballPlayers.add("Gareth Bale")
      myFavFootballPlayers.add("Neymar JR")
      myFavFootballPlayers.add("David de Gea")
      val myFavTennisPlayers: MutableList<String> = ArrayList()
      myFavTennisPlayers.add("Roger Federer")
      myFavTennisPlayers.add("Rafael Nadal")
      myFavTennisPlayers.add("Andy Murray")
      myFavTennisPlayers.add("Novak Jokovic")
      myFavTennisPlayers.add("Sania Mirza")
      expandableListDetail["CRICKET PLAYERS"] = myFavCricketPlayers
      expandableListDetail["FOOTBALL PLAYERS"] = myFavFootballPlayers
      expandableListDetail["TENNIS PLAYERS"] = myFavTennisPlayers
      return expandableListDetail
   }
}
步骤 5 - 将以下代码添加到 src/MainActivity.kt
示例
import android.os.Bundle
import android.widget.ExpandableListAdapter
import android.widget.ExpandableListView
import android.widget.Toast
import androidx.appcompat.app.AppCompatActivity
import app.com.q14.ExpandableListData.data
class MainActivity : AppCompatActivity() {
   private var expandableListView: ExpandableListView? = null
   private var adapter: ExpandableListAdapter? = null
   private var titleList: List<String>? = null
   override fun onCreate(savedInstanceState: Bundle?) {
      super.onCreate(savedInstanceState)
      setContentView(R.layout.activity_main)
      title = "KotlinApp"
      expandableListView = findViewById(R.id.expendableList)
      if (expandableListView != null) {
         val listData = data
         titleList = ArrayList(listData.keys)
         adapter = CustomExpandableListAdapter(this, titleList as ArrayList<String>, listData)
         expandableListView!!.setAdapter(adapter)
         expandableListView!!.setOnGroupExpandListener { groupPosition ->
         Toast.makeText(
            applicationContext,
            (titleList as ArrayList<String>)[groupPosition] + " List Expanded.",
            Toast.LENGTH_SHORT
         ).show()
         }
         expandableListView!!.setOnGroupCollapseListener { groupPosition ->
         Toast.makeText(
            applicationContext,
            (titleList as ArrayList<String>)[groupPosition] + " List Collapsed.",
            Toast.LENGTH_SHORT
         ).show()
         }
         expandableListView!!.setOnChildClickListener { _, _, groupPosition, childPosition, _ ->
         Toast.makeText(
         applicationContext,
         "Clicked: " + (titleList as ArrayList<String>)[groupPosition] + " -> " + listData[(
            titleList as
            ArrayList<String>
         )
         [groupPosition]]!!.get(
            childPosition
         ),
         Toast.LENGTH_SHORT
         ).show()
            false
         }
      }
   }
}
步骤 6 - 创建一个新的布局资源 (list_item.xml) 并添加以下代码。
示例
<?xml version="1.0" encoding="utf-8"?>
<LinearLayout mlns:android="http://schemas.android.com/apk/res/android"
   android:layout_width="match_parent"
   android:layout_height="match_parent"
   android:orientation="vertical">
   <TextView
      android:id="@+id/listView"
      android:layout_width="match_parent"
      android:layout_height="wrap_content"
      android:paddingStart="?android:attr/expandableListPreferredItemPaddingLeft"
      android:paddingTop="10dp"
      android:paddingBottom="10dp"
      android:textColor="@android:color/black" />
</LinearLayout>
步骤 7 - 将以下代码添加到 androidManifest.xml
示例
<?xml version="1.0" encoding="utf-8"?>
<manifest xmlns:android="http://schemas.android.com/apk/res/android" package="app.com.q13">
   <application
      android:allowBackup="true"
      android:icon="@mipmap/ic_launcher"
      android:label="@string/app_name"
      android:roundIcon="@mipmap/ic_launcher_round"
      android:supportsRtl="true"
      android:theme="@style/AppTheme">
      <activity android:name=".MainActivity">
         <intent-filter>
            <action android:name="android.intent.action.MAIN" />
            <category android:name="android.intent.category.LAUNCHER" />
         </intent-filter>
      </activity>
   </application>
</manifest>
让我们尝试运行您的应用程序。我假设您已将您的实际 Android 移动设备连接到您的电脑。要从 Android Studio 运行应用程序,请打开您的一个项目活动文件,然后点击工具栏上的运行图标![]() 。选择您的移动设备作为选项,然后检查您的移动设备,它将显示您的默认屏幕
。选择您的移动设备作为选项,然后检查您的移动设备,它将显示您的默认屏幕

更新于: 2020年5月23日
4K+ 次查看

广告