如何在Android中使用Volley获取包含自定义对象的数组列表?
此示例演示如何在Android中使用Volley获取包含自定义对象的数组列表。
步骤1 - 在Android Studio中创建一个新项目,转到文件 ⇒ 新建项目,并填写所有必需的详细信息以创建一个新项目。
步骤2 - 将以下代码添加到res/layout/activity_main.xml。
<?xml version="1.0" encoding="utf-8"?>
<LinearLayout xmlns:android="http://schemas.android.com/apk/res/android"
   xmlns:app="http://schemas.android.com/apk/res-auto"
   xmlns:tools="http://schemas.android.com/tools"
   android:layout_width="match_parent"
   android:gravity="center"
   android:layout_height="match_parent"
   tools:context=".MainActivity">
   <TextView
      android:id="@+id/text"
      android:textSize="30sp"
      android:layout_width="match_parent"
      android:layout_height="match_parent" />
</LinearLayout>
在上面的代码中,我们使用了TextView来显示自定义数组列表对象的元素。
步骤3 - 将以下代码添加到src/MainActivity.java
package com.example.myapplication;
import android.os.Build;
import android.os.Bundle;
import android.support.annotation.RequiresApi;
import android.support.v7.app.AppCompatActivity;
import android.util.Log;
import android.widget.TextView;
import com.android.volley.Request;
import com.android.volley.RequestQueue;
import com.android.volley.Response;
import com.android.volley.VolleyError;
import com.android.volley.toolbox.StringRequest;
import com.android.volley.toolbox.Volley;
import org.json.JSONArray;
import org.json.JSONException;
import org.json.JSONObject;
import java.util.ArrayList;
import java.util.List;
public class MainActivity extends AppCompatActivity {
   TextView textView;
   RequestQueue queue;
   String URL = "http://www.mocky.io/v2/597c41390f0000d002f4dbd1";
   @RequiresApi(api = Build.VERSION_CODES.N)
   @Override
   protected void onCreate(Bundle savedInstanceState) {
      super.onCreate(savedInstanceState);
      setContentView(R.layout.activity_main);
      textView = findViewById(R.id.text);
      final List<UserInfo> list=new ArrayList<>();
      queue = Volley.newRequestQueue(this);
      StringRequest request = new StringRequest(Request.Method.GET, URL, new Response.Listener<String>() {
         @Override
         public void onResponse(String response) {
            try {
               JSONObject object=new JSONObject(response);
               JSONArray array=object.getJSONArray("users");
               for(int i=0;i<array.length();i++) {
                  JSONObject object1=array.getJSONObject(i);
                  String name =object1.getString("name");
                  String email =object1.getString("email");
                  list.add(new UserInfo(name,email));
               }
               textView.setText("email: "+list.get(0).email+ "
name: "+list.get(0).name);
            } catch (JSONException e) {
               e.printStackTrace();
            }
         }
      }, new Response.ErrorListener() {
         @Override
         public void onErrorResponse(VolleyError error) {
            Log.d("error",error.toString());
         }
      });
     queue.add(request);
   }
   private class UserInfo {
      String name,email;
    public UserInfo(String name, String email) {
this.name=name;
this.email=email;
}
}
}
步骤4 - 将以下代码添加到AndroidManifest.xml
<?xml version="1.0" encoding="utf-8"?>
<manifest xmlns:android="http://schemas.android.com/apk/res/android"
   package="com.example.myapplication">
   <uses-permission android:name="android.permission.INTERNET" />
   <application
      android:allowBackup="true"
      android:icon="@mipmap/ic_launcher"
      android:label="@string/app_name"
      android:roundIcon="@mipmap/ic_launcher_round"
      android:supportsRtl="true"
      android:theme="@style/AppTheme">
      <activity android:name=".MainActivity">
         <intent-filter>
            <action android:name="android.intent.action.MAIN" />
            <action android:name="android.net.conn.CONNECTIVITY_CHANGE" />
            <category android:name="android.intent.category.LAUNCHER" />
         </intent-filter>
      </activity>
</application>
</manifest>
步骤5 - 将以下代码添加到build.gradle
apply plugin: 'com.android.application'
android {
   compileSdkVersion 28
   defaultConfig {
      applicationId "com.example.myapplication"
      minSdkVersion 15
      targetSdkVersion 28
      versionCode 1
      versionName "1.0"
      testInstrumentationRunner "android.support.test.runner.AndroidJUnitRunner"
   }
   buildTypes {
      release {
         minifyEnabled false
         proguardFiles getDefaultProguardFile('proguard-android-optimize.txt'), 'proguard-rules.pro'
      }
   }
}
dependencies {
   implementation fileTree(dir: 'libs', include: ['*.jar'])
   implementation 'com.android.volley:volley:1.1.0'
   implementation 'com.android.support:appcompat-v7:28.0.0'
   implementation 'com.android.support.constraint:constraint-layout:1.1.3'
   testImplementation 'junit:junit:4.12'
   androidTestImplementation 'com.android.support.test:runner:1.0.2'
   androidTestImplementation 'com.android.support.test.espresso:espresso-core:3.0.2'
}
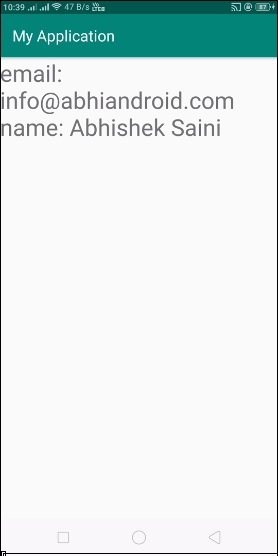
让我们尝试运行您的应用程序。我假设您已将您的实际Android移动设备连接到您的计算机。要从Android Studio运行应用程序,请打开您的项目活动文件之一,然后单击运行 ![]() 工具栏中的图标。选择您的移动设备作为选项,然后检查您的移动设备,它将显示您的默认屏幕 –
工具栏中的图标。选择您的移动设备作为选项,然后检查您的移动设备,它将显示您的默认屏幕 –

点击 这里 下载项目代码

广告

 数据结构
数据结构 网络
网络 关系数据库管理系统 (RDBMS)
 操作系统
操作系统 Java
Java iOS
iOS HTML
HTML CSS
CSS Android
 Python
 C语言编程
C语言编程 C++
C++ C#
C# MongoDB
 MySQL
MySQL Javascript
 PHP
PHP