
 数据结构
数据结构 网络
网络 关系数据库管理系统 (RDBMS)
 操作系统
操作系统 Java
Java iOS
iOS HTML
HTML CSS
CSS Android
 Python
 C语言编程
C语言编程 C++
C++ C#
C# MongoDB
 MySQL
MySQL Javascript
 PHP
PHP如何在Ubuntu 16.04上设置Apache使用密码认证
在本文中,我们将学习如何设置和配置Apache Web服务器,以限制未经身份验证的访问者,从而可以向未经身份验证的用户隐藏某些重要和关键信息。
前提条件
- 我们需要一台Ubuntu机器,该机器上拥有Sudo权限的非root用户。
- 机器上安装了Apache2 Web服务器。
安装Apache实用程序
我们需要安装一个名为“htpasswd”的Apache2实用程序包,此实用程序是“apache2-utils”包的一部分。
这将帮助我们创建和管理访问网站受限部分所需的用户名和密码。
以下是安装“apache2-utils”包的命令。
$ sudo apt-get install apache2-utils
Output:
Reading package lists... Done
Building dependency tree
Reading state information... Done
The following package was automatically installed and is no longer required:
apache2-data
The following NEW packages will be installed: apache2-utils
0 upgraded, 1 newly installed, 0 to remove and 92 not upgraded.
Need to get 0 B/81.3 kB of archives.
After this operation, 323 kB of additional disk space will be used.
Selecting previously unselected package apache2-utils.
(Reading database ... 117511 files and directories currently installed.)
Preparing to unpack .../apache2-utils_2.4.18-2ubuntu3.1_amd64.deb ...
Unpacking apache2-utils (2.4.18-2ubuntu3.1) ...
Setting up apache2-utils (2.4.18-2ubuntu3.1) ...
Reading package lists... Done
Need to get 0 B/81.3 kB of archives.
After this operation, 323 kB of additional disk space will be used.
Selecting previously unselected package apache2-utils.
(Reading database ... 117511 files and directories currently installed.)
Preparing to unpack .../apache2-utils_2.4.18-2ubuntu3.1_amd64.deb ...
Unpacking apache2-utils (2.4.18-2ubuntu3.1) ...
Setting up apache2-utils (2.4.18-2ubuntu3.1) ...
创建Apache2密码文件
安装apache2-utils后,我们将拥有htpasswd命令,我们将使用此htpasswd命令创建Apache将用于用户身份验证的密码文件。
以下是使用用户身份验证信息创建htpasswd文件的命令。
当我们第一次为Apache 2创建文件时,我们将使用以下命令以及–c选项。
$ sudo htpasswd -c /etc/apache2/.htpasswd user1
Output:
New password:
Re-type new password:
Adding password for user user1
“–c”选项用于在第一次创建时创建初始文件。
$ sudo htpasswd /etc/apache2/.htpasswd user2
Output:
New password:
Re-type new password:
Adding password for user user2
如果我们添加–c选项,它将用新文件覆盖旧文件,您将丢失之前创建的所有用户。
要验证是否已创建用户,我们将检查位于/etc/apache2/的.htpasswd文件。
以下是检查文件内容的命令:
$ cat /etc/apache2/.htpasswd
Output:
user1:$apr1$8mLF0tmz$rvN0z15hv6tnIU9ymXPmH1
user2:$apr1$vGFgrOU4$K0uAbeRlc5sb8ICJJbhxe.
如果您可以看到此文件包含用户的用户名和加密密码。
配置Apache以使用密码身份验证
在此演示中,我们只使用虚拟主机文件进行身份验证,我们也可以通过其他方法提供身份验证。由于我们具有与Apache2 Web服务器可以读取的相同格式的已认证用户的文件。
我们将通过向虚拟主机添加密码保护来实现此目的,默认虚拟主机配置文件为000-default.conf,位于/etc/apache2/sites-enabled
以下是编辑apache2配置文件的命令。
$ sudo vi /etc/apache2/sites-enabled/000-default.conf
原始Apache Web服务器配置文件如下所示,我们需要编辑此文件。
<VirtualHost *:80>
   ServerAdmin admin@webhost.com
   DocumentRoot /var/www/html
   ErrorLog ${APACHE_LOG_DIR}/error.log
   CustomLog ${APACHE_LOG_DIR}/access.log combined
</VirtualHost>
我们将在directory块中添加身份验证,身份验证基于目录进行。以下是带有身份验证的示例配置
<VirtualHost *:80>
   ServerAdmin admin@webhost.com
   DocumentRoot /var/www/html
   ErrorLog ${APACHE_LOG_DIR}/error.log
   CustomLog ${APACHE_LOG_DIR}/access.log combined
   <Directory "/var/www/html">
      AuthType Basic
      AuthName "Restricted Content"
      AuthUserFile /etc/apache2/.htpasswd
      Require valid-user
   </Directory>
</VirtualHost>
“directory”块有一些选项,现在我们将看到我们用于密码身份验证的选项。
**AuthType Basic**: 这将为站点设置基本身份验证。
**AuthName “Restricted Contents”**: 这将在提示符处显示身份验证的名称。
**AuthUserFile /etc/apache2/.htpasswd**: 这将显示身份验证文件的位置。
**Require Valid-user**: 这将被任何已验证身份验证的用户使用,这些用户被允许访问网站。
编辑配置文件后,我们将重新启动Apache2 Web服务器并检查状态
$ sudo systemctl restart apache2
$ sudo systemctl status apache2
Output:
apache2.service - LSB: Apache2 web server
Loaded: loaded (/etc/init.d/apache2; bad; vendor preset: enabled)
Drop-In: /lib/systemd/system/apache2.service.d
└─apache2-systemd.conf
Active: active (running) since Mon 2016-09-19 16:33:34 IST; 6s ago
Docs: man:systemd-sysv-generator(8)
Process: 19606 ExecStop=/etc/init.d/apache2 stop (code=exited, status=0/SUCCESS)
Process: 19630 ExecStart=/etc/init.d/apache2 start (code=exited, status=0/SUCCESS)
Tasks: 55 (limit: 512)
Memory: 6.3M
CPU: 54ms
CGroup: /system.slice/apache2.service
├─19648 /usr/sbin/apache2 -k start
├─19651 /usr/sbin/apache2 -k start
└─19652 /usr/sbin/apache2 -k start
Sep 19 16:33:33 ubuntu-16 systemd[1]: Starting LSB: Apache2 web server...
Sep 19 16:33:33 ubuntu-16 apache2[19630]: * Starting Apache httpd web server apache2
Sep 19 16:33:34 ubuntu-16 apache2[19630]: *
Sep 19 16:33:34 ubuntu-16 systemd[1]: Started LSB: Apache2 web server.
验证密码身份验证
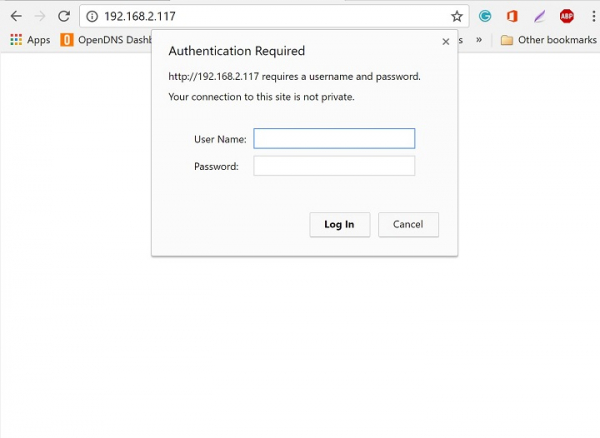
要验证密码身份验证是否有效,我们需要从Web浏览器访问Apache。当我们访问站点时,Apache将用于身份验证,如果我们提供正确的用户凭据,Apache将允许用户访问网页。
您可以看到下图是Apache2 Web服务器的密码身份验证页面。
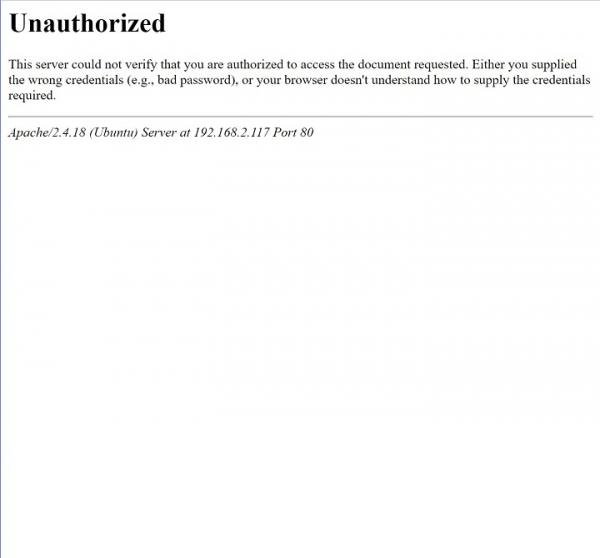
如果用户未提供正确的凭据,或者我们意外单击取消,您将看到如下所示的“未授权”窗口:
通过使用以上文章和设置,我们可以保护网站或网页的某些部分,我们可以限制用户在未经身份验证的情况下访问某些关键信息,在此设置中,我们仅使用了基本身份验证,有关更多选项和配置,可以查看Apache2原始文档或网站。

463 次浏览
