
 数据结构
数据结构 网络
网络 关系数据库管理系统 (RDBMS)
 操作系统
操作系统 Java
Java iOS
iOS HTML
HTML CSS
CSS Android
 Python
 C语言编程
C语言编程 C++
C++ C#
C# MongoDB
 MySQL
MySQL Javascript
 PHP
PHP如何在Android中使用单例模式的AlertDialog?
在进入示例之前,我们应该了解什么是单例设计模式。单例是一种设计模式,它限制类的实例化只能有一个实例。值得注意的用途包括控制并发以及创建应用程序访问其数据存储的中心访问点。
此示例演示如何在Android中使用单例模式的AlertDialog。
步骤1 - 在Android Studio中创建一个新项目,转到文件 ⇒ 新建项目,并填写所有必需的详细信息以创建新项目。
步骤2 - 将以下代码添加到res/layout/activity_main.xml。
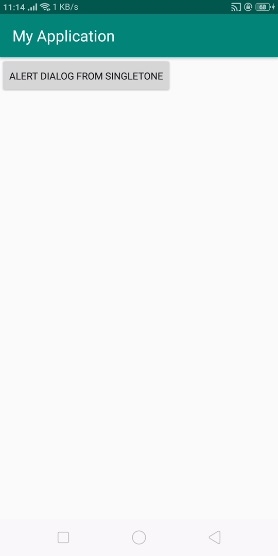
<?xml version = "1.0" encoding = "utf-8"?>
<LinearLayout xmlns:android = "http://schemas.android.com/apk/res/android"
   xmlns:tools = "http://schemas.android.com/tools"
   android:layout_width = "match_parent"
   android:layout_height = "match_parent"
   tools:context = ".MainActivity"
   android:orientation = "vertical">
   <Button
      android:id = "@+id/show"
      android:text = "Alert Dialog from singleTone"
      android:layout_width = "wrap_content"
      android:layout_height = "wrap_content" />
</LinearLayout>
在上面的代码中,我们添加了一个按钮。当用户点击“显示”按钮时,它将显示来自单例类的AlertDialog。
步骤3 - 将以下代码添加到src/MainActivity.java。
package com.example.andy.myapplication;
import android.os.Bundle;
import android.support.v7.app.AppCompatActivity;
import android.view.View;
import android.widget.Button;
public class MainActivity extends AppCompatActivity {
   Button show;
   singleTonExample singletonexample;
   @Override
   protected void onCreate(Bundle savedInstanceState) {
      super.onCreate(savedInstanceState);
      setContentView(R.layout.activity_main);
      show = findViewById(R.id.show);
      singletonexample = singleTonExample.getInstance();
      singletonexample.init(getApplicationContext());
      show.setOnClickListener(new View.OnClickListener() {
         @Override
         public void onClick(View v) {
            singletonexample.AlertDialog(MainActivity.this);
         }
      });
   }
}
在上面的代码中,我们使用了**singleTonExample**作为单例类,因此创建一个名为**singleTonExample.java**的调用并添加以下代码 -
package com.example.andy.myapplication;
import android.app.AlertDialog;
import android.content.Context;
import android.content.DialogInterface;
import android.speech.tts.TextToSpeech;
import android.widget.Toast;
public class singleTonExample {
static TextToSpeech t1;
private static singleTonExample ourInstance = new singleTonExample();
private Context appContext;
private singleTonExample() { }
public static Context get() {
return getInstance().getContext();
}
public static synchronized singleTonExample getInstance() {
return ourInstance;
}
public void init(Context context) {
if (appContext = = null) {
this.appContext = context;
}
}
private Context getContext() {
return appContext;
}
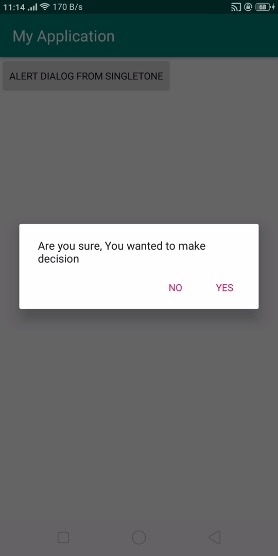
public void AlertDialog(final MainActivity mainActivity) {
AlertDialog.Builder alertDialogBuilder = new AlertDialog.Builder(mainActivity);
alertDialogBuilder.setMessage("Are you sure, You wanted to make decision");
alertDialogBuilder.setPositiveButton("yes",
new DialogInterface.OnClickListener() {
@Override
public void onClick(DialogInterface arg0, int arg1) {
Toast.makeText(mainActivity, "You clicked yes button", Toast.LENGTH_LONG).show();
}
});
alertDialogBuilder.setNegativeButton("No", new DialogInterface.OnClickListener() {
@Override
public void onClick(DialogInterface dialog, int which) {
mainActivity.finish();
}
});
AlertDialog alertDialog = alertDialogBuilder.create();
alertDialog.show();
}
}让我们尝试运行您的应用程序。我假设您已将您的实际Android移动设备连接到您的计算机。要在Android Studio中运行该应用程序,请打开项目中的一个活动文件,然后点击工具栏中的运行![]() 图标。选择您的移动设备作为选项,然后检查您的移动设备,它将显示您的默认屏幕 -
图标。选择您的移动设备作为选项,然后检查您的移动设备,它将显示您的默认屏幕 -
现在点击上面的按钮,它将显示来自单例类的AlertDialog,如下所示 -。
点击这里下载项目代码

更新于:2019年7月30日
443 次浏览

广告