- Llama 教程
- Llama - 首页
- Llama - 环境设置
- Llama - 快速入门
- Llama - 数据准备
- Llama - 从零开始训练
- Llama 模型微调
- Llama - 评估模型性能
- Llama - 模型优化
- Llama 有用资源
- Llama - 快速指南
- Llama - 有用资源
- Llama - 讨论
Llama 入门
Llama 代表 大型语言模型 Meta AI。由 Meta AI 成立,其架构在 Transformer 的基础上进行了改进,旨在处理自然语言处理中更复杂的问题。Llama 以一种赋予其类人特征的方式生成文本,从而提高对语言的理解,以及更多功能,包括文本生成、翻译、摘要等。
Llama 是一种能够在比其同类 GPT-3 所需的数据集小得多的数据集上优化性能的模型。它旨在在较小的数据集上高效运行,从而使其能够被更广泛的用户访问,并且具有可扩展性。
Llama 架构概述
Transformer 模型是 Llama 的核心架构。它最初由 Vaswani 等人在名为“注意力就是你所需要的一切”的论文中提出,但它本质上是一个自回归模型。这意味着它一次生成一个标记,根据之前出现的标记预测序列中的下一个单词。
Llama 架构的重要特性如下:
- 高效训练 - Llama 能够在小得多的数据集上高效训练。因此,它特别适用于计算能力有限或数据可用性较低的研究和应用场景。
- 自回归结构 - 它逐个生成标记,使生成的文本高度连贯,因为每个后续标记都基于迄今为止的所有标记。
- 多头自注意力 - 模型的注意力机制的设计方式是根据重要性为句子中的单词分配不同的权重,因此它能够理解输入中的局部和全局上下文。
- 堆叠的 Transformer 层 - Llama 堆叠了许多 Transformer 块,每个块由一个自注意力机制和一个前馈神经网络组成。
为什么选择 Llama?
Llama 在计算效率方面实现了其模型容量的合理拟合。它可以生成非常长的连贯文本流,并执行几乎任何任务,包括问答和摘要,直至语言翻译等资源节约型活动。与一些其他大型语言模型(如 GPT-3)相比,Llama 模型更小且运行成本更低,因此这项工作能够让更多人参与。
Llama 变体
Llama 存在多种版本,所有这些版本都使用不同数量的参数进行训练:
- Llama-7B = 70 亿参数
- Llama-13B = 130 亿参数
- Llama-30B = 300 亿参数
- Llama-65B = 650 亿参数
通过这样做,用户可以根据其硬件以及特定任务的需求选择合适的模型版本。
了解模型的组件
Llama 的功能建立在一些高度关键的组件之上。让我们讨论每个组件,并考虑它们如何相互通信以增强模型的整体性能。
嵌入层
Llama 的嵌入层将输入标记映射到高维向量。因此,它捕获了单词之间的语义关系。这种映射背后的直觉是,在连续的向量空间中,语义上相似的标记彼此最接近。
嵌入层还通过将标记的形状更改为变换层期望的维度来为后续的变换层准备输入。
import torch
import torch.nn as nn
# Embedding layer
embedding = nn.Embedding(num_embeddings=10000, embedding_dim=256)
# Tokenized input (for example: "The future is bright")
input_tokens = torch.LongTensor([2, 45, 103, 567])
# Output embedding
embedding_output = embedding(input_tokens)
print(embedding_output)
输出
tensor([[-0.4185, -0.5514, -0.8762,  ...,  0.7456,  0.2396,  2.4756],
        [ 0.7882,  0.8366,  0.1050,  ...,  0.2018, -0.2126,  0.7039],
        [ 0.3088, -0.3697,  0.1556,  ..., -0.9751, -0.0777, -1.3352],
        [ 0.7220, -0.7661,  0.2614,  ...,  1.2152,  1.6356,  0.6806]],
       grad_fn=<EmbeddingBackward0>)
这种词嵌入表示还允许模型以复杂的方式理解标记之间如何相互关联。
自注意力机制
Transformer 模型的自注意力是 Llama 的创新之处,它将注意力机制应用于句子的部分,并理解每个单词与其他单词的关系。在这种情况下,Llama 使用多头注意力,将注意力机制分成多个头,以便模型可以自由地探索输入序列的部分。
因此,创建了查询、键和值矩阵,模型根据这些矩阵选择对每个单词相对于其他单词赋予多少权重(或注意力)。
import torch
import torch.nn.functional as F

# Sample query, key, value tensors
queries = torch.rand(1, 4, 16)  # (batch_size, seq_length, embedding_dim)
keys = torch.rand(1, 4, 16)
values = torch.rand(1, 4, 16)

# Compute scaled dot-product attention
scores = torch.bmm(queries, keys.transpose(1, 2)) / (16 ** 0.5)
attention_weights = F.softmax(scores, dim=-1)

# apply attention weights to values
output = torch.bmm(attention_weights, values)
print(output)
输出
tensor([[[0.4782, 0.5340, 0.4079, 0.4829, 0.4172, 0.5398, 0.3584, 0.6369,
          0.5429, 0.7614, 0.5928, 0.5989, 0.6796, 0.7634, 0.6868, 0.5903],
         [0.4651, 0.5553, 0.4406, 0.4909, 0.3724, 0.5828, 0.3781, 0.6293,
          0.5463, 0.7658, 0.5828, 0.5964, 0.6699, 0.7652, 0.6770, 0.5583],
         [0.4675, 0.5414, 0.4212, 0.4895, 0.3983, 0.5619, 0.3676, 0.6234,
          0.5400, 0.7646, 0.5865, 0.5936, 0.6742, 0.7704, 0.6792, 0.5767],
         [0.4722, 0.5550, 0.4352, 0.4829, 0.3769, 0.5802, 0.3673, 0.6354,
          0.5525, 0.7641, 0.5722, 0.6045, 0.6644, 0.7693, 0.6745, 0.5674]]])
这种注意力机制使模型能够“关注”序列的不同部分,从而使其能够学习句子中单词之间的长距离依赖关系。
多头注意力
多头注意力是自注意力的扩展,其中多个注意力头并行应用。通过这样做,每个注意力头都选择输入的不同部分,确保实现数据中所有可能的依赖关系。
然后,它进入一个前馈网络,分别处理每个注意力结果。
import torch
import torch.nn as nn
import torch.nn.functional as F

class MultiHeadAttention(nn.Module):
   def __init__(self, dim_model, num_heads):
      super(MultiHeadAttention, self).__init__()
      self.num_heads = num_heads
      self.dim_head = dim_model // num_heads

        self.query = nn.Linear(dim_model, dim_model)
        self.key = nn.Linear(dim_model, dim_model)
        self.value = nn.Linear(dim_model, dim_model)
        self.out = nn.Linear(dim_model, dim_model)

   def forward(self, x):
      B, N, C = x.shape
      queries = self.query(x).reshape(B, N, self.num_heads, self.dim_head).transpose(1, 2)
      keys = self.key(x).reshape(B, N, self.num_heads, self.dim_head).transpose(1, 2)
      values = self.value(x).reshape(B, N, self.num_heads, self.dim_head).transpose(1, 2)
      intention = torch.matmul(queries, keys.transpose(-2, -1)) / (self.dim_head ** 0.5)
      attention_weights = F.softmax(intention, dim=-1)
      out = torch.matmul(attention_weights, values).transpose(1, 2).reshape(B, N, C)
      return self.out(out)

# Multiple attention building and calling
attention_layer = MultiHeadAttention(128, 8)
output = attention_layer(torch.rand(1, 10, 128))  # (batch_size, seq_length, embedding_dim)
print(output)
输出
tensor([[[-0.1015, -0.1076,  0.2237,  ...,  0.1794, -0.3297,  0.1177],
         [-0.1028, -0.1068,  0.2219,  ...,  0.1798, -0.3307,  0.1175],
         [-0.1018, -0.1070,  0.2228,  ...,  0.1793, -0.3294,  0.1183],
         ...,
         [-0.1021, -0.1075,  0.2245,  ...,  0.1803, -0.3312,  0.1171],
         [-0.1041, -0.1070,  0.2232,  ...,  0.1817, -0.3308,  0.1184],
         [-0.1027, -0.1087,  0.2223,  ...,  0.1801, -0.3295,  0.1179]]],
       grad_fn=<ViewBackward0>)
前馈网络
前馈网络可能是 Transformer 块中最简单但最基本的部分。顾名思义,它对输入序列应用某种非线性变换;因此,模型可以学习更复杂的模式。
Llama 的每一层注意力都使用前馈网络进行这种变换。
class FeedForward(nn.Module):
   def __init__(self, dim_model, dim_ff):
      super(FeedForward, self).__init__() #This line was incorrectly indented
      self.fc1 = nn.Linear(dim_model, dim_ff)
      self.fc2 = nn.Linear(dim_ff, dim_model)
      self.relu = nn.ReLU()
   def forward(self, x):
      return self.fc2(self.relu(self.fc1(x)))

# define and use the feed-forward network
ffn = FeedForward(128, 512)
ffn_output = ffn(torch.rand(1, 10, 128))  # (batch_size, seq_length, embedding_dim)
print(ffn_output)
输出
tensor([[[ 0.0222, -0.1035, -0.1494,  ...,  0.0891,  0.2920, -0.1607],
         [ 0.0313, -0.2393, -0.2456,  ...,  0.0704,  0.1300, -0.1176],
         [-0.0838, -0.0756, -0.1824,  ...,  0.2570,  0.0700, -0.1471],
         ...,
         [ 0.0146, -0.0733, -0.0649,  ...,  0.0465,  0.2674, -0.1506],
         [-0.0152, -0.0657, -0.0991,  ...,  0.2389,  0.2404, -0.1785],
         [ 0.0095, -0.1162, -0.0693,  ...,  0.0919,  0.1621, -0.1421]]],
       grad_fn=<ViewBackward0>)
使用 Llama 模型创建标记的步骤
在访问 Llama 模型之前,您需要在 Hugging Face 上创建令牌。我们使用 Llama 2 模型,因为它比较轻量级。您可以选择任何模型。请按照以下步骤开始。
步骤 1:注册 Hugging Face 账户(如果您尚未注册)
- 在 Hugging Face 首页上,点击“注册”。
- 对于所有尚未创建账户的用户,请立即创建一个。
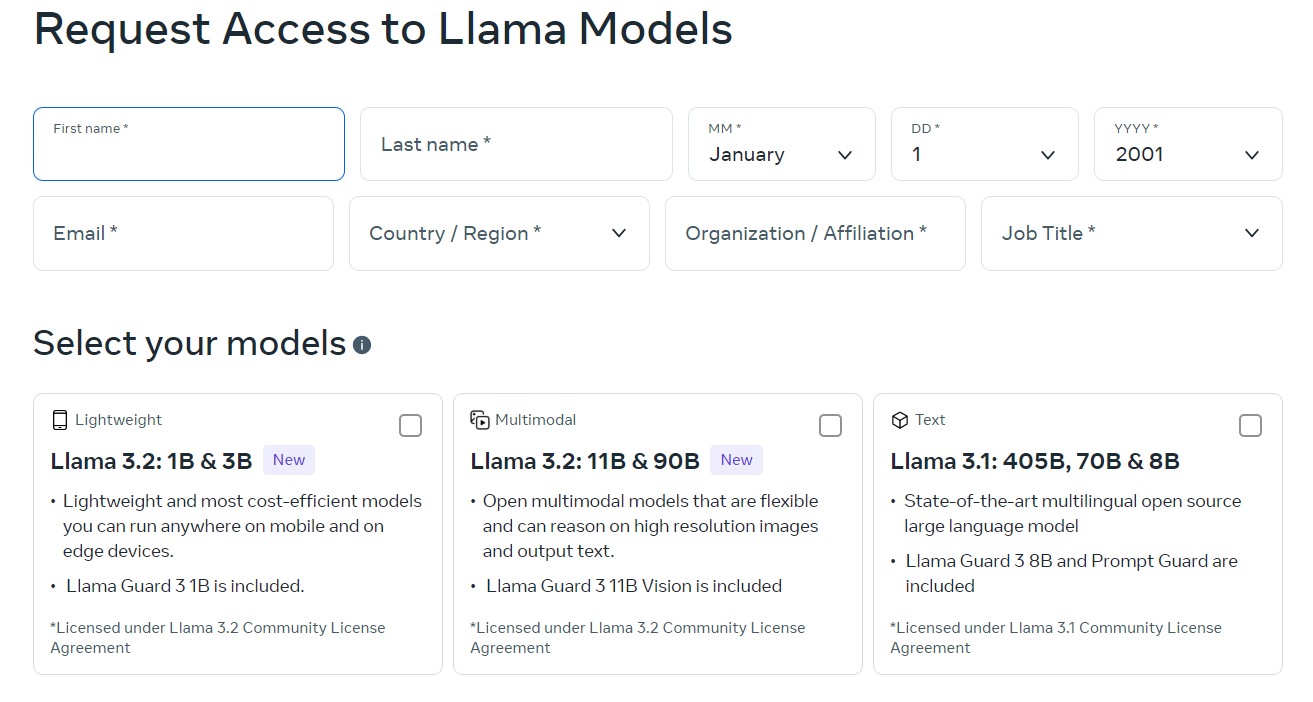
步骤 2:填写请求表单以访问 Llama 模型
要下载和使用 Llama 模型,您需要填写一个请求表单。为此:
- 访问 Llama 下载页面,并填写所有必填字段。

- 选择您的模型(这里我们为了简单和轻量级使用 Llama 2)并点击表单中的下一步。
- 接受Llama 2 的条款和条件,然后点击“接受并继续”。
- 您已完成设置。
步骤 3:获取访问令牌
- 访问您的 Hugging Face 账户。
- 点击右上角的个人资料照片,您将进入“设置”页面。
- 导航到访问令牌
- 点击创建新令牌
- 例如将其命名为“Llama 访问令牌”
- 勾选用户权限。范围至少应设置为读取以访问受限模型。
- 点击创建令牌
- 复制令牌,您将在下一步中使用它。
步骤 4:使用令牌在脚本中进行身份验证
获得 Hugging Face 令牌后,必须在 Python 脚本中使用此令牌进行身份验证。
首先,如果您尚未安装,请安装所需的软件包:
!pip install transformers huggingface_hub torch
从 Hugging Face Hub 导入登录方法,并使用您的令牌登录:
from huggingface_hub import login
# Set your_token to your token
login(token=" <your_token>")
或者,如果您不想交互式登录,可以在加载模型时直接在代码中传递您的令牌。
步骤 5:更新代码以使用令牌加载模型
使用您的令牌加载受限模型。
令牌可以直接传递给 from_pretrained() 方法。
from transformers import AutoModelForCausalLM, AutoTokenizer
from huggingface_hub import login

token = "your_token"
# Login with your token (put <your_token> in quotes)
login(token=token)

# Loading tokenizer and model from gated repository and using auth token
tokenizer = AutoTokenizer.from_pretrained('meta-llama/Llama-2-7b-hf', token=token)
model = AutoModelForCausalLM.from_pretrained('meta-llama/Llama-2-7b-hf', token=token)
步骤 6:运行代码
插入令牌并登录或在模型加载函数中传递令牌后,您的脚本现在应该能够访问受限存储库并从 Llama 模型中获取文本。
运行您的第一个 Llama 脚本
我们已经创建了令牌和其他身份验证;现在是时候运行您的第一个 Llama 脚本了。您可以使用预训练的 Llama 模型进行文本生成。我们使用 Llama-2-7b-hf,它是 Llama 2 模型之一。
from transformers import AutoModelForCausalLM, AutoTokenizer
#import tokenizer and model
tokenizer = AutoTokenizer.from_pretrained('meta-llama/Llama-2-7b-hf', token=token)
model = AutoModelForCausalLM.from_pretrained('meta-llama/Llama-2-7b-hf', token=token)
#Encode input text and generate
input_text = "The future of AI is"
input_ids = tokenizer.encode(input_text, return_tensors="pt")
outputs = model.generate(input_ids, max_length=50, num_return_sequences=1)

# Decode and print output
print(tokenizer.decode(outputs[0], skip_special_tokens=True))
输出
The future of AI is a subject of great interest, and it is not surprising
that many people are interested in the subject. It is a very interesting
topic, and it is a subject that is likely to be discussed for many years to come
生成文本 - 上述脚本生成一个文本序列,表示 Llama 如何解释上下文以及创建连贯的写作。
总结
凭借其基于 Transformer 的架构、多头注意力和自回归生成功能,Llama 令人印象深刻。计算效率和模型性能之间的平衡使得 Llama 适用于广泛的自然语言处理任务。熟悉 Llama 最重要的组件和架构将使您有机会尝试生成文本、翻译、摘要等等。