- 文件系统模块
- PhantomJS - 属性
- PhantomJS - 方法
- 系统模块
- PhantomJS - 属性
- Web 服务器模块
- PhantomJS - 属性
- PhantomJS - 方法
- 其他
- 命令行界面
- PhantomJS - 截屏
- PhantomJS - 网页自动化
- PhantomJS - 网络监控
- PhantomJS - 测试
- PhantomJS - REPL
- PhantomJS - 示例
- PhantomJS 有用资源
- PhantomJS - 快速指南
- PhantomJS - 有用资源
- PhantomJS - 讨论
PhantomJS - 示例
在本章中,我们提供了一些更实际的示例,以便理解 PhantomJS 的一些重要特性。
示例 1 - 查找页面速度
在此示例中,我们将使用 PhantomJS 查找任何给定页面 URL 的页面速度。
var page = require('webpage').create(),
   system = require('system'),
   t, address;

if (system.args.length === 1) {
   console.log('Usage: loadspeed.js <some URL>');
   phantom.exit(1);
} else {
   t = Date.now();
   address = system.args[1];

   page.open(address, function (status) {
      if (status !== 'success') {
         console.log('FAIL to load the address');
      } else {
         t = Date.now() - t;

         console.log('Page title is ' + page.evaluate(function () {
            return document.title;
         }));
         console.log('Loading time ' + t + ' msec');
      }
      phantom.exit();
   });
}
以上程序会生成以下输出。
命令 − phantomjs pagespeed.js http://www.google.com
Page title is Google
Loading time 1396 msec
示例 2 - 向页面发送点击事件
在以下示例中,我们将使用 PhantomJS 向页面发送点击事件。
var page = require('webpage').create();
page.onConsoleMessage = function(str) {
   console.log(str);
}
page.open('http://phantomjs.org/api/phantom/', function(status) {
   page.render('beforeclick.png');
   console.log(page.url);

   var element = page.evaluate(function() {
      return document.querySelector('img[src = "http://phantomjs.org/img/phantomjslogo.png"]');
   });
   page.sendEvent('click', element.offsetLeft, element.offsetTop, 'left');

   window.setTimeout(function () {
      console.log(page.url);
      page.render('afterclick.png');
      phantom.exit();
   }, 5000);
   console.log('element is ' + element);
});
以上程序会生成以下输出。
http://phantomjs.org/api/phantom/
element is [object Object]
http://phantomjs.org/
我们的程序将在bin 文件夹中创建以下两个png 图像。这两个图像显示了执行以上程序前后之间的差异。
示例 3 - 提交表单
以下示例展示了如何使用 PhantomJS 提交表单。
var wpage = require('webpage').create();
wpage.open("https:///tasks/submitform.html", function(status) {
   console.log(status);
   wpage.uploadFile('input[name = fileToUpload]', 'output.png');
   wpage.render("sform.png");

   var element = wpage.evaluate(function() {
      return document.querySelector('input[type = "submit"]');
      // getting details of submit button using queryselector.
   });
   wpage.sendEvent('click', element.offsetLeft, element.offsetTop, 'left');

   // sendevent is used to send click event and also giving the left and top
      position of the submit button.

   window.setTimeout(function () {
      console.log(wpage.url);
      wpage.render("submit.png");  // screenshot is saved in submit.png
      phantom.exit();
   }, 5000);
   console.log('element is ' + element);
});
submitform.html
以下代码显示了如何使用submitform.html 文件。
<html>
   <head>
      <title>Window 2</title>
   </head>

   <body>
      <form action = "submitform.php" method = "post" enctype = "multipart/form-data"
         id = "form1">
         <input type = "file" name = "fileToUpload" id = "fileToUpload">
         <input type = "submit" value = "Upload Image" name = "submit">
      </form>
   </body>

</html>
提交表单后,会转到submitform.php。
submitform.php
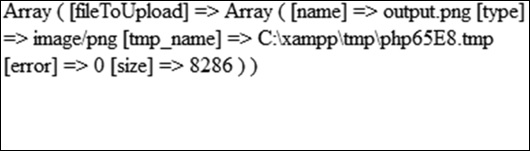
submitform.php 只是打印文件详情。
<?php
   print_r($_FILES);
?>
以上程序会生成以下输出。
Success
element is [object Object]
https:///tasks/submitform.php
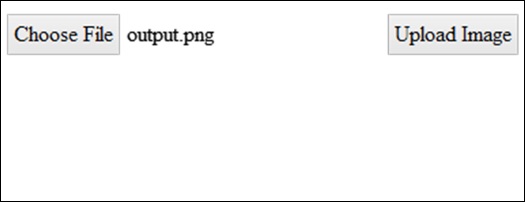
图像
以下是用于文件上传和表单提交的图像。
广告