
 数据结构
数据结构 网络
网络 关系数据库管理系统 (RDBMS)
 操作系统
操作系统 Java
Java iOS
iOS HTML
HTML CSS
CSS Android
 Python
 C语言编程
C语言编程 C++
C++ C#
C# MongoDB
 MySQL
MySQL Javascript
 PHP
PHP电位器及示例
本文将通过两个不同的示例演示如何使用ESP32使用电位器。第一个示例使用微调电位器将电压变化范围控制在0到3V之间。第二个示例在Wokwi模拟器上使用滑杆电位器来控制伺服电机。Wokwi模拟器是一款软件,可用于运行代码并虚拟测试结果,而无需购买组件。实际组件图通常与Wokwi中使用的组件图不同,因此图1给出了实际滑杆电位器的外观。
示例1:使用微调电位器将电压更改为0到3V/5V之间。
电路设计步骤和编码
步骤1 − 首先将ESP32微控制器放置在面包板上。
步骤2 − 现在将电位器插入面包板。
步骤3 − 将电位器的正极连接到ESP32的3V3/Vin引脚。将电位器的负极连接到ESP32的GND引脚。电位器的侧引脚是可以互换的。
步骤4 − 使用Arduino编写C程序来控制电压,并将电位器的中间引脚连接到ESP32的D13引脚。
步骤5 − 使用USB数据线将ESP32连接到计算机。
步骤6 − 编译并将代码传输到ESP32,并在串口监视器上检查结果。
示例2:使用滑杆电位器控制伺服电机。
电路设计步骤和编码
步骤1 − 在Wokwi模拟器上启动一个新的ESP32项目。
步骤2 − 将ESP32放置在虚拟电路区域。
步骤3 − 将电位器连接到ESP32。将其GND连接到ESP32的GND,将其Vin连接到ESP32的3V3,将其第三个引脚连接到ESP32的D26。
步骤4 − 将伺服电机连接到ESP32。将其GND连接到ESP32的GND,将其Vin连接到ESP32的3V3,将其第三个引脚连接到ESP32的D27。
步骤5 − 使用Wokwi编写C程序,并从库选项卡中包含库<ESP32Servo.h>。
步骤6 − 使用Wokwi上的播放按钮编译程序。
步骤7 − 通过更改滑块设置来检查伺服电机角的运动结果。
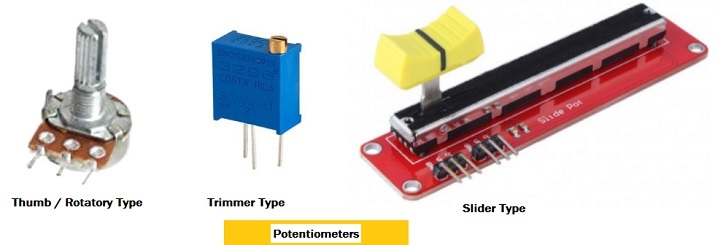
电位器的类型
电位器是一种可以控制和调节电压的设备。它有多种形式,例如滑杆式、微调式和旋钮式。
示例1:使用微调电位器将电压更改为0到3V/5V之间
微调电位器通常用于一次性固定电位器的控制设置,因为旋转螺丝很困难,但是,在这个编程示例中,旋转螺丝的任务用于在查看结果的同时更改电压。电路是使用Arduino软件制作的,程序也是使用Arduino软件编写的。
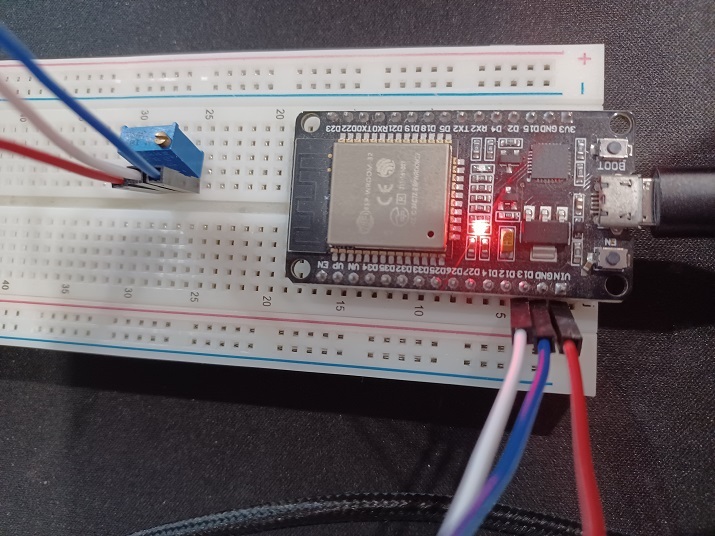
图2:电位器电路图。
代码
// function for mapping input range to output range
float mapTwoRanges(float reading_x, float minInput, float maxInput, float minOutput, float maxOutput) {
   return (reading_x - minInput) * (maxOutput - minOutput) / (maxInput - minInput) + minOutput;
}
void setup() {
   //baud rate setting
   Serial.begin(9600);
}
void loop() {

   // reading the analog value using ESP32 pin D4 or D13
   //int analog_val = analogRead(4);

   int analog_val = analogRead(13);

   // get the voltage between 0 and 3 V by rotating the screw of the potentiometer
   float result_volts = mapTwoRanges(analog_val, 0, 4095, 0, 3);

   // Check these readings below in the Serial Monitor
   Serial.print("Analog: ");
   Serial.print(analog_val);
   Serial.print(", Voltage: ");
   Serial.println(result_volts);
   delay(1000);
}
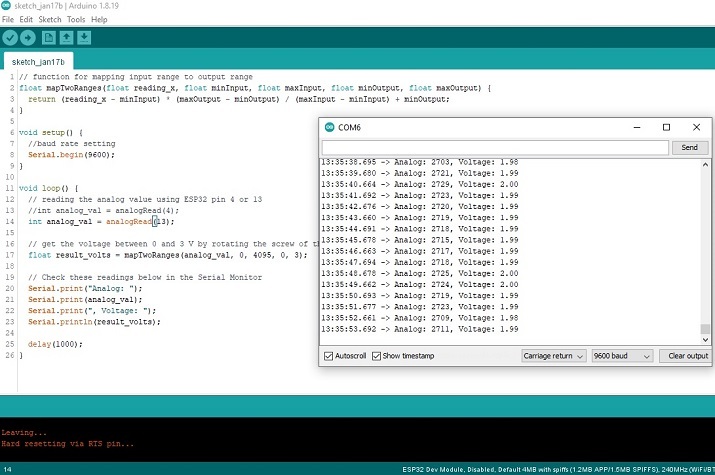
查看结果 - 示例1
一旦代码编译并传输/上传到ESP32,就可以看到结果。
示例2:使用滑杆电位器控制伺服电机
滑杆电位器通常用于通过滑动来固定或调整电位器的设置。在这个编程示例中,滑杆用于在查看结果的同时更改伺服电机角的位置。电路使用Wokwi模拟器虚拟制作,程序使用C语言编写。
代码
//The required library
#include <ESP32Servo.h>
const byte servoObjMotorPin = 27;
const byte potentiometerReadingentiometerPin = 26;
Servo servoObj;
void setup(){

   // baud rate specification
   Serial.begin(115200);

   // attach the 27 ESP32 pin
   servoObj.attach(servoObjMotorPin);
   servoObj.write(0);
   delay(1000);
}
void loop(){

   //Getting the analog reading of the potentiometer
   int potentiometerReading = analogRead(potentiometerReadingentiometerPin);

   //getting the resulting angle by mapping the potentiometer analog reading
   int angleResult = map(potentiometerReading , 0 , 4095 , 0 , 180);

   //Changing the angle for the horn of the servomotor
   servoObj.write(angleResult);
   delay(10);
}
查看结果 - 示例2
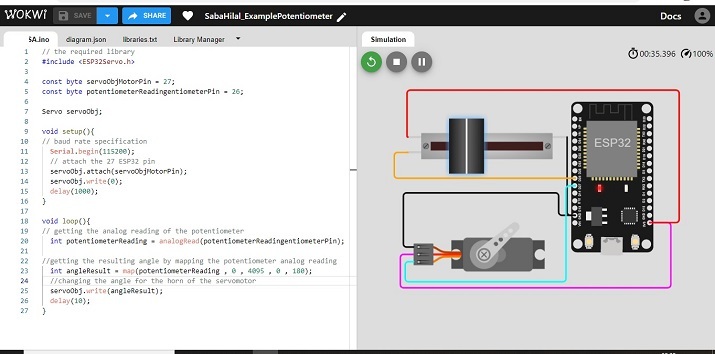
图3:显示Wokwi在线模拟器上用于电位器和伺服电机控制的虚拟电路。
本文通过两个不同的示例介绍了使用ESP32使用电位器的方法。首先,介绍了将微调电位器与ESP32模拟引脚连接的方法。在第二个示例中,使用Wokwi在线模拟器制作了一个带有电位器和伺服电机的虚拟电路。首先,使用电位器控制电压,并将其映射到0到180度之间的角度,然后将其用于控制伺服电机的角位置。

浏览量:532
