- PySimpleGUI 教程
- PySimpleGUI - 首页
- PySimpleGUI - 简介
- PySimpleGUI - 环境设置
- PySimpleGUI - Hello World
- PySimpleGUI - 弹出窗口
- PySimpleGUI - 窗口类
- PySimpleGUI - 元素类
- PySimpleGUI - 事件
- PySimpleGUI - 菜单栏
- PySimpleGUI - Matplotlib 集成
- PySimpleGUI - 使用 PIL
- PySimpleGUI - 调试器
- PySimpleGUI - 设置
- PySimpleGUI 有用资源
- PySimpleGUI - 快速指南
- PySimpleGUI - 有用资源
- PySimpleGUI - 讨论
PySimpleGUI - 输入元素
这种部件在任何 GUI 工具包中都非常流行。输入元素基于 Tkinter 中的 Entry 部件。此类的对象提供单行文本输入字段。
除了常用属性外,Input 元素特有的属性如下:
| 序号 | 属性及描述 |
|---|---|
| 1 | default_text 最初显示在输入框中的文本,作为默认值 |
| 2 | disabled 设置元素的禁用状态 |
| 3 | use_readonly_for_disable 如果为 True(默认值),则 tkinter 状态设置为“只读”。否则状态设置为“禁用” |
| 4 | password_char 如果这是一个密码字段,则为密码字符 |
Input 类定义了 **get()** 方法,该方法返回用户输入的文本。**update()** 方法更改 Input 元素的某些设置。定义了以下属性:
| 序号 | 属性及描述 |
|---|---|
| 1 | value 在输入字段中显示为默认文本的新文本 |
| 2 | disabled 元素的禁用或启用状态 |
| 3 | select 如果为 True,则文本将被选中 |
| 4 | visible 更改元素的可见性 |
| 5 | move_cursor_to 将光标移动到特定偏移量。默认为“end” |
| 6 | password_char 如果这是一个密码字段,则为密码字符 |
| 7 | paste 如果为 True,则将值“粘贴”到元素中,而不是替换整个元素。如果任何内容被选中,则会被替换。文本将插入到当前光标位置。 |
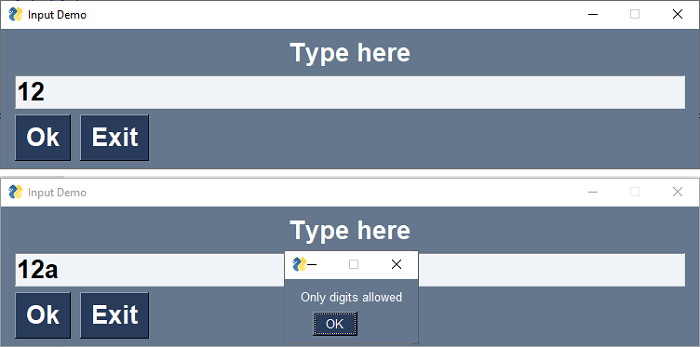
在下面的示例中,窗口包含一个 Input 元素来接受用户输入。它被编程为仅接受数字。如果按下任何非数字键,则会弹出一个消息,告知不允许这样做。为此,将 Input 的最后一个字符与由数字字符组成的字符串进行比较。如果按下的最后一个键不是数字,则将其从 Input 框中删除。
import PySimpleGUI as psg
l1 = psg.Text('Type here', key='-OUT-', font=('Arial Bold', 20), expand_x=True, justification='center')
t1 = psg.Input('', enable_events=True, key='-INPUT-', font=('Arial Bold', 20), expand_x=True, justification='left')
b1 = psg.Button('Ok', key='-OK-', font=('Arial Bold', 20))
b2 = psg.Button('Exit', font=('Arial Bold', 20))
layout = [[l1], [t1], [b1, b2]]
window = psg.Window('Input Demo', layout, size=(750, 150))
while True:
   event, values = window.read()
   print(event, values)
   if event == '-INPUT-':
      if values['-INPUT-'][-1] not in ('0123456789'):
         psg.popup("Only digits allowed")
         window['-INPUT-'].update(values['-INPUT-'][:-1])
   if event == psg.WIN_CLOSED or event == 'Exit':
      break
window.close()
它将生成以下 **输出** 窗口:
多行元素
如果要输入包含多行的文本,可以使用 Multiline 元素代替 Input 元素。实际上,它既用作输入元素也用作输出元素。如果输入/显示文本的长度超过输入/显示文本的高度/宽度,则元素将出现滚动条。
以下属性特定于 Multiline 元素:
| 序号 | 属性及描述 |
|---|---|
| 1 | default_text 显示的初始文本 |
| 2 | autoscroll 如果为 True,则元素的内容将在更多数据添加到末尾时自动滚动 |
| 3 | auto_size_text 如果为 True(默认值),则 tkinter 状态设置为“只读”。否则状态设置为“禁用” |
| 4 | horizontal_scroll 控制是否应显示水平滚动条。如果为 True,则除了垂直滚动条外,还将显示水平滚动条 |
| 5 | reroute_stdout 如果为 True,则所有输出到 stdout 的内容都将输出到此元素 |
| 6 | reroute_cprint 如果为 True,则您的 cprint 调用将输出到此元素。 |
| 7 | no_scrollbar 如果为 False,则将显示垂直滚动条(默认值) |
与 Input 元素一样,Multiline 类也有一个 **get()** 方法来检索其文本内容。**Update()** 方法更改此元素某些属性的值。例如:
**value** - 要显示的新文本
**append** - 如果为 True,则新值将添加到当前值的末尾。如果为 False,则内容将被替换。
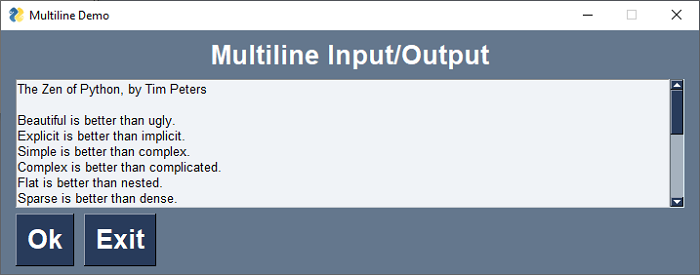
在以下示例中,使用 Multiline 文本框显示文本文件的内容:
import PySimpleGUI as psg
file = open("zen.txt")
text = file.read()
l1 = psg.Text('Multiline Input/Output', font=('Arial Bold', 20), expand_x=True, justification='center')
t1 = psg.Multiline(text, enable_events=True, key='-INPUT-', expand_x=True, expand_y=True, justification='left')
b1 = psg.Button('Ok', key='-OK-', font=('Arial Bold', 20))
b2 = psg.Button('Exit', font=('Arial Bold', 20))
layout = [[l1], [t1], [b1, b2]]
window = psg.Window('Multiline Demo', layout, size=(715, 250))
while True:
   event, values = window.read()
   if event == psg.WIN_CLOSED or event == 'Exit':
      break
window.close()
程序将生成以下 **输出** 窗口: