
- Python Falcon 教程
- Python Falcon - 首页
- Python Falcon - 简介
- Python Falcon - 环境搭建
- Python Falcon - WSGI vs ASGI
- Python Falcon - Hello World (WSGI)
- Python Falcon - Waitress
- Python Falcon - ASGI
- Python Falcon - Uvicorn
- Python Falcon - API 测试工具
- 请求 & 响应
- Python Falcon - 资源类
- Python Falcon - 应用类
- Python Falcon - 路由
- Falcon - 后缀响应器
- Python Falcon - Inspect 模块
- Python Falcon - Jinja2 模板
- Python Falcon - Cookie
- Python Falcon - 状态码
- Python Falcon - 错误处理
- Python Falcon - Hook
- Python Falcon - 中间件
- Python Falcon - CORS
- Python Falcon - WebSocket
- Python Falcon - SQLAlchemy 模型
- Python Falcon - 测试
- Python Falcon - 部署
- Python Falcon 有用资源
- Python Falcon 快速指南
- Python Falcon - 有用资源
- Python Falcon - 讨论
Python Falcon 快速指南
Python Falcon - 简介
Falcon 是一个用于开发关键型 REST API 和微服务的 Python 库。它支持 WSGI 和 ASGI 规范。Falcon 框架由 Kurt Griffiths 于 2013 年 1 月开发。Falcon 的最新版本是 3.1.0,于 2022 年 3 月发布。
Falcon 是一个轻量级的 Web 开发框架。其极简主义的设计允许开发者根据需要选择最佳策略和第三方包。
Falcon - 重要特性
Falcon 在 Apache 2.0 许可证条款下发布。
Falcon 的一些重要特性包括:
最新版本的 Falcon 支持 ASGI、WSGI 和 WebSocket。
Falcon 提供对 asyncio 的原生支持。
其稳定的接口确保向后兼容性。
Falcon 遵循 REST 架构风格来构建 API。
基于类的 HTTP 资源构建。
高度优化的、可扩展的代码库。
Falcon 通过请求和响应类提供对标头和正文的轻松访问。
提供中间件组件和钩子用于 DRY 请求处理。
惯用的 HTTP 错误响应和异常处理。
Falcon - 设计理念
Falcon 最大限度地减少了对象的实例化数量,以避免创建对象的开销并减少内存使用。同一实例将用于服务到达该路由的所有请求。
异常由资源响应器(例如 on_get()、on_post() 等方法)正确处理。Falcon 不会努力保护响应器代码免受自身影响。高质量的 Falcon API 应满足以下要求:
资源响应器将响应变量设置为合理的值。
您的代码经过充分测试,具有较高的代码覆盖率。
每个响应器中都提供了自定义错误处理程序来预测、检测和处理错误。
Falcon 框架是线程安全的。为每个传入的 HTTP 请求创建单独的新请求和响应对象。但是,附加到路由的每个资源类的单个实例在所有请求之间共享。中间件对象、钩子和自定义错误处理程序也是共享的。因此,您的 WSGI 应用整体将是线程安全的。
从 3.0 版本开始,Falcon 支持 asyncio。使用 falcon.asgi.App 类创建异步应用程序,并通过 ASGI 应用程序服务器(例如 Uvicorn)提供服务。
Falcon 的异步版本支持 ASGI WebSocket 协议。
Falcon - 与其他框架的比较
Python Web 框架主要分为两大类:全栈式和微型框架。
全栈式框架带有内置功能和库。Django、Turbogears 和 Web2Py 是全栈式框架。
相比之下,微型框架非常简洁,只提供最基本的功能;因此,它使开发者可以自由选择官方或第三方的扩展,并且只包含他们需要的插件。Flask、Falcon、Pyramid 属于微型框架类别。
我们根据以下参数比较 Falcon 框架与不同的框架:
性能
与 Flask 和 Pyramid 等微型框架相比,Falcon 应用程序非常快。全栈式框架通常较慢。
REST 支持
Falcon 旨在成为开发 REST API 和微服务的首选框架。FastAPI 也鼓励 REST 开发。Flask 和 Django 没有内置的 REST 支持。但是,可以使用扩展来启用它。
模板引擎
Falcon 应用不应提供模板网页。它没有捆绑任何模板库。但是,可以使用 jinja2 或 Mako 库。另一方面,Flask 内置支持 jinja2。Django 有自己的模板库。FastAPI 也能处理任何选择的模板库。
数据库支持
在 Falcon 中,数据库支持不是内置的。可以使用 SQLAlchemy 模型与关系数据库(如 MySQL、PostgreSQL、SQLite 等)进行交互。另一方面,Django 有自己的 ORM 框架,可以直接使用。
Flask 应用程序也可以通过 Flask 扩展与数据库交互。早期版本的 TurboGears 与 SQLObject ORM 库兼容。较新的版本与 SQLAlchemy 兼容。
灵活性
Falcon 应用程序非常灵活。它非常适合需要高度自定义和性能调整的应用程序。FastAPI 和 Flask 也易于编写代码,并且不会限制用户使用特定的项目或代码布局。
安全性
Falcon 没有内置的安全支持。Django 和 FastAPI 等其他框架确保高度安全性。Flask 也提供了针对 CSRF 和 XSS 等安全威胁的出色保护。
测试
Falcon 使用 unittest 和 Pytest 提供内置测试支持。Flask 和 Django 也支持 unittest。FastAPI 支持 unittest 和 starlette 测试功能。
Python Falcon - 环境搭建
最新版本的 Falcon 需要 Python 3.5 或更高版本。安装 Falcon 最简单也是推荐的方法是使用 PIP 安装程序,最好是在虚拟环境中。
可以通过运行以下命令安装最新稳定版本:
pip3 install falcon
要验证安装是否成功,请导入库并检查其版本。
>>> import falcon
>>>falcon.__version__
'3.1.0'
要安装最新的 Beta 版本,应使用以下命令:
pip3 install --pre falcon
从早期版本开始,Falcon 就支持 WSGI。可以使用 Python 标准库模块 wsgiref 中的内置 WSGI 服务器运行 Falcon 应用程序。但是,它不适合生产环境,为此需要 gunicorn、waitress 或 uwsgi 等 WSGI 服务器。
对于 Windows 上的 Falcon,可以使用 Waitress,这是一个生产级的纯 Python WSGI 服务器。像往常一样,使用 pip 安装程序安装它。
pip3 install waitress
Gunicorn 服务器无法安装在 Windows 上。但是,它可以在 Windows 10 上的 Windows Subsystem Linux (WSL) 环境中使用。要在 Linux、WSL 或 Docker 容器内使用 gunicorn,请使用
pip3 install gunicorn
如果要运行异步 Falcon 应用程序,则需要 ASGI 兼容的应用程序服务器。Uvicorn 服务器可以在 Windows 和 Linux 系统上使用。
pip3 install uvicorn
Python Falcon - WSGI vs ASGI
Web 服务器网关接口 (WSGI)
一些最流行的 Python Web 框架实现了 WSGI(代表 Web Server Gateway Interface)。WSGI 本质上是一组规范,用于 Web 服务器和 Web 应用程序之间的通用接口,由 Web 服务器软件实现,用于处理来自基于 Python 的 Web 应用程序的请求。WSGI 规范于 2003 年(PEP 333)首次推出,后来于 2010 年(PEP 3333)更新。
服务器通过传递以下参数来调用 WSGI 应用程序对象:
environ - 一个类似于 CGI 环境变量和某些 WSGI 特定变量的 Python dict 对象。
start_response - 一个回调函数,应用程序可以使用它来返回其响应以及标头和状态代码。
此对象可以是 Python 中的任何可调用对象,例如函数、方法、类或具有 __call__() 方法的实例。此应用程序对象必须返回一个由单个字节字符串组成的迭代器。
def application (environ, start_response):
   ...
   ...
   return [("Hello World!".encode("utf-8")]
但是,由于 WSGI 启用服务器的操作是同步的,因此应用程序效率不高。Python 通过将 asyncio 模块作为标准库的一部分引入,从 3.4 版本开始支持异步编程。
asyncio 模块提供在 Python 应用程序中整合并发编程风格的能力(通常称为协作式多任务处理)。在这种方法中,操作系统不会阻塞不同进程之间的上下文切换。相反,一个进程会定期让出以适应其他进程,以便许多应用程序可以同时运行。
在 Python 3.5 版本中,添加了这两个关键字 async 和 await。使用 async 关键字定义的 Python 函数成为 协程,因此不能像普通函数一样运行。相反,我们需要使用 asyncio.run(coroutine) 来调用它。协程的执行可以通过 await 关键字暂停,直到另一个协程完成。
import asyncio
async def main():
   print('hello')
   await asyncio.sleep(5)
   print('world')

asyncio.run(main())
异步服务器网关接口 (ASGI)
ASGI 代表 Asynchronous Server Gateway Interface(根据其官方文档,它是 WSGI 的继承者),它为 Python Web 服务器、应用程序和框架添加了异步功能。
ASGI 应用程序是一个异步可调用对象(用户定义的函数或具有 __call__() 方法的类的对象)。它接受三个参数,如下所示:
Scope - 包含特定连接详细信息的 dict。
Send - 一个异步可调用对象,应用程序可以使用它向客户端发送事件消息。
Receive - 另一个异步可调用对象。应用程序可以从中接收来自客户端的事件消息。
以下是异步函数表示的简单 ASGI 应用程序的原型:
async def app(scope, receive, send):
   assert scope['type'] == 'http'
   await send({
   'type': 'http.response.start',
   'status': 200,
   'headers': [
      [b'content-type', b'text/plain'],
   ],
})
await send({
   'type': 'http.response.body',
   'body': b'Hello, world!',
})
Python Falcon - Hello World (WSGI)
要创建一个简单的 Hello World Falcon 应用,首先导入库并声明 App 对象的实例。
import falcon
app = falcon.App()
Falcon 遵循 REST 架构风格。声明一个资源类,其中包含一个或多个表示标准 HTTP 动词的方法。下面的 **HelloResource** 类包含 **on_get()** 方法,该方法在服务器接收到 **GET** 请求时会被调用。该方法返回“Hello World”响应。
class HelloResource:
   def on_get(self, req, resp):
   """Handles GET requests"""
   resp.status = falcon.HTTP_200
   resp.content_type = falcon.MEDIA_TEXT
   resp.text = (
      'Hello World'
   )
要调用此方法,我们需要将其注册到路由或 URL。Falcon 应用程序对象通过 **add_rule** 方法将处理程序方法分配给相应的 URL 来处理传入的请求。
hello = HelloResource()
app.add_route('/hello', hello)
Falcon 应用程序对象只不过是一个 WSGI 应用程序。我们可以使用 Python 标准库 wsgiref 模块中的内置 WSGI 服务器。
from wsgiref.simple_server import make_server

if __name__ == '__main__':
   with make_server('', 8000, app) as httpd:
   print('Serving on port 8000...')
# Serve until process is killed
httpd.serve_forever()
示例
让我们将所有这些代码片段放在 **hellofalcon.py** 中
from wsgiref.simple_server import make_server

import falcon

app = falcon.App()

class HelloResource:
   def on_get(self, req, resp):
      """Handles GET requests"""
      resp.status = falcon.HTTP_200
      resp.content_type = falcon.MEDIA_TEXT
      resp.text = (
         'Hello World'
      )
hello = HelloResource()

app.add_route('/hello', hello)

if __name__ == '__main__':
   with make_server('', 8000, app) as httpd:
   print('Serving on port 8000...')
# Serve until process is killed
httpd.serve_forever()
从命令提示符运行此代码。
(falconenv) E:\falconenv>python hellofalcon.py
Serving on port 8000...
输出
在另一个终端中,运行 Curl 命令如下:
C:\Users\user>curl localhost:8000/hello
Hello World
您也可以打开浏览器窗口并输入上述 URL 以获得“Hello World”响应。

Python Falcon - Waitress
不建议在生产环境中使用开发服务器。开发服务器效率低、不稳定且不安全。
Waitress 是一个生产级的纯 Python WSGI 服务器,性能非常出色。除了 Python 标准库中的依赖项之外,它没有任何其他依赖项。它运行在 Unix 和 Windows 上的 CPython 上。
确保 Waitress 服务器已安装在工作环境中。该库包含 serve 类,其对象负责处理传入的请求。serve 类的构造函数需要三个参数。
serve (app, host, port)
Falcon 应用程序对象是 app 参数。host 和 port 的默认值分别是 localhost 和 8080。listen 参数是一个字符串,是 **host:port** 参数的组合,默认为 '0.0.0.0:8080'
示例
在 **hellofalcon.py** 代码中,我们导入 **serve** 类而不是 **simple_server**,并实例化其对象如下:
from waitress import serve
import falcon
class HelloResource:
   def on_get(self, req, resp):
   """Handles GET requests"""
   resp.status = falcon.HTTP_200
   resp.content_type = falcon.MEDIA_TEXT
   resp.text = (
      'Hello World'
   )
app = falcon.App()
hello = HelloResource()
app.add_route('/hello', hello)
if __name__ == '__main__':
   serve(app, host='0.0.0.0', port=8000)
执行 **hellofalcon.py** 并访问浏览器中的 **https://:8000/hellolink**,如前所述。请注意,host 0.0.0.0 使 localhost 对公众可见。
Waitress 服务器也可以从命令行启动,如下所示:
waitress-serve --port=8000 hellofalcon:app
Python Falcon - ASGI
ASGI 代表 Asynchronous Server Gateway Interface(根据其官方文档,它是 WSGI 的继承者),它为 Python Web 服务器、应用程序和框架添加了异步功能。
要运行异步 Web 应用程序,我们需要一个 ASGI 应用程序服务器。流行的选择包括:
- Uvicorn
- Daphne
- Hypercorn
在本教程中,我们将使用 **Uvicorn** 服务器进行 **async** 示例。
Hello World - ASGI
Falcon 的 ASGI 相关功能在 falcon.asgi 模块中可用。因此,我们需要在开始时导入它。
import falcon
import falcon.asgi
虽然资源类与之前的示例相同,但 on_get() 方法必须使用 async 关键字声明。我们必须获取 Falcon 的 ASGI 应用程序的实例。
app = falcon.asgi.App()
示例
因此,用于 ASGI 的 hellofalcon.py 将如下所示:
import falcon
import falcon.asgi
class HelloResource:
   async def on_get(self, req, resp):
      """Handles GET requests"""
      resp.status = falcon.HTTP_200
      resp.content_type = falcon.MEDIA_TEXT
      resp.text = (
         'Hello World'
      )
app = falcon.asgi.App()
hello = HelloResource()
app.add_route('/hello', hello)
要运行应用程序,请从命令行启动 Uvicorn 服务器,如下所示:
uvicorn hellofalcon:app –reload
输出
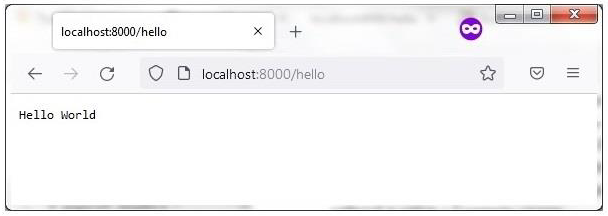
打开浏览器并访问 **https://:8000/hello**。您将在浏览器窗口中看到响应。
Python Falcon - Uvicorn
Uvicorn 使用 **uvloop** 和 **httptools** 库。它还提供对 HTTP/2 和 WebSockets 的支持,而 WSGI 无法处理这些协议。**uvloop** 类似于内置的 **asyncio** 事件循环。**httptools** 库处理 http 协议。
Falcon 的 ASGI 兼容应用程序在 Uvicorn 服务器上启动,命令如下:
Uvicorn hellofalcon:app – reload
**--reload** 选项启用调试模式,以便 app.py 中的任何更改都会自动反映出来,并且客户端浏览器上的显示也会自动刷新。此外,可以使用以下命令行选项:
| --host TEXT | 将套接字绑定到此主机。[默认值 127.0.0.1] |
| --port INTEGER | 将套接字绑定到此端口。[默认值 8000] |
| --uds TEXT | 绑定到 UNIX 域套接字。 |
| --fd INTEGER | 绑定到此文件描述符的套接字。 |
| --reload | 启用自动重新加载。 |
| --reload-dir PATH | 显式设置重新加载目录,默认为当前工作目录。 |
| --reload-include TEXT | 监视文件时包含文件。默认包含 '*.py' |
| --reload-exclude TEXT | 监视文件时排除文件。 |
| --reload-delay FLOAT | 上次检查和下次检查之间的延迟,默认为 0.25 |
| --loop [auto|asyncio|uvloop] | 事件循环实现。[默认值 auto] |
| --http [auto|h11|httptools] | HTTP 协议实现。[默认值 auto] |
| --interface auto|asgi|wsgi | 选择应用程序接口。[默认值 auto] |
| --env-file PATH | 环境配置文件。 |
| --log-config PATH | 日志配置文件。支持的格式为 **.ini、.json、.yaml**。 |
| --version | 显示 Uvicorn 版本并退出。 |
| --app-dir TEXT | 在指定的目录中查找 APP,默认为当前目录 |
| --help | 显示此消息并退出。 |
Uvicorn 服务器也可以从程序内部启动,而不是使用上述命令行。为此,导入 **uvicorn** 模块并调用 **uvicorn.run()** 方法,如下所示:
import uvicorn
if __name__ == "__main__":
   uvicorn.run("hellofalcon:app", host="0.0.0.0", port=8000, reload=True)
相应地更改 hellofalcon.py 代码,并从命令提示符执行相同的代码。结果可以通过 curl 命令或浏览器验证,如前所述。
Python Falcon - API 测试工具
Falcon 是一个极简主义框架,适用于开发 API。API 是两个应用程序之间的接口。API 开发人员需要在将其发布到生产环境之前测试其功能、可靠性、稳定性、可扩展性和性能等。
为此目的,可以使用各种 API 测试工具。在本节中,我们将学习如何使用命令行工具 **Curl** 和 **HTTPie**,以及一个名为 **Postman** 的 GUI 工具。
cURL
cURL 是一个开源项目,它提供 libcurl 库和一个名为 curl 的命令行工具,该工具可以使用各种协议传输数据。支持 20 多种协议,包括 HTTP。缩写 cURL 代表 Client URL。从命令行使用 Curl 的语法如下:
curl [options] [URL1, URL2,..]
URL 参数由协议相关的一个或多个 URL 字符串组成。Curl 命令可以使用各种选项进行自定义。一些重要的命令行选项如下:
**–X**: 指定请求方法。默认情况下,Curl 假设 GET 为请求方法。要发送 POST、PUT 或 DELETE 请求,必须使用此选项。例如:
Curl –X DELETE https://:8000/student/1
**–H**: 此选项用于在请求中添加标头。例如:
Curl –H "Content-Type: application/json" -X GET
https://:8000/students
**–i**: 当此选项包含在命令行中时,将显示所有响应标头。例如:
Curl –I –X DELETE https://:8000/student/2
**–d**: 要包含要在 HTTP 请求中进行处理的数据,我们必须使用此选项,尤其是在需要 POST 或 PUT 请求时。
Curl –H "Content-Type: application/json" -X PUT -d
"{"""marks""":"""50"""}" https://:8000/students/3
HTTPie
HTTPie 是一个用 Python 编写的命令行工具。据说它是一个“面向人类的类似 cURL 的工具”。它支持表单和文件上传,并生成格式良好的彩色终端输出。与 Curl 相比,其表达性和直观的语法使其更易于使用。
示例
**GET 请求** - http GET localhost:8000/students
**POST 请求** - http POST localhost:8000/students id=4 name="aaa" percent=50
**PUT 请求** - http PUT localhost:8000/students/2 id=3 name="Mathews" percent=55
**DELETE 请求** - http DELETE localhost:8000/students/2
Postman
Postman 是一款非常流行的 API 测试工具。它是一个 GUI 应用程序,而不是 Curl 和 HTTPie。它以浏览器插件和桌面应用程序的形式提供。由于浏览器插件不接受针对基于 localhost 的 API 的请求,因此我们需要从 https://www.postman.com/downloads. 下载桌面版本。
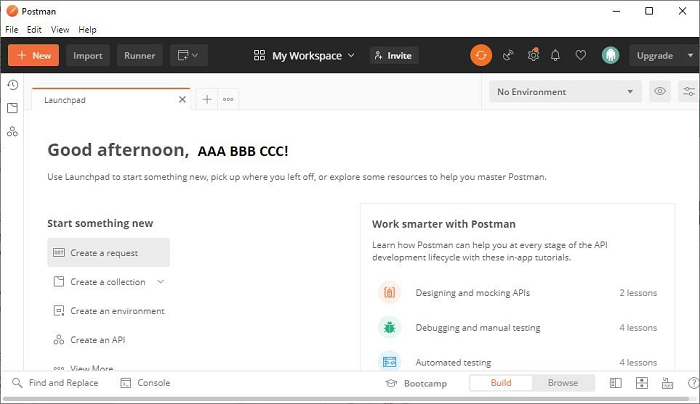
完成基于向导的安装后,启动 Postman 应用程序并创建一个新的请求。
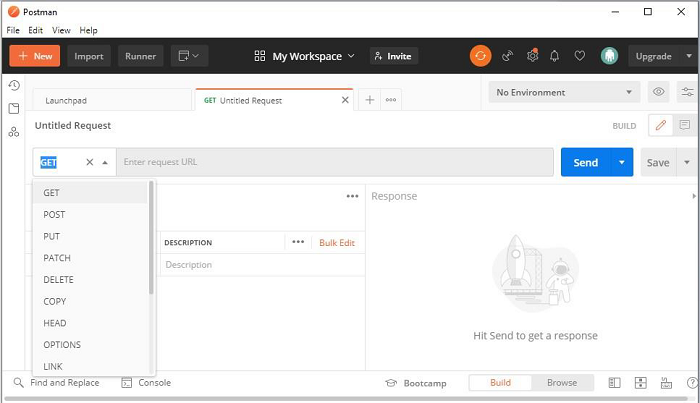
下拉菜单显示各种 HTTP 请求类型供选择。
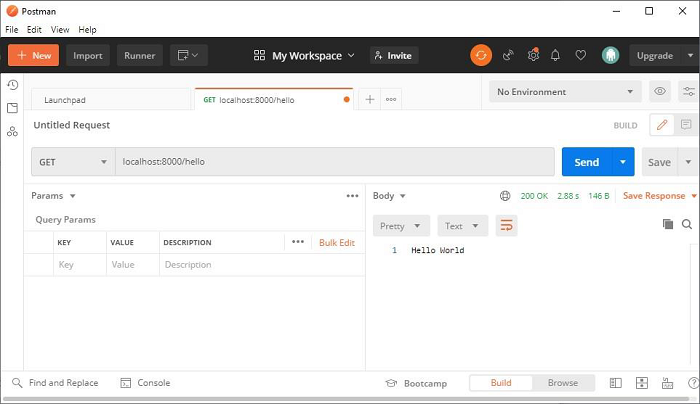
在请求 URL 字段中输入 **https://:8000/hello**。右侧的响应窗格显示结果。
当我们测试 Falcon API 对 SQLite 数据库的 CRUD 操作时,稍后我们将使用相应的请求类型。
Python Falcon - 请求和响应
HTTP 协议规定客户端向服务器发送 HTTP 请求,在服务器上应用某些业务逻辑并制定响应,然后将响应重定向到客户端。对于两者之间的同步传输,Python 框架使用 WSGI 标准,而异步传输遵循 ASGI 标准。Falcon 支持两者。
WSGI/ASGI 服务器在上下文数据中提供 Request 和 Response 对象。响应器、钩子、中间件等使用这些对象作为参数。对于 WSGI 应用程序,处理 **falcon.Request** 类的实例。在 ASGI 应用程序中,它表示 **falcon.asgi.Request** 类。虽然不同,但这两个类都被设计为具有相似的属性和方法,以最大限度地减少混淆并允许更容易的移植性。
请求
Request 对象表示 HTTP 请求。由于它由服务器提供,因此此对象并非旨在由响应器方法直接实例化。此对象提供以下属性和方法,可在响应器、钩子和中间件方法中使用:
**method** - 请求的 HTTP 方法(例如,“GET”、“POST”等)
**host** - Host 请求头字段
**port** - 用于请求的端口。返回给定模式的默认端口(HTTP 为 80,HTTPS 为 443)
**uri** - 请求的完全限定 URI。
**path** - 请求 URI 的路径部分(不包括查询字符串)。
**query_string** - 请求 URI 的查询字符串部分,不包含前导 '?' 字符。
**cookies** - 名/值 Cookie 对的字典。
**content_type** - Content-Type 标头的值,如果标头缺失则为 None。
**stream** - 用于读取请求正文(如果有的化)的文件式输入对象。此对象提供对服务器数据流的直接访问,并且不可搜索。
**bounded_stream** - stream 的文件式包装器
**headers** - 来自请求的原始 HTTP 标头
**params** - 请求查询参数名称与其值的映射。
**get_cookie_values(name)** - 返回 Cookie 标头中为指定 Cookie 提供的所有值。cookies 属性的别名。
**get_media()** - 返回请求流的反序列化形式。类似于 media 属性。
**get_param(name)** - 将查询字符串参数的原始值作为字符串返回。如果使用 **application/x-wwwform-urlencoded** 媒体类型发布了 HTML 表单,则 Falcon 可以自动从请求正文解析参数并将它们合并到查询字符串参数中。要启用此功能,请通过 **App.req_options** 将 **auto_parse_form_urlencoded** 设置为 True。
响应
Response 对象表示服务器对客户端的 HTTP 响应。与 Request 对象一样,Response 对象也不应由响应器直接实例化。
响应器、钩子函数或中间件方法通过访问以下属性和方法来操作此对象:
**status** - HTTP 状态代码,例如“200 OK”。这可以设置为 **http.HTTPStatus** 的成员、HTTP 状态行字符串或字节字符串或整数。Falcon 提供了许多常用状态代码的常量,以 HTTP_ 开头,例如:**falcon.HTTP_204**。
**media** - 通过 **falcon.RequestOptions** 配置的媒体处理程序支持的可序列化对象。
**text** - 表示响应内容的字符串。
**body** - text 的已弃用别名。
**data** - 表示响应内容的字节字符串。
**stream** - 表示响应内容的文件式对象。
**content_length** - 设置 Content-Length 标头。当未设置 text 或 data 属性时,它会手动设置内容长度。
**content_type** - 设置 Content-Type 标头。Falcon 的常用媒体类型的预定义常量包括 falcon.MEDIA_JSON、falcon.MEDIA_MSGPACK、falcon.MEDIA_YAML、falcon.MEDIA_XML、falcon.MEDIA_HTML、falcon.MEDIA_JS、falcon.MEDIA_TEXT、falcon.MEDIA_JPEG、falcon.MEDIA_PNG 和 falcon.MEDIA_GIF。
append_header (name, value) − 为此响应设置或追加标头。用于设置cookie。
delete_header (name) − 删除先前为此响应设置的标头。
get_header (name) − 检索给定标头的原始字符串值。
set_cookie (name, value) − 设置响应cookie。此方法可以多次调用以向响应添加一个或多个cookie。
set_header (name, value) − 将此响应的标头设置为给定值。
set_stream (stream, content_length) − 设置流和内容长度。
unset_cookie (name, domain=None, path=None) − 在响应中取消设置cookie。此方法清除cookie的内容,并指示用户代理立即过期其自己的cookie副本。
Python Falcon - 资源类
Falcon的设计借鉴了REST架构风格的几个关键概念。REST代表表述性状态转移(Representational State Transfer)。REST定义了Web应用程序的架构应该如何运行。
REST是一种基于资源的架构。在这里,REST服务器托管的所有内容,无论是文件、图像还是数据库表中的行,都被视为资源,它可能具有多种表示形式。REST API提供对这些资源的受控访问,以便客户端可以检索和修改它们。
服务器上的资源应该只有一个统一资源标识符 (URI)。它只标识资源;它不会指定对该资源采取什么操作。相反,用户可以选择一组标准方法。HTTP动词或方法用于对资源进行操作。POST、GET、PUT和DELETE方法分别执行CREATE、READ、UPDATE和DELETE操作。
Falcon使用普通的Python类来表示资源。这样的类充当应用程序中的控制器。它将传入的请求转换为一个或多个内部操作,然后根据这些操作的结果向客户端返回响应。

每个资源类都定义了各种“响应器”方法,每个资源允许的HTTP方法对应一个。响应器名称以“on_”开头,并根据它们处理的HTTP方法命名,例如on_get()、on_post()、on_put()等。
在上文中使用的hellofalcon.py示例代码中,HelloResource(资源类)有一个on_get()响应器方法。响应器必须始终定义至少两个参数以接收Request和Response对象。
import falcon
class HelloResource:
   def on_get(self, req, resp):
      """Handles GET requests"""
      resp.status = falcon.HTTP_200
      resp.content_type = falcon.MEDIA_TEXT
      resp.text = (
         'Hello World'
      )
对于 ASGI 应用,响应器必须是协程函数,即必须用async关键字定义。
class HelloResource:
   async def on_get(self, req, resp):
      """Handles GET requests"""
      resp.status = falcon.HTTP_200
      resp.content_type = falcon.MEDIA_TEXT
      resp.text = (
         'Hello World'
      )
Request对象表示传入的HTTP请求。可以通过此对象访问请求标头、查询字符串参数以及与请求相关的其他元数据。
Response对象表示应用程序对请求的HTTP响应。此对象的属性和方法设置状态、标头和正文数据。它还公开了一个类似字典的上下文属性,用于将任意数据传递给钩子和其他的中间件方法。
请注意,上述示例中的HelloResource只是一个普通的Python类。它可以有任意名称;但是,约定是将其命名为xxxResource。
Python Falcon - 应用类
此类是基于Falcon的WSGI应用程序的主要入口点。此类的实例提供可调用的WSGI接口和路由引擎。
import falcon
app = falcon.App()
此类的__init__()构造函数采用以下关键字参数:
media_type − 初始化RequestOptions和ResponseOptions时使用的媒体类型。Falcon允许轻松自定义internet媒体类型处理。默认情况下,Falcon仅启用对JSON和HTML(URL编码和多部分)表单的处理程序。
falcon.MEDIA_JSON
falcon.MEDIA_MSGPACK
falcon.MEDIA_MULTIPART
falcon.MEDIA_URLENCODED
falcon.MEDIA_YAML
falcon.MEDIA_XML
falcon.MEDIA_HTML
falcon.MEDIA_JS
falcon.MEDIA_TEXT
falcon.MEDIA_JPEG
falcon.MEDIA_PNG
falcon.MEDIA_GIF
request_type − 此参数的默认值为falcon.Request类。
response_type − 此参数的默认值为falcon.Response类。
Falcon支持的其他媒体类型由以下常量表示:
为了使App对象可调用,它的类具有__call__()方法。
__call__(self, env, start_response)
这是一个WSGI应用程序方法。WSGI开发服务器或其他生产服务器(Waitress/Uvicorn)使用此对象启动服务器实例并侦听来自客户端的请求。
App类还定义了add_route()方法。
add_route(self, uri_template, resource)
此方法有助于将URI路径与资源类对象关联。传入的请求根据一组URI模板路由到资源。如果路径与给定路由的模板匹配,则请求将传递给关联的资源进行处理。根据请求方法,将调用相应的响应器方法。
示例
让我们向HelloResource类添加on_post()响应器方法,并测试GET和POST请求的端点。
from waitress import serve
import falcon
import json
class HelloResource:
   def on_get(self, req, resp):
      resp.status = falcon.HTTP_200
      resp.content_type = falcon.MEDIA_TEXT
      resp.text = (
         'Hello World'
      )
   def on_post(self, req, resp):
      data=req.media
      nm=data['name']
      resp.status = falcon.HTTP_200
      resp.content_type = falcon.MEDIA_TEXT
      resp.text = (
         'Hello '+nm
      )
app = falcon.App()
hello = HelloResource()
app.add_route('/hello', hello)
if __name__ == '__main__':
   serve(app, host='0.0.0.0', port=8000)
输出
使用Waitress服务器运行应用程序,并使用Curl检查响应。对于GET请求的响应,使用以下命令:
C:\Users\User>curl localhost:8000/hello
Hello World
我们通过POST方法向/hello URL发送一些数据,如下所示:
C:\Users\User>curl -i -H "Content-Type:application/json" -X
POST -d "{"""name""":"""John"""}" https://:8000/hello
HTTP/1.1 200 OK
Content-Length: 10
Content-Type: text/plain; charset=utf-8
Date: Sun, 17 Apr 2022 07:06:20 GMT
Server: waitress
Hello John
要向静态文件的目录添加路由,Falcon具有add_static_route()方法。
add_static_route(self, prefix, directory, downloadable=False,
fallback_filename=None)
prefix参数是要为此路由匹配的路径前缀。directory参数是要从中提供文件的源目录。如果要包含ContentDisposition标头到响应中,则将downloadable参数设置为True。fallback_filename默认为None,但在找不到请求的文件时可以指定。
add_error_handler()方法用于为一种或多种异常类型注册处理程序。
add_error_handler(self, exception, handler=None)
WSGI 可调用 App 类拥有相同的方法。它在 falcon.asgi 模块中定义。
import falcon.asgi
app=falcon.asgi.App()
请注意, ASGI 应用程序中资源类的响应器必须是协程(用async关键字定义),而不是普通方法。
class HelloResource:
   async def on_get(self, req, resp):
      """Handles GET requests"""
      resp.status = falcon.HTTP_200
      resp.content_type = falcon.MEDIA_TEXT
      resp.text = (
         'Hello World'
      )
Python Falcon - 路由
Falcon采用RESTful架构风格。因此它使用基于资源的路由。资源类负责通过响应器处理HTTP方法,响应器本质上是类方法,其名称以on_开头,以小写的HTTP方法名称结尾(例如,on_get()、on_patch()、on_delete()等)。Falcon Application对象的add_route()方法将其路由器与资源类的实例关联。
在上文中使用的Hellofalcon.py示例中,当客户端分别通过GET和POST方法请求/hello路由时,将调用on_get()和on_post()响应器。
如果没有路由与请求匹配,则会引发HTTPRouteNotFound实例。另一方面,如果路由匹配但资源未为请求的HTTP方法实现响应器,则默认响应器会引发HTTPMethodNotAllowed实例。
字段转换器
Falcon的路由机制允许URL将参数传递给响应器。URL包含三个部分:协议(例如http://或https://),后跟IP地址或主机名。主机名之后第一个/之后的URL剩余部分称为路径或端点。要传递的参数位于端点之后。

这充当资源标识符,例如唯一ID或主键。参数名称用花括号括起来。路径参数的值除了请求和响应外,还会传递给响应器方法中定义的参数。
在下面的示例中,路由器将资源类对象与包含端点后参数的URL关联。
from waitress import serve
import falcon
import json
class HelloResource:
   def on_get(self, req, resp, nm):
      """Handles GET requests"""
      resp.status = falcon.HTTP_200
      resp.content_type = falcon.MEDIA_TEXT
      resp.text = (
         'Hello '+nm
      )
app = falcon.App()
hello = HelloResource()
app.add_route('/hello/{nm}', hello)
if __name__ == '__main__':
   serve(app, host='0.0.0.0', port=8000)
我们可以看到,on_get()响应器方法有一个额外的参数nm来接受从URL路由解析的数据。让我们使用HTTPie工具测试https://:8000/hello/Priya。
>http GET localhost:8000/hello/Priya
HTTP/1.1 200 OK
Content-Length: 11
Content-Type: text/plain; charset=utf-8
Date: Mon, 18 Apr 2022 12:27:35 GMT
Server: waitress
Hello Priya
路径参数解析到的默认数据类型为str(即字符串)。但是,Falcon的路由引擎具有以下内置字段转换器,可以使用它们将其读取为其他数据类型。
IntConverter − 此类在falcon.routing模块中定义。构造函数使用以下参数:
IntConverter(num_digits=None, min=None, max=None)
num_digits − 值必须具有给定的位数。
min − 参数的最小值
max − 参数的最大值。
其中,
例如,以下add_route()函数接受1到100之间的整数作为rollno。
app.add_route('/student/{rollno:int(1,1,100}', StudentResource())
UUIDConverter − falcon.routing模块中的此类将32个十六进制数字的字符串转换为UUID(通用唯一标识符)。
DateTimeConverter − 将参数字符串转换为datetime变量。参数必须是任何被strptime()函数识别的格式的字符串,默认为'%Y-%m-%dT%H:%M:%SZ'。
格式字符串使用以下格式代码:
| %a | 缩写的星期几名称 | Sun, Mon |
| %A | 完整的星期几名称 | Sunday, Monday |
| %d | 月份中的日期,为零填充的十进制数 | 01, 02 |
| %-d | 月份中的日期,为十进制数 | 1, 2.. |
| %b | 缩写的月份名称 | Jan, Feb |
| %m | 月份,为零填充的十进制数 | 01, 02 |
| %B | 完整的月份名称 | January, February |
| %-y | 年份(不含世纪),为十进制数 | 0, 99 |
| %Y | 年份(含世纪),为十进制数 | 2000, 1999 |
| %H | 小时(24小时制),为零填充的十进制数 | 01, 23 |
| %p | 区域设置的AM或PM | AM, PM |
| %-M | 分钟,为十进制数 | 1, 59 |
| %-S | 秒,为十进制数 | 1, 59 |
在下面的示例中,add_route()函数将具有两个参数的URL与Resource对象关联。第一个参数nm默认为字符串。第二个参数age使用IntConverter。
from waitress import serve
import falcon
import json
class HelloResource:
   def on_get(self, req, resp, nm,age):
      """Handles GET requests"""
      retvalue={"name":nm, "age":age}
      resp.body=json.dumps(retvalue)
      resp.status = falcon.HTTP_200
      resp.content_type = falcon.MEDIA_JSON
app = falcon.App()
hello = HelloResource()
app.add_route('/hello/{nm}/{age:int}', hello)
if __name__ == '__main__':
   serve(app, host='0.0.0.0', port=8000)
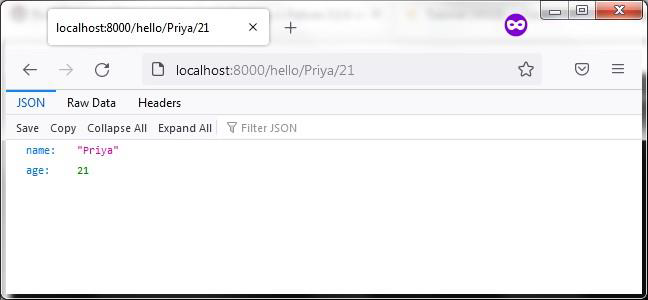
请注意,on_get()响应器使用路径参数来形成dict对象 – retvalue。然后,它的JSON表示形式被赋值为响应正文的值并返回给客户端。如前所述,JSON是Falcon响应对象的默认内容类型。
启动Waitress服务器并使用HTTPie检查URLhttps://:8000/hello/Priya/21的响应。
http GET localhost:8000/hello/Priya/21
HTTP/1.1 200 OK
Content-Length: 28
Content-Type: application/json
Date: Fri, 22 Apr 2022 14:22:47 GMT
Server: waitress {
   "age": 21,
   "name": "Priya"
}
您也可以在浏览器中检查响应,如下所示:
Python Falcon - 后缀响应器
为了理解后缀响应器的概念和需求,让我们定义一个StudentResource类。它包含一个on_get()响应器,该响应器将学生转换为dict对象的列表,并将其作为响应返回。
让我们还添加on_post()响应器,它从传入的请求中读取数据,并在列表中添加一个新的dict对象。
import falcon
import json
from waitress import serve
students = [
   {"id": 1, "name": "Ravi", "percent": 75.50},
   {"id": 2, "name": "Mona", "percent": 80.00},
   {"id": 3, "name": "Mathews", "percent": 65.25},
]
class StudentResource:
   def on_get(self, req, resp):
      resp.text = json.dumps(students)
      resp.status = falcon.HTTP_OK
      resp.content_type = falcon.MEDIA_JSON
   def on_post(self, req, resp):
      student = json.load(req.bounded_stream)
      students.append(student)
      resp.text = "Student added successfully."
      resp.status = falcon.HTTP_OK
      resp.content_type = falcon.MEDIA_TEXT
使用Falcon的App对象的add_route()函数,我们添加/students路由。
app = falcon.App()
app.add_route("/students", StudentResource())
启动服务器后,我们可以从HTTPie命令行测试GET和POST请求:
http GET localhost:8000/students
HTTP/1.1 200 OK
Content-Length: 187
Content-Type: application/json
Date: Mon, 18 Apr 2022 06:21:02 GMT
Server: waitress
[
   {
      "id": 1,
      "name": "Ravi",
      "percent": 75.5
   },
   {
      "id": 2,
      "name": "Mona",
      "percent": 80.0
   },
   {
      "id": 3,
      "name": "Mathews",
      "percent": 65.25
   }
]
http POST localhost:8000/students id=4 name="Prachi"
percent=59.90
HTTP/1.1 200 OK
Content-Length: 27
Content-Type: text/plain; charset=utf-8
Date: Mon, 18 Apr 2022 06:20:51 GMT
Server: waitress
Student added successfully.
再次调用on_get()确认添加了新的学生资源。
http GET localhost:8000/students
HTTP/1.1 200 OK
Content-Length: 187
Content-Type: application/json
Date: Mon, 18 Apr 2022 06:21:02 GMT
Server: waitress
[
   {
      "id": 1,
      "name": "Ravi",
      "percent": 75.5
   },
   {
      "id": 2,
      "name": "Mona",
      "percent": 80.0
   },
   {
      "id": 3,
      "name": "Mathews",
      "percent": 65.25
   },
   {
      "id": "4",
      "name": "Prachi",
      "percent": "59.90"
   }
]
在此阶段,我们希望在StudentResource类中有一个GET响应器方法,它从URL读取id参数并从列表中检索相应的dict对象。
换句话说,格式为/student/{id}的URL应与资源类中的GET方法关联。但显然,一个类不能有两个同名的方法。因此,我们定义使用add_route()方法的suffix参数来区分on_get()响应器的两个定义。
通过指定suffix ='student'向Application对象添加带有id参数的路由。
app.add_route("/students/{id:int}", StudentResource(), suffix='student')
我们现在可以使用此后缀添加另一个on_get()方法的定义,以便此响应器的名称为on_get_student(),如下所示:
def on_get_student(self, req, resp, id):
   resp.text = json.dumps(students[id-1])
   resp.status = falcon.HTTP_OK
   resp.content_type = falcon.MEDIA_JSON
添加新路由和on_get_student()响应器后启动Waitress服务器,并按如下方式测试此URL:
http GET localhost:8000/students/2
HTTP/1.1 200 OK
Content-Length: 42
Content-Type: application/json
Date: Mon, 18 Apr 2022 06:21:05 GMTy
Server: waitress
{
   "id": 2,
   "name": "Mona",
   "percent": 80.0
}
请注意,当客户端使用适当的请求头请求URL路由/students/{id:int}时,也会调用on_put()响应程序(更新资源)和on_delete()响应程序(删除资源)。
我们已经添加了这个路由,后缀为student。因此,on_put_student()方法将路径参数解析为一个整型变量。获取具有给定ID的项目的JSON表示形式,并使用PUT请求中提供的数据进行更新。
def on_put_student(self, req, resp, id):
   student=students[id-1]
   data = json.load(req.bounded_stream)

   student.update(data)
   resp.text = json.dumps(student)
   resp.status = falcon.HTTP_OK
   resp.content_type = falcon.MEDIA_JSON
on_delete_student()响应程序 simply 删除DELETE请求中指定的ID对应的项目。返回剩余资源的列表。
def on_delete_student(self, req, resp, id):
   students.pop(id-1)
   resp.text = json.dumps(students)
   resp.status = falcon.HTTP_OK
   resp.content_type = falcon.MEDIA_JSON
我们可以使用HTTPie命令测试API的PUT和DELETE操作。
http PUT localhost:8000/students/2 id=3 name="Mathews"
percent=55
HTTP/1.1 200 OK
Content-Length: 46
Content-Type: application/json
Date: Sat, 18 Apr 2022 10:13:00 GMT
Server: waitress
{
   "id": "3",
   "name": "Mathews",
   "percent": "55"
}
http DELETE localhost:8000/students/2
HTTP/1.1 200 OK
Content-Length: 92
Content-Type: application/json
Date: Sat, 18 Apr 2022 10:18:00 GMT
Server: waitress
[
   {
      "id": 1,
      "name": "Ravi",
      "percent": 75.5
   },
   {
      "id": 3,
      "name": "Mathews",
      "percent": 65.25
   }
]
此API(studentapi.py)的完整代码如下:
import falcon
import json
from waitress import serve
students = [
   {"id": 1, "name": "Ravi", "percent": 75.50},
   {"id": 2, "name": "Mona", "percent": 80.00},
   {"id": 3, "name": "Mathews", "percent": 65.25},
]
class StudentResource:
   def on_get(self, req, resp):
      resp.text = json.dumps(students)
      resp.status = falcon.HTTP_OK
      resp.content_type = falcon.MEDIA_JSON
   def on_post(self, req, resp):
      student = json.load(req.bounded_stream)
      students.append(student)
      resp.text = "Student added successfully."
      resp.status = falcon.HTTP_OK
      resp.content_type = falcon.MEDIA_TEXT
   def on_get_student(self, req, resp, id):
      resp.text = json.dumps(students[id-1])
      resp.status = falcon.HTTP_OK
      resp.content_type = falcon.MEDIA_JSON
   def on_put_student(self, req, resp, id):
      student=students[id-1]
      data = json.load(req.bounded_stream)

      student.update(data)

      resp.text = json.dumps(student)
      resp.status = falcon.HTTP_OK
      resp.content_type = falcon.MEDIA_JSON
   def on_delete_student(self, req, resp, id):
      students.pop(id-1)
      print (students)
      resp.text = json.dumps(students)
      resp.status = falcon.HTTP_OK
      resp.content_type = falcon.MEDIA_JSON
app = falcon.App()
app.add_route("/students", StudentResource())
app.add_route("/students/{id:int}", StudentResource(), suffix='student')
if __name__ == '__main__':
   serve(app, host='0.0.0.0', port=8000)
Python Falcon - Inspect 模块
inspect模块是一个方便的工具,它提供有关已注册路由以及Falcon应用程序的其他组件(如中间件、接收器等)的信息。
应用程序的检查可以通过两种方式完成:CLI工具和编程方式。falcon-inspect工具CLI脚本从命令行执行,给出声明Falcon应用程序对象的Python脚本的名称。
例如,要检查studentapi.py中的应用程序对象:
falcon-inspect-app studentapi:app
Falcon App (WSGI)
Routes:
   ⇒ /students - StudentResource:
   ├── GET - on_get
   └── POST - on_post
   ⇒ /students/{id:int} - StudentResource:
   ├── DELETE - on_delete_student
   ├── GET - on_get_student
   └── PUT - on_put_student
输出显示已注册的路由和资源类中的响应程序方法。要以编程方式执行检查,请使用应用程序对象作为inspect模块中inspect_app()函数的参数。
from falcon import inspect
from studentapi import app
app_info = inspect.inspect_app(app)
print(app_info)
将上述脚本保存为inspectapi.py,然后从命令行运行它。
python inspectapi.py
Falcon App (WSGI)
Routes:
   ⇒ /students - StudentResource:
   ├── GET - on_get
   └── POST - on_post
   ⇒ /students/{id:int} - StudentResource:
   ├── DELETE - on_delete_student
   ├── GET - on_get_student
   └── PUT - on_put_student
Python Falcon - Jinja2 模板
Falcon库主要用于构建API和微服务。因此,默认情况下,Falcon响应程序返回JSON响应。但是,如果内容类型更改为falcon.MEDIA_HTML,则可以呈现HTML输出。
使用可变数据呈现HTML内容非常繁琐。为此,使用Web模板库。许多Python Web框架都捆绑了特定的模板库。但Falcon作为一个极简的微型框架,并没有预捆绑任何一个。
Jinja2是许多Python框架使用的最流行的模板库之一。在本节中,我们将了解如何在Falcon应用程序中使用Jinja2。Jinja2是一个快速且对设计人员友好的模板语言,易于配置和调试。它的沙箱环境使得防止执行不受信任的代码、禁止潜在的不安全数据以及防止跨站点脚本攻击(称为XSS攻击)变得容易。
Jinja2的另一个非常强大的功能是模板继承,您可以定义一个具有公共设计特征的基模板,子模板可以覆盖这些特征。
首先,使用PIP实用程序在当前Python环境中安装Jinja2。
pip3 install jinja2
Hello World 模板
Jinja2模块定义了一个Template类。通过读取包含HTML脚本的文件(扩展名为.html的文件)的内容来获得Template对象。通过调用此Template对象的render()方法,可以将HTML响应呈现给客户端浏览器。Response对象的content_type属性必须设置为falcon.MEDIA_HTML。
让我们将以下HTML脚本保存为应用程序文件夹中的hello.py。
<html>
   <body>
      <h2>Hello World</h2>
   </body>
</html>
示例
下面的资源类中的on_get()响应程序读取此文件并将其呈现为HTML响应。
import uvicorn
import falcon
import falcon.asgi
from jinja2 import Template
class HelloResource:
   async def on_get(self, req, resp):
      resp.status = falcon.HTTP_200
      resp.content_type = 'text/html'
      fp=open("hello.html","r")
      tempobj=Template(fp.read())
      resp.body=tempobj.render()
app = falcon.asgi.App()
hello = HelloResource()
app.add_route('/hello', hello)
if __name__ == "__main__":
   uvicorn.run("hello:app", host="0.0.0.0", port=8000, reload=True)
输出
运行上述Python代码,并在浏览器中访问https://:8000/hello链接。

模板变量
Jinja2是一个服务器端模板库。网页通过将Jinja2模板语言的各种元素作为占位符放在HTML脚本内的适当分隔符内来构建为模板。模板引擎读取HTML脚本,用服务器上的上下文数据替换占位符,重新组合HTML,并将其呈现给客户端。
Template.render()函数有一个可选的上下文字典参数。此字典的关键属性成为模板变量。这有助于在网页中呈现响应程序传递的数据。
示例
在下面的示例中,路由/hello/nm与资源对象注册,其中nm是路径参数。on_get()响应程序将其作为上下文传递给从网页获得的模板对象。
import uvicorn
import falcon
import falcon.asgi
from jinja2 import Template
class HelloResource:
   async def on_get(self, req, resp, nm):
      resp.status = falcon.HTTP_200
      resp.content_type = 'text/html'
      fp=open("hello.html","r")
      tempobj=Template(fp.read())
      resp.body=tempobj.render({'name':nm})
app = falcon.asgi.App()
hello = HelloResource()
app.add_route('/hello/{nm}', hello)
if __name__ == "__main__":
   uvicorn.run("hello:app", host="0.0.0.0", port=8000, reload=True)
hello.html在一个名为name的模板变量中读取路径参数。它在HTML脚本中充当占位符。它放在{{和}}符号中,以便其值显示为HTML响应。
<html>
   <body>
      <h2>Hello {{ name }}</h2>
   </body>
</html>
输出
运行Python代码并输入https://:8000/hello/Priya作为URL。浏览器将显示以下输出:

Jinja2模板中的循环
如果响应程序传递任何Python可迭代对象,例如列表、元组或字典,则可以使用其循环结构语法在Jinja2模板内遍历其元素。
{% for item in collection %}
HTML block
{% endfor %}
在下面的示例中,on_get()响应程序将students对象(一个dict对象的列表)发送到模板list.html。它依次遍历数据并将其呈现为HTML表格。
import falcon
import json
from waitress import serve
from jinja2 import Template
students = [
   {"id": 1, "name": "Ravi", "percent": 75.50},
   {"id": 2, "name": "Mona", "percent": 80.00},
   {"id": 3, "name": "Mathews", "percent": 65.25},
]
class StudentResource:
   def on_get(self, req, resp):
      resp.status = falcon.HTTP_OK
      resp.content_type = falcon.MEDIA_HTML
      fp=open("list.html","r")
      tempobj=Template(fp.read())
      resp.body=tempobj.render({'students':students})
list.html是一个Jinja2模板。它接收students对象作为字典对象的列表,并将每个键的值放在表格的<td>..</td>元素内。
<html>
<body>
<table border=1>
   <thead> <tr>
      <th>Student ID</th> <th>Student Name</th>
      <th>percentage</th>
      <th>Actions</th>
   </tr> </thead>
   <tbody>
   {% for Student in students %}
   <tr> <td>{{ Student.id }}</td> <td>{{ Student.name }}</td>
      <td>{{ Student.percent }}</td>
      <td>
         <a href="#">Edit</a>
         <a href="#">Delete</a>
      </td> </tr>
   {% endfor %}
   </tbody>
</table>
</body>
</html>
在浏览器的地址栏中访问/students路由。学生列表将在浏览器中呈现。

HTML表单模板
在本节中,我们将了解Falcon如何读取HTML表单中的数据。让我们将以下HTML脚本保存为myform.html。我们将使用它来获取模板对象并呈现它。
<html>
<body>
   <form method="POST" action="https://:8000/students">
   <p>Student Id: <input type="text" name="id"/> </p>
   <p>student Name: <input type="text" name="name"/> </p>
   <p>Percentage: <input type="text" name="percent"/> </p>
   <p><input type="submit"> </p>
</body>
</html>
Falcon App对象在Hello.py文件中声明,该文件还包含一个映射到/adddnew路由的资源类。on_get()响应程序读取myform.html并呈现相同的HTML表单。该表单通过POST方法提交到/students路由。
为了能够读取表单数据,必须将falcon.RequestOptions类的auto_parse_form_urlencoded属性设置为True。
app = falcon.App()
app.req_options.auto_parse_form_urlencoded = True
在这里,我们还从student.py导入StudentResource类。on_get()响应程序呈现学生列表。
当用户填写并提交表单时,将调用on_post()响应程序。此方法在req.params属性中收集表单数据,它只是表单元素及其值的字典。然后附加students字典。
def on_post(self, req, resp):
   student=req.params
   students.append(student)
hello.py的完整代码如下:
import falcon
import json
from waitress import serve
from jinja2 import Template
from student import StudentResource
class MyResource:
   def on_get(self, req, resp):
      resp.status = falcon.HTTP_200
      resp.content_type = 'text/html'
      fp=open("myform.html","r")
      tempobj=Template(fp.read())
      resp.body=tempobj.render()
app = falcon.App()
app.req_options.auto_parse_form_urlencoded = True
form = MyResource()
app.add_route('/addnew', form)
app.add_route("/students", StudentResource())
if __name__ == '__main__':
   serve(app, host='0.0.0.0', port=8000)
包含StudentResource类以及on_get()和on_post()响应程序的student.py如下:
import falcon
import json
from waitress import serve
from jinja2 import Template
students = [
   {"id": 1, "name": "Ravi", "percent": 75.50},
   {"id": 2, "name": "Mona", "percent": 80.00},
   {"id": 3, "name": "Mathews", "percent": 65.25},
]
class StudentResource:
   def on_get(self, req, resp):
      resp.status = falcon.HTTP_OK
      resp.content_type = falcon.MEDIA_HTML
      fp=open("list.html","r")
      tempobj=Template(fp.read())
      resp.body=tempobj.render({'students':students})

   def on_post(self, req, resp):
      student = req.params
      students.append(student)
      resp.text = "Student added successfully."
      resp.status = falcon.HTTP_OK
      resp.content_type = falcon.MEDIA_JSON
从命令行运行hello.py。通过输入http://locLhost:8000/addnew在浏览器中打开HTML表单。

students数据库字典将被附加。访问/students路由。您将看到一个新的行被附加。

多部分表单
为了让用户从本地文件系统选择文件,HTML表单的enctype属性必须设置为multipart/form-data。Falcon使用MultipartFormHandler处理multipart/form-data媒体类型,允许它迭代表单中的主体部分。
BodyPart类具有以下属性:
stream - 仅适用于当前主体部分的流包装器
data - 主体部分内容字节
content_type 如果未指定,则默认为text/plain,符合RFC
text - 当前主体部分解码为文本字符串(仅当类型为text/plain时提供,否则为None)
media - 通过媒体处理程序自动解析,方式与req.media相同
name, filename - 来自Content-Disposition标头的相关部分
secure_filename - 经过清理的文件名,可以在服务器文件系统安全使用。
以下HTML脚本(index.html)是一个多部分表单。
<html>
   <body>
      <form action="https://:8000/hello" method="POST" enctype="multipart/form-data">
         <h3>Enter User name</h3>
         <p><input type='text' name='name'/></p>
         <h3>Enter address</h3>
         <p><input type='text' name='addr'/></p>
         <p><input type="file" name="file" /></p>
         <p><input type='submit' value='submit'/></p>
      </form>
   </body>
</html>
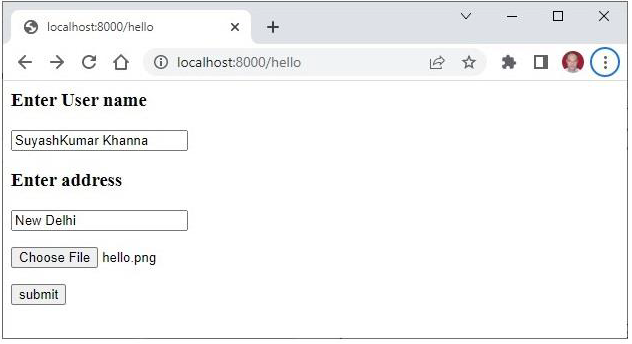
此表单由以下代码中HelloResource类的on_get()响应程序呈现。表单数据提交到on_post()方法,该方法迭代各个部分并发送表单数据的JSON响应。
import waitress
import falcon
import json
from jinja2 import Template
class HelloResource:
   def on_get(self, req, resp):
      resp.status = falcon.HTTP_200
      resp.content_type = 'text/html'
      fp=open("index.html","r")
      tempobj=Template(fp.read())
      resp.body=tempobj.render()

   def on_post(self, req, resp):
      result=[]
      for part in req.media:
         data={"name" :part.name,
            "content type":part.content_type,
            "value":part.text, "file":part.filename}
         result.append(data)
         resp.text = json.dumps(result)
         resp.status = falcon.HTTP_OK
         resp.content_type = falcon.MEDIA_JSON
app = falcon.App()
hello = HelloResource()
app.add_route('/hello', hello)
if __name__ == '__main__':
   waitress.serve(app, host='0.0.0.0', port=8000)
运行上述程序并访问https://:8000/hello链接以呈现如下所示的表单:
填写数据后提交表单时,JSON响应将在浏览器中呈现,如下所示:
[
   {
      "name": "name",
      "content type": "text/plain",
      "value": "SuyashKumar Khanna",
      "file": null
   },
   {
      "name": "addr",
      "content type": "text/plain",
      "value": "New Delhi",
      "file": null
   },
   {
      "name": "file",
      "content type": "image/png",
      "value": null,
      "file": "hello.png"
   }
]
Python Falcon - Cookie
cookie以文本文件的形式存储在客户端的计算机上。其目的是记住和跟踪与客户端使用相关的 数据,以获得更好的访问者体验和网站统计信息。
Request对象包含cookie的属性。它是客户端已传输的所有cookie变量及其对应值的字典对象。除此之外,cookie还存储其过期时间、路径和网站的域名。
在Falcon中,使用set_cookie()方法在响应对象上设置cookie。
resp.set_cookie('cookiename', 'cookievalue')
此外,还可以提供cookie的max_age(以秒为单位)和域名参数。
import falcon
import json
from waitress import serve
class resource1:
   def on_post(self, req, resp):
      resp.set_cookie("user", 'admin')
      resp.text = "cookie set successfully."
      resp.status = falcon.HTTP_OK
      resp.content_type = falcon.MEDIA_TEXT
从命令行调用响应程序方法:
http POST localhost:8000/cookie
HTTP/1.1 200 OK
Content-Length: 24
Content-Type: text/plain; charset=utf-8
Date: Tue, 26 Apr 2022 06:56:30 GMT
Server: waitress
Set-Cookie: user=admin; HttpOnly; Secure
cookie set successfully.
也可以使用响应对象的append_header()方法设置cookie Set-cookie头。
要检索cookie,request对象具有request.cookies属性以及get_cookie_values()方法。
def on_get(self, req, resp):
   cookies=req.cookies
   values = req.get_cookie_values('user')
   if values:
      v = values[0]
      resp.body={"user":v}
   resp.status = falcon.HTTP_OK
   resp.content_type = falcon.MEDIA_JSON
响应对象的unset_cookie方法清除当前请求的cookie。
resp.unset_cookie('user')
对于 ASGI 应用程序,falcon.asgi.Request 实现与 falcon.Request 相同的 cookie 方法和属性。 ASGI 版本的 set_cookie() 和 append_header() 是同步的,因此不需要等待它们。
Python Falcon - 状态码
默认情况下,HTTP服务器对客户端请求的响应具有200 OK状态。Falcon提供了自己的状态常量列表,以提高方便性和可读性。
例如,200 OK状态码表示为:
resp.status = falcon.HTTP_OK
这些预定义的Falcon常量避免了拼写错误,并减少了准备响应时必须创建的字符串对象数量。但是,从Falcon 3.0版本开始,也允许使用裸int代码。
resp.status = 200
对于 ASGI 应用程序,相同的状态代码适用。
以下是Falcon库中定义的一些状态代码:
信息代码
HTTP_CONTINUE = HTTP_100
HTTP_SWITCHING_PROTOCOLS = HTTP_101
HTTP_PROCESSING = HTTP_102
成功状态代码
HTTP_OK = HTTP_200
HTTP_CREATED = HTTP_201
HTTP_ACCEPTED = HTTP_202
HTTP_NON_AUTHORITATIVE_INFORMATION = HTTP_203
HTTP_NO_CONTENT = HTTP_204
HTTP_RESET_CONTENT = HTTP_205
HTTP_PARTIAL_CONTENT = HTTP_206
HTTP_MULTI_STATUS = HTTP_207
HTTP_ALREADY_REPORTED = HTTP_208
HTTP_IM_USED = HTTP_226
重定向错误代码
HTTP_MULTIPLE_CHOICES = HTTP_300
HTTP_MOVED_PERMANENTLY = HTTP_301
HTTP_FOUND = HTTP_302
HTTP_SEE_OTHER = HTTP_303
HTTP_NOT_MODIFIED = HTTP_304
HTTP_USE_PROXY = HTTP_305
HTTP_TEMPORARY_REDIRECT = HTTP_307
HTTP_PERMANENT_REDIRECT = HTTP_308
客户端错误代码
HTTP_BAD_REQUEST = HTTP_400
HTTP_UNAUTHORIZED = HTTP_401 # "未经授权"
HTTP_PAYMENT_REQUIRED = HTTP_402
HTTP_FORBIDDEN = HTTP_403 # "未授权"
HTTP_NOT_FOUND = HTTP_404
HTTP_METHOD_NOT_ALLOWED = HTTP_405
HTTP_NOT_ACCEPTABLE = HTTP_406
HTTP_PROXY_AUTHENTICATION_REQUIRED = HTTP_407
HTTP_REQUEST_TIMEOUT = HTTP_408
HTTP_CONFLICT = HTTP_409
服务器错误代码
HTTP_INTERNAL_SERVER_ERROR = HTTP_500
HTTP_NOT_IMPLEMENTED = HTTP_501
HTTP_BAD_GATEWAY = HTTP_502
HTTP_SERVICE_UNAVAILABLE = HTTP_503
HTTP_GATEWAY_TIMEOUT = HTTP_504
HTTP_HTTP_VERSION_NOT_SUPPORTED = HTTP_505
HTTP_INSUFFICIENT_STORAGE = HTTP_507
HTTP_LOOP_DETECTED = HTTP_508
HTTP_NETWORK_AUTHENTICATION_REQUIRED = HTTP_511
Python Falcon - 错误处理
为了处理各种错误情况,可以使用上述状态代码来处理响应对象。Falcon还提供了一组错误类。当出现相应的运行时错误情况时,可以引发它们的错误对象。
这些错误类都继承自**HTTPError**类作为它们的基类。错误对象引发方式如下例所示:
import falcon
class MyResource:
   def on_get(self, req, resp):
      # some Python code
      raise falcon.HTTPBadRequest(
         title="Value Out of Range",
         description="The value is not between permissible range"
      )
预定义错误类
Falcon提供的一些预定义错误类如下:
**HTTPBadRequest** − 400 错误请求。由于客户端错误(例如请求语法错误、无效的请求消息框架等),服务器无法处理请求。
**HTTPInvalidHeader** − 导致400错误请求,因为请求中的一个或多个头部无效。
**HTTPInvalidParam** − 表示400错误请求。此错误可能指提交给请求的查询字符串、表单或文档中的无效参数。
**HTTPMissingParam** − 请求中缺少参数时引发400错误请求。
**HTTPForbidden** − 服务器理解了请求,但拒绝授权。状态码为403禁止。
**HTTPNotFound** − 当服务器找不到目标资源的当前表示时,会引发404状态码。它不指示这种表示的缺乏是暂时的还是永久的。
**HTTPMethodNotAllowed** − 405 方法不允许。请求行中收到的方法不受目标资源支持。
**HTTPLengthRequired** − 当服务器拒绝在没有定义Content-Length的情况下接受请求时。411 需要长度。错误代码。
**HTTPUnsupportedMediaType** − 如果源服务器由于有效负载采用此方法在目标资源上不支持的格式而拒绝服务请求。等效状态码为415不支持的媒体类型。
**HTTPUnprocessableEntity** − 如果服务器理解请求实体的内容类型并且请求实体的语法正确,但无法处理所包含的指令,则引发的错误状态码为422无法处理的实体。例如,如果XML请求正文包含格式良好但语义错误的XML指令。
**HTTPTooManyRequests** − 当用户在给定时间内发送了过多的请求(“速率限制”)时,会引发429过多请求状态码。
**HTTPInternalServerError** − 一个非常常见的错误情况,导致500内部服务器错误。服务器遇到意外情况,阻止其完成请求。
**HTTPNotImplemented** − 501(未实现)状态码表示服务器不支持完成请求所需的功能。当服务器无法识别请求方法并且无法为任何资源支持它时,这是适当的响应。
**HTTPServiceUnavailable** − 503服务不可用表示服务器目前由于临时过载或计划维护而无法处理请求。
**MediaNotFoundError** − 400错误请求。媒体处理程序在尝试解析空正文时引发此异常。
**MediaMalformedError** − 400错误请求。媒体处理程序在尝试解析格式错误的正文时引发此异常。
重定向
还有一些异常,当引发这些异常时,会触发对客户端的重定向响应。状态码为3xx类型。这些异常由以下类表示,作为**HttpError**的子类,会中断请求处理。
**HTTPMovedPermanently** − 301永久移动。此状态码表示目标资源已分配新的永久URI。
**HTTPFound** − 302已找到状态码,表示目标资源暂时位于不同的URI下。
**HTTPTemporaryRedirect** − 此类引发307(临时重定向)状态码,这意味着目标资源暂时位于不同的URI下,并且如果用户代理对此URI执行自动重定向,则用户代理必须不更改请求方法。
**HTTPPermanentRedirect** − 导致308永久重定向,表示目标资源已分配新的永久URI。
Python Falcon - Hook
钩子是用户定义的函数,在响应客户端请求时调用资源类中的特定响应程序方法时会自动执行。Falcon支持**before**和**after**钩子。
要作为钩子使用的函数,除了任何必要的可选参数外,还使用请求、响应和资源类作为参数进行定义。
def hookfunction(req, resp, resource):
   . . . . .
   . . . . .
通过应用以下装饰器之一,可以将此类函数附加到单个响应程序或整个资源类:
@falcon.before(hookfunction)
@falcon.after(hookfunction)
要将before钩子应用于**on_post()**响应程序:
@falcon.before(hookfunction)
def on_post(self, req, resp):
   . . .
   . . .
要应用after钩子:
@falcon.after(hookfunction)
def on_get(self, req, resp):
   . . .
   . . .
要装饰整个资源类,请在类声明上方使用装饰器:
@falcon.after(hookfunction)
class SomeResource:
 def on_get(self, req, resp):
   . . .
   . . .
   def on_post(self, req, resp):
   . . .
   . . .
在以下示例中,我们有**StudentResource**类,其中已定义**on_get()**和**on_post()**响应程序。当POST请求发送一些数据并且使用它创建的新**dict**对象添加到**Students**列表中时,会调用**on_post()**响应程序。
接收到的数据需要在处理之前进行验证。为此,已定义以下函数。它检查percent参数的值是否在0到100之间。只有当数据通过此条件时,才会将其传递给响应程序。
def checkinput(req, resp, resource,params):
   student = json.load(req.bounded_stream)
   if "name" not in student:
      raise falcon.HTTPBadRequest(
         title="Bad request", description="Bad input, name must be provided."
      )

   per=int(student['percent'])
   if per<0 or per>100:
      raise falcon.HTTPBadRequest(
         title="Bad request", description="Bad input, invalid percentage"
      )
      req.context.data = student
此函数作为钩子应用于**StudentResource**类的**on_post()**响应程序。
import falcon
import json
from waitress import serve
students = [
   {"id": 1, "name": "Ravi", "percent": 75.50},
   {"id": 2, "name": "Mona", "percent": 80.00},
   {"id": 3, "name": "Mathews", "percent": 65.25},
]
class StudentResource:
   def on_get(self, req, resp):
      resp.text = json.dumps(students)
      resp.status = falcon.HTTP_OK
      resp.content_type = falcon.MEDIA_JSON
   @falcon.before(checkinput)
   def on_post(self, req, resp):
      student = json.load(req.context.data)
      students.append(student)
      resp.text = "Student added successfully."
      resp.status = falcon.HTTP_OK
      resp.content_type = falcon.MEDIA_TEXT

   def on_get_student(self, req, resp, id):
      resp.text = json.dumps(students[id-1])
      resp.status = falcon.HTTP_OK
      resp.content_type = falcon.MEDIA_JSON
app = falcon.App()
app.add_route("/students", StudentResource())
if __name__ == '__main__':
   serve(app, host='0.0.0.0', port=8000)
让我们运行**Waitress**服务器并启动POST请求。
http POST localhost:8000/students id=4 percent=50
HTTP/1.1 400 Bad Request
Content-Length: 76
Content-Type: application/json
Date: Tue, 26 Apr 2022 14:49:07 GMT
Server: waitress
Vary: Accept {
   "description": "Bad input, name must be provided.",
   "title": "Bad request"
}
由于数据不包含name参数的值,因此会引发异常。
在如下所示的另一个POST请求中,percent参数的值未能满足所需条件,因此会引发异常。
http POST localhost:8000/students id=4 name="aaa" percent=500
HTTP/1.1 400 Bad Request
Content-Length: 72
Content-Type: application/json
Date: Tue, 26 Apr 2022 15:01:20 GMT
Server: waitress
Vary: Accept {
   "description": "Bad input, invalid percentage",
   "title": "Bad request"
}
Python Falcon - 中间件
**“中间件”**是在处理每个请求(在任何特定响应程序处理之前)以及在返回每个响应之前处理的函数。此函数接收进入应用程序的每个请求。
中间件的工作方式类似于钩子。但是,与钩子不同,中间件方法全局应用于整个应用程序。它可以通过运行其中定义的代码来对请求执行某些处理,然后将请求传递给相应的操作函数进行处理。它还可以在返回生成的响应之前处理操作函数生成的响应。
中间件是一个实现以下一个或多个事件处理程序方法的类。对于WSGI应用程序,这些方法是:
**process_request (self, req, resp)** − 此方法在路由请求之前处理请求。
**process_resource (self, req, resp, resource, params)** − 路由后处理请求。可以传递一个**dict**对象,该对象表示从路由的URI模板字段派生的任何附加参数。
**process_response (self, req, resp, resource, req_succeeded)** − 此方法用于响应的后处理(路由后)。如果未引发异常,则**req_succeeded**参数为True,否则为False。
对于 ASGI 应用程序,除了上述方法外,中间件类还可以定义更多方法。
为了考虑生命周期事件(WSGI规范的一个可选部分),可以包含启动和关闭事件处理程序。
**process_startup (self, scope, event)** − 此方法处理 ASGI 生命周期启动事件。当服务器准备启动并接收连接但尚未开始这样做时,就会调用它。
**process_shutdown(self, scope, event)** − 此方法处理 ASGI 生命周期关闭事件。当服务器停止接受连接并关闭所有活动连接时,就会调用它。
由于 ASGI 应用程序也响应 Websocket 协议下的请求,因此中间件可以定义以下协程方法:
**process_request_ws (self, req, ws)** − 此方法在路由 WebSocket 握手请求之前处理它。
**process_resource_ws (self, req, ws, resource, params)** − 此方法在路由后处理 WebSocket 握手请求。可以将从路由的 URI 模板字段派生的 dict 对象传递给资源的响应程序。
必须在初始化时将中间件类的实例添加到 Falcon 应用程序对象。对于 WSGI Falcon 应用程序:
class MyMiddleware:
   def process_request(self, req, resp):
      pass
   def process_resource(self, req, resp, resource, params):
      pass
   def process_response(self, req, resp, resource, req_succeeded):
      pass
from falcon import App
app=App(middleware=[MyMiddleware()])
对于 ASGI 应用程序:
class MyMiddleware:
   async def process_startup(self, scope, event):
      pass
   async def process_shutdown(self, scope, event):
      pass
   async def process_request(self, req, resp):
      pass
   async def process_resource(self, req, resp, resource, params):
      pass
   async def process_response(self, req, resp, resource, req_succeeded):
      pass
   async def process_request_ws(self, req, ws):
      pass
   async def process_resource_ws(self, req, ws, resource, params):
      pass
from falcon.asgi import App
app=App(middleware=[MyMiddleware()])
Python Falcon - CORS
**“跨源资源共享”(CORS)**是一种情况,其中在一个客户端浏览器上运行的前端应用程序尝试通过 JavaScript 代码与后端通信,而后端位于与前端不同的“源”中。此处的源是协议、域名和端口号的组合。因此,**https://** 和 **https://** 具有不同的来源。
如果具有一个源 URL 的浏览器发送来自另一个源的 JavaScript 代码执行请求,则浏览器会发送 OPTIONS http 请求。如果后端通过发送适当的标头来授权来自此不同源的通信,它将允许前端的 JavaScript 将其请求发送到后端。
要为所有响应启用 CORS 策略,Falcon 应用程序配置如下:
from falcon import App
app=App(cors_enable=True)
要显式指定允许的来源,请导入**CORSMiddleware**并将来源列表添加到应用程序的中间件,以及相应的凭据。
from falcon import App
app = falcon.App(middleware=falcon.CORSMiddleware(allow_origins='example.com', allow_credentials='*')
Python Falcon - WebSocket
**WebSocket** 是客户端和服务器之间持久的连接,用于在两者之间提供双向、**全双工**通信。通信通过单个 TCP/IP 套接字连接通过 HTTP 进行。它可以被视为 HTTP 的升级,而不是协议本身。
HTTP 的一个限制是它是一种严格的半双工或单向协议。另一方面,使用 WebSockets,我们可以发送基于消息的数据,类似于 UDP,但具有 TCP 的可靠性。WebSocket 使用 HTTP 作为初始传输机制,但在收到 HTTP 响应后保持 TCP 连接活动。相同的连接对象可以用于客户端和服务器之间的双向通信。因此,可以使用 WebSocket API 构建实时应用程序。
Falcon 的 WebSocket 支持仅适用于 ASGI 应用程序。要提供 WebSocket 功能,资源类应具有**on_websocket()**响应程序协程。
async def on_websocket(self, req, ws):
   . . .
WebSocket 请求也可以被钩子和中间件拦截。传递 falcon.asgi.WebSocket 对象而不是 Response 对象。
Falcon 中 WebSocket 的工作原理?
以下示例演示了 Falcon 应用程序中 WebSocket 的功能。首先,我们有一个渲染模板的**on_get()**响应程序。
示例
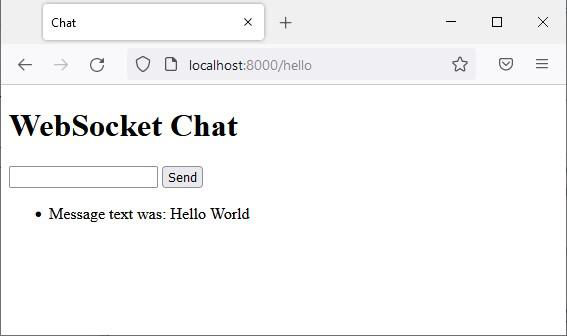
客户端浏览器显示一个带有文本字段和按钮的表单,单击按钮时,将创建**websocket**对象,并触发**on_websocket()**响应程序。它接受用户输入的消息并将其回显到客户端,前缀为“The message text was”。
import falcon
import falcon.asgi
import jinja2
html = """
<!DOCTYPE html>
<html>
   <head>
      <title>Chat</title>
   </head>
   <body>
      <script>
         var ws = new WebSocket("ws://:8000/hello");
         ws.onmessage = function(event) {
            var messages =document.getElementById('messages')
            var message = document.createElement('li')
            var content = document.createTextNode(event.data)
            message.appendChild(content)
            messages.appendChild(message)
         };
         function sendMessage(event) {
            var input = document.getElementById("messageText")
            ws.send(input.value)
            input.value = ''
            event.preventDefault()
         }
      </script>
      <h1>WebSocket Chat</h1>
      <form action="" onsubmit="sendMessage(event)">
         <input type="text" id="messageText" autocomplete="off"/>
         <button>Send</button>
      </form>
      <ul id='messages'></ul>
   </body>
</html>
"""
class HelloResource:
   async def on_get(self, req, resp):
      """Handles GET requests"""
      resp.status = falcon.HTTP_200
      resp.content_type = 'text/html'
      template=jinja2.Template(html)
      resp.body=template.render()
   async def on_websocket(self, req, websocket):
      await websocket.accept()
      while True:
         data = await websocket.receive_text()
         await websocket.send_text(f"Message text was: {data}")
app = falcon.asgi.App()
hello = HelloResource()
app.add_route('/hello', hello)
import uvicorn
if __name__ == "__main__":
   uvicorn.run("main:app", host="0.0.0.0", port=8000, reload=True)
输出
启动 Uvicorn 服务器并访问**https://:8000/ws** URL 以显示聊天表单。

输入一些文本并按**发送**按钮。
Python Falcon - SQLAlchemy 模型
为了演示 Falcon 的响应程序函数(**on_post()、on_get()、on_put()** 和 **on_delete()**)的工作方式,我们对内存数据库(以 Python 字典对象列表的形式)执行了**CRUD**(代表创建、检索、更新和删除)操作。相反,我们可以使用任何关系数据库(例如 MySQL、Oracle 等)来执行存储、检索、更新和删除操作。
我们不使用符合**DB-API**的数据库驱动程序,而是使用**SQLAlchemy**作为 Python 代码和数据库之间的接口(我们将使用 SQLite 数据库,因为 Python 对其有内置支持)。SQLAlchemy 是一个流行的 SQL 工具包和**对象关系映射器**。
对象关系映射是一种编程技术,用于在面向对象的编程语言中转换不兼容类型系统之间的数据。通常,在像 Python 这样的面向对象语言中使用的类型系统包含非标量类型。但是,大多数数据库产品(如 Oracle、MySQL 等)中的数据类型是原始类型,例如整数和字符串。
在ORM系统中,每个类都映射到底层数据库中的一个表。ORM替你处理了这些繁琐的数据库交互代码,让你可以专注于系统逻辑的编程。
为了使用SQLAlchemy,我们需要首先使用PIP安装器安装该库。
pip install sqlalchemy
SQLAlchemy设计用于与为特定数据库构建的DBAPI实现一起工作。它使用方言系统与各种类型的DBAPI实现和数据库进行通信。所有方言都需要安装相应的DBAPI驱动程序。
包含的方言如下:
Firebird
Microsoft SQL Server
MySQL
Oracle
PostgreSQL
SQLite
Sybase
数据库引擎
由于我们将使用SQLite数据库,我们需要为名为test.db的数据库创建一个数据库引擎。从sqlalchemy模块导入create_engine()函数。
from sqlalchemy import create_engine
from sqlalchemy.dialects.sqlite import *
SQLALCHEMY_DATABASE_URL = "sqlite:///./test.db"
engine = create_engine(SQLALCHEMY_DATABASE_URL, connect_args =
{"check_same_thread": False})
为了与数据库交互,我们需要获取它的句柄。会话对象是数据库的句柄。Session类使用sessionmaker()定义——一个可配置的会话工厂方法,它绑定到引擎对象。
from sqlalchemy.orm import sessionmaker, Session
session = sessionmaker(autocommit=False, autoflush=False, bind=engine)
接下来,我们需要一个声明式基类,用于在声明式系统中存储类和映射表的目录。
from sqlalchemy.ext.declarative import declarative_base
Base = declarative_base()
模型类
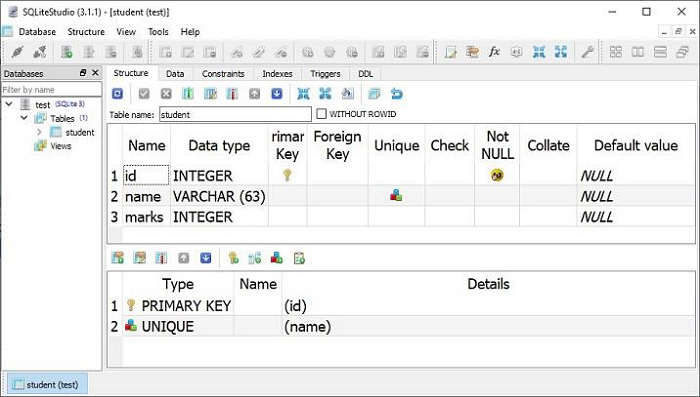
Students是Base的子类,映射到数据库中的students表。Books类中的属性对应于目标表中列的数据类型。请注意,id属性对应于book表中的主键。
class Students(Base):
   __tablename__ = 'student'
   id = Column(Integer, primary_key=True, nullable=False)
   name = Column(String(63), unique=True)
   marks = Column(Integer)
Base.metadata.create_all(bind=engine)
create_all()方法在数据库中创建相应的表。可以使用SQLite可视化工具(如SQLiteStudio)进行确认。
现在,我们需要声明一个StudentResource类,其中定义了HTTP响应方法,用于对students表执行CRUD操作。此类的对象与路由相关联,如下面的代码片段所示:
import falcon
import json
from waitress import serve
class StudentResource:
   def on_get(self, req, resp):
      pass
   def on_post(self, req, resp):
      pass
   def on_put_student(self, req, resp, id):
      pass
   def on_delete_student(self, req, resp, id):
      pass
app = falcon.App()
app.add_route("/students", StudentResource())
app.add_route("/students/{id:int}", StudentResource(), suffix='student')
on_post()
其余代码与内存中的CRUD操作类似,不同之处在于操作函数通过SQLalchemy接口与数据库交互。
on_post()响应方法首先根据请求参数构造Students类的对象,并将其添加到Students模型中。由于此模型映射到数据库中的students表,因此会添加相应的行。on_post()方法如下:
def on_post(self, req, resp):
   data = json.load(req.bounded_stream)
   student=Students(id=data['id'], name=data['name'], marks=data['marks'])
   session.add(student)
   session.commit()
   resp.text = "Student added successfully."
   resp.status = falcon.HTTP_OK
   resp.content_type = falcon.MEDIA_TEXT
如前所述,当收到POST请求时,将调用on_post()响应程序。我们将使用Postman应用程序传递POST请求。
启动Postman,选择POST方法,并将值(id=1,name="Manan"和marks=760)作为主体参数传递。请求成功处理,并将一行添加到students表中。
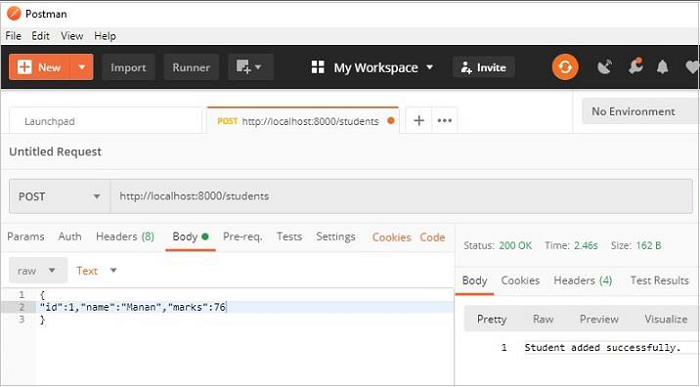
继续发送多个POST请求以添加记录。
on_get()
此响应程序旨在检索Students模型中的所有对象。Session对象上的query()方法检索对象。
rows = session.query(Students).all()
由于Falcon响应程序的默认响应为JSON格式,因此我们必须将上述查询的结果转换为dict对象的列表。
data=[]
for row in rows:
   data.append({"id":row.id, "name":row.name, "marks":row.marks})
在StudentResource类中,让我们添加执行此操作并发送其JSON响应的on_get()方法,如下所示:
def on_get(self, req, resp):
   rows = session.query(Students).all()
   data=[]
   for row in rows:
      data.append({"id":row.id, "name":row.name, "marks":row.marks})
      resp.text = json.dumps(data)
      resp.status = falcon.HTTP_OK
      resp.content_type = falcon.MEDIA_JSON
可以在Postman应用程序中测试GET请求操作。/students URL将显示JSON响应,其中显示students模型中所有对象的数据。
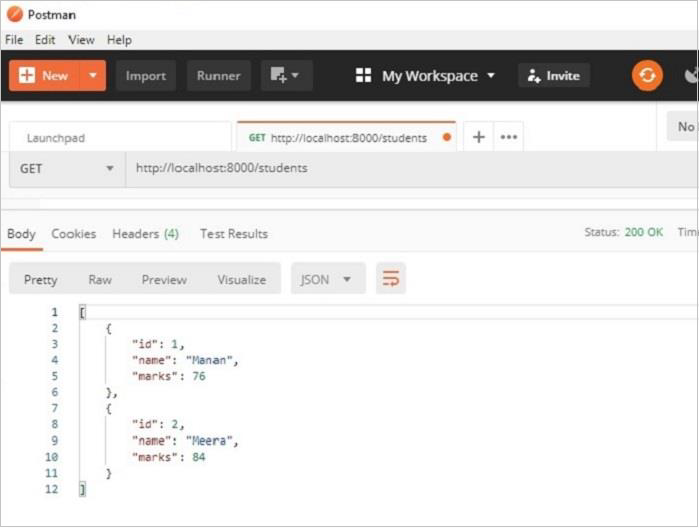
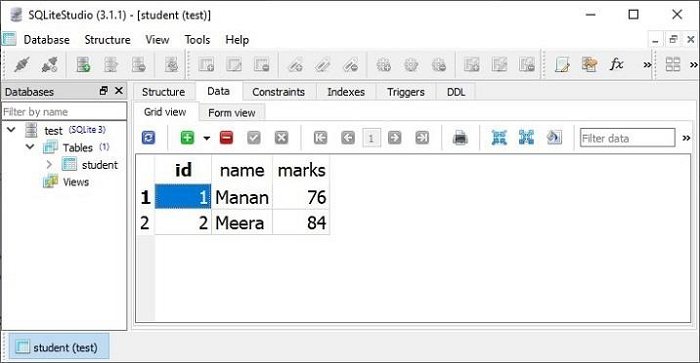
Postman应用程序结果窗格中显示的两条记录也可以在SQLiteStudio的数据视图中进行验证。
on_put()
on_put()响应程序执行UPDATE操作。它响应URL /students/id。为了从Students模型中获取具有给定id的对象,我们将过滤器应用于查询结果,并使用从客户端接收的数据更新其属性的值。
student = session.query(Students).filter(Students.id == id).first()
on_put()方法的代码如下:
def on_put_student(self, req, resp, id):
   student = session.query(Students).filter(Students.id == id).first()
   data = json.load(req.bounded_stream)
   student.name=data['name']
   student.marks=data['marks']
   session.commit()
   resp.text = "Student updated successfully."
   resp.status = falcon.HTTP_OK
   resp.content_type = falcon.MEDIA_TEXT
让我们在Postman的帮助下更新Students模型中id=2的对象,并更改名称和分数。请注意,这些值作为主体参数传递。
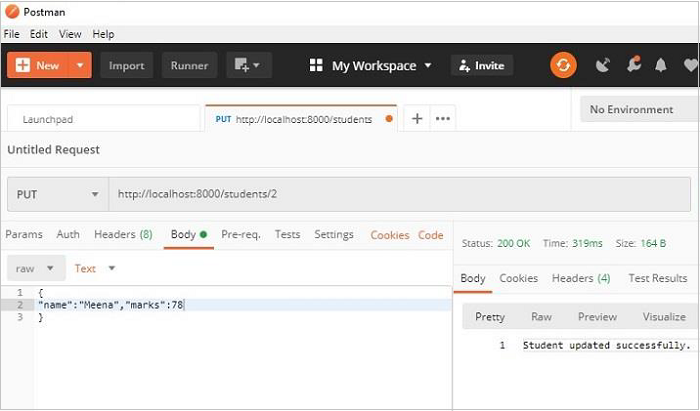
SQLiteStudio中的数据视图显示修改已生效。

on_delete()
最后,DELETE操作很简单。我们需要获取给定id的对象并调用delete()方法。
def on_delete_student(self, req, resp, id):
   try:
      session.query(Students).filter(Students.id == id).delete()
      session.commit()
   except Exception as e:
      raise Exception(e)
      resp.text = "deleted successfully"
      resp.status = falcon.HTTP_OK
      resp.content_type = falcon.MEDIA_TEXT
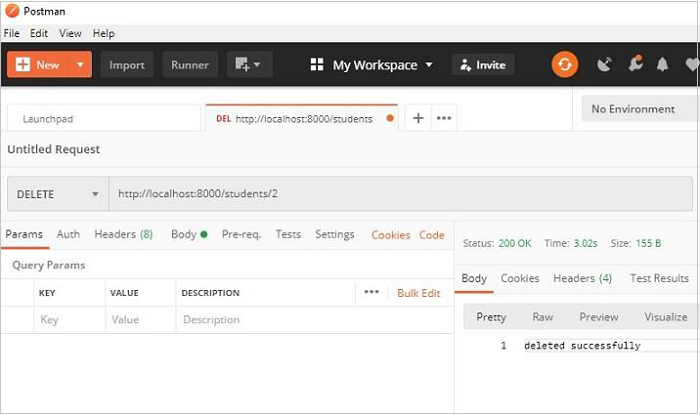
作为on_delete()响应程序的测试,让我们在Postman的帮助下删除id=2的对象,如下所示:
Python Falcon - 测试
Falcon的测试模块是Falcon应用程序的功能测试框架。它包含各种测试类和实用程序函数,以支持功能测试。该测试框架同时支持unittest和pytest。
我们将使用以下脚本(myapp.py)来演示测试功能。它包含一个HelloResource类,该类具有一个on_get()响应程序,该响应程序呈现Hello World的JSON响应。create()函数返回添加了已注册'/' URL路由的Falcon应用程序对象。
from waitress import serve
import falcon
import json
class HelloResource:
   def on_get(self, req, resp):
      """Handles GET requests"""
      resp.text=json.dumps({"message":"Hello World"})

   # This is the default status
   resp.status = falcon.HTTP_200

   # Default is JSON, so override
   resp.content_type = falcon.MEDIA_JSON
def create():
   app = falcon.App()
   hello = HelloResource()
   app.add_route('/', hello)
   return app
app=create()
if __name__ == '__main__':
   serve(app, host='0.0.0.0', port=8000)
使用unittest
testing.TestCase扩展了unittest,以方便对使用Falcon编写的WSGI/ASGI应用程序进行功能测试。我们需要继承此基类并编写测试。
TestCase子类中的测试函数名称为simulate_*(),其中'*'代表HTTP方法,如GET、POST等。这意味着我们必须获取simulate_get()函数的结果,并通过断言函数将其与预期结果进行比较。
simulate_*()函数接收两个参数。
simulate_*(app, route)
以下是test-myapp.py的代码。它执行simulate_get()函数,并将其结果与预期结果进行断言,并指示测试是否失败或通过。
from falcon import testing
import myapp
class MyTestCase(testing.TestCase):
   def setUp(self):
      super(MyTestCase, self).setUp()
      self.app = myapp.create()
class TestMyApp(MyTestCase):
   def test_get_message(self):
      doc = {'message': 'Hello world!'}
      result = self.simulate_get('/')
      self.assertEqual(result.json, doc)
if '__name__'=='__main__':
   unittest.main()
使用以下命令运行上述测试:
python -m unittest test-myapp.py
F
==============================================================
FAIL: test_get_message (test-myapp.TestMyApp)
--------------------------------------------------------------
Traceback (most recent call last):
   File "E:\falconenv\test-myapp.py", line 17, in test_get_message
   self.assertEqual(result.json, doc)
AssertionError: {'message': 'Hello World'} != {'message':
'Hello world!'}
- {'message': 'Hello World'}
? ^
+ {'message': 'Hello world!'}
? ^ +
--------------------------------------------------------------
Ran 1 test in 0.019s
FAILED (failures=1)
使用Pytest
要使用PyTest框架执行测试,需要使用PIP实用程序安装它。
pip3 install pytest
要运行test函数,我们需要一个testing.TestClient类的对象。它模拟WSGI和ASGI应用程序的请求。首先通过将Falcon应用程序对象作为参数来获取此对象。
我们运行simulate_*()函数,并将其结果与预期输出进行断言,以确定测试是否失败或通过。在这两个示例中,测试都由于“Hello World”消息中“W”的大小写不同而失败。响应程序将其返回为大写“W”,而测试函数将其设置为小写。
from falcon import testing
import pytest
import myapp
@pytest.fixture()
def client():
   return testing.TestClient(myapp.create())
def test_get_message(client):
   doc = {'message': 'Hello world!'}
   result = client.simulate_get('/')
   assert result.json == doc
使用以下命令运行上述测试:
pytest test-myapp.py –v
=========== test session starts ==========================
platform win32 -- Python 3.8.6, pytest-7.1.2, pluggy-1.0.0 --
e:\falconenv\scripts\python.exe
cachedir: .pytest_cache
rootdir: E:\falconenv
plugins: anyio-3.5.0
collected 1 item
test-myapp.py::test_get_message FAILED
[100%]
==================== FAILURES =======================
_____________________________________________________
test_get_message
_____________________________________________________
client = <falcon.testing.client.TestClient object at 0x0000000003EAA6A0>
def test_get_message(client):
   doc = {'message': 'Hello world!'}
   result = client.simulate_get('/')
> assert result.json == doc
E AssertionError: assert {'message': 'Hello World'} ==
{'message': 'Hello world!'}
E Differing items:
E {'message': 'Hello World'} != {'message': 'Hello world!'}
E Full diff:
E - {'message': 'Hello world!'}
E ? ^ -
E + {'message': 'Hello World'}
E ? ^
test-myapp.py:42: AssertionError
============ short test summary info ==================
FAILED test-myapp.py::test_get_message - AssertionError:
assert {'message': 'Hello World'} == {'message': 'Hello
world!'}
============ 1 failed in 4.11s ========================
Python Falcon - 部署
可以使用启用了mod_wsgi模块的Apache服务器来部署Falcon Web应用程序,就像任何WSGI应用程序一样。另一种替代方案是使用uWSGI或gunicorn进行部署。
uWSGI是一个快速且高度可配置的WSGI服务器。如果与NGINX一起使用,它可以在生产就绪环境中以速度的形式提供更好的性能。
首先,使用PIP安装程序在Python虚拟环境中安装Falcon和uWSGI,并使用wsgi.py将其公开给uWSGI,如下所示:
import os
import myapp
config = myproject.get_config(os.environ['MYAPP_CONFIG'])
application = myapp.create(config)
要配置uWSGI,请准备如下所示的uwsgi.ini脚本:
[uwsgi]
master = 1
vacuum = true
socket = 127.0.0.1:8080
enable-threads = true
thunder-lock = true
threads = 2
processes = 2
virtualenv = /path/to/venv
wsgi-file = venv/src/wsgi.py
chdir = venv/src
uid = myapp-runner
gid = myapp-runner
现在您可以像这样启动uWSGI:
venv/bin/uwsgi -c uwsgi.ini
尽管uWSGI可以直接处理HTTP请求,但使用反向代理(如NGINX)可能会有所帮助。NGINX原生支持uwsgi协议,可以有效地将请求代理到uWSGI。
安装Ngnix,然后创建一个NGINX配置文件,如下所示:
server {
   listen 80;
   server_name myproject.com;
   access_log /var/log/nginx/myproject-access.log;
   error_log /var/log/nginx/myproject-error.log warn;
   location / {
      uwsgi_pass 127.0.0.1:8080
      include uwsgi_params;
   }
}
最后启动Ngnix服务器。您应该有一个正在运行的应用程序。