从连接到 Arduino 的 SD 卡读取文件
顾名思义,在本教程中,我们将从连接到 Arduino 的 SD 卡读取文件。
电路图
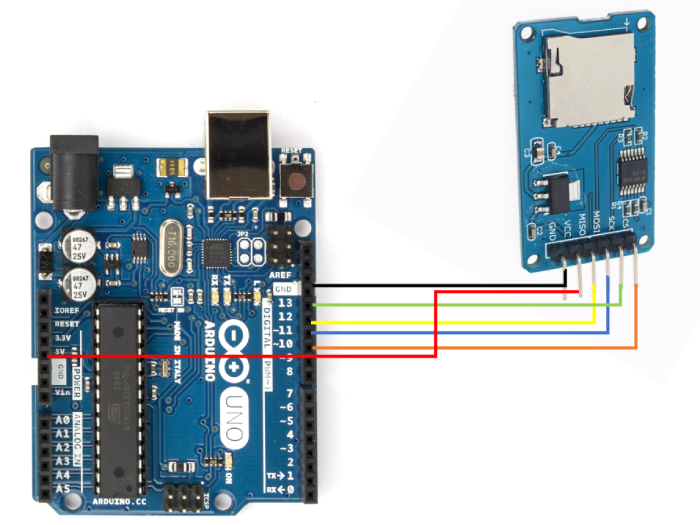
电路图如下所示:

如您所见,您需要进行以下连接:
| SD 卡座 | Arduino Uno |
|---|---|
| Vcc | 5V |
| GND | GND |
| MISO | 12 |
| MOSI | 11 |
| SCK | 13 |
| CS | 10 |
仅对于 Vcc,请确保您的 SD 卡座以 5V 作为输入。如果它接受 3.3V,则将其连接到 Arduino Uno 上的 3.3V 引脚。
代码演练
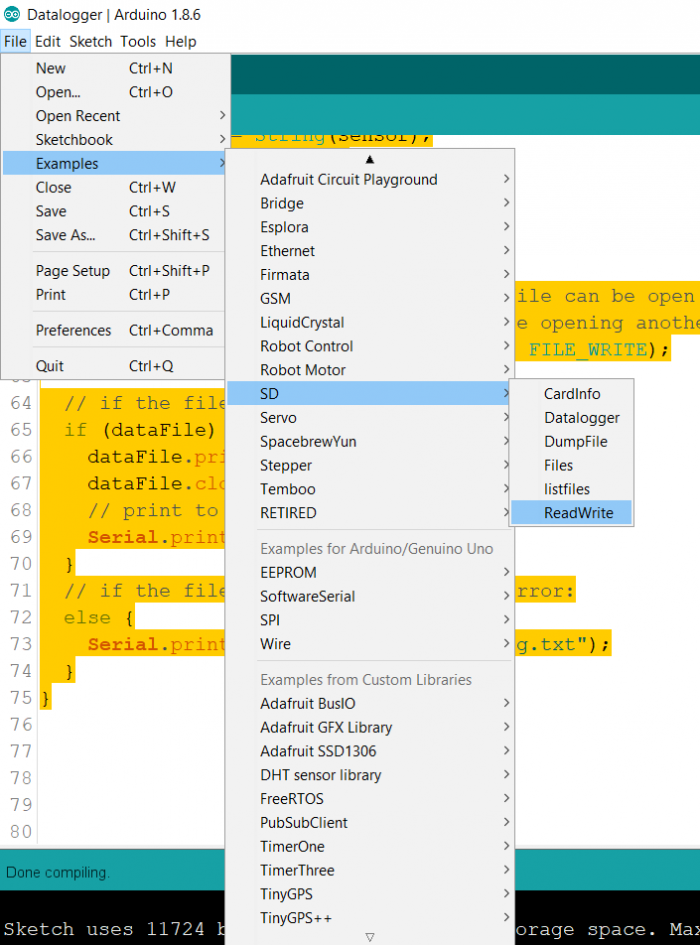
我们将逐步介绍随附内置 SD 库的示例代码。您可以从文件 → 示例 → SD → 读取写入中访问它

或者,您可以在 GitHub 上找到代码:https://github.com/adafruit/SD/blob/master/examples/ReadWrite/ReadWrite.ino 如您所见,我们首先包含库和文件的创建对象。
#include <SPI.h>
#include <SD.h>

File myFile;
在 Setup 中,我们首先初始化 Serial,然后初始化 SD 卡。请注意,我们将 SD 卡的 chipSelect 连接到引脚 10 而不是 4。因此,我们将使用 10 作为 SD.begin() 中的参数初始化 SD,而不是 4。
void setup() {
   // Open serial communications and wait for port to open:
   Serial.begin(9600);
   while (!Serial) {
      ; // wait for serial port to connect. Needed for native USB port only
   }

   Serial.print("Initializing SD card...");

   if (!SD.begin(10)) {
      Serial.println("initialization failed!");
      while (1);
   }
Serial.println("initialization done.");
接下来,我们以 FILE_WRITE 模式打开一个名为 test.txt 的文件。请注意,如果这样的文件不存在,这将创建一个新的文件 test.txt。然后我们向 test.txt 写入一行并关闭文件。
   // open the file. note that only one file can be open at a time,
   // so you have to close this one before opening another.
   myFile = SD.open("test.txt", FILE_WRITE);

   // if the file opened okay, write to it:
   if (myFile) {
      Serial.print("Writing to test.txt...");
      myFile.println("testing 1, 2, 3.");
      // close the file:
      myFile.close();
      Serial.println("done.");
   } else {
      // if the file didn't open, print an error:
      Serial.println("error opening test.txt");
}
然后,我们重新打开文件,这次用于读取(我们没有向 SD.open() 提供第二个参数,因为默认模式是读取模式。然后我们逐个字符读取文件,并在 Serial Monitor 上打印读取的内容,然后关闭文件。请注意,这里的重要函数是 .available() 和 .read()。.available() 告诉我们是否还有任何内容要读取,而 .read() 读取下一个可用的字符。
   // re-open the file for reading:
   myFile = SD.open("test.txt");
   if (myFile) {
      Serial.println("test.txt:");

      // read from the file until there's nothing else in it:
      while (myFile.available()) {
         Serial.write(myFile.read());
      }
      // close the file:
      myFile.close();
   } else {
      // if the file didn't open, print an error:
      Serial.println("error opening test.txt");
   }
}
循环中没有执行任何操作。
void loop() {
   // nothing happens after setup
}

广告

 数据结构
数据结构 网络
网络 关系型数据库管理系统
 操作系统
操作系统 Java
Java iOS
iOS HTML
HTML CSS
CSS Android
 Python
 C 编程
C 编程 C++
C++ C#
C# MongoDB
 MySQL
MySQL Javascript
 PHP
PHP