- Spring Boot 和 H2 教程
- Spring Boot 和 H2 - 主页
- Spring Boot 和 H2 - 概览
- Spring Boot 和 H2 - 设置环境
- Spring Boot 和 H2 - 设置项目
- Spring Boot 和 H2 - REST API
- Spring Boot 和 H2 - H2 控制台
- Spring Boot 和 H2 实例
- Spring Boot 和 H2 - 新增记录
- Spring Boot 和 H2 - 获取记录
- Spring Boot 和 H2 - 获取所有记录
- Spring Boot 和 H2 - 更新记录
- Spring Boot 和 H2 - 删除记录
- Spring Boot 和 H2 - 单元测试控制器
- Spring Boot 和 H2 - 单元测试服务
- Spring Boot 和 H2 - 单元测试存储库
- Spring Boot 和 H2 有用资源
- Spring Boot 和 H2 - 快速指南
- Spring Boot 和 H2 - 有用资源
- Spring Boot 和 H2 - 讨论
Spring Boot 和 H2 - 获取所有记录
现在让我们更新到目前为止创建的项目,来准备一个完整的获取所有记录 API 并进行测试。
更新服务
// Use repository.findAll() to get all Employee records
public List<Employee> getAllEmployees(){
   List<Employee> employees = new ArrayList<Employee>();
   repository.findAll().forEach(employee -> employees.add(employee));
   return employees;
}
EmployeeService
package com.tutorialspoint.service;

import java.util.ArrayList;
import java.util.List;
import org.springframework.beans.factory.annotation.Autowired;
import org.springframework.stereotype.Service;
import com.tutorialspoint.entity.Employee;
import com.tutorialspoint.repository.EmployeeRepository;

@Service
public class EmployeeService {
   @Autowired
   EmployeeRepository repository;
   public Employee getEmployeeById(int id) {
      return repository.findById(id).get();
   }
   public List<Employee> getAllEmployees(){
      List<Employee> employees = new ArrayList<Employee>();
      repository.findAll().forEach(employee -> employees.add(employee));
      return employees;
   }
   public void saveOrUpdate(Employee employee) {
      repository.save(employee);
   }
   public void deleteEmployeeById(int id) {
   }
}
更新控制器
// Use service.getAllEmployees() to get a list of employees from database
@GetMapping("/employees")
public List<Employee> getAllEmployees(){
   return employeeService.getAllEmployees();
}
EmployeeController
package com.tutorialspoint.controller;

import java.util.List;
import org.springframework.beans.factory.annotation.Autowired;
import org.springframework.web.bind.annotation.DeleteMapping;
import org.springframework.web.bind.annotation.GetMapping;
import org.springframework.web.bind.annotation.PathVariable;
import org.springframework.web.bind.annotation.PostMapping;
import org.springframework.web.bind.annotation.PutMapping;
import org.springframework.web.bind.annotation.RequestBody;
import org.springframework.web.bind.annotation.RequestMapping;
import org.springframework.web.bind.annotation.RestController;
import com.tutorialspoint.entity.Employee;
import com.tutorialspoint.service.EmployeeService;

@RestController
@RequestMapping(path = "/emp")
public class EmployeeController {
   @Autowired
   EmployeeService employeeService;
   @GetMapping("/employees")
   public List<Employee> getAllEmployees(){
      return employeeService.getAllEmployees();
   }
   @GetMapping("/employee/{id}")
   public Employee getEmployee(@PathVariable("id") int id) {
      return employeeService.getEmployeeById(id);
   }
   @DeleteMapping("/employee/{id}")
   public void deleteEmployee(@PathVariable("id") int id) {
   }
   @PostMapping("/employee")
   public void addEmployee(@RequestBody Employee employee) {
      employeeService.saveOrUpdate(employee);
   }
   @PutMapping("/employee")
   public void updateEmployee(@RequestBody Employee employee) {
   }
}
运行应用程序
在 eclipse 中,按照 应用程序设置 中的准备执行 Employee Application 配置
Eclipse 控制台将显示类似输出。
[INFO] Scanning for projects...
...
2024-08-21T15:01:29.377+05:30  INFO 14180 --- [springboot-h2] [  restartedMain] o.s.b.d.a.OptionalLiveReloadServer       : LiveReload server is running on port 35729
2024-08-21T15:01:29.426+05:30  INFO 14180 --- [springboot-h2] [  restartedMain] o.s.b.w.embedded.tomcat.TomcatWebServer  : Tomcat started on port 8080 (http) with context path '/'
2024-08-21T15:01:29.434+05:30  INFO 14180 --- [springboot-h2] [  restartedMain] c.t.s.SpringbootH2Application            : Started SpringbootH2Application in 6.729 seconds (process running for 7.28)
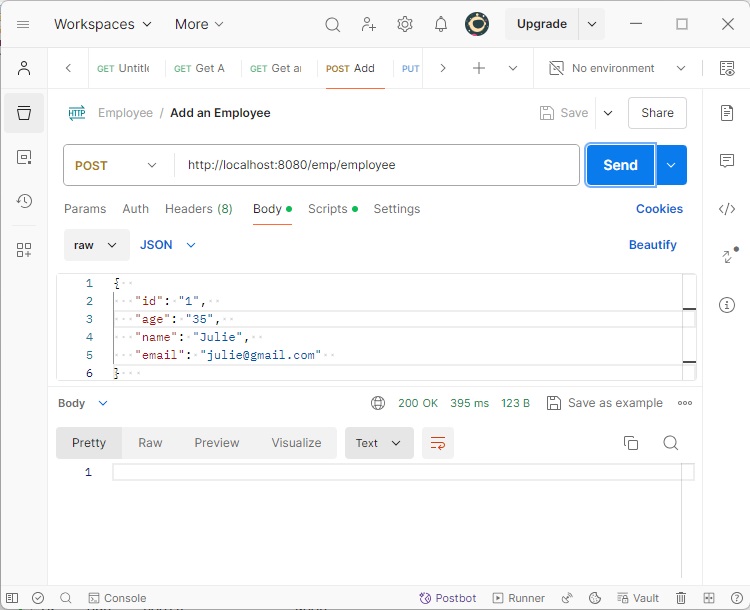
服务器启动并运行后,使用 Postman 发送 POST 请求 −
在 POSTMAN 中设置以下参数。
HTTP 方法 − POST
URL − https://:8080/emp/employee
主体 − 一个员工 JSON
{
   "id": "1",
   "age": "35",
   "name": "Julie",
   "email": "julie@gmail.com"
}
点击 Send 按钮并检查响应状态是否为 OK。
现在创建一个 GET 请求以获取所有记录。在 POSTMAN 中设置以下参数。
HTTP 方法 − GET
URL − https://:8080/emp/employees
点击发送按钮并检查响应。

广告