- TypeORM 教程
- TypeORM - 首页
- TypeORM - 简介
- TypeORM - 安装
- TypeORM - 创建一个简单的项目
- TypeORM - 连接 API
- TypeORM - 实体
- TypeORM - 关系
- TypeORM - 使用 Repository
- TypeORM - 使用 Entity Manager
- TypeORM - 查询构建器 (QueryBuilder)
- TypeORM - 查询操作
- TypeORM - 事务
- TypeORM - 索引
- TypeORM - 实体监听器和日志记录
- TypeORM 与 JavaScript
- TypeORM - 使用 MongoDB
- TypeORM 与 Express
- TypeORM - 迁移
- TypeORM - 使用 CLI
- TypeORM 有用资源
- TypeORM - 快速指南
- TypeORM - 有用资源
- TypeORM - 讨论
TypeORM - 查询操作
数据操作用于管理和查看数据。本节介绍如何使用 QueryBuilder 访问数据库查询,例如插入、更新、选择和删除查询。让我们逐一详细了解。
构建插入查询
让我们创建一个名为Customer的实体,如下所示:
Customer.ts
import {Entity, PrimaryGeneratedColumn, Column} from "typeorm";
@Entity()
export class Customer {

   @PrimaryGeneratedColumn()
   id: number;

   @Column()
   name: string;

   @Column()
   age: number;
}
让我们在 index.ts 中添加以下更改:
index.ts
import "reflect-metadata";
import {createConnection} from "typeorm";
import {Customer} from "./entity/Customer";
import {getConnection} from "typeorm";

createConnection().then(async connection => {
   await getConnection().createQueryBuilder()   .insert()
      .into(Customer)
      .values([ { name: "Adam",age:11},
         { name: "David",age:12} ]) .execute();
}).catch(error => console.log(error));
现在,使用以下命令启动您的应用程序:
npm start
输出
您可以在屏幕上看到以下输出:

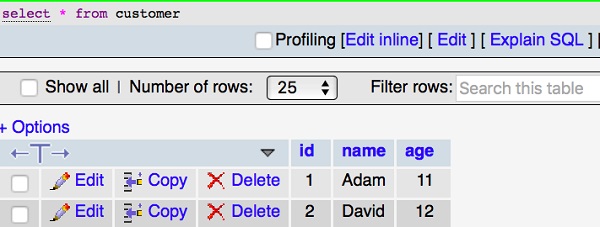
现在打开您的 MySQL 服务器,可以看到插入的表包含两个字段,如下所示:
构建更新查询
上一节,我们插入了两行数据。让我们检查更新查询是如何工作的。在 index.ts 中添加以下更改:
import "reflect-metadata";
import {createConnection} from "typeorm";
import {Customer} from "./entity/Customer";
import {getConnection} from "typeorm";

createConnection().then(async connection => {

await getConnection()
   .createQueryBuilder() .update(Customer)
   .set({ name: "Michael" }) .where("id = :id", { id: 1 }) .execute();
   console.log("data updated");

}).catch(error => console.log(error));
现在,使用以下命令启动您的应用程序:
npm start
您可以在屏幕上看到以下输出:

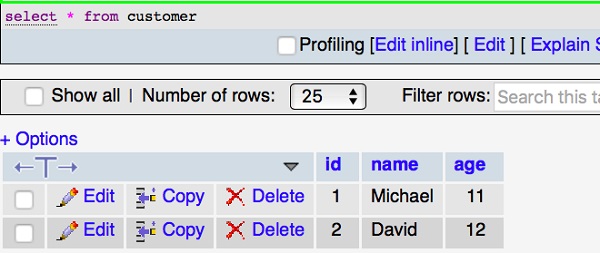
MySQL 表修改如下所示:
构建选择查询
select 查询用于显示表中的记录。让我们在index.ts中添加以下代码:
index.ts
import "reflect-metadata";
import {createConnection} from "typeorm";
import {Customer} from "./entity/Customer";

createConnection().then(async connection => {

   console.log("Display records from Customer table...");
   const cus = new Customer();

   console.log("Loading customers from the database...");
   const customers = await connection.manager.find(Customer); console.log("Loaded users: ", customers);
}).catch(error => console.log(error));
您可以在屏幕上看到以下输出:

where 表达式
让我们在查询中添加 where 表达式来过滤客户。示例代码如下:
import "reflect-metadata";
import {createConnection} from "typeorm";
import {Customer} from "./entity/Customer";
import {getConnection} from "typeorm";

createConnection().then(async connection => {
   const customer = await getConnection() .createQueryBuilder() .select("cus")
   .from(Customer, "cus") .where("cus.id = :id", { id: 1 }) .getOne();

   console.log(customer);
})
.catch(error => console.log(error));
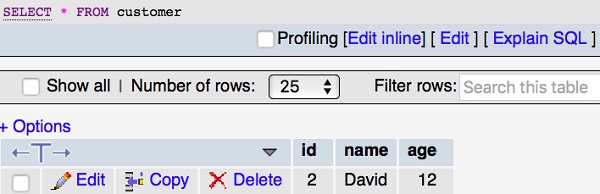
上面的程序将返回第一个 id 的记录。您可以在屏幕上看到以下输出:

同样,您也可以尝试其他表达式。
构建删除查询
上一节,我们已经插入、更新和选择数据。让我们检查删除查询是如何工作的。在 index.ts 中添加以下更改:
import "reflect-metadata";
import {createConnection} from "typeorm";
import {Customer} from "./entity/Customer";
import {getConnection} from "typeorm";

createConnection().then(async connection => {
   await getConnection() .createQueryBuilder()
   .delete()
   .from(Customer)
   .where("id = :id", { id: 1 }) .execute();
console.log("data deleted"); }).catch(error => console.log(error));
您可以在屏幕上看到以下输出:

您的 MySQL 表将修改如下:
广告