
 数据结构
数据结构 网络
网络 RDBMS
RDBMS 操作系统
操作系统 Java
Java iOS
iOS HTML
HTML CSS
CSS Android
 Python
 C语言编程
C语言编程 C++
C++ C#
C# MongoDB
 MySQL
MySQL Javascript
 PHP
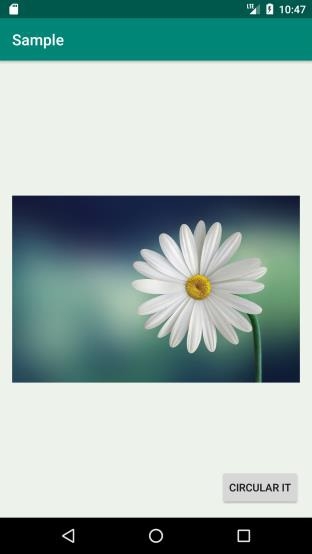
PHPAndroid,如何从位图裁剪圆形区域
此示例演示如何在 Android 中从位图裁剪圆形区域。
步骤 1 − 在 Android Studio 中创建一个新项目,转到文件 ⇒ 新建项目,并填写所有必需的详细信息以创建新项目。
步骤 2 − 将以下代码添加到 res/layout/activity_main.xml。
<?xml version="1.0" encoding="utf-8"?>
<RelativeLayout xmlns:android="http://schemas.android.com/apk/res/android"
   xmlns:app="http://schemas.android.com/apk/res-auto"
   xmlns:tools="http://schemas.android.com/tools"
   android:layout_width="match_parent"
   android:layout_height="match_parent"
   tools:context=".MainActivity"
   android:id="@+id/rl"
   android:padding="16dp"
   android:background="#edf2ea">
   <ImageView
      android:id="@+id/iv"
      android:layout_width="wrap_content"
      android:layout_height="wrap_content"
      android:layout_centerInParent="true"/>
   <Button
      android:id="@+id/btn"
      android:layout_width="wrap_content"
      android:layout_height="wrap_content"
      android:text="Circular It"
      android:layout_alignParentBottom="true"
      android:layout_alignParentRight="true"/>
</RelativeLayout>
步骤 3 − 将以下代码添加到 src/MainActivity.java
package com.medkart.sample;
import androidx.appcompat.app.AppCompatActivity;
import android.content.Context;
import android.content.res.Resources;
import android.graphics.Bitmap;
import android.graphics.BitmapFactory;
import android.graphics.Canvas;
import android.graphics.Color;
import android.graphics.Paint;
import android.graphics.PorterDuff;
import android.graphics.PorterDuffXfermode;
import android.graphics.Rect;
import android.graphics.RectF;
import android.os.Bundle;
import android.view.View;
import android.widget.Button;
import android.widget.ImageView;
import android.widget.RelativeLayout;
public class MainActivity extends AppCompatActivity {
private Context mContext;
private Resources mResources;
private RelativeLayout mRelativeLayout;
private Button mBTN;
private ImageView mImageView;
private Bitmap mBitmap;
@Override
protected void onCreate(Bundle savedInstanceState) {
super.onCreate(savedInstanceState);
setContentView(R.layout.activity_main);
// Get the application context
mContext = getApplicationContext();
// Get the Resources
mResources = getResources();
// Get the widgets reference from XML layout
mRelativeLayout = (RelativeLayout) findViewById(R.id.rl);
mImageView = (ImageView) findViewById(R.id.iv);
mBTN = (Button) findViewById(R.id.btn);
// Get the bitmap resource id
final int bitmapResourceID =R.drawable.flower;
// Set an image to ImageView
mImageView.setImageBitmap(BitmapFactory.decodeResource(mResources, bitmapResourceID));
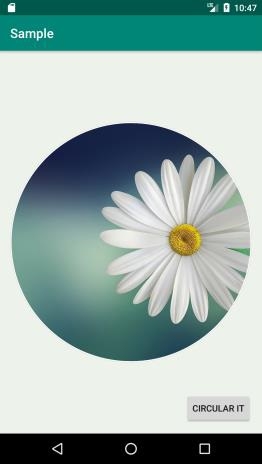
// Set a click listener for Button widget
mBTN.setOnClickListener(new View.OnClickListener() {
@Override
public void onClick(View view) {
// Get the bitmap from drawable resources
mBitmap = BitmapFactory.decodeResource(mResources, bitmapResourceID);
// Create a circular bitmap
mBitmap = getCircularBitmap(mBitmap);
// Add a border around circular bitmap
mBitmap = addBorderToCircularBitmap(mBitmap, 15, Color.WHITE);
// Add a shadow around circular bitmap
mBitmap = addShadowToCircularBitmap(mBitmap, 4, Color.LTGRAY);
// Set the ImageView image as drawable object
mImageView.setImageBitmap(mBitmap);
}
});
}
protected Bitmap getCircularBitmap(Bitmap srcBitmap) {
// Calculate the circular bitmap width with border
int squareBitmapWidth = Math.min(srcBitmap.getWidth(), srcBitmap.getHeight());
// Initialize a new instance of Bitmap
Bitmap dstBitmap = Bitmap.createBitmap (
squareBitmapWidth, // Width
squareBitmapWidth, // Height
Bitmap.Config.ARGB_8888 // Config
);
Canvas canvas = new Canvas(dstBitmap);
// Initialize a new Paint instance
Paint paint = new Paint();
paint.setAntiAlias(true);
Rect rect = new Rect(0, 0, squareBitmapWidth, squareBitmapWidth);
RectF rectF = new RectF(rect);
canvas.drawOval(rectF, paint);
paint.setXfermode(new PorterDuffXfermode(PorterDuff.Mode.SRC_IN));
// Calculate the left and top of copied bitmap
float left = (squareBitmapWidth-srcBitmap.getWidth())/2;
float top = (squareBitmapWidth-srcBitmap.getHeight())/2;
canvas.drawBitmap(srcBitmap, left, top, paint);
// Free the native object associated with this bitmap.
srcBitmap.recycle();
// Return the circular bitmap
return dstBitmap;
}
// Custom method to add a border around circular bitmap
protected Bitmap addBorderToCircularBitmap(Bitmap srcBitmap, int borderWidth, int borderColor) {
// Calculate the circular bitmap width with border
int dstBitmapWidth = srcBitmap.getWidth()+borderWidth*2;
// Initialize a new Bitmap to make it bordered circular bitmap
Bitmap dstBitmap = Bitmap.createBitmap(dstBitmapWidth,dstBitmapWidth, Bitmap.Config.ARGB_8888);
// Initialize a new Canvas instance
Canvas canvas = new Canvas(dstBitmap);
// Draw source bitmap to canvas
canvas.drawBitmap(srcBitmap, borderWidth, borderWidth, null);
// Initialize a new Paint instance to draw border
Paint paint = new Paint();
paint.setColor(borderColor);
paint.setStyle(Paint.Style.STROKE);
paint.setStrokeWidth(borderWidth);
paint.setAntiAlias(true);
canvas.drawCircle(
canvas.getWidth() / 2, // cx
canvas.getWidth() / 2, // cy
canvas.getWidth()/2 - borderWidth / 2, // Radius
paint // Paint
);
// Free the native object associated with this bitmap.
srcBitmap.recycle();
// Return the bordered circular bitmap
return dstBitmap;
}
// Custom method to add a shadow around circular bitmap
protected Bitmap addShadowToCircularBitmap(Bitmap srcBitmap, int shadowWidth, int shadowColor){
// Calculate the circular bitmap width with shadow
int dstBitmapWidth = srcBitmap.getWidth()+shadowWidth*2;
Bitmap dstBitmap = Bitmap.createBitmap(dstBitmapWidth,dstBitmapWidth, Bitmap.Config.ARGB_8888);
// Initialize a new Canvas instance
Canvas canvas = new Canvas(dstBitmap);
canvas.drawBitmap(srcBitmap, shadowWidth, shadowWidth, null);
// Paint to draw circular bitmap shadow
Paint paint = new Paint();
paint.setColor(shadowColor);
paint.setStyle(Paint.Style.STROKE);
paint.setStrokeWidth(shadowWidth);
paint.setAntiAlias(true);
// Draw the shadow around circular bitmap
canvas.drawCircle (
dstBitmapWidth / 2, // cx
dstBitmapWidth / 2, // cy
dstBitmapWidth / 2 - shadowWidth / 2, // Radius
paint // Paint
);
srcBitmap.recycle();
return dstBitmap;
}
}步骤 4 − 将以下代码添加到 Manifests/AndroidManifest.xml
<?xml version="1.0" encoding="utf-8"?>
<manifest xmlns:android="http://schemas.android.com/apk/res/android"
   package="com.medkart.sample">
   <application
      android:allowBackup="true"
      android:icon="@mipmap/ic_launcher"
      android:label="@string/app_name"
      android:roundIcon="@mipmap/ic_launcher_round"
      android:supportsRtl="true"
      android:theme="@style/AppTheme">
      <activity android:name=".MainActivity">
         <intent-filter>
            <action android:name="android.intent.action.MAIN" />
            <category android:name="android.intent.category.LAUNCHER" />
         </intent-filter>
      </activity>
   </application>
</manifest>
让我们尝试运行您的应用程序。我假设您已将您的实际 Android 移动设备连接到您的计算机。要从 Android Studio 运行应用程序,请打开您的一个项目活动文件,然后单击运行 ![]() 工具栏中的图标。选择您的移动设备作为选项,然后检查您的移动设备,它将显示您的默认屏幕 -
工具栏中的图标。选择您的移动设备作为选项,然后检查您的移动设备,它将显示您的默认屏幕 -
点击 这里 下载项目代码。

更新于: 2020-07-03
994 次查看

广告